
| KIT: | Trumpeter 1/32 WIldcat V (FM-1) |
| KIT #: | 02223 |
| PRICE: | $44.95 MSRP |
| DECALS: | Two options |
| REVIEWER: | Tom Cleaver |
| NOTES: | Mild conversion |
| HISTORY |
In the spring of 1942, the decision was made that the Grumman would cease production of the F4F Wildcat as soon as possible to make way for production of the TBF Avenger. General Motors would convert five of their auto plants in New Jersey for aircraft production as Eastern Aircraft Division. There were many in the aviation community who did not believe that an automobile company could adapt itself to the much more precise tolerance standards necessary for aircraft production. In the end, GM proved the doubters wrong, as Eastern Aircraft went on to produce the majority of both Wildcats and Avengers during World War II.
 The
F4F-4 was not seen as an advance by most naval aviators, when it replaced
the F4F-3 that spring. While the folding wings meant that more Wildcats
could be operated from a carrier, the change from 4-gun to 6-gun armament -
while maintaining the original ammunition supply - meant that the
individual pilot had less time to fire his weapons with 6 machine guns than
had been the case with the 4 guns of the F4F-3. Thus, when Grumman began
the redesign of the F4F-4 for production by GM, one of the things that was
done was to reduce the guns back to the original four by deletion of the
outer weapon in each wing.
The
F4F-4 was not seen as an advance by most naval aviators, when it replaced
the F4F-3 that spring. While the folding wings meant that more Wildcats
could be operated from a carrier, the change from 4-gun to 6-gun armament -
while maintaining the original ammunition supply - meant that the
individual pilot had less time to fire his weapons with 6 machine guns than
had been the case with the 4 guns of the F4F-3. Thus, when Grumman began
the redesign of the F4F-4 for production by GM, one of the things that was
done was to reduce the guns back to the original four by deletion of the
outer weapon in each wing.
GM set up Wildcat production at the Linden, New Jersey plant. The plant required considerable remodeling for aircraft production, with a near-razing of the facility accomplished by April 1942. The first FM-1s were made by Grumman, and trucked from nearby Bethpage to the Linden plant in July, 1942. By September, GM delivered their first all-GM Wildcat in September - by the end of 1942 they had delivered 21 FM-1 Wildcats and worked out the kinks in production. Grumman built the last 100 F4F-4 Wildcats between January and May 1943, by which time GM was producing 50 FM-1s a month.
The Wildcat in the Royal Navy:
The F4F Wildcat was the first modern, designed-for-the-purpose carrier-based fighter operated by the Fleet Air Arm, and it was - as Captain Eric Brown put it - “love at first sight.” Wildcats scored the first Fleet Air Arm victory over an enemy airplane on Christmas Day 1940, when two Martlet Is shot down a Ju-88 over Scapa Flow, just as the first F4F-3s were being accepted by VF-4. These were Wildcats originally designed for the French.
The
Martlet II was the first of the series to have folding wings and a 6-gun
armament, arriving in the late summer of 1941. A squadron of these
fighters went aboard the first British escort carrier, HMS “Audacity,” and
were responsible for shooting
 down four Fw-200 Condors during their first
escort trip to Gibraltar that November. Eventually, the Martlet II and IV
- the name was changed to Wildcat in January 1944 - would fly from several
escort carriers to provide fighter cover for convoys in the Atlantic and
end the reign of the Focke-Wulf Condor. The airplane would also see action
in the Mediterranean aboard fleet carriers.
down four Fw-200 Condors during their first
escort trip to Gibraltar that November. Eventually, the Martlet II and IV
- the name was changed to Wildcat in January 1944 - would fly from several
escort carriers to provide fighter cover for convoys in the Atlantic and
end the reign of the Focke-Wulf Condor. The airplane would also see action
in the Mediterranean aboard fleet carriers.
The first FM-1s arrived for the FAA in the fall of 1943. They were known originally as the Martlet V but with the name changed to Wildcat V by the time they first saw action in January 1944 against Focke-Wulf Condors. Wildcat Vs also took part in the Tirpitz strikes known as Operation Tungsten in April 1944.
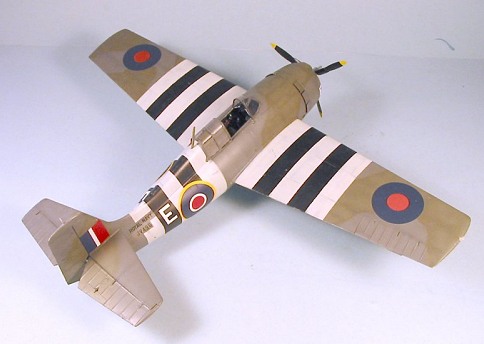
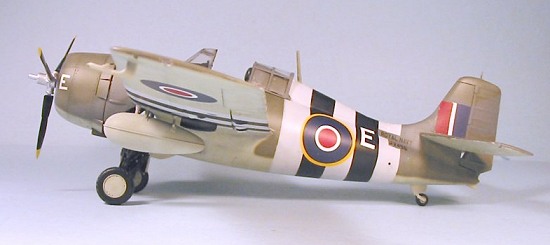
By the summer of 1944, the Wildcat V was being replaced by the Wildcat VI - the FAA version of the definitive FM-2. The last action of the Wildcat V with the Fleet Air Arm was during Operation Dragoon, the invasion of Southern France, in August 1944. 22 Wildcat Vs of 882 Squadron operated from HMS “Searcher” in support of invasion forces. They were distinctively marked, being the only Wildcats to ever carry the famous “D-Day invasion stripes.”
882 Squadron, by then operating the Wildcat VI fought the last aerial battle by FAA Wildcats during World War II, when four Wildcats were attacked by four Bf-109Gs of JG5 off of Norway on march 26, 1945. The Messerschmitts damaged one Wildcat in the first pass, but the dogfight that followed saw all five Bf-109s shot down by the Wildcats.
| THE KIT |
The
F4F-4 Wildcat by Trumpeter was at first seen as a disaster when it was
released in early 2004, when the kit was reviled for a completely incorrect
geometry in all areas. The complaints were so loud that Trumpeter pulled
back the first release and re-engineered the kit. What was ultimately
released was not as totally accurate as the 1/48 Tamiya Wildcat, but was
far 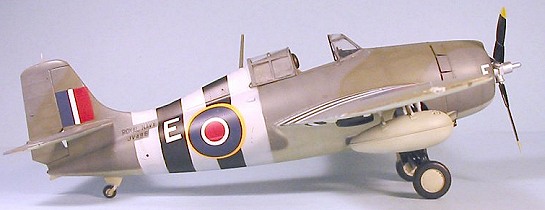 superior to the initial release and makes up into an accurate model of
the Wildcat. I built one of these when they first came out, and was
pleased by the results.
superior to the initial release and makes up into an accurate model of
the Wildcat. I built one of these when they first came out, and was
pleased by the results.
The kit appears to have been largely a shelf-sitter, since I have seen very few completed models - I think this is unfortunate, because it is a good kit that makes up into an accurate model, and is competitively priced with the Hasegawa 109s and 190s, and the other limited-run 1/32 kits that have been released since; it may be that the kit has never lived down the reputation it got from the very first release. I recently ran across one of the kits at my local shop at a steep markdown, which became even steeper when Tony realized he could get it to stop gathering dust on the shelf and make room for the new (and more commercially-viable) big diecast models people are buying these days, with the result that I picked up the kit for half price.
| CONSTRUCTION |
After
having turned the Trumpeter Avenger into a Fleet Air Arm airplane, I
decided I wanted to do this kit as a Fleet Air Arm
 Wildcat V.
Specifically, I wanted to do a Wildcat in invasion stripes. Back 50 years
ago, Model Airplane News magazine had released an issue with a painting of
one of these airplanes on the cover, which had always attracted me.
Recently, the magazine has been republishing these covers, and I had seen
the cover again about a month before I bought the kit.
Wildcat V.
Specifically, I wanted to do a Wildcat in invasion stripes. Back 50 years
ago, Model Airplane News magazine had released an issue with a painting of
one of these airplanes on the cover, which had always attracted me.
Recently, the magazine has been republishing these covers, and I had seen
the cover again about a month before I bought the kit.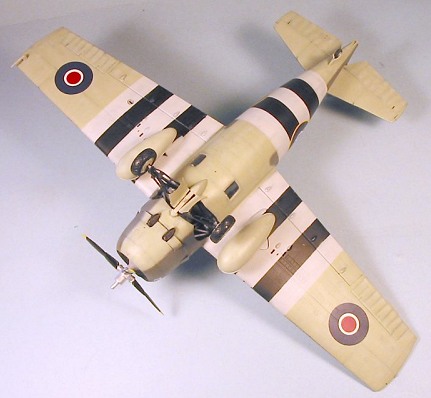
The big problem was finding 1/32 decals for an FAA Wildcat. I was eventually able to piece these together out of the decal dungeon. After I found I could do the markings, it was only a matter of time till the model began production.
The big conversion problem is to get rid of the outer gun with its door on the upper surface of the wing, and its shell ejection chute and ammo box on the lower wing, as well as to restore the engraved rivet detail. Before proceeding further with construction, I attached the upper gun bay covers, covered them with cyanoacrylate glue, and sanded the area smooth. I filled in the shell ejection chute on the lower wing half, cut off the fairing behind it, and filled in the engraved panel for the ammo box, and sanded that smooth. I then applied Mr. Surfacer 500 to these areas and sanded them smooth again. I finished this off by polishing the area with Tamiya plastic polish. The engraved rivet detail was restored using my pounce wheel.
The rest of the construction followed the instructions without difficulty, other than I attached the separate ailerons, elevators and rudder halves to the relevant parts before further assembly, so I could glue them on from inside, thus leaving the gap outside that would look realistic.. Since I was doing the model with the wings extended, I also reinforced the inner joints along the wingfold with Evergreen sheet before assembling the wings. I also departed the norm by using the Cutting Edge 1/32 resin Sutton Harness seatbelt. Assembly was completed over a weekend.
| COLORS & MARKINGS |
Painting:
I
first “pre-shaded” the model with black paint, and also painted the areas
where the invasion stripes would be with the black paint. When that was
dry, I masked off the black stripes with tape cut to 9/16 inch wide - 18
scale inches in 1/32. The wings were easy to do, but the fuselage was
done with Tamiya 5mm tape to get the borders, “filled in” with Tamiya 10mm
tape, in order to deal with all the curves. I then painted the white
stripes,  using
thinned white that gave a “ragged” look when applied over the black paint,
since I wanted to do the “temporary” look of these stripes. When they
were dry, the stripes were masked off.
using
thinned white that gave a “ragged” look when applied over the black paint,
since I wanted to do the “temporary” look of these stripes. When they
were dry, the stripes were masked off.
The rest of the model was painted with Xtracrylix paints. I used “Sky,” “Dark Sea Grey” and “Dark Slate Grey,” the standard FAA colors. While all TBM Avengers were painted in US equivalent colors, and most FM-1s and all FM-2s were also, I have a color photograph misidentified as a “Wildcat II” that is definitely a Wildcat V (identified by the intake on the cowling and two gunports in the wing) that is definitely in FAA colors. My suspicion is that early Wildcat Vs might have used the Grumman paints (since Bethpage wasn’t far away), and the change came later to standardize the airplanes with equivalent colors. At any rate, I wanted this model in different colors from the Avenger, and was glad to have that photo confirm the choice I wanted to make.
When all was dry, I unmasked the D-Day stripes, and applied a coat of Future to the model.
Decals:
The decals were from various sources: the upper wing decals came from a sheet for a 1/48 Lancaster, the fuselage and lower wing decals came from a Tamiya Mosquito sheet, and the fin flash was done with stripe decals cut individually to the proper sizes. “Royal Navy” and the serial number came from the remains of a very old Modeldecal sheet of letters and numbers in various sizes.
| FINAL CONSTRUCTION |
When all the decals had dried, I gave the model a coat of Xtracrylix Satin Varnish, followed by a coat of Flat Varnish, followed by a coat of Testors Dullcote to get it as flat as I wanted it from the one photo I had of these Wildcats in D-Day stripes. I then unmasked the canopy and posed it in the open position, attached the rubber wheels to their hubs and then to the landing gear, attached the drop tanks and the prop.
| CONCLUSIONS |
 Converting this F4F-4 to an FM-1 was very easy, using the old standards of
filling and sanding and rescribing detail. I understand there may soon be
an aftermarket resin conversion to do the Cyclone-powered Martlet IV and
FM-2 Wildcat. A Wildcat in D-Day stripes will always get attention from
those who see it.
Converting this F4F-4 to an FM-1 was very easy, using the old standards of
filling and sanding and rescribing detail. I understand there may soon be
an aftermarket resin conversion to do the Cyclone-powered Martlet IV and
FM-2 Wildcat. A Wildcat in D-Day stripes will always get attention from
those who see it.
The truth is, the Trumpeter Wildcat is an accurate kit, providing good value and a good price. I had the chance when I bought this one to compare it with the old Revell 1/32 Wildcat which has recently been re-released by ProModeler. There is no comparison, folks! If you worked and worked and worked on the ancient Revell kit, you might be able to get it up to what you can get with an out-of-the-box build of this Trumpeter kit that takes one-tenth the time you’d spend on the Revell, and the price differential is not that much. If you add in your time at $10/hour to modernize and correct the old kit, the Trumpeter kit is a bargain.
June 2005
Review kit courtesy of my wallet.
If you would like your product reviewed fairly and quickly by a site that has around 300,000 visitors a month, please contact me or see other details in the Note to Contributors.