| KIT #: | ? |
| PRICE: | $69.95 MSRP |
| DECALS: | Six options |
| REVIEWER: | Tom Cleaver |
| NOTES: | Short run with photo etched details |
| HISTORY |
 The
Hurricane in
The
Hurricane in
Thus, Britain and France had the delicate necessity of placating public
opinion - which was strongly pro-Finnish and demanded aid be sent to “Plucky
Little Finland” - with the realpolitik need not to antagonize the Soviets
sufficiently to poison future relations.
It was obvious the Finns would eventually have to give in once the
Soviets applied the necessary level of force.
Any aid given would come from their own military equipment, which might
soon be needed in large numbers to counter the attack in the West everyone knew
Hitler must make sooner or later.
| THE KIT |
This early Hurricane Mk. I by Pacific Coast Hobbies (molded by Sword,
photo-etch from Eduard and decals by Cartograf, designed by Richard Caruana) is
the second “rag-wing” Hurricane released in injection plastic, the other being
the 1/48 Hurricane by Classic Airframes that is now long out of production.
The parts option for the armored windscreen has a serious molding flaw in it that I have not been able to correct in two different attempts. Fortunately the Finnish, Belgian, and one of the RAF options are for Hurricanes without the armored windscreen. I think one could fake this using the unarmored windscreen and attaching a piece of clear plastic sheet cut to shape. Ken Lawrence of Pacific Coast Models has already stated that this problem will be solved in their future release, which will have the armored windscreen as its only option.
| CONSTRUCTION |
This is my first Hurricane model, and I want to re-emphasize here the best way I know of to get the important parts of assembly right, because this kit was done wrong
 So to repeat: overall, this model is not difficult, but there is a “big
secret” to overall assembly which can have a major effect on the way your model
turns out.
So to repeat: overall, this model is not difficult, but there is a “big
secret” to overall assembly which can have a major effect on the way your model
turns out.
The kit instructions and a modeler’s experience would have one build the
kit as two major sub-assemblies - the fuselage and the wing - and then mate them
once otherwise assembled. DO NOT
DO THIS!
Here’s the trick to doing this kit with a minimum of hassle and a maximum
of good looks when finished: You have to approach the model as a collective
whole. There are not two major
sub-assemblies to this project, but rather one overall process.
The first thing to do is to assemble the fuselage, including the lower
rear part. While that is setting
up, assemble and paint the cockpit and install the seat belts. I strongly urge
that you attach the rear cockpit headrest bulkhead and the instrument panel into
the fuselage separately. Once you
have the rest of the cockpit assembled, slip it inside and glue it in position.
At this point, you need to test fit the canopy if you plan to pose it
open, and to sand down the area of the fuselage immediately aft of the cockpit
so the canopy can sit down properly.
 Once the fuselage is done, you want to attach the upper wing parts.
You will immediately notice that the curvature of the upper wing differs
from that of the fuselage joint.
You’re going to need to engage in a bit of industrial-strength bending and
curling to get the upper wing to fit - don’t be afraid to stress the plastic, it
is soft enough it won’t crack or break. Once everything fits nice and tight,
work the joint from inside, to lessen the amount of glue that is used on the
exterior. If you trim and get it
just right, you should need only a very little bit of Mr. Surfacer along the
upper wing joint to get it smooth, which means you won’t be losing any of that
wonderful surface detail.
Once the fuselage is done, you want to attach the upper wing parts.
You will immediately notice that the curvature of the upper wing differs
from that of the fuselage joint.
You’re going to need to engage in a bit of industrial-strength bending and
curling to get the upper wing to fit - don’t be afraid to stress the plastic, it
is soft enough it won’t crack or break. Once everything fits nice and tight,
work the joint from inside, to lessen the amount of glue that is used on the
exterior. If you trim and get it
just right, you should need only a very little bit of Mr. Surfacer along the
upper wing joint to get it smooth, which means you won’t be losing any of that
wonderful surface detail.
When you cut the molding block off the main gear well, be sure to dremel
down the roof of the well to where you can see light through the outer areas on
each end, and then round down the piece fore and aft on the top.
Assemble the interior parts for the gear well and attach it to the lower
wing.
You then need to test fit the lower wing to the rest of the model. Trim
as necessary to get a nice smooth fit to the fuselage fore and aft.
Then take the leading edge gun port for one wing, test fit it to the
upper wing, trimming the cutout in the wing as necessary to get good fit, then
glue it in position. Test fit the
lower wing, and trim that cutout as necessary to get good fit.
Do the same on the other wing.
Then fit the lower wing and be sure the cutouts for the landing lights
are aligned. Glue the landing light
parts into the upper wing, then glue the lower wing in position.
If you have done this right, you will only need a little Mr. Surfacer
along the joints to the fuselage, and a little sanding down of the wingtips so
they match up.
All that might sound like a lot of work, but it is really very minor
fiddling, and the end result of not having harmed all the wonderful surface
detail is well worth all the effort taken.
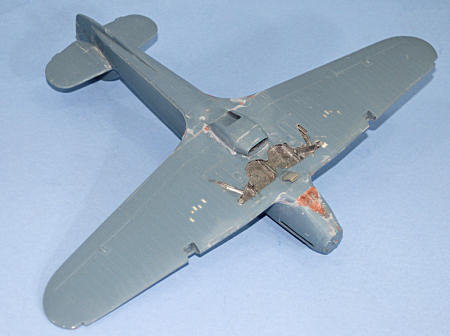
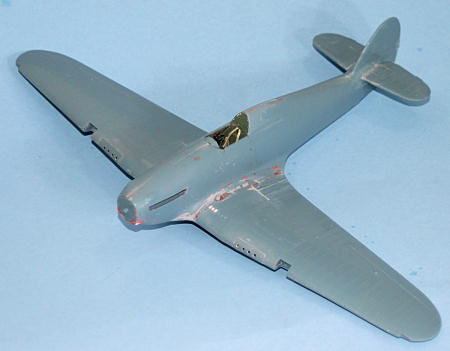
 What I did with this model was to follow the “common wisdom” and assemble
it as two sub-assemblies - wing and fuselage, then join them.
I had a huge gap on the upper wing and fuselage joint, and poor fit on
the area of the lower nose. As you
can see from the accompanying assembly photos, I used a fair amount of red Bondo
putty, and the result was a severe loss of surface detail on the upper wing and
fuselage. I rescribed the fuselage,
but had to end up using thin Evergreen strip to recreate the wing rib detail,
which I sanded down to approximate the original.
From a distance of 18 inches or so, it looks nice, but up close and in
comparison with the kit that was done right, the degradation of detail is
obvious.
What I did with this model was to follow the “common wisdom” and assemble
it as two sub-assemblies - wing and fuselage, then join them.
I had a huge gap on the upper wing and fuselage joint, and poor fit on
the area of the lower nose. As you
can see from the accompanying assembly photos, I used a fair amount of red Bondo
putty, and the result was a severe loss of surface detail on the upper wing and
fuselage. I rescribed the fuselage,
but had to end up using thin Evergreen strip to recreate the wing rib detail,
which I sanded down to approximate the original.
From a distance of 18 inches or so, it looks nice, but up close and in
comparison with the kit that was done right, the degradation of detail is
obvious.
The joint of the horizontal stabilizers to the fuselage will need a
little filling with cyanoacrylate glue and then some Mr. Surfacer.
The lower fuselage strake will need a little filling with cyanoacrylate
when you attach it.
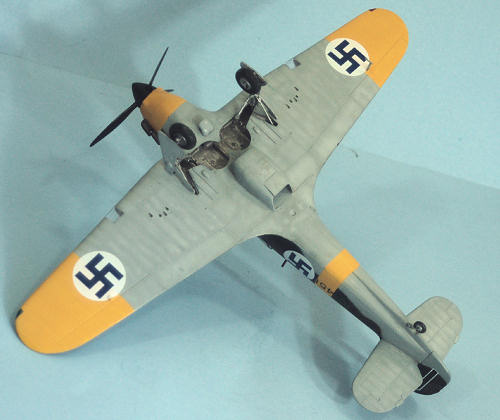
As regards the landing gear, assemble the three-part gear doors before
attaching them to the gear legs, to insure proper fit.
For all the Hurricanes presented here, you will want to use the 4-spoke
wheels.
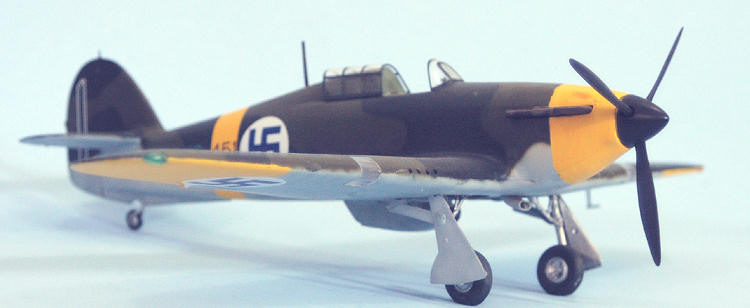
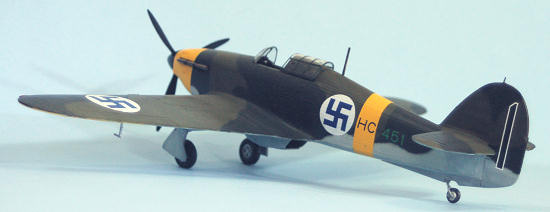
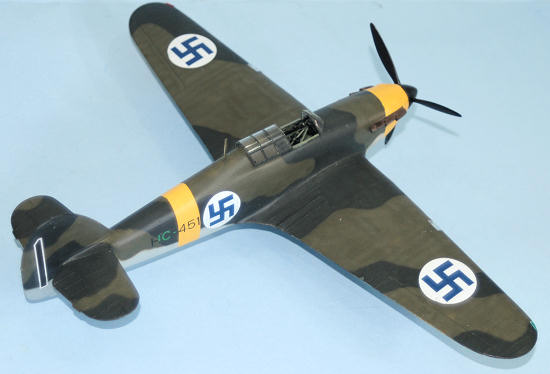
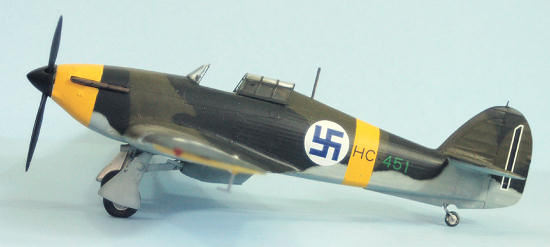
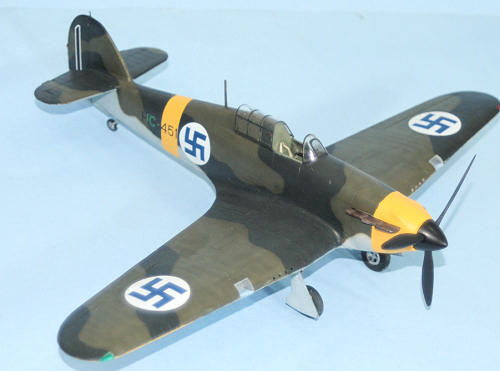
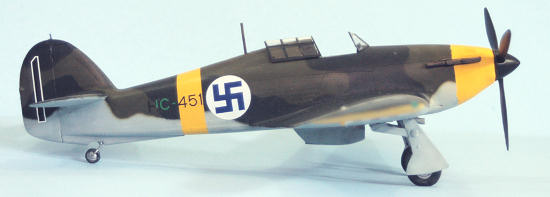
| COLORS & MARKINGS |
 The Caruana profile in the SAMI Hurricane book showed the dark upper
color as being “black green” rather than the black most of us commonly think is
right for Finnish aircraft. I did
some further research and discovered that the color is really a “dark
black-green,” so dark that the green tone can only be noticed in good light.
No wonder the mistake as made to consider this color black!
I made my own mixture of Tamiya “Black-Green” and “NATO Black.”
The Olive Green was done using Gunze-Sangyo modern RAF Dark Green.
The lower surface was painted with Xtracrylix RLM76 light blue.
The Caruana profile in the SAMI Hurricane book showed the dark upper
color as being “black green” rather than the black most of us commonly think is
right for Finnish aircraft. I did
some further research and discovered that the color is really a “dark
black-green,” so dark that the green tone can only be noticed in good light.
No wonder the mistake as made to consider this color black!
I made my own mixture of Tamiya “Black-Green” and “NATO Black.”
The Olive Green was done using Gunze-Sangyo modern RAF Dark Green.
The lower surface was painted with Xtracrylix RLM76 light blue.
When everything was dry, I unmasked the model and gave it two coats of
Xtracrylix Gloss Varnish.
| FINAL CONSTRUCTION |
Assembling the landing gear presents no problems, though you need to drill out the wheels a little deeper to take the entire axle. With the gear doors assembled previously, there was no problem presented in attaching them. I then attached the navigation lights to the wing tips and the rudder.
| CONCLUSIONS |
 This is an excellent kit of the Hurricane.
While it is a limited-run kit and therefore requires some extra attention
in assembly, there is no problem presented that cannot be solved with a bit of
“some modeling skill required.” If
you don’t assemble the model the way I did with this one, the result will be a
very good-looking model. I have
always thought the early “rag wing” Hurricane was interesting, and am glad that
PCM has started their line of Hurricanes with this version.
The Finnish markings are particularly striking.
This is an excellent kit of the Hurricane.
While it is a limited-run kit and therefore requires some extra attention
in assembly, there is no problem presented that cannot be solved with a bit of
“some modeling skill required.” If
you don’t assemble the model the way I did with this one, the result will be a
very good-looking model. I have
always thought the early “rag wing” Hurricane was interesting, and am glad that
PCM has started their line of Hurricanes with this version.
The Finnish markings are particularly striking.
If you would like your product reviewed fairly and quickly, please contact me or see other details in the Note to Contributors.