Tamiya 1/32 Spitfire VIII
| KIT #: | 60320 |
| PRICE: |
11,000 yen (about
$128 at HobbyLink
|
| DECALS: | Three options |
| REVIEWER: | Tom Cleaver |
| NOTES: |
Victory Productions
Decals 32-003 “Spitfire: Aces of the Empire Part 1" used. |
| HISTORY |
The Royal Australian Air
Force was always on the far end of a very long supply line ‑ either from Great
Britain or the United States ‑ throughout the Second World War, which meant
there was a constant struggle to obtain first‑class combat aircraft.
When the Japanese attacked
Darwin in 1942, the Australian government was able to convince the British they
needed the return of three RAAF Squadrons from the Middle East, and the
provision of at least two more RAF squadrons ‑ mounted on first‑class aircraft ‑
to provide effective air defense. The result was the entry of the Supermarine
Spitfire Vc into combat in the Southwest Pacific Theater, where they were
instrumental in stopping the Japanese attacks in 1943.
Due to the range limitations
of the Spitfire, it was not really suited to the needs of the theater, and
General George Kenney, USAAF, who commanded the Allied air forces in the SWPA,
did not favor its presence. However, he also refused RAAF requests to equip with
the P‑51 Mustang. The RAAF was left with no alternative but to update the
Spitfire force, and this began when the RAAF received 251 F.VIIIs, serials
A58‑300 to 550, from November 1943 through July 1944.
The Spitfire VIII was the ultimate
 development
of the Spitfire to take maximum advantage of the Merlin 60-series engine. By
this period of the war, unfortunately,
there was little opportunity for the Australians to prove the superiority
of the Spitfire VIII against their Japanese opponents, though Spitfire VIIIs in
the Burma Theater demonstrated clear superiority over their opponents during the
campaign to drive the Japanese out of Southeast Asia.
development
of the Spitfire to take maximum advantage of the Merlin 60-series engine. By
this period of the war, unfortunately,
there was little opportunity for the Australians to prove the superiority
of the Spitfire VIII against their Japanese opponents, though Spitfire VIIIs in
the Burma Theater demonstrated clear superiority over their opponents during the
campaign to drive the Japanese out of Southeast Asia.
Clive “Killer”
Group Captain Clive
Robertson Caldwell DSO,
Caldwell's first assignment
was with a British Hurricane unit, 73 Squadron, during the early stages of the
North African campaign. Shortly thereafter he was transferred to 250 Squadron
RAF which had recently converted to the new P‑40 Tomahawk.
Caldwell, flying as Flying Officer Jack Hamlyn's wingman, participated in
the first P‑40 victory, over an Italian CANT Z.1007 bomber, on June 6, 1941,
though the claim was not officially recognized.
Soon afterwards the squadron was to
Struggling to acquire skill
with gunnery deflection,
250 Squadron returned to
On August 29, while flying
to his base alone,
On
 On
December 24, Caldwell fought another Luftwaffe ace, 69-victory experte
Hauptmann Erbo Graf von Kageneck of
On
December 24, Caldwell fought another Luftwaffe ace, 69-victory experte
Hauptmann Erbo Graf von Kageneck of
In January 1942, Caldwell
was transferred to 112 Squadron, where he scored a striking victory in February
1942. While leading 11 Kittyhawks
of 112 and 3 Squadrons over Gazala, he sighted a schwarm of Bf 109Fs
2,000 feet above. He nosed into a
shallow dive, applied maximum power and boost, pulling his Kittyhawk into a
vertical climb. With the P‑40 "hanging from its propeller," he fired a burst at
the Bf-109 flown by Leutnant Hans‑Arnold Stahlschmidt of I./JG27, who was
lagging behind the others. Stahlschmidt's fighter "shuddered like a carpet being
whacked with a beater" before spinning out of control.
In July 1942, Caldwell was
recalled to Australia by the RAAF, where he assumed command of No. 1 Fighter
Wing, consisting of 54 Squadron RAF, and 452 and 457 Squadrons RAAF. The wing
was equipped with Spitfire Vc aircraft and arrived at Darwin in early 1943, to
defend it against Japanese air raids.
Caldwell claimed two
victories in his first interception over Darwin, a Mitsubishi A6M Zero and a
Nakajima B5N "Kate." The Australian pilots found the Japanese reluctant to
engage in combat over Australia, due to the distance from their bases in the
Dutch East Indies. 1 Wing initially suffered high losses because of inexperience
and mechanical problems with their newly‑"tropicalized" Spitfires.
Caldwell scored his last aerial victory, a Mitsubishi Ki‑46 "Dinah" of
the 202nd Sentai, over the Arafura Sea on August 17, 1943, giving him a total of
6.5 Japanese aircraft shot down
After a tour as commander of
the fighter training unit, when 80 Wing re‑equipped with the Spitfire VIII in
1944, Caldwell moved up to Wing Commander, while fellow ace Robert Gibbes became
Wing Leader. Since the position of
Wing Commander was administrative and did not involve regularly flying on
operations, Caldwell did his best to keep his hand in, leading the unit on
strafing missions throughout the East Indies from their base on Morotai.
The Revolt of the Wing
Leaders or “The Morotai Mutiny”:
By early 1945, the RAAF
First Tactical Air Force was based at Morotai, where the Spitfires of 80 Wing
provided fighter cover for the Beaufighter wing and the Kittyhawk wing.
They flew missions over the southern Philippines, the Netherlands East
Indies, and British Borneo as part of the Montclair Plan.
The plan was overtly political, as the Australian government was already
looking toward an expanded regional role post‑war. While few enemy aircraft were
encountered, enemy anti‑aircraft defenses were strong and losses mounted. There
was a certain amount of grumbling over these losses, since the men saw the “real
war” was in the north at Okinawa, while the East Indies were seen as places the
Japanese would surrender regardless once the war was over.
Thus, aircrew deaths and other losses were seen as pointless in the
overall situation.
 At 24,
Group Captain Wilfred Stanley “Wilf” Arthur, was the youngest Group Captain in
the RAAF. After a distinguished
combat career with 3 Squadron in North Africa and 75 Squadron in New Guinea, was
he became Officer Commanding 81 Wing, equipped with Kittyhawk IVs in the Spring
of 1945.
At 24,
Group Captain Wilfred Stanley “Wilf” Arthur, was the youngest Group Captain in
the RAAF. After a distinguished
combat career with 3 Squadron in North Africa and 75 Squadron in New Guinea, was
he became Officer Commanding 81 Wing, equipped with Kittyhawk IVs in the Spring
of 1945.
As he later put it, “There
were occasions previously when certain things that had been done by the RAAF had
disappointed and probably disgusted me, but I finally sold out about the time I
was at Morotai. I thought there was very little hope left for the RAAF.”
By "selling out", he meant, “What I considered the complete dishonesty of
purpose evident in First TAF and the fact that I considered there was no attempt
being made to kill Japanese, and that the only reason for most of the activities
of First TAF was personal benefit of individuals within the Air Force. I
considered there were certain persons using the Air Force for their own personal
advantage and in the Air Force, it means lives. I reckoned it was and I reckon
it is treason. It is also my opinion from what I have seen before that it is not
peculiar to First TAF; that it exists in all the Air Force. We were wasting
time, endangering lives and wasting valuable bombs and ammunition."
Arthur had his Intelligence
Officer put together a “Balance Sheet” for the Wing's operations and took it to
the office of Air Commodore Cobby, the Air Officer Commanding, 1st
TAF, where it was ignored. Group
Captain Gerald Packer, the Senior Officer Administrative of 1st TAF,
considered the document had merit, and told Arthur to take it direct to
Disappointed that no
official attention was given after, Arthur concluded that because no action was
taken, there was something dishonest in the way 1st TAF in particular
‑ and the RAAF in general ‑ were prosecuting the war. He brought this up to the
leaders of the other units in 1st TAF, who agreed with him.
On April 20, 1945, Group
Captain Wilfred Arthur, Group Captain Clive Caldwell, Wing Commander Kenneth
Ranger, Wing Commander Robert Gibbes, Squadron Leader John Waddy, Squadron
Leader Bert Grace, Squadron Leader Douglas Vanderfield and Squadron Leader
Stuart Harpham applied for permission to resign from the RAAF, on the grounds
their service was wasted in these operations.
All indicated a strong willingness to take 1st
TAF to Okinawa and fly combat on the front lines of the Pacific War.
Being some of the most
famous names and genuine heroes in the wartime RAAF, the Australian government
could not afford the adverse publicity if their complaint became known in the
country, since the Australian public had - and still has - a strong opposition
to the needless waste of men in war stemming from their experience as cannon
fodder for the British at Gallipoli.
The government leaders feared the government
could fall if this became public.
 An
Inquiry was held, conducted by John Vincent William Barry, KC. The government
was considering bringing charges of mutiny in wartime and resignation in
wartime.
An
Inquiry was held, conducted by John Vincent William Barry, KC. The government
was considering bringing charges of mutiny in wartime and resignation in
wartime.
At the inquiry, Arthur
stated that, after he arrived at Morotai, he decided he would not take part in
operations he thought were worthless. He was asked "This gets very close to
Mutiny, does it not?" He responded "Yes. I meant to make as big a fuss as I
possibly could with the object of getting the position corrected. We thought
that, in the end, if we put our cards on the table, we would have a sufficiently
strong case to prejudice a lot of people in our favor. All the same, we realized
that, to lay ourselves open to any charge of mutiny, we might lessen the force
of what we were doing, which was the reason we put the things in as resignations
and not as any attempt to unseat people higher up ... It occurred to us, but we
did not seriously think, or I did not, anyhow, that we would be charged with
mutiny.”
The Inquiry determined the
eight had no real intentions towards mutiny.
The Government, however, was not prepared to forgive and forget this
affront to their authority.
In the end, while the serious charges were dropped, each and every officer was found ‑ after a very detailed investigation ‑ to have committed many small variances in the conduct of paperwork and the enforcement of petty regulations such as allowing access to liquor at forward bases. Each was demoted one grade for allegedly having profited in a scheme to provide alcohol to their men. All left the RAAF in the year following the end of the war, though each had been seen before this event as having a spectacular future in the air force.
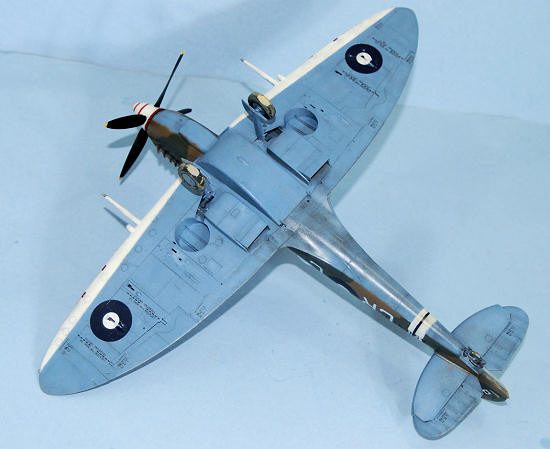
| THE KIT |
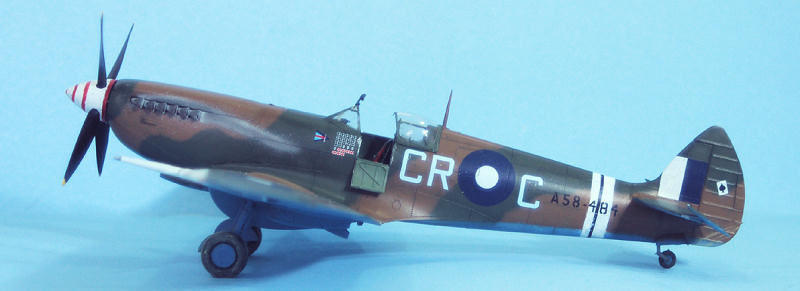
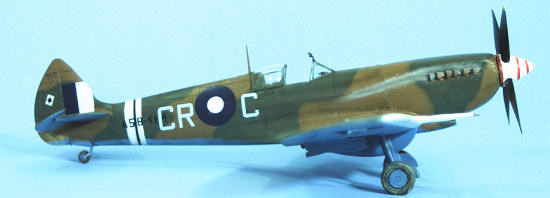
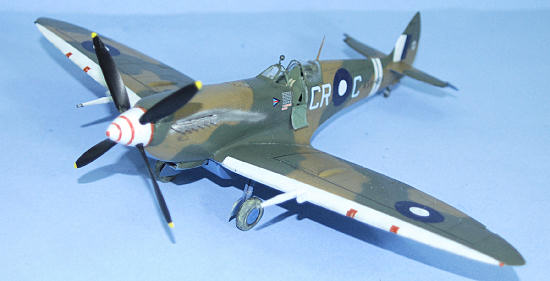
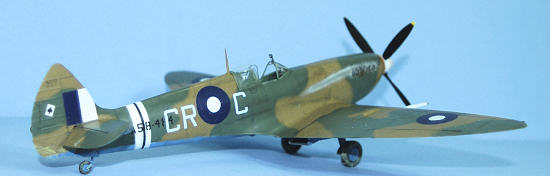
This is the second Tamiya “Uber-Spitfire.” It differs from the Spitfire IX kit in providing the retractable tail wheel and shorter-span ailerons associated with the Mk. VIII, as well as the pointed rudder and extended wingtips used by some versions. Decals provide markings for an H.F. VIII with extended wingtips of 417 Squadron RCAF in Italy, the Spitfire F. Mk.VIII flown by Wing Commander Robert Gibbes. RAAF, and a Spitfire flown by the 31st Fighter Group, USAAF in Italy in 1943 and early 1944.
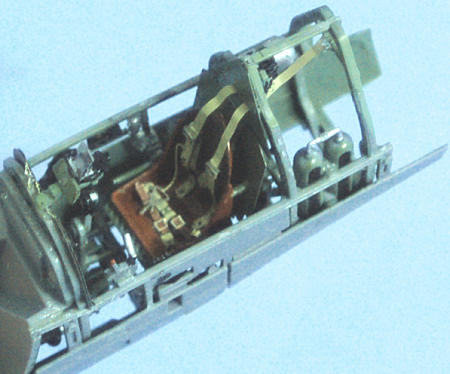
| CONSTRUCTION |
| COLORS & MARKINGS |
Modelers have long been
interested in these Australian Spitfires, and have had to put up with a lot of
misleading information regarding the camouflage and markings. Fortunately there
is now a body of recent research available, which goes far toward solving the
problem. I am indebted to RAAF historical researcher Peter Malone for providing
the following information.
 slight
sheen and appear to be glossy in some photos.
slight
sheen and appear to be glossy in some photos.
 made this
necessary). When the RAAF repainted airplanes after reassembling them there was
no need to keep these stencils. Where these can be found, this proves that these
are parts of the aircraft that were painted RAF Dark Earth.
made this
necessary). When the RAAF repainted airplanes after reassembling them there was
no need to keep these stencils. Where these can be found, this proves that these
are parts of the aircraft that were painted RAF Dark Earth.
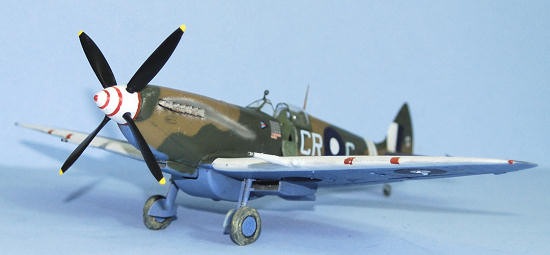
| FINAL CONSTRUCTION |
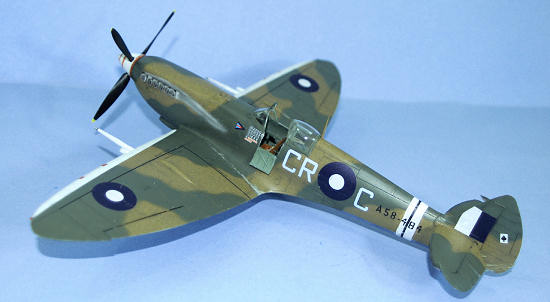 Photos
show the original airplane to be well-maintained other than some visible exhaust
staining due to the lean fuel mixtures that were used to maximize range, as well
as some “dings” on the wing where the pilot boarded the aircraft.
I “dinged” that area with Talon aluminum acrylic, hand painted, and did
the exhaust staining by applying Tamiya “Sky Grey,” then Tamiya “Dark Grey” and
finally Tamiya “Smoke.”
Photos
show the original airplane to be well-maintained other than some visible exhaust
staining due to the lean fuel mixtures that were used to maximize range, as well
as some “dings” on the wing where the pilot boarded the aircraft.
I “dinged” that area with Talon aluminum acrylic, hand painted, and did
the exhaust staining by applying Tamiya “Sky Grey,” then Tamiya “Dark Grey” and
finally Tamiya “Smoke.”
| CONCLUSIONS |
The kit is worth its
expensive price, even if a modeler does not build it so that the engine can be
displayed. I personally think if
one is going to display the engine, extra work has to be given to the detail
with the addition of electrical wires and other tubing, to bring that area
“alive.” My “curbside” model looks
fine to me. This is the only
out-of-box kit for a Spitfire VIII that is accurate in all the small ways that
this version differed from others, and so any Spitfire Boffin will be happy with
the result.
September 2010
If you would like your product reviewed fairly and quickly, please contact me or see other details in the Note to Contributors.