| KIT #: | 8281 |
| PRICE: | $49.95 SRP |
| DECALS: | Five options |
| REVIEWER: | Tom Cleaver |
| NOTES: | New Tool kit - Profipak version |
| HISTORY |
Had not the RAF
been able to bring a new Spitfire into combat in the summer of 1942 to face the
Fw‑190A that could outfly the Spitfire V on every point but turning circle, the
war over Northern Europe would have likely taken a different course. As it was,
the RAF had to stop daylight operations over northern France twice - in November
-December 1941 and in March-April 1942 - due to high losses of Spitfires
operating against JG 2 and JG 26 on the Channel Front.
The new Merlin 61-powered Spitfire VII and VIII with
their 2-stage superchargers could match the Fw-190's performance, but were at
least a year away from production.
As a “stopgap,”
two Spitfire Vc airframes, AB196 and AB197, were given strengthened longerons
Merlin 61s with 2-stage superchargers were mounted.
AB196 first flew on February 26, with AB197 taking to
the air a month later.
Both were successful and on the strength of these
results the Spitfire IX was ordered into production at Castle Bromwich
immediately.
Even given top priority, the Spitfire IX did not fully equip all
 RAF
fighter squadrons in the UK until late 1943. The "interim" Mk.IX became the
second most‑produced Spitfire, running close behind the Spitfire V, and gave the
RAF parity with the best German equipment. As leading Spitfire IX ace Johnny
Johnson noted in his autobiography, "Wing Leader," the Spitfire IX and the
Fw‑190A were so closely‑similar in performance that the outcome of a fight was a
matter of pilot ability.
RAF
fighter squadrons in the UK until late 1943. The "interim" Mk.IX became the
second most‑produced Spitfire, running close behind the Spitfire V, and gave the
RAF parity with the best German equipment. As leading Spitfire IX ace Johnny
Johnson noted in his autobiography, "Wing Leader," the Spitfire IX and the
Fw‑190A were so closely‑similar in performance that the outcome of a fight was a
matter of pilot ability.
By D‑Day, the
Spitfire IX had been replaced as the RAF's high altitude air‑superiority fighter
by the Griffon‑powered Spitfire XIV,; however, even with its assignment changing
to that of fighter‑bomber to support the invasion, the Mk.IX would show on
numerous occasions that it was still the mount of aces, right up to the
concluding weeks of the war.
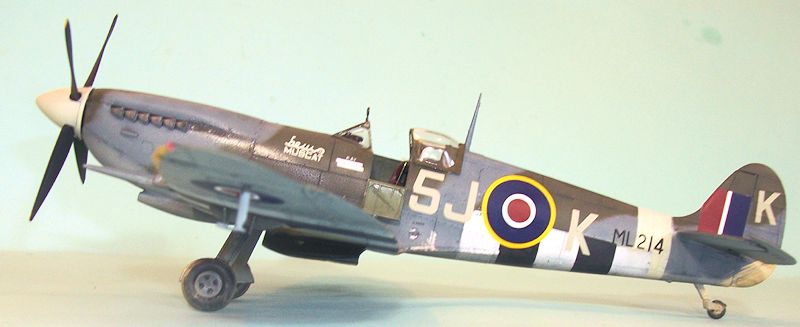
John Plagis, a
Rhodesian of Greek parentage, first made a name for himself flying Spitfire Vs
over Malta with 249 and 185 Squadrons in 1942‑43, with whom he scored ten
victories over German and Italian opponents. Evacuated to England after
suffering a complete physical and mental breakdown from extended daily combat
over the previous eight months, he joined 64 Squadron, the unit that had been
first to take the Spitfire IX into combat in July 1942, in September 1943;
flying over northern Europe, he scored four more victories by early 1944. In May
1944 he was assigned Officer Commanding 126 "Persian Gulf" Squadron. The unit
took on that name because half the establishment were Spitfire IXs purchased by
British residents of the Persian Gulf; they were named for the states of the
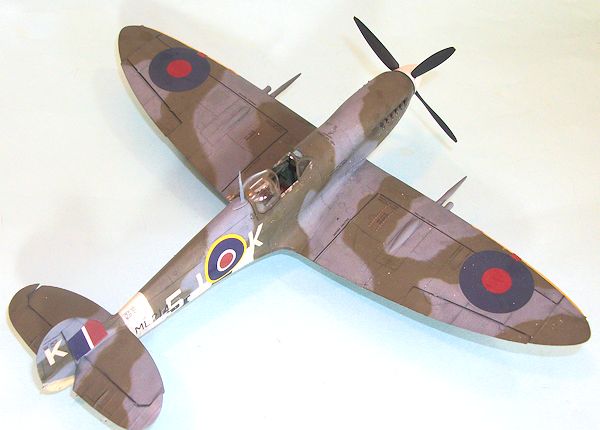
region, with Plagis' ML214 named for the sheikdom of Muscat.
As were most
Spitfire squadrons in 2nd Tactical Air Force, 126 Squadron was a fighter‑bomber
unit, its Spitfires carrying two 250‑lb bombs underwing. However, on July 24,
1944, Plagis and his wingman were jumped by a group of Bf‑109Gs, and ‑ in the
ensuing melee ‑ Plagis nailed one enemy fighter, his last definite kill of the
war. His final tally was 15 destroyed, 2 shared destroyed, 2 shared probably
destroyed, 6 damaged
 and 1
shared damaged.
and 1
shared damaged.
In September 1944
during the ill‑fated Operation “Market‑Garden” Plagis was shot down by flak over
Arnhem and crashed at high speed, surviving with only minor injuries.
In late 1944, 126
Squadron was equipped with the Mustang III and Plagis led the squadron in
bomber-escort missions til April, when he was posted for a rest.
Remaining in the
RAF, he was posted to Rhodesia, his home country, taking command of a squadron
that October. Returning to Britain in 1947, Plagis commanded two units flying
Gloster Meteors until he retired in May 1948.
He returned to Rhodesia and went into business in
Salisbury. Tragically, in 1952 he committed suicide, most likely a victim of the
then little-understood malady of PTSD.
| THE KIT |
Modelers have
wanted an accurate model of the Spitfire IX since at least 1959, when I first
embarked on the quest.
Utilizing parts from the old Airfix Spitfire IX (wings),
Matchbox Spitfire IX (fuselage, tail,landing gear, prop) one could create an
accurate model in 1/72 in the early 1970s.
The situation in 1/48 was more difficult: in 1969, Otaki
brought out a Spitfire IX which could be turned into a Spitfire IX with extra
work, but it lacked the accurate shape of the cowling, and importantly the
curvaceous lower area immediately aft of the wing for the “gulled” effect.
Falcon brought out vacuform parts that would change the
lower fuselage, but the cowling remained uncorrected.
The first kit in
the series is the late-production Spitfire IX with the larger Aero-Vee intake
and air filter, narrow-chord cannon fairings and a choice of rounded or pointed
rudders.
Looking at the parts supplied, it is obvious there will be an
early-production Spitfire IX and a Spitfire Ixe/XVI to come.
I was worried
about the rivets, too.
I have been around two 1:1 Spitfires out at Planes of
Fame since 2002, and from a distance further than ten feet (2.5 inches in 1/48)
it is virtually impossible to see the rivets on the airframe, unless it is
sitting outside in good sunlight at “magic hour” when the angle of the light
“pops out” rivets if one is standing within 16 feet (4 inches in 1/48) of the
airplane.
The good news with the Eduard rivets is that under a coat of
paint, they’re not that noticeable beyond about 5 inches (a scale 20 feet) away
from the model, holding it under a strong light.
They’re very nice, and were done because the CAD
technology is now such that such molds can be made.
In my experience, most of the “very serious indeed”
modelers who love all these rivets have mostly never been within five miles of
an actual airplane.
The good news is these rivets can disappear with a light
sanding; that is very much necessary with the leading edge of the wing back to
the main spar, which has flush riveting and was puttied for smoothness in World
War II just like the P-51.
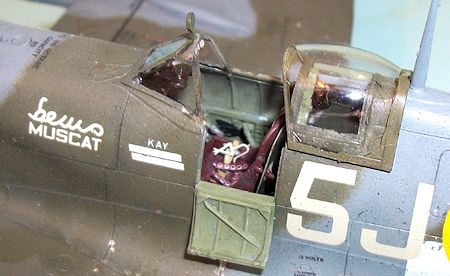
The cockpit
detail provided by the kit is “good enough,” particularly since this is a “Profipack”
release with photo-etch details such as instrument panel and seat belts. The
truth is, once a 1/48 Spitfire model is assembled, the only part of the cockpit
that can easily be seen in any detail is the seat, unless you’re one of those
who has to use a penlight to look at your model.
Eduard is pushing a very nice Brassin cockpit with all
the bells and whistles, which ups the price of the model by 50%, but the fact is
with a Spitfire cockpit that 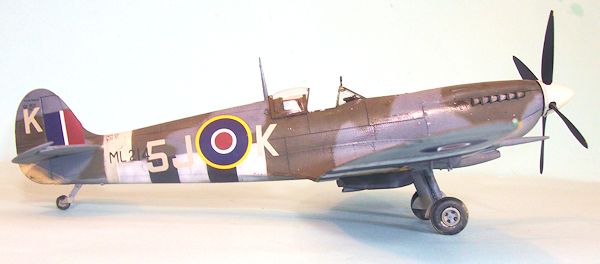 “good
enough is good enough,” and in my opinion the money spent on a resin cockpit
could be better spent on a second kit. Resinaholics may find their mileage
varies.
“good
enough is good enough,” and in my opinion the money spent on a resin cockpit
could be better spent on a second kit. Resinaholics may find their mileage
varies.
The decals
provide markings for five airplanes (one in two different schemes for a total of
six different looks).
Most of these are well-known airplanes and the decals
are good.
Fortunately, there were a number of aftermarket decal sheets
released back in the late 1990s/early 2000s and while the companies may no
longer exist the decal sheets can be found on eBay and other sources; most
Spitfire fans probably have several sheets in their collections now.
| CONSTRUCTION |
I divided the
model into two major sub-assemblies: fuselage and wing.
I first assembled
the wing.
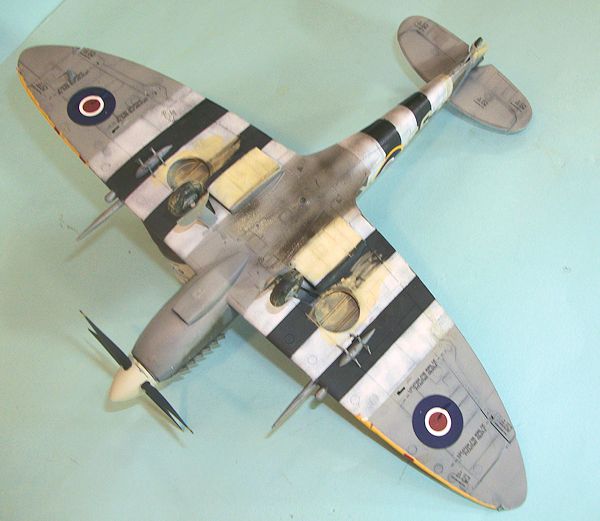
The wheel wells come in six-parts; I have to say that once they
were assembled and the wing was glued together, I could not see any real detail
difference between what Eduard had created and what Airfix accomplished with
greater simplicity.
The separate ailerons, however, do a very good job of
showing the deep separation between wing and aileron on the upper surface.
I was also puzzled by the multi-part radiators, which
provided several opportunities to mis-align the four parts that make up each.
Again, comparing the final result to the two-part Airfix
radiator housings, I couldn’t see any detail difference.
(In making that parts count, I am not counting the two
parts of each radiator, which both Airfix and Eduard do as separate parts.)
 Next, I assembled the part upper cowling.
There is no very positive alignment to these parts, and
no matter how careful I was in assembling them, in the end there was one of
those @#$%@!! centerline seams to fill with C-A glue and then cover with Mr.
Surfacer before it finally disappeared (along with the rivet detail, which
wasn’t really a great loss).
Next, I assembled the part upper cowling.
There is no very positive alignment to these parts, and
no matter how careful I was in assembling them, in the end there was one of
those @#$%@!! centerline seams to fill with C-A glue and then cover with Mr.
Surfacer before it finally disappeared (along with the rivet detail, which
wasn’t really a great loss).
I moved on to the
cockpit.
This assembly is a bit more fiddly than other Spitfire cockpits I have
done, and the detail was not as extensive as one finds in the Hasegawa kit
(probably as a way of pushing the Brassin cockpit), but the end result looks
quite nice when viewed inside the assembled fuselage.
As I said earlier, the one real thing any Spitfire
cockpit needs is a good seat, and Eduard gives you that (again in four parts,
which left me puzzled once again when comparing it to the one-piece seats Airfix
manages to create).
The fuselage went
together without problem, and I attached the horizontal stabilizers for the
later elevators.
If you are going to droop the elevators, cut off the little
alignment pins, since they make things harder.
Also, please don’t drop the elevators 45 degress as one
frequently sees on models - the fact is that Spitfire elevators only travel
about 15 degrees up or down at a maximum.
The wing was
fiddly to attach, and I discovered I needed to sand down the lower edge of the
cockpit side pieces just a bit.
Once that was done, the wing slipped right into
position.
(I might add that these new kits done with state-of-the-art CAD
design really are precision fit.
Be sure you clean off all sprue attachment points
thoroughly, or things will not fit right.
I would be willing to bet that Plagis’ airplane, like so many other Spitfire Ixc’s turned into fighter bombers, had the cannon moved outboard as with the universal or “e” wing. However, there are no photographs of this airplane that I could find in an internet search; I wonder where the profile, which was first published in Osprey’s “Late Marque Spitfire Aces 1942-45" came from. Since there is no proof one way or the other, I went ahead and did it with the “c” wing.
| COLORS & MARKINGS |
I decided I would
do John Plagis’ Spitfire since I had the Aeromaster sheet that had those
markings.
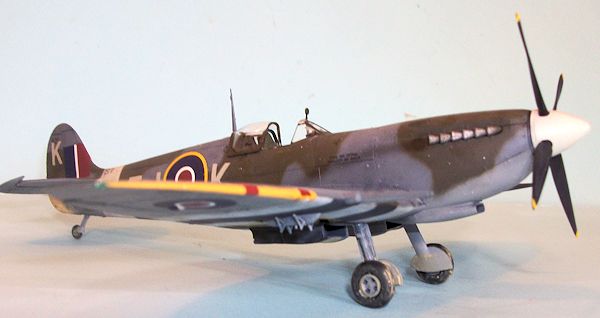
All the profiles show the airplane with full wraparound D-Day
stripes, but I decided I wanted to do it as it most likely looked on July 24,
1944, when he scored his final victory: in early July, directions came to units
operating in France to remove the stripes from the upper fuselage and top of the
wings.
Therefore, when I painted the model, I only did the stripes on the lower
areas.
I pre-shaded the model with flat black, then applied white over that in
a thin coat, which would make the white stripes look “distressed,” since they
were a temporary paint.
When I painted the upper camouflage, I left the areas
that would have been touched up following the removal of the stripes the
original dark color I had applied, doing “post shading” only on those 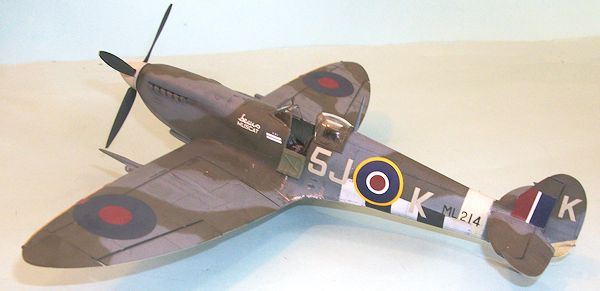
I gave the model
an overall coat of Xtracrylix Flat varnish, then applied the lower fuselage oil
stains and the exhaust stains with Tamiya “Smoke.”
I “muddied” the wheels and wheel wells, and applied mud
spray behind the gear, given that the summer of 1944 in Normandy was pretty
rainy from all accounts.
I then attached the landing gear and prop, unmasked the
canopy, and set it in the open position.
| CONCLUSIONS |
Review Kit courtesy of Hobby Link Japan.
If you would like your product reviewed fairly and fairly quickly, please contact the editor or see other details in the Note to Contributors.