Special Hobby 1/32 Hawk 75A-4 'Mohawk'
|
KIT #: |
SH32016 |
|
PRICE: |
8,650 yen at
www.hlj.com (about $80 at the current
rate) |
|
DECALS: |
Two options |
|
REVIEWER: |
Tom
Cleaver |
|
NOTES: |
|
Don Berliner, Chief Designer of
Curtiss-Wright, first set pencil to paper to create the Hawk 75 in 1934, the
same year that saw the birth of the Messerschmitt Bf-109, the Hawker Hurricane
and the Supermarine Spitfire.
The design was as revolutionary for Curtiss - at the
time the premier supplier of fighter aircraft to the U.S. Army Air Corps and the
U.S. Navy - as were the other designs for their respective creators.
It was the first all-metal, retractable-gear,
enclosed-cockpit fighter produced by Curtiss.
While the XP-36 lost the 1937 Fighter Competition to the
Seversky P-35, the P-36 came back - powered by a better engine - to obtain the
largest production order from the Army for a fighter since the First World War,
and went on to spawn the P-40.
Curtiss had always been known for
maximizing the export potential of their designs, and the Hawk 75 was no
exception. The largest export order went to the Armee de
l’Air just before the outbreak of the Second World War.
Numerically second only to the Morane-Saulnier M.S. 406, the Hawk 75 equipped
four Groupes de Chasse at the time of
the German invasion on May 10, 1940.
 French Hawk pilots shot down over 150
German aircraft in the five weeks they fought the Luftwaffe.
French Hawk pilots shot down over 150
German aircraft in the five weeks they fought the Luftwaffe.
Following the Franco-German
Armistice, almost all of the 200 Cyclone-powered Hawk 75A-4s on order for the
French were taken on charge by the RAF, since they had not yet been delivered
from the manufacturer. While the previous Hawk 75s had been powered by the Pratt
and Whitney R-1830 Twin Wasp, the Hawk 75A-4 utilized the Wright GR-1820 Cyclone
9. The Cyclone-powered Hawk was the fastest of all, with a top speed of 323 mph,
though the Cyclone was a much more troublesome engine than the Twin Wasp, with
constant trouble with the oil pressure.
The 200 ex-French Hawk 75A-4s,
along with 12 similar Hawk 75A-8s originally sold to Norway, as well as 12 Hawk
75A-9s sold to Iran, were known as the Mohawk IV in RAF service. After being
assembled in the UK and kept at Maintenance Units while there was danger of a
German invasion, the Mohawks were sent overseas beginning in late 1941.
72 Mohawk IVs were used as fighter
trainers in South Africa, though at least one SAAF squadron did use them for air
defense of Capetown until 1943, when the likelihood of an Axis air attack was
remote.
Portugal invoked its ancient treaty of defense with Great Britain and 12
Mohawk IVs were supplied to the Portuguese Air Force where they equipped one
fighter squadron in the Azores.
The remaining Mohawk IVs were
eventually sent on to India, where 5 Squadron RAF began equipping with the
Mohawk IV in
 December 1941, providing the sole fighter defense of north-east
India until May 1942. In March 1942, 146 Squadron equipped with Mohawk IVs. The
two squadrons were joined by 155 Squadron in
September 1942, forming the Mohawk Wing.
December 1941, providing the sole fighter defense of north-east
India until May 1942. In March 1942, 146 Squadron equipped with Mohawk IVs. The
two squadrons were joined by 155 Squadron in
September 1942, forming the Mohawk Wing.
The Mohawk IVs were used for bomber
escort, standing patrols and close support over the eastern India front and
Burma. In January 1943, the squadrons began “Rhubarb” operations, sending
flights of 2-4 fighters free-ranging over enemy territory at low altitude in bad
weather,
strafing whatever enemy activity they came across.
The maneuverability of the Hawk 75 was put to good use
on these operations, which frequently constituted the only offensive RAF
operations during the monsoon season which began in May and lasted through
October.
The Mohawk Wing was heavily engaged
in ground-support operations during the heavy fighting following the Japanese
invasion of Imphal in February-March 1943. 5 Squadron turned in their Mohawks
for Hurricanes in June 1943, followed by 146 Squadron that October. 155 Squadron
was the last Mohawk operator, exchanging their Mohawks for Spitfire VIIIs in
January 1944.
At least six JAAF Ki.43
Hayabusa fighters were shot down by Mohawks
during their escort and rhubarb missions, including two credited to the Mohawk
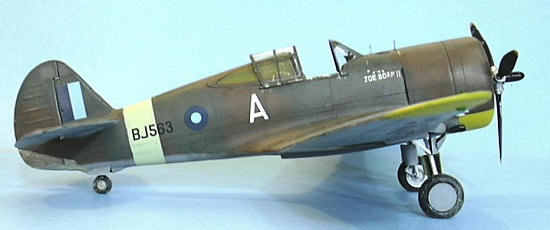
IV “Joe Soap II,” which was operated by 155 Squadron.
Following the basic P-36A in
November 2005, and the “high-tech French Hawk 75A series in 2006, this Hawk is
one of two released by Special Hobby.
 This kit differs from the previous
kits in having parts for the Cyclone-powered H-75A-4/8.
This is accomplished through an additional sprue
containing the parts for the Cyclone engine and the different forward
fuselage/cowling.
The kit reverts to an all-plastic cockpit, which is
actually superior to the resin cockpit provided in the Azur “high-tech” kit,
since these parts actually fit. A pre-painted photo-etch instrument panel is
also provided, along with RAF-style seat belts and other cockpit details in
photo-etch.
This kit differs from the previous
kits in having parts for the Cyclone-powered H-75A-4/8.
This is accomplished through an additional sprue
containing the parts for the Cyclone engine and the different forward
fuselage/cowling.
The kit reverts to an all-plastic cockpit, which is
actually superior to the resin cockpit provided in the Azur “high-tech” kit,
since these parts actually fit. A pre-painted photo-etch instrument panel is
also provided, along with RAF-style seat belts and other cockpit details in
photo-etch.
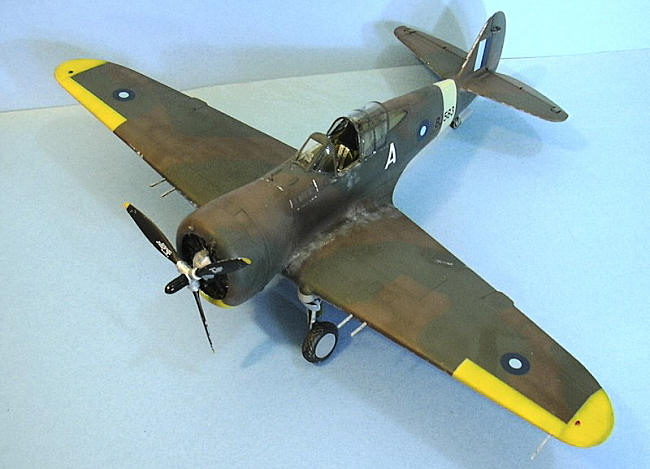
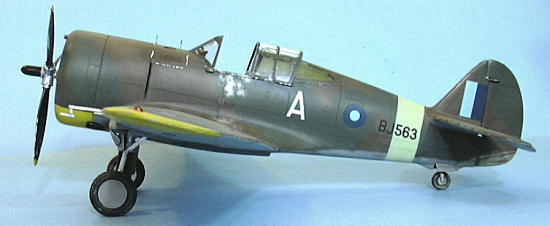
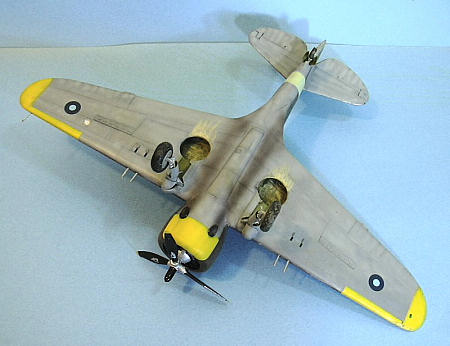
Decals are provided for two Mohawk
IVs with differing national insignia, one being the early SEAC roundel in which
the red center of the standard insignia was overpainted with white, while the
second - the well-known “Joe Soap II” - has the later dark blue/light blue SEAC
insignia.
The kit breaks down into two major
sub-assemblies: the engine/cowling/main fuselage with cockpit, and the wings.
As with the Finnish Hawk, I started
by gluing each half of the cowling to the proper fuselage half, and then painted
the interior of the fuselage and cowling, and all the interior parts, with
Interior Green, and painted the details in the cockpit parts.
I then built the very nice R-1820
Cyclone, attached it to its bulkhead, then tacked that to one fuselage half and
began test-fitting.
I had to sand down the engine bulkhead a bit to avoid a
large gap between the fuselage halves.
When this was accomplished, I glued the cockp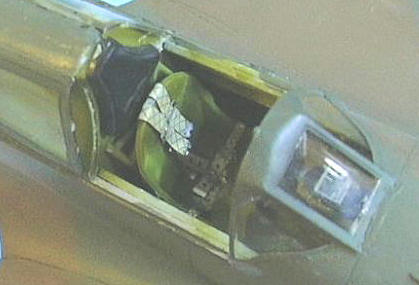 it side
panels in position and glued the fuselage together.
I took this time to attach the part that forms the tail
wheel wall.
it side
panels in position and glued the fuselage together.
I took this time to attach the part that forms the tail
wheel wall.
I then test fitted and reshaped the
forward cockpit bulkhead.
It is essential that this part fits perfectly inside the
fuselage.
I also test-fitted and modified the rear cockpit in a similar
manner.
When that was accomplished and
those parts were correctly glued in position, I assembled the fuselage weapons,
the instrument panel and rudder pedals, and attached that in position.
I then glued the cockpit floor in position.
I then attached the lower wing to
the fuselage.
After that, I test-fitted and reshaped each upper wing so it
would fit to the fuselage and the wing correctly.
When that was done, I assembled the bulkheads for the
main gear well into each upper wing and glued the wings in position.
I also finished off main assembly by attaching the
horizontal stabilizers.
I then applied liberal amounts of
cyanoacrylate glue to all seams, sanded them down, reapplied more cyanoacrylate,
sanded that down, then applied and reapplied Mr. Surfacer, followed by more
sanding, and more Mr. Surfacer where necessary, the model was finally in shape
and I then rescribed the panel lines that had been lost.
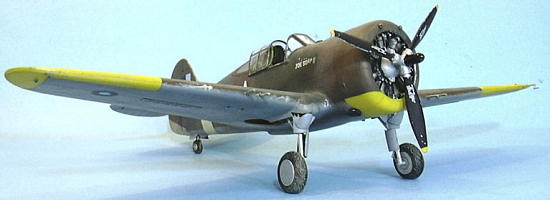
Painting:
 The kit instructions say these
airplanes were painted in the European Temperate Scheme of Ocean Grey, Dark
Green and Sea Grey Medium.
However, all SEAC aircraft I know of were painted in the
Tropical Land Scheme of Dark Earth and Dark Green uppers and Sea Grey Medium
lower surfaces.
I painted over the areas where the earlier markings would have
been on the upper surfaces with Dark Green. Utilizing the instructions from the
Cutting Edge sheet for the airplane I was doing, I first pre-shaded the model
with flat black over the panel lines, then painted the Sky Band and then the
Trainer Yellow ID markings.
When these were dry I masked them off and applied the
camouflage freehand, using the Cutting Edge painting diagram.
All colors used were Xtracrylix.
All the camouflage colors were “sun faded” by adding in
white to each color and going over the area painted a second time.
When all this was dry, I gave the model a coat of
Xtracrylix “Gloss” varnish.
The kit instructions say these
airplanes were painted in the European Temperate Scheme of Ocean Grey, Dark
Green and Sea Grey Medium.
However, all SEAC aircraft I know of were painted in the
Tropical Land Scheme of Dark Earth and Dark Green uppers and Sea Grey Medium
lower surfaces.
I painted over the areas where the earlier markings would have
been on the upper surfaces with Dark Green. Utilizing the instructions from the
Cutting Edge sheet for the airplane I was doing, I first pre-shaded the model
with flat black over the panel lines, then painted the Sky Band and then the
Trainer Yellow ID markings.
When these were dry I masked them off and applied the
camouflage freehand, using the Cutting Edge painting diagram.
All colors used were Xtracrylix.
All the camouflage colors were “sun faded” by adding in
white to each color and going over the area painted a second time.
When all this was dry, I gave the model a coat of
Xtracrylix “Gloss” varnish.
Decals:
I used the kit decals to do “Joe
Soap II.”
These went down without problems.
 I washed the model and then
applied a coat of Xtracrylix Flat varnish with a couple brushfulls of Tamiya
Flat Base to flatten it more as it would have been under the tropic sun.
I “dinged” the airplane with Tamiya Flat Aluminum,
then applied exhaust staining and mud streaks around the gear wells.
I washed the model and then
applied a coat of Xtracrylix Flat varnish with a couple brushfulls of Tamiya
Flat Base to flatten it more as it would have been under the tropic sun.
I “dinged” the airplane with Tamiya Flat Aluminum,
then applied exhaust staining and mud streaks around the gear wells.
I then assembled the landing gear.
I decided to use the rubber tires from the old Dragon
P-51D - they look good but modifying the kit hubs to take them was ultimately
more trouble than they were really worth and I wouldn’t recommend this.
The tires were “muddied up” and the landing gear
attached.
I unmasked the clear parts and
positioned the canopy in the open position.
I attached the wing guns, the pitot tube (I had to
scratch this, since the kit does not include the RAF-style pitot the Mohawk IV
used.
I finished off by attaching the “dinged” prop.
This kit makes up into a far
more accurate model of the Mohawk IV than did the Cutting Edge conversion
for the Trumpeter P-40B I did four years ago.
The engine
is right (not the case with the CE set) and the correct exhaust pipes are
supplied.
If you like the P-36/P-40 series, this is an important
sub-type of the series and looks good sitting next to the Finnish, French
and pre-war US Hawks in my collection.
Review kit courtesy of HobbyLink Japan.
Get yours at www.hlj.com
August 2008
Tom
Cleaver
Copyright ModelingMadness.com. All rights reserved. No reproduction in part or in whole without express permission.
If you would like your product reviewed fairly and quickly , please
contact
the editor or see other details in the
Note to
Contributors.
Back to the Main Page
Back to the Review
Index Page 2023