| KIT: | Tamiya 1/48 P-51B Mustang |
| KIT #: | ? |
| PRICE: | $26.00 MSRP |
| DECALS: | Three options |
| REVIEWER: | Tom Cleaver |
| NOTES: | Aeromaster decals used |
| HISTORY |
The 354th Fighter Group took the name “Pioneer” because the unit was the first in the U.S. Army Air Forces to take the Merlin-powered P-51B Mustang into combat.
It is important to note that the 354th FG was not the first USAAF P-51 Mustang group in combat in the role of bomber escort. That honor goes to the 311th FG, which took its Allison-powered P-51A Mustangs and A-36A “Invaders” into combat to provide air defense over the Brahmaputra Valley in upper Assam, India, for the northern air route to China, and for offensive operations in northern Burma in preparation for General Stilwell’s coming Chinese-American offensive to re-open the Burma Road. Commencing operations on October 18, 1843, the 311th saw almost continuous operation with the end of the annual monsoon. In late November 1943, the 530th Fighter Squadron began to operate their P-51As on escort of B-24s of the 7th Bomb Group in long range bombing missions across the Bay of Bengal to Rangoon, Burma, fully a month in advance of the first escort mission flown by the 354th in England.
That said, the performance of the 354th FG was absolutely crucial to the eventual success of the 8th Air Force’s daylight bombing offensive over Europe. The Luftwaffe had beaten the Americans in the battle of unescorted daylight missions on October 14th, 1943. The 8th’s second mission to Schweinfurt cost 60 B-17s and B-24s shot down of 290 sent, with another 75 that survived the flight home being written off after arrival, and more than 120 sustaining damage. On October 15, the 8th air Force couldn’t muster a squadron’s worth of heavy bombers fit for operations. This defeat was masked by the fact the weather went bad over Northern Europe for the rest of the year, with only six days where it was clear enough to mount a mission over Germany.
The
air war in England during the summer of 1943 had seen an endless struggle by the
fighter groups to find ways to hang drop tanks on their big fighters and extend
their range; for the 354th Fighter Group it was a time spent on the
U.S. West Coast turning the squadrons into an operationally-ready group. The
unit had been formed in March 1943 at Hamilton Air Base north of San Francisco,
initially equipped with the P-39 Airacobra. They moved to Tonopah, Nevada and
then to Portland, Oregon as the 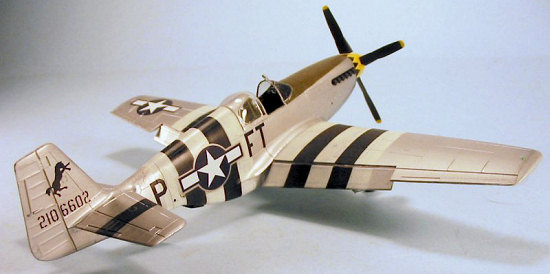 new pilots built flight hours and became more
confident under the tutelage of squadron leaders like former American Volunteer
Group ace James O. Howard, CO of the 356th Fighter Squadron.
new pilots built flight hours and became more
confident under the tutelage of squadron leaders like former American Volunteer
Group ace James O. Howard, CO of the 356th Fighter Squadron.
The Mustang got into this battle almost by chance. The USAAF had not been in favor of the Mustang from the outset, since it had been developed and produced for the RAF - making it subject to the NIH (Not Invented Here) Rule. The RAF, discovering that the Allison-powered version was excellent at altitudes below 10,000 feet, had assigned their Mustangs to tactical reconnaissance units. When the USAAF began taking the Mustang into their inventory, the early versions were given similar assignments, and this was to be carried through with the Merlin-powered version. Apparently, no one in the upper ranks of the USAAF had noticed the fact that with the Merlin powerplant, the Mustang outperformed nearly every other Allied fighter at high altitude, and - with the long range the airplane had always been capable of - was the perfect escort fighter for the 8th Air Force.
Thus, the 354th Fighter Group - which had been trained for tactical operations on the Airacobra - was sent to the 9th Air Force, the tactical organization, upon their arrival in England and equipped with the brand-new P-51B in October 1943.
Fortunately for the 8th Air Force, someone at “Pinetree” took a look at the performance specifications of the Merlin Mustang. This was reinforced by the early reports of LCOL Don Blakeslee - Deputy Group Commander of the 4th Fighter Group - who led the 354th on their initial operational missions in early December 1943. Blakeslee, along with all the other ex-Eagle Squadron pilots of the 4th FG, hated the P-47 in comparison with the Spitfire they had originally flown. He called the P-51B “a long-range Spitfire.” Since the 9th Air Force was not slated to go into independent combat until the invasion of Europe, they were already providing escort to the 8th Air Force with their P-47-equipped groups. The 354th, while still administratively part of the 9th air Force, was assigned to the operational command of the 8th Air Force until the coming invasion. This strange bureaucratic “limbo” was one reason why the 354th would be so little-known to contemporary history, since the publicity machine of the 8th Air Force concentrated on their units, while the 9th Air Force tended to forget the 354th existed.
At the time they entered combat, the 354th was the only fighter group that could provide cover for the bombers over the target. The 48 new pilots, in their new and still-unreliable airplanes, would be responsible for keeping the Luftwaffe at bay directly over the cities of Germany for nearly three months, until 8th Fighter Command was able to break the bureaucratic logjam and get priority for P-51B deliveries diverted to the correct assignment of strategic fighter escort.
Not
only did the 354th have to put up with an unreliable airplane until
the secret of British spark plugs was discovered in February 1944, they
initially had to worry about attack from their own side, since the Mustang
looked closely-similar to the Messerschmitt Bf-109 under combat conditions.
After several attacks by P-47 groups, which fortunately did not result in losses
though there was both damage and wounds to pilots, the P-51B was painted with
the most extensive identification stripes of any fighter in Europe: 15-inch wide
white bands on the inner wing and horizontal stabilizer, and a 12-in band
halfway up the vertical fin 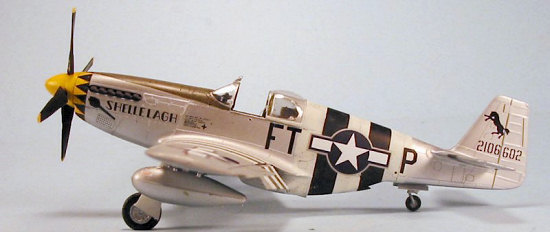 and rudder; this latter would be quickly overpainted
when it was realized the white band broke up the shape of the vertical fin,
making the airplane look even more like a ‘109 in side profile.
and rudder; this latter would be quickly overpainted
when it was realized the white band broke up the shape of the vertical fin,
making the airplane look even more like a ‘109 in side profile.
Group Commander COL Kenneth B. Martin was committed to developing the leadership of all pilots. Martin, a 26-year old pre-war pilot, had his ego under control, and had no problem assigning combat veteran James O. Howard to lead the group on its first independent missions. Soon, other Squadron CO’s would alternate group lead, and by February 1944, flight commanders in each squadron were expected to lead their squadron on two of every three missions, to ensure that command experience was continually spread throughout the unit. This would form the basis of the group’s ultimate success.
Throughout the Battle of Germany in the Spring of 1944, the 354th was in the vanguard of the battle to destroy the Jadgwaffe. Howard was promoted to succeed Martin as Group Commander and maintained the policy of extending command experience throughout the group. Pilots like Glenn Eagleston, Richard Turner, “Buzz” Beerbower, “Swede” Anderson, Ken Dahlberg, George Bickell, Felix Rogers, and Lowell Brueland would become aces in these furious air battles in March and April. During this time they moved from the permanent RAF base at Boxted to temporary quarters with tents and a PSP runway at Maidstone, Kent, a reminder that their real mission was coming soon in the invasion.
In May, the 354th reverted to 9th Air Force for operational control and began tactical operations over northern France after a two week stint learning to dive-bomb. The Pioneers still found time to shoot down the Luftwaffe fighters that came up to oppose them on these missions. While they weren’t needed on D-Day itself, the group spent the next several days escorting supply drops to the paratroops by C-47s. After release from this duty, they flew long-range fighter sweeps behind the front, now that the Luftwaffe had arrived on the scene.
On June 23, the group became “pioneers” in an additional sense when they became the first USAAF unit based in Normandy, operating from A-2 at Criqueville on the Normandy coast. The rest of the month was spent on sweeps against the Luftwaffe, escort missions for B-26 Marauders, and dive-bombing the retreating Wehrmacht. General Eisenhower visited the unit on July 4, 1944, during which he was given an aerial tour of the St. Lo front in the group’s P-51B “hack” which had a second seat installed in place of the fuselage fuel tank. Everyone breathed a sigh of relief on the general’s successful return, since there was no way for him to have exited the airplane in an emergency, due to the fact the folding panel used for access was screwed shut from the outside.
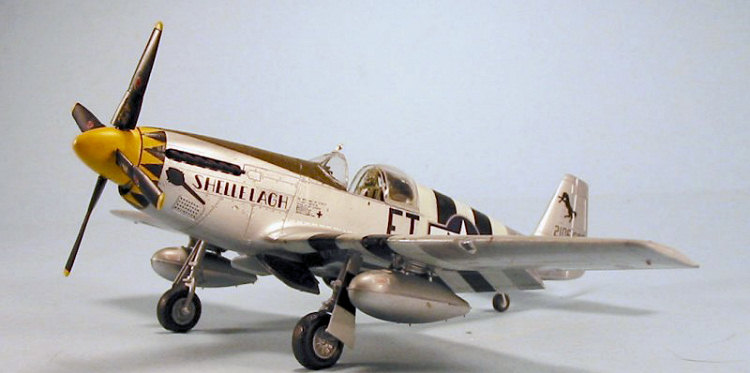
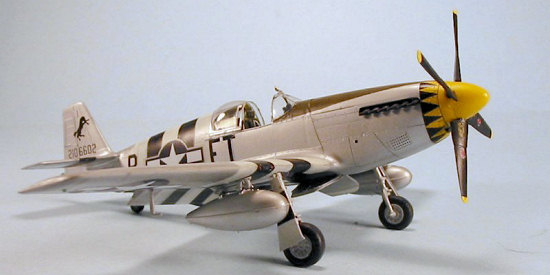
Among the group’s aircraft operating from A-2 was P-51B-10NA, s/n 42-106602, “Shillelagh,” which was at the time the favorite plane flown by CAPT Kenneth H. Dahlberg, of the 353rd FS. Although one of the top scorers of the top-scoring 353rd FS, Ken Dahlberg never had an airplane of his own. “Shillelagh” was originally delivered in Olive Drab/Grey, and was stripped to natural metal when it went through an overhaul following damage incurred in late April, 1944. Dahlberg also flew another P-51B with the same name and similar markings.
 Throughout the year of fighting in northeastern Europe between D-Day and V-E
Day, the 354th FG maintained their reputation as the leading unit of
the 9th Air Force in air combat, even with a two-month drought while
they were forcibly converted to P-47s during the Battle of the Bulge. Returning
to Mustangs in February 1945, they resumed cutting a swathe through what was
left of the Luftwaffe. May 8, 1945, found the Pioneers at R-45 outside Ansbach,
Germany. Their record during the war was unmatched. Flying 1,834 missions, the
354th produced 41 aces - the highest number of any American unit in
the ETO - and destroyed 701 German aircraft, making the 354th the
highest-scoring USAAF unit of World War II for air-to-air victories. This came
at a cost of 187 pilots killed or missing in action - if one considers that the
standard assignment of pilots to a fighter group was 48, this is roughly a 400%
casualty rate over 17 months, just in killed and missing, not counting wounded.
Those who said the fighter pilots had it “easy” during the Second World War
don’t know what they’re talking about.
Throughout the year of fighting in northeastern Europe between D-Day and V-E
Day, the 354th FG maintained their reputation as the leading unit of
the 9th Air Force in air combat, even with a two-month drought while
they were forcibly converted to P-47s during the Battle of the Bulge. Returning
to Mustangs in February 1945, they resumed cutting a swathe through what was
left of the Luftwaffe. May 8, 1945, found the Pioneers at R-45 outside Ansbach,
Germany. Their record during the war was unmatched. Flying 1,834 missions, the
354th produced 41 aces - the highest number of any American unit in
the ETO - and destroyed 701 German aircraft, making the 354th the
highest-scoring USAAF unit of World War II for air-to-air victories. This came
at a cost of 187 pilots killed or missing in action - if one considers that the
standard assignment of pilots to a fighter group was 48, this is roughly a 400%
casualty rate over 17 months, just in killed and missing, not counting wounded.
Those who said the fighter pilots had it “easy” during the Second World War
don’t know what they’re talking about.
The 353rd Fighter Squadron was the top-ranked unit inside the group with a total 289.5 kills (which included 13 on the P-47), with a total of 84 pilots scoring at least one victory. For comparison, the next two top-ranked squadrons in the ETO were the 357th Fighter Group’s 364th Fighter Squadron with 212 victories by 70 pilots and the 352nd Fighter Group’s 487th Fighter Squadron with 206 victories by 62 pilots.
It was this writer’s privilege to personally know two of these outstanding pilots, Richard Turner and Bruce Carr, both of whom lived in Southern California and were active supporters of The Air Museum, Planes of Fame, at Chino. Their deaths are still lamented.
| THE KIT |
One can read several reviews here at Modeling Madness of the Tamiya P-51. In the 12 years it has been on the market, I doubt there is a modeler who hasn’t taken a peek in the box and doesn’t know what’s there.
| CONSTRUCTION |
I was moved to do this article after looking at the latest go-round at That Other Place of modeler’s work, this being displays of the P-51 Mustang. It always amazes me that the P-51 - which has to be one of the most-built models there is - must also qualify as the model most likely to be built wrong. From canopies sliding up into space on P-51Ds to landing gear pointing every direction but right, modelers seem to find a myriad of ways to screw the pooch. This article attempts to explain how to build what I have always thought of as a relatively “fool-proof” model correctly.
For a modeler building Mustangs in 1/48, the Gold Standard is the P-51B and P-51D produced by Tamiya. The kits are accurate in outline, and so outstandingly well designed that a modeler has to actively do something wrong to end up with a bad model.
For those of us who like building Mustangs, a very good alternative to the increasingly-expensive Tamiya kits (I have seen the price rise from an MSRP of US$26.00 to US$32.00 recently) is the ICM release of the “Mustang Mk. IV” and “Mustang Mk. III” kits, which can still be found at dealer’s tables and in hobby shops, despite ICM having gone out of business a few years back. These are so close to the Tamiya kit that the major parts are interchangeable; a lawsuit over infringement of copyright was avoided by basing the cockpits of both on the Accurate Miniatures P-51A kit, which is completely inaccurate for either.
 Additionally, both kits provide only the cuffed Hamilton-Standard or the
Korean-era Aeroproducts prop blades - fortunately, the Hamilton-Standard is
correct for both. Also, both kits have the same outer landing gear doors, which
are only right for the P-51D; fortunately, this is one of those things
99.9999999999% of us won’t notice at a distance further than 6 inches, and it
will be completely unnoticed if you attach drop tanks. Both kits also only have
the 75-gallon metal tanks. But at a price of around US$10 or less, they are
such a good value that any modeler who likes P-51s should just grab them
whenever you find them.
Additionally, both kits provide only the cuffed Hamilton-Standard or the
Korean-era Aeroproducts prop blades - fortunately, the Hamilton-Standard is
correct for both. Also, both kits have the same outer landing gear doors, which
are only right for the P-51D; fortunately, this is one of those things
99.9999999999% of us won’t notice at a distance further than 6 inches, and it
will be completely unnoticed if you attach drop tanks. Both kits also only have
the 75-gallon metal tanks. But at a price of around US$10 or less, they are
such a good value that any modeler who likes P-51s should just grab them
whenever you find them.
Built-up, the ICM kits are almost indistinguishable from the Tamiya original. The one place I find I can always spot an ICM kit is in the fact that the flaps are uniformly “short shot” with a bit of a “sag” in the lower surface of the flap. With the flap lowered, 98% of viewers will not notice this, but the analists among us will want to fill that in, sand it smooth and spend some extra time rescribing the engraved rivet detail there.
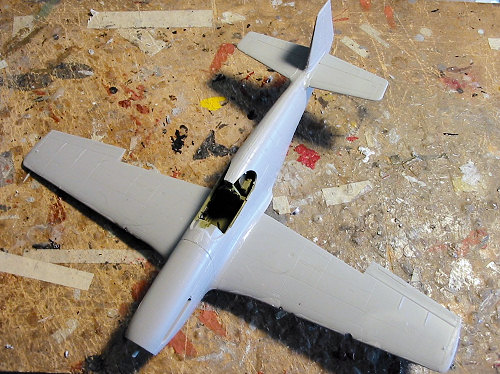
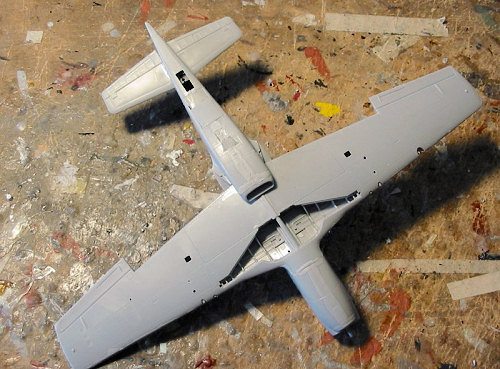
The major shortcoming of the kit - regardless of manufacturer - is the cockpit. The big problem for the Tamiya P-51B is that they failed to get the fact that this Mustang did not use the upper wing surface as the cockpit floor, as was the case with the Allison-powered aircraft. While - in the Tamiya version - the kit supplied cockpit will be very acceptable given the limited ability to see everything in the final result, there are good resin cockpits with the correct flat floor and correct depth of the cockpit available. Aires makes a P-51B cockpit that is a bit pricey but very accurate. I personally have only ever made one P-51B with a resin cockpit.
That
said, these resin cockpits are also the source of one of the biggest mistakes a
modeler can make in building the kit - and when it comes to the point one
realizes they have made the mistake, it is permanently un-correctable. This is
a result of the kit design, with the one-piece lower wing. When you use one of
these cockpits, it is absolutely essential that you thin down the sides
of the plastic fuselage halves in the area of the cockpit by at least half, and
that you sand down the resin cockpit interior walls till they are thin enough
that you can see light through them. If you don’t, the result will be that
after you fit the resin cockpit inside, the fuselage will be just a little bit
wide - when you then attach the wing sub-assembly, the wing will bend down to
widen the upper attachment area and fit the fuselage. This is by so small an
amount that you will not notice any difficulty assembling the wing to the
fuselage. You’ll know you have made the mistake when you look at your model and
realize the wing has either zero dihedral or a slight anhedral, viewed head-on.
Like I said, at that point, you aren’t going to be pulling the wing off the
fuselage, pulling the fuselage halves apart and scraping off that nice resin
cockpit you glued in place with cyanoacrylate glue. If you take the time in
 preparation to thin down the fuselage sides, thin down the cockpit walls, and
test fit everything beforehand, you’ll have a really good-looking model.
preparation to thin down the fuselage sides, thin down the cockpit walls, and
test fit everything beforehand, you’ll have a really good-looking model.
Another item I highly recommend are the Squadron/Falcon vacuform canopies. Be sure to get the ones that are listed for the Tamiya kit, or they will not fit. The P-51B canopy has both the “coffin lid” and Malcolm hood canopies, with the Malcolm hood being so clear when dipped in Future it can be posed closed and still allow you to see the cockpit detail.
As regards markings, I think the P-51 is only beaten for aftermarket decals by the Fw-190 and Bf-109. A huge number of sheets have been made over the years by SuperScale, MicroScale, Aeromaster, Eagle Strike, and Cutting Edge, not to mention smaller companies. Many of these sheets are no longer in production, but the enterprising modeler can still find them at shops, swap meets, and model shows, not to mention advertising for a sheet at the swap sites on the internet. Pretty much every well-known P-51B, C or D has been done on at least one sheet at some time. There are so many possibilities a modeler could easily spend the rest of their career building differently-marked Mustangs without running out of subject matter.
General Assembly Notes:
There are a number of ways a modeler can screw up this otherwise-easy-to-assemble kit. If you follow these points, you will miss all of them.
In addition to the above-mentioned Major Mistake one can do when installing a resin cockpit, the single most-common mistake modelers make when building a P-51 is to attach the landing gear incorrectly. Mustang gear legs DO NOT stick down straight from the wheel well!!! This is an easy mistake to make, even moreso when the best way to attach the gear is to build it as a sub-assembly of gear leg, wheel and gear door before attaching it. Here is the way to know you have the gear in the right position:
Attach the gear. Look down at the model from directly above. The gear is in correct alignment when you can just see the entire axle of the main gear ahead of the leading edge of the wing. A simple trick and proof there are no “secrets” in modeling.
That said, there are some “areas of controversy” that could be listed among the top ten “how do I do this?” questions one reads at any scale modeling internet discussion group. Here are some answers. They are not “definitive,” but if you follow them you are 99% likely to have created an “accurate model”.
Wheel wells: when all P-51s - from the A onward - came out of the factory, the wheel wells, the inside of the wheel well doors, the gear leg and the wheel hub, were all painted with aluminum lacquer. The main wing spar - which forms the rear “bulkhead” of the wheel well - was painted yellow zinc chromate. As a matter of fact, the rear wall of the Mustang wheel well is the main spar, even in the area where the lower wing surface comes forward. This has been universally done by all model companies as a wall that comes forward. The truly anal among you will want to cut that out and scratchbuild the area, despite the fact that 99.9999999999% of those who ever look at your model will not look in that area, let alone know that fact if they do.
Yes, some P-51s had zinc chromate wheel wells - but all evidence is this was either an “in the field” bit of work on a repaired airplane, or the result of a postwar IRAN rebuild.
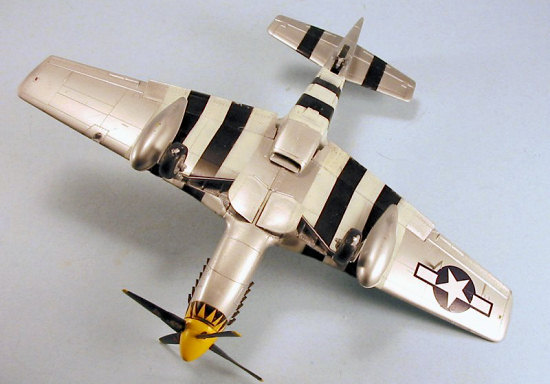
Wheel doors: the Mustang was designed so that the wheel doors are up when the engine is running, so as not to block air to the radiator and overheat the engine. When the airplane was switched off, if the hydraulic pressure system wasn’t relieved, the main wheel doors would remain in the “up” position and gradually “creep down” - with a differential “creep” between doors. If the hydraulic pressure system was relieved, then the doors would come down all the way. Myself, I have come to like attaching the doors at the “differential creep” just because they then look different and some idiot will come along and tell me “you did it wrong” at which point I get to tell him he doesn’t know as much as he thinks he does. If you are someone for whom a collection of chrome-plated plastic pots on your mantel is important, just assemble the gear doors all the way down, the way “everyone” knows is “right.”
Flaps - up or down? Again, if the hydraulic system is unrelieved, the flaps
will stay up, and eventually “creep down” like the main gear doors. If the
system is relieved, the flaps come down all the way, about 45 degrees. Both
Tamiya kits provide separate  flaps, and they are much easier to install down
than up, though you can do either. The Tamiya kits have tabs on the flaps that
insure they are installed in the “full down” position, while those for the ICM
kits do not have these; if you want to do “differential creep” for the gear
doors, and you’re building the ICM kit, then it is easy to assemble the tabless
flaps without worrying about getting the absolutely-right angle, since you can
say they “crept down.”
flaps, and they are much easier to install down
than up, though you can do either. The Tamiya kits have tabs on the flaps that
insure they are installed in the “full down” position, while those for the ICM
kits do not have these; if you want to do “differential creep” for the gear
doors, and you’re building the ICM kit, then it is easy to assemble the tabless
flaps without worrying about getting the absolutely-right angle, since you can
say they “crept down.”
Past all this detail worry, building the models - whether they are from Tamiya or ICM - is really easy. A modeler who builds the Tamiya kits out of the box is guaranteed a very acceptable result.
Finishing a P-51:
Many modelers fail to consider the fact that they are indeed creating a “work of art” with their model. Any work of art tells a story, one way or another. A model is commonly considered “representational art,” i.e., the creator is attempting to portray a particular moment in time for a particular thing - in this case, a representation of a particular airplane at a particular moment in its career.
As with everything else in modeling, getting this right involves research, and as with nearly every other failure in creating a successful model, the cause of the failure can be ascribed to “failure to do proper research.”
If you’re visiting this site, you are a “historian” of one sort or another. You are interested in the history of the airplane you want to model, in the events that the real original participated in, and the people who flew it. You need to do your research, as much as you would if you were Robert Taylor creating one of his true “works of art”.
Research for a model means not only checking the history of the particular airplane to ensure you have the right markings, but research that lets you come to understand the environment in which the plane operated so you can make all the rest of it over and beyond the markings “look right,” to understand its “world.”
Since this article is concerned with an airplanes that operated in England and Northwestern Europe, I’m going to give you a short cut in your research by providing some things to consider:
For
those Americans who haven’t been to Europe, the place is cloudy - rain and “bad
weather” are common (so long as the Gulf Stream keeps working - if it ever
changes due to climate change, the place will end up looking like Canada around
Hudson’s Bay). What this means is, an airplane sitting on the ground is not
going to be subject to sun-fading of its paint the way, say, a Corsair sitting
in its hardstand at Piva-1 on Bougainville would have been. As mentioned above,
pilots frequently had to take off and fly on instruments through several
thousand feet of cloud before they broke out “on top” in the sunlight. It was
commonly said by American pilots in the ETO, “Find the biggest cloud in Europe,
and England will be right under it.” Sunlight at 25,000 feet is different from
that at ground-level - it has a higher ultraviolet content, which means that the
paint on the airplane will fade toward the purple region of the spectrum.
An easy way to get this is to lighten your primary color with a tiny bit of
“Violet” paint, accompanied by some “blue-grey” paint color. The longer
 your original airplane survived
to fly missions, the more this will be apparent. Also, if you are doing
the airplane early in its career, then this effect will not be so strong.
your original airplane survived
to fly missions, the more this will be apparent. Also, if you are doing
the airplane early in its career, then this effect will not be so strong.
Another thing - look where it fades. Hold a model under your workbench lamp and take the time to really look at where the light hits it. Horizontal surfaces, like upper surfaces of wings and stabilizers, get more; upper surfaces of fuselages get more than side surfaces and lower side surfaces get less than upper side surfaces; vertical surfaces get less than upper surfaces, more like side surfaces; surfaces in the shade (like below the tail” don’t get light at all. Consider this when you think about fading the paint on your model. If you get close, you will have a visually-interesting model - there is nothing more boring than monochromatic surfaces! And as always with any artwork, Aristotle’s warning to writers in “The Poetics” holds true: LESS IS MORE! An overdone model looks just flat-out ridiculous. However, “overdone” is a relative term. “Overdone” for a Mustang in England might be “underdone” for a Corsair in the Solomons.
Trust me here - this is not some terrible thing you have to worry about with your model. It’s fun to think this stuff out beforehand, and it will increase your knowledge of the history that interests you. And it will result in a really cool model.
For visual research, I highly recommend any of the “World War II In Color” books by the late Jeff Ethell. Jeff had the best collection of World War II color photography of any historical researcher. The best of the bunch for our requirements is “Fighter Command,” published by Motorbooks International. Just look at the pictures, concentrate on seeing what’s there - how the paint fades, where it fades, etc. Once you know this stuff, it’s easy to turn out superior models as a matter of course (and if no one else thinks they’re superior, they’ll certainly make you happy - and that’s what it’s really all about here).
Most of the time, when I build a Malcolm-hood P-51B, I do it with the canopy closed - I think it looks better that way, and the Malcolm “bubble” allows one to see all of the cockpit. However, I always do that when I am using a beautiful spotlessly-clear Falcon vacuform canopy, which wasn’t available for this model. For “Shillelagh,” I vacuformed a Malcolm hood with my trusty Mattel from the kit part; while it was clear, it wasn’t as clear as a Falcon canopy, so I attached it in the open position; this way, the casual viewer doesn’t see the visual distortion in the vacuformed canopy. Also, you will notice that the main wheel doors are not “uniform” in their drop - this represents how the wheel doors look when they “droop” from lack of hydraulic pressure but were not actually dropped when the aircraft was shut down.
| COLORS & MARKINGS |
Painting:
As
regards the markings, I have only ever used decals for D-Day stripes for one
Mustang. I paint the stripes before applying the natural metal finish. I start
with black - applied liberally to the area where the stripes will be - then mask
it off and do the white stripes with very thin paint; the result is the white
looks “distressed” which gives an approximation of “hastily-applied” D-Day
stripes. For those of you who haven’t done a D-Day striped model, single-engine
fighters like the Mustang had stripes that were
 18 inches wide, which translates
to 3/8-inch in 1/48 scale. I use drafting tape, which is pretty
commonly-available at office supply and artist’s supply stores - this is a
low-tack tape that will not pull off the paint underneath when you remove it
(assuming you didn’t get antsy and put the tape on top of paint that wasn’t
completely dry). For the complex shape of the radiator housing, I apply masking
tape on the fuselage sides in the correct dimension, then use thinner pieces of
tape to bend over the lower surface and create the outline, then “fill in” the
masking with slightly-wider pieces of tape.
18 inches wide, which translates
to 3/8-inch in 1/48 scale. I use drafting tape, which is pretty
commonly-available at office supply and artist’s supply stores - this is a
low-tack tape that will not pull off the paint underneath when you remove it
(assuming you didn’t get antsy and put the tape on top of paint that wasn’t
completely dry). For the complex shape of the radiator housing, I apply masking
tape on the fuselage sides in the correct dimension, then use thinner pieces of
tape to bend over the lower surface and create the outline, then “fill in” the
masking with slightly-wider pieces of tape.
I also masked off the nose - which was painted white first which I always use as a base coat for yellow - and the anti-glare panel, which was done with Gunze-Sangyo “Olive Drab” and then masked off. The black ID stripes on the horizontal stabilizer - which are 15 inches wide - were also painted and masked first.
As regards the natural metal finish, I use SNJ Aluminum as my base coat. It is a reliable paint that will never “eat” your model, as Alclad II metalizer paint will if put on too heavy and without a primer. It dries to the touch in about 20 minutes and can be masked over with sticky regular masking tape (if you’re uninformed enough to do that) without risk of being pulled up when you unmask the paint. For a P-51 in invasion stripes, the only other colors to apply are a darker metal color for the two panels immediately above/below the exhaust stacks, for which I generally use Model Master Metalizer “Stainless Steel”, and the fabric control surfaces - for which I use Model Master Metalizer “Aluminum non-buffing” followed by sealer to create an “aluminum dope” look.
Since the airplane was based in France, flying several missions a day, and cared for by crews that didn’t have the time to give the airplane the care they had provided in England, the exhaust staining and gunfire stains are more extensive.
| CONCLUSIONS |
It’s really true, as Hemingway said of cats, that “one Mustang model leads to another.” With the excellent Tamiya kits and the mass of aftermarket detail sets such as cockpits and decals, a modeler can make as many models as they want of the premiere fighter of the Second World War and not grow tired of them.
Kit courtesy of my wallet.
January 2007
If you would like your product reviewed fairly and quickly by a site that has nearly 350,000 visitors a month, please contact me or see other details in the Note to Contributors.