ICM 1/48 LaGG-3 series 1-4
| KIT #: | 48091 |
| PRICE: | $26.00 MSRP |
| DECALS: | Four options |
| REVIEWER: | Tom Cleaver |
| NOTES: |
| HISTORY |
While the Red Air Force had fielded
the most advanced fighter in the world in 1934 when the I-16 joined its first
operational unit, it was clear by 1939 that Soviet fighter aircraft had fallen
behind the international standard.
While Stalin believed that Hitler would live up to the
1939 Non-Aggression Pact, it was clear that if he did not, the V-VS would be in
need of fighters that could successfully oppose the Luftwaffe.
 Unfortunately, the Soviet aviation
industry was not up to Western standards.
Aluminum was in short supply and so it was determined
that any new fighters would have to be made of wood.
Additionally, the only fighter engine available was the
M-105, a license-built version of the Hispano-Suiza 12Y series, which was not
competitive with either the German DB-601 or the British Merlin, since it only
provided 1,000 h.p.
Unfortunately, the Soviet aviation
industry was not up to Western standards.
Aluminum was in short supply and so it was determined
that any new fighters would have to be made of wood.
Additionally, the only fighter engine available was the
M-105, a license-built version of the Hispano-Suiza 12Y series, which was not
competitive with either the German DB-601 or the British Merlin, since it only
provided 1,000 h.p.
Three designs were created by
different design bureaus in 1940, and approved for production.
Given that time was of the essence, none of them had
been fully tested and modified in light of testing before being ordered into
mass production.
These were the Mikoyan Gurevich MiG-1, the Yakovlev Yak-1, and
the Lavochkin-Gorbunov-Goudkov LaGG-1.
Only the Yak-1 was good enough in its initial form to
continue into mass production, while both the MiG and the LaGG fighters were
found so deficient that they were forced into further development, eventually
emerging as the MiG-3 and the LaGG-3.
The LaGG-3 suffered from a
too-heavy airframe, with its proposed armament of two 50-caliber Berezin machine
guns and a 20mm ShVAK cannon firing through the propeller hub.
In an effort to drop the weight, various factories
engaged in production of the fighter produced aircraft armed with 1 cannon and 2
7.62mm ShKAS machine guns, 1 Berezin replacing the 20mm cannon
 with two
ShKAS weapons, and 1 ShVAK cannon and one Berezin 50-caliber weapon.
Eventually, the LaGG-3 would see 66 different sub-types
of the 6,258 that were built in the never-ending struggle to drop enough weight
to remain competitive.
The one thing that could be said about the LaGG was that
its heavier structure made it more resistant to enemy fire, but the opinion of
the pilots can be seen in their belief that LaGG stood for
Lakirovanny Garantirovanny Grob ("guaranteed varnished
coffin"). Throughout its production life, the wood-laminate construction
continued to be of poor quality and the airplane did not stand up to field
service as did the Yak series. Some aircraft supplied to the front line were up
to 40 km/h (25 mph) slower than they should have been and some were not
airworthy.
with two
ShKAS weapons, and 1 ShVAK cannon and one Berezin 50-caliber weapon.
Eventually, the LaGG-3 would see 66 different sub-types
of the 6,258 that were built in the never-ending struggle to drop enough weight
to remain competitive.
The one thing that could be said about the LaGG was that
its heavier structure made it more resistant to enemy fire, but the opinion of
the pilots can be seen in their belief that LaGG stood for
Lakirovanny Garantirovanny Grob ("guaranteed varnished
coffin"). Throughout its production life, the wood-laminate construction
continued to be of poor quality and the airplane did not stand up to field
service as did the Yak series. Some aircraft supplied to the front line were up
to 40 km/h (25 mph) slower than they should have been and some were not
airworthy.
While the LaGG-3 was never “good enough,” it was close to the Bf-109F in overall performance and was superior in maneuverability. Experiments during 1942 in mating a more powerful radial engine to the basic airframe resulted in the La-5 series, which were among the best Soviet fighters of the war.
| THE KIT |
 Scott Van Aken provided an in-depth
first look.
Suffice it to say that further detail examination reveals that
while the kit is supposed to be able to be built as any of the first 4
sub-types, out of the box it is a mish-mash of the Series 1 and Series 4
sub-types, with the exhaust plating on the fuselage of the Series 1 and the wing
intakes of the Series 4.
That said, the kit provides the raw
material to build a very nice model out of the box, and a modeler who is anal
about the small details should be able to make a fix with “some modeling skill
required.”
While there are detail parts
provided in the kit for later versions, the wing is definitely an early series
without the leading edge slats, and the fuselage is definitely early series.
Since the wing and fuselage are on
one sprue and the detail parts on the other, it is clear that ICM plans to
release further versions of the LaGG-3.
Scott Van Aken provided an in-depth
first look.
Suffice it to say that further detail examination reveals that
while the kit is supposed to be able to be built as any of the first 4
sub-types, out of the box it is a mish-mash of the Series 1 and Series 4
sub-types, with the exhaust plating on the fuselage of the Series 1 and the wing
intakes of the Series 4.
That said, the kit provides the raw
material to build a very nice model out of the box, and a modeler who is anal
about the small details should be able to make a fix with “some modeling skill
required.”
While there are detail parts
provided in the kit for later versions, the wing is definitely an early series
without the leading edge slats, and the fuselage is definitely early series.
Since the wing and fuselage are on
one sprue and the detail parts on the other, it is clear that ICM plans to
release further versions of the LaGG-3.
| CONSTRUCTION |
The kit is simple to assemble.
The only real problem I found was
trying to fit all the radiator gear into position and then get the wing to mate
to the fuselage correctly.
I realized that the offending part
- the rear radiator face - is not really visible when the
 model is
completed, and so I solved the problem by removing it.
Everything fit easily once that was
done.
The fuselage otherwise is simple,
and the detail provided for the cockpit is sufficient.
Other modelers have reported
problems using the full instrument panel decal sheet, but I used the decal with
provided only the instrument faces and had no trouble applying it and getting it
to sit down.
I used lead foil from a wine bottle
to make the Sutton-type seat harness, which was the only additional detail
needed.
The clear canopy parts were much
better once they had been dipped in Future.
model is
completed, and so I solved the problem by removing it.
Everything fit easily once that was
done.
The fuselage otherwise is simple,
and the detail provided for the cockpit is sufficient.
Other modelers have reported
problems using the full instrument panel decal sheet, but I used the decal with
provided only the instrument faces and had no trouble applying it and getting it
to sit down.
I used lead foil from a wine bottle
to make the Sutton-type seat harness, which was the only additional detail
needed.
The clear canopy parts were much
better once they had been dipped in Future.
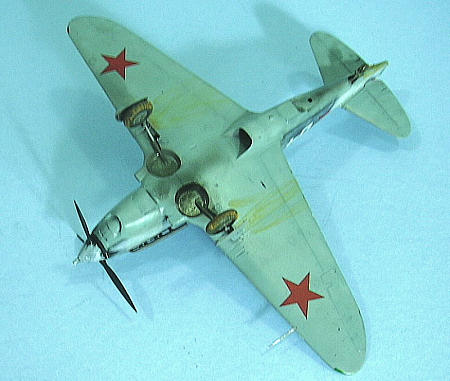
The only place where the kit was deficient was in the fact that the area around the wing fairing on the fuselage was short-shot, and the upper-wing/fuselage joint was in need of filling. I attached the wing, using rubber bands fore and aft to assure proper attachment to the fuselage, and another rubber band to assure the proper dihedral. Once that was all set up, I filled the gaps with cyanoacrylate glue, sanded smooth when dry, and then covered these joints and the fuselage center seam with Mr. Surfacer.
| COLORS AND MARKINGS |
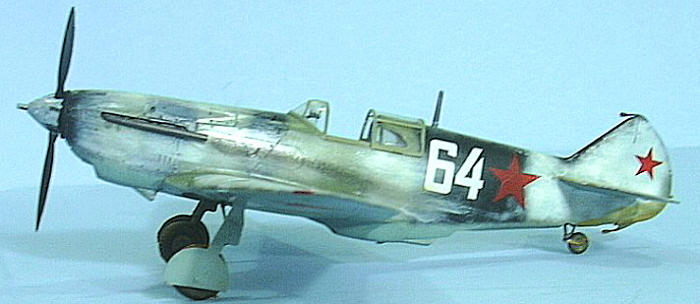
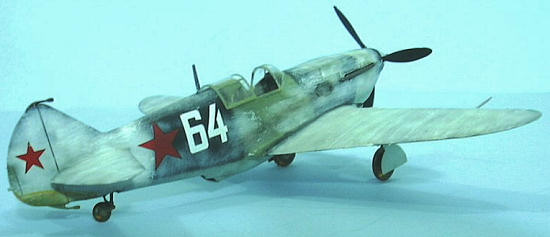
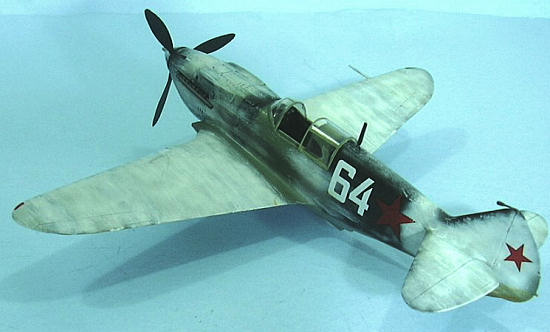
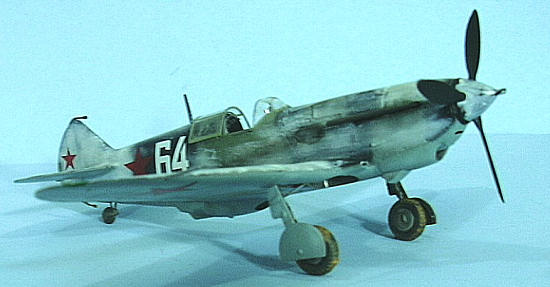
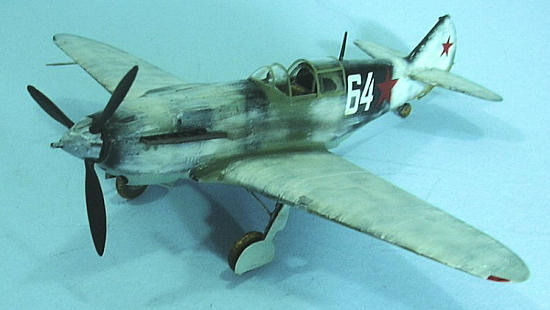
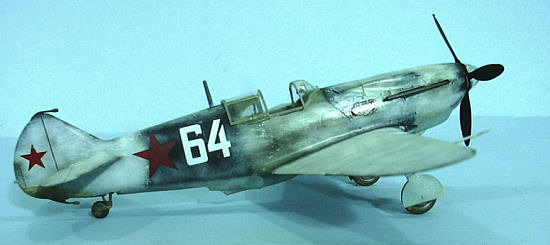 I decided to do the fourth option
for markings, a Series 4 in a ragged winter camo scheme.
I first applied the standard
camouflage, using Xtracrylix RLM65
Hellblau for the lower color, and
RLM83 Lichtgrun
and Night Black for the upper colors, which were all applied freehand.
I applied a thin coat of white to
the areas of winter camouflage, being sure it was thin enough to be able to see
the underlying scheme.
I then gave the model a coat of
Xtracrylix Gloss Varnish.
The decals are not great, but they
went down without problem under an application of Micro-Sol.
I decided to do the fourth option
for markings, a Series 4 in a ragged winter camo scheme.
I first applied the standard
camouflage, using Xtracrylix RLM65
Hellblau for the lower color, and
RLM83 Lichtgrun
and Night Black for the upper colors, which were all applied freehand.
I applied a thin coat of white to
the areas of winter camouflage, being sure it was thin enough to be able to see
the underlying scheme.
I then gave the model a coat of
Xtracrylix Gloss Varnish.
The decals are not great, but they
went down without problem under an application of Micro-Sol.
Once that was all set, I gave the model an overall coat of Xtracrylix Satin varnish. When that was dry, I applied a thinned coat of Xtracrylix White with a 1/8' wide flat-tip brush, which left brush strokes and allowed a “ragged” look to the “thin” areas of camouflage, which was done by dry-brushing. I finished off by applying exhaust stains with Tamiya “Smoke.”
| FINAL BITS |
I attached the main gear, the prop, and the exhaust stacks, then unmasked the canopy and attached the sliding section in the open position.
| CONCLUSIONS |
 While the LaGG-3 may have been a
dog, it was an important dog, and any collection of Soviet fighters from the
Second World War would be sadly lacking if it didn’t contain at least one of
these.
The ICM kit is light years better
than the old LTD kit Squadron produced 14 years ago, and is additionally better
than the South Front kit on matters of buildability and overall final look.
The kit is inexpensive, and a
modeler of average ability should be able to create a nice looking model in a
month of evenings away from the “honey-do’s” without a problem.
While the LaGG-3 may have been a
dog, it was an important dog, and any collection of Soviet fighters from the
Second World War would be sadly lacking if it didn’t contain at least one of
these.
The ICM kit is light years better
than the old LTD kit Squadron produced 14 years ago, and is additionally better
than the South Front kit on matters of buildability and overall final look.
The kit is inexpensive, and a
modeler of average ability should be able to create a nice looking model in a
month of evenings away from the “honey-do’s” without a problem.
November 2008
If you would like your product reviewed fairly and quickly, please contact the editor or see other details in the Note to Contributors.