
| KIT #: | 61099 |
| PRICE: | 4600 yen at www.hlj.com |
| DECALS: | Three options |
| REVIEWER: | Tom Cleaver |
| NOTES: |
| HISTORY |
Most of the Swordfish produced during the Second World War were constructed by Blackburn Aviation, including all Swordfish Mks. II and III. This situation must have felt good to Fairey Aviation - the company responsible for the original design - inasmuch as the two had been locked in competition throughout the 1920s and 1930s as suppliers of aircraft to the Fleet Air Arm. Blackburn producing the Swordfish would have been the equivalent of Chance Vought having to produce Grumman Hellcats because they had no Corsair. The Swordfish built by Blackburn were nicknamed "Blackfish."
The ungainly-looking Swordfish - a biplane that was obsolete at the time of its first flight as a prototype in 1934 - was in fact the most successful naval strike aircraft of the Second World War. The strike against the Italian fleet at Taranto inspired the Japanese attack at Pearl Harbor, while the "Bismarck" pursuit, and "The Channel Dash" are epic actions, as a result of which the Swordfish passed into legend.
 What is less well-known but perhaps more important than all of these epic
battles combined was the day-to-day work of the Swordfish during the Battle of
the Atlantic. From 1940 to 1945, the Fleet Air Arm sank 18 Axis submarines and
shared 16 other sinkings with escort vessels or RAF units. The Swordfish was
responsible for 15 of the 18 solo kills, and participated in 10 of the 16
shared sinkings - and it didn't even enter the Battle of the Atlantic until
February 1943! That is quite a record. Even more important than the submarines
sunk were the merchant ships successfully escorted across the Atlantic. The
Swordfish was like the loyal shepherd’s dog that protects the flock not by
killing the wolves that follow the defenseless sheep, but by keeping them at
bay.
What is less well-known but perhaps more important than all of these epic
battles combined was the day-to-day work of the Swordfish during the Battle of
the Atlantic. From 1940 to 1945, the Fleet Air Arm sank 18 Axis submarines and
shared 16 other sinkings with escort vessels or RAF units. The Swordfish was
responsible for 15 of the 18 solo kills, and participated in 10 of the 16
shared sinkings - and it didn't even enter the Battle of the Atlantic until
February 1943! That is quite a record. Even more important than the submarines
sunk were the merchant ships successfully escorted across the Atlantic. The
Swordfish was like the loyal shepherd’s dog that protects the flock not by
killing the wolves that follow the defenseless sheep, but by keeping them at
bay.
The Swordfish first went aboard the escort carrier H.M.S. "Biter" in February 1943. Later that year the first MAC ships - which were converted grain ships or tankers that were even smaller than the CVEs, with no below-decks hangar space to get the 4-6 aircraft they carried out of the weather for maintenance or protection - began operations. The Swordfish was famous for being able to stagger off these decks in weather conditions that kept other aircraft tied down for safety, and for bringing its crews back to small, short decks pitching through 20-30 feet while rolling 10-15 degrees from vertical to either side, in North Atlantic storms where the freezing level was at 500 feet. Escorting Archangel convoy RA-58 in April 1944, Swordfish of 819 Squadron flew from H.M.S. "Activity," while Avengers of 846 Squadron - the premier F.A.A. Avenger sub-hunting squadron - flew from H.M.S. "Tracker." The Swordfish flew every day of the trip, even on days when 846's Avengers couldn't even be brought on deck to attempt a launch.
The Swordfish that accomplished all this was the Mk.II, a progressive modification of the original Mk.I, that was primarily distinguishable by a slightly more powerful engine and its strengthened lower wings, the lower surfaces of which were metal covered. These wings were fitted to the Swordfish starting with W5836, which also utilized the more powerful Pegasus 30 engine, for the remainder of the Blackburn production run. Late-production Swordfish IIs and all Swordfish IIIs are distinguishable by an enlarged oil cooler on the starboard forward fuselage for this engine.
 The aircraft had been experimentally equipped with radar in 1941. By 1943, all
Swordfish II carried early ASV radar, with the Mk.III - which entered service in
late 1943 - carrying centimetric air-to-surface radar in a radome between the
landing gear.
The aircraft had been experimentally equipped with radar in 1941. By 1943, all
Swordfish II carried early ASV radar, with the Mk.III - which entered service in
late 1943 - carrying centimetric air-to-surface radar in a radome between the
landing gear.
The Swordfish first successfully fired rockets during tests in October, 1942. The Swordfish took rockets into action in 1943, with the first successful use of rockets against a U-boat occurring on May 23, 1943, when a Swordfish of 811 Squadron flown by Sub-Lt. Horrocks pierced the hull of U-752, which subsequently sank after further attacks by Wildcats and a bomb-carrying Swordfish. The last contact between a Swordfish and a U-boat occurred April 20, 1945.
The Model:
Back in 2002, I built a Swordfish II from the Swordfish I kit, which was a very simple conversion that used the parts that were already there for the Swordfish II in the box, with a few add-ons from the spares box. At the conclusion of that review, I asked “When will Tamiya release their own version of the Swordfish II?” It turns out that it took five years for this to happen, with the Swordfish II being released this past February in a limited production run.
 Essentially, the kit is the same as the earlier kit, other than for lower wing
parts that do not have fabric effect since they are metal-covered, and with an
additional sprue that includes the larger oil cooler, the ASV antennas for the
interplane struts, and other antennas associated with the type. Interestingly,
the kit does not include the radar gear for the cockpit, so the fastidious
modeler who wants technical accuracy will either have to use some part from the
spares box, as I did with my earlier conversion, or a scratchbuilt part. I left
off doing that for this model.
Essentially, the kit is the same as the earlier kit, other than for lower wing
parts that do not have fabric effect since they are metal-covered, and with an
additional sprue that includes the larger oil cooler, the ASV antennas for the
interplane struts, and other antennas associated with the type. Interestingly,
the kit does not include the radar gear for the cockpit, so the fastidious
modeler who wants technical accuracy will either have to use some part from the
spares box, as I did with my earlier conversion, or a scratchbuilt part. I left
off doing that for this model.
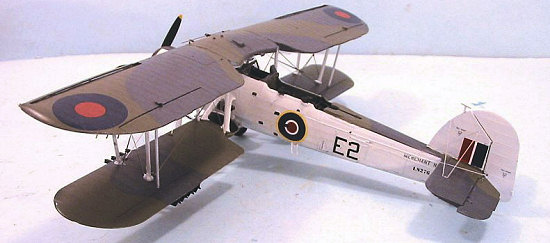
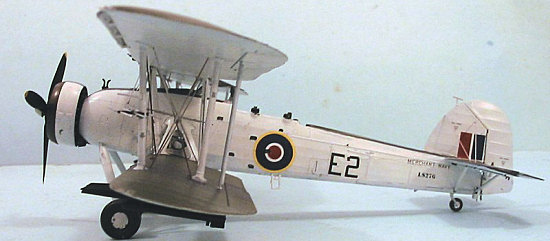
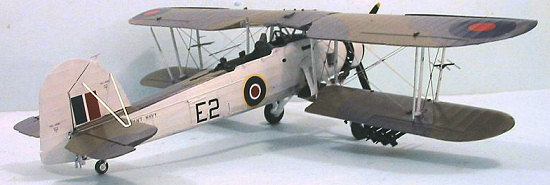
Decals are included for HS164 "2F", a Swordfish II in the standard Extra Dark Sea Grey/Dark Slate Grey/Sky camouflage flown by 810 Squadron, a training squadron in Madagascar, and two Atlantic-scheme Swordfish: LS276 "E2" of 836 Sq., assigned to the MAC-Ship Amastra, and HS158 "B" of 816 Sq. aboard HMS Tracker in 1943.
| CONSTRUCTION |
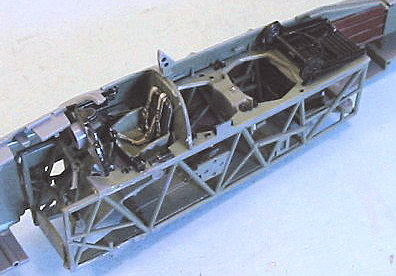
 The Swordfish is one of the best-designed plastic kits ever produced, and all a
modeler needs to do to insure a beautiful result is follow the instructions.
The one place where problems may ensue is the attachment of the cockpit interior
to the right side fuselage part. Be very careful here in insuring the
sub-assembly is aligned perfectly. If you do so, the fus
The Swordfish is one of the best-designed plastic kits ever produced, and all a
modeler needs to do to insure a beautiful result is follow the instructions.
The one place where problems may ensue is the attachment of the cockpit interior
to the right side fuselage part. Be very careful here in insuring the
sub-assembly is aligned perfectly. If you do so, the fus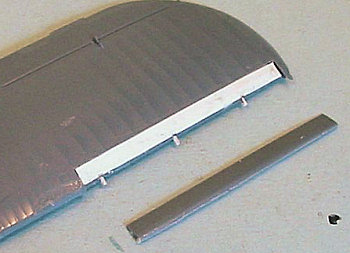 elage will snap together
so good it won’t really need any Mr. Surfacer or other filler on the
centerline.
elage will snap together
so good it won’t really need any Mr. Surfacer or other filler on the
centerline.
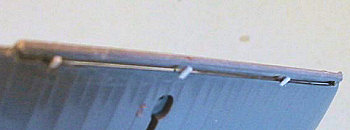
My
one deviation from an out of the box build was to cut the leading edge slats off
the upper wing and then attach them in the open position, whicht was the way
they were on all Swordfish sitting on the ground. This is easy. You cut off the
parts, glue upper and lower parts together, then sand the interior of the slat
so
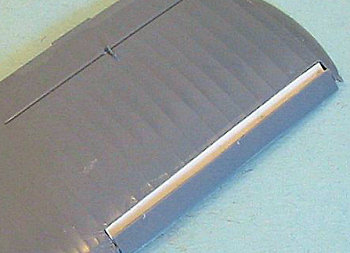 that it has a sharp trailing edge. Evergreen sheet can be used to fill in the
gap in the wing, and can also be used for the three extension arms. Why it is
that Tamiya never did this to the kit, when they did do it to the Bf-109E kits,
and the slats on the Swordfish are no more difficult to mold separately and for
a modeler to assemble than they are for that kit, is beyond me. But it’s an
easy fix and the kit looks far more accurate once assembled with the slats open.
that it has a sharp trailing edge. Evergreen sheet can be used to fill in the
gap in the wing, and can also be used for the three extension arms. Why it is
that Tamiya never did this to the kit, when they did do it to the Bf-109E kits,
and the slats on the Swordfish are no more difficult to mold separately and for
a modeler to assemble than they are for that kit, is beyond me. But it’s an
easy fix and the kit looks far more accurate once assembled with the slats open.
 Once the fuselage was assembled with the tail surfaces attached and the lower
wing center section attached, it was time to paint the model.
Once the fuselage was assembled with the tail surfaces attached and the lower
wing center section attached, it was time to paint the model.
As
a side note, if you choose to build HS158 “B” of 816 squadron, there are no
flare chutes under the fuselage. This is a misreading of a famous photograph of
this airplane by Tamiya. What they mistook for flare chutes are actually
 the
tails of the rockets on the rails of the left wing, which is still folded back
in the photo. No Swordfish ever carried flare chutes like these.
the
tails of the rockets on the rails of the left wing, which is still folded back
in the photo. No Swordfish ever carried flare chutes like these.
I managed to drop one of the racks for the flares and find it the hard way (Crrruuunnnch!), so I decided that this model would be of a Swordfish without those racks, since photos show that not all carried them, and those that did didn’t always carry them.
| COLORS & MARKINGS |
 Painting:
The “Atlantic Scheme” with the fuselage sides, vertical fin and rudder, and lower surfaces of the wings and tail painted white appears from photos to have been done after the airplanes left the factory, with the white applied over the standard FAA camouflage. Since the kit is in grey plastic, I applied Xtracrylix White to these areas, without getting a uniform, fully opaque coat. Thus the darker color under the white can be “seen” to varying degrees. This has to be done subtly, and what you want is the finish you get just before you get full coverage airbrushing the white. I let that dry and then applied Xtracrylix Extra Dark Sea Grey and Dark Slate Grey, with a very little bit of lightening of each color for “post shading” once the main color was applied.
Decals:
When all that was dry, I applied the decals. I had decals for the 836 Squadron “Merchant Navy” Swordfish from the Xtradecals sheet I had used for my earlier Swordfish II, and used these since they were thinner than the Tamiya kit decals. There are also two now out of production Aeromaster sheets for the Swordfish that include Swordfish IIs in the Atlantic scheme.
| FINAL CONSTRUCTION |
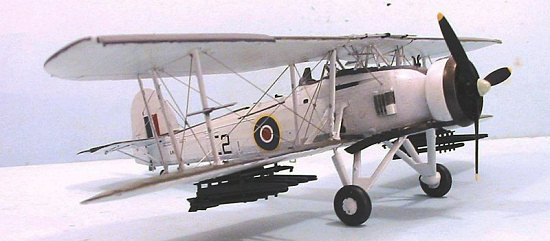
I assembled and attached the upper wing center section to the fuselage, and attached the photo-etch torpedo aiming sights. I then assembled the outer wings, and attached the photoetch rigging. Once these sub-assemblies were complete, I attached the wings to the rest of the model.
I then assembled and attached the rocket rails and bomb racks, and attached the propeller.
| CONCLUSIONS |
 There is no getting around the fact that the Swordfish was very far indeed from
being a beautiful biplane. However, it is living proof that beauty is as beauty
does. The Swordfish was one of four British aircraft in first line service in
1939 that were still in first-line service at the end of the war. It outlasted
its replacement and in many ways outperformed the Avenger, performing its tasks
under appalling conditions that no other airplane could have operated in. It
fully deserves its status as one of the truly legendary aircraft of the Second
World War. It’s nice that Tamiya’s kit is one of the best plastic model kits
ever made. You should definitely pick up the separate photoetch rigging set,
which is worth every penny and creates better, more accurate rigging than any
possible alternative. The Swordfish is a biplane that even those who cringe at
the very thought of building a biplane can complete without trouble.
There is no getting around the fact that the Swordfish was very far indeed from
being a beautiful biplane. However, it is living proof that beauty is as beauty
does. The Swordfish was one of four British aircraft in first line service in
1939 that were still in first-line service at the end of the war. It outlasted
its replacement and in many ways outperformed the Avenger, performing its tasks
under appalling conditions that no other airplane could have operated in. It
fully deserves its status as one of the truly legendary aircraft of the Second
World War. It’s nice that Tamiya’s kit is one of the best plastic model kits
ever made. You should definitely pick up the separate photoetch rigging set,
which is worth every penny and creates better, more accurate rigging than any
possible alternative. The Swordfish is a biplane that even those who cringe at
the very thought of building a biplane can complete without trouble.
Thanks to HobbyLink Japan for the review kit. Get yours at (really, really great) “Japanese prices” at www.hlj.com
June 2007
If you would like your product reviewed fairly and fairly quickly, please contact the editor or see other details in the Note to Contributors.