| KIT #: | ? |
| PRICE: | $109.95 |
| DECALS: | Two Options |
| REVIEWER: | Tom Cleaver |
| NOTES: |
| HISTORY |
Designed to a specification for a heavy bomber first issued in 1932, the first Wellington prototype flew in 1934. It was the second airplane to use the revolutionary geodetic construction system first created by Barnes Wallis for the R-100 airship in the early 1920s. This lightweight construction method made the resulting airplane extremely strong and resistant to structural damage, which was greatly appreciated by crews during the Second World War when the Wellington returned with battle damage that would have downed any other airplane. The geodetic construction allowed the weight of the airplane to grow from 21,000 pounds to 36,500 pounds with no major change in the basic airframe.
 William Green described the Wellington thus in his book “Famous Bombers of the
Second World War, Vol. 2":
William Green described the Wellington thus in his book “Famous Bombers of the
Second World War, Vol. 2":
“Few if any bombers of the Second World War enjoyed a longer or more distinguished operational career than the Vickers Wellington. Blooded in combat at the very outset of hostilities,
it carried the lion’s share of Bomber Command’s night bombing offensive until the operational debut of the four engined heavies and was still first-line equipment when the war ended. Indeed, such was the brilliant battle record of the Wellington that any tribute can be but a pale reflection of the distinctions that this remarkable warplane won for itself.”
The first bomber to carry power-operated gun turrets and prove their worth, the Wellington also proved that unescorted bombers could not survive in daylight against determined fighter opposition.
The two major sub-types of the Wellington were the Mk. IC and the Mk.III, though the Mk. X - a Mk.III with American Pratt and Whitney engines - was the type most-produced, with over 3,500 coming out of the factories between 1943 and the end of the war. Production from the three factories totaled 11,461,making the Wellington the most-produced single bomber type used by the RAF.
In addition to its outstanding work in the European Theatre, the Wellington served with distinction in the Middle East and the China-Burma-India Theatre. It also became a major workhorse for Coastal Command in the antisubmarine war during the Battle of the Atlantic.
2010 update. Reader Paul Long has added this information:
| THE KIT |
To my knowledge, there has never been a 1/48 Wellington released in any media before this kit from Trumpeter. The kit portrays the first major wartime version, the Mk. IC, and will be followed later this year by the Mk.III.
The kit has fourteen parts trees in light gray styrene and two trees in clear styrene. One fret of photo-etched parts provides the inner walls of the main wheel wells. White metal landing gear struts are provided for the main gear and the tail wheel. The wheel hubs are styrene, and the tires are rubber.
 The
kit provides a detailed interior that does not just include the cockpit, but the
whole interior, which will be very visible through the very clear windows along
the fuselage sides. A well-detailed bomb bay can put to use the three trees of
bombs that provide all of the early RAF bombs, including 2,000 lb AP, 1,000 lb
GP, 500 lb GP, 500 lb SAP, 250 lb SAP, 250 lb B, and 250 lb GP. The instructions
show seven different load options. There are 30 doors for the bomb bay if you
choose to display it open, though there is also the option of one single part to
close it up.
The
kit provides a detailed interior that does not just include the cockpit, but the
whole interior, which will be very visible through the very clear windows along
the fuselage sides. A well-detailed bomb bay can put to use the three trees of
bombs that provide all of the early RAF bombs, including 2,000 lb AP, 1,000 lb
GP, 500 lb GP, 500 lb SAP, 250 lb SAP, 250 lb B, and 250 lb GP. The instructions
show seven different load options. There are 30 doors for the bomb bay if you
choose to display it open, though there is also the option of one single part to
close it up.
As with other Trumpeter kits, the engines are super-detailed models on their own, in this case they are Pegasus XVIIIs, and the kit provides open or closed cowl flaps. If the flaps are opened, there is plenty of detail inside. Also, positionable flight control surfaces and landing flaps are provided.
The decals are the least part of the kit, being too bright in color, though one of the markings is for the 75 Squadron Wellington in which Sgt. J.A. Ward won the VC, the only one awarded a Wellington crewmember during the war. Fortunately, Xtradecal has released a very good sheet for the Wellington that has markings for three different aircraft in the correct colors and also provides information for the two different camouflage patterns used on the Wellington. The sheet is available now from Hannant’s and is highly recommended - I will be using it in the coming full-build review.
 Since the most noteworthy feature about the Wellington is the geodetic
construction, it is good that this lattice-type framework has been captured in
the kit. Some have complained that the surface detail of this
kit is vastly overdone, and have labeled it “unbuildable” as a result. The fact
is, it is overdone - personally, I wish the Trumpeter designers had had
the opportunity to look at the new Classic Airframes Anson when they were
creating this kit, since that kit has some of the more realistic fabric detail I
have seen recently. But why the muddlers have chosen now to complain about
“overdone detail” on plastic kits is beyond me, given the fact that
there is
no plastic model airplane kit that does not have overdone detail! The new
Eduard World War I models everyone lauds are among the worst offenders with
their overdone rib tapes, yet no one complains about them! If “overdone surface
detail” is a problem for you, find another hobby - you’re going to be
continually disappointed! If you don’t like the surface detail here, go buy one
of the many other 1/48 Wellington kits out there.
Since the most noteworthy feature about the Wellington is the geodetic
construction, it is good that this lattice-type framework has been captured in
the kit. Some have complained that the surface detail of this
kit is vastly overdone, and have labeled it “unbuildable” as a result. The fact
is, it is overdone - personally, I wish the Trumpeter designers had had
the opportunity to look at the new Classic Airframes Anson when they were
creating this kit, since that kit has some of the more realistic fabric detail I
have seen recently. But why the muddlers have chosen now to complain about
“overdone detail” on plastic kits is beyond me, given the fact that
there is
no plastic model airplane kit that does not have overdone detail! The new
Eduard World War I models everyone lauds are among the worst offenders with
their overdone rib tapes, yet no one complains about them! If “overdone surface
detail” is a problem for you, find another hobby - you’re going to be
continually disappointed! If you don’t like the surface detail here, go buy one
of the many other 1/48 Wellington kits out there.
Additionally, other “hex-spurts” have declared that Trumpeter got it wrong with the cockpit detail, since dual controls are provided. These highly-knowledgeable individuals have declared that Trumpeter must have followed the two surviving Wellingtons, which were used as trainers, where dual controls must have been added on at some point, since “all British bombers only ever had one pilot.” So please tell me, all you “hex-spurts,” what exactly was F/Sgt. J.A. Ward, RNZAF, doing back in 1941, when he won his Victoria Cross while filling the crew position of second pilot? In point of fact, only the Wellington I had a single pilot. Starting with the Wellington IA, the crew was increased from five to six, with the sixth crewman being the “second pilot,” a position also known as “co-pilot” in American parlance, and a crewmember who had controls to operate.
| CONSTRUCTION |
Overall, this kit is complex, but not really complicated. For me, two things were the greatest difficulty - protecting the machine guns in the turrets, and discovering that sometimes in the instructions when one is referred to the “E” sprue, the part will really be found on the “F” sprues. So, when you scratch your head and say “I can’t find that part,” look on the other sprues to correct the typo.
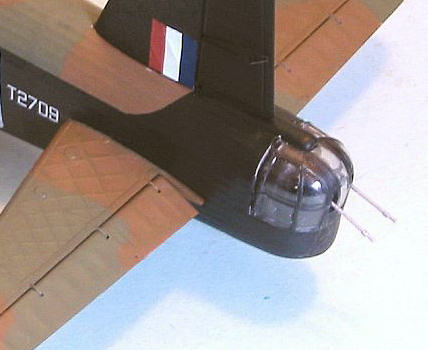 Due
to the construction design, you have to attach the turrets before closing up the
fuselage. If you mount the very nice petite 30-caliber machine guns per the
instructions, the life of those gun barrels will be measured in minutes and you
won’t get to a double-digit number before you swing the fuselage around and
whack those barrels right off. Fortunately, for me, I did this only to one
turret before discovering the solution, and was able to use the extra gun
barrels of the unused belly turret to save the day.
Due
to the construction design, you have to attach the turrets before closing up the
fuselage. If you mount the very nice petite 30-caliber machine guns per the
instructions, the life of those gun barrels will be measured in minutes and you
won’t get to a double-digit number before you swing the fuselage around and
whack those barrels right off. Fortunately, for me, I did this only to one
turret before discovering the solution, and was able to use the extra gun
barrels of the unused belly turret to save the day.
The solution is to trim off the connecting pins on the guns, and be sure they slide into position in the assembled turret structure, then set them aside until the model is completely finished. Then slide them in and glue them in position - you don’t want “operating” guns that can be raised and lowered anyway, you’re making a model, not a toy. Also, not having the guns in position will make masking off the turrets easier, since they need to be painted before they are glued in position.
If you do this, there is nothing in the rest of the construction of this kit that will give you any trouble.
You will need to do extensive painting before further assembly with this project. That includes the interior of the fuselage. The Wellington, being fabric-covered, has an interior that is a dull dark red, from the filler dope painted into the fabric. This is actually not a solid color, and if you want to do it most accurately, you should first paint the interior a light tan for fabric, then overspray a brick red color in varying degrees of coverage. The geodetic structure was painted aluminum, as was the floor and the various bulkheads. The cockpit and the rest of the nose is black.
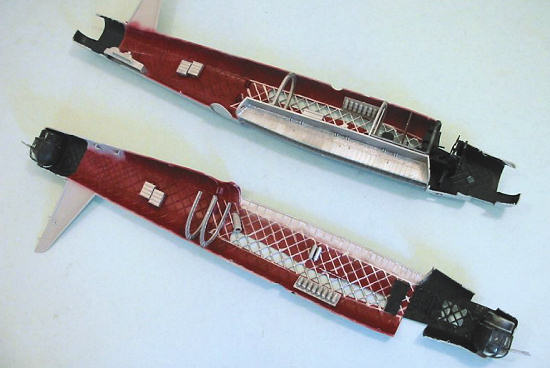 The truth is, with these dark colors, you really are not going to see much of
the great interior detail that the kit provides once you close up the fuselage
and attach the various clear parts. All the effort you put into super-detailing
the interior or detail-painting the various black boxes and instrument panels
will really be for naught. So if you, like me, subscribe to the idea that “if
you can’t see it, I didn’t do it,” all you need to do is get the basic colors
and provide the impression of interior detail.
The truth is, with these dark colors, you really are not going to see much of
the great interior detail that the kit provides once you close up the fuselage
and attach the various clear parts. All the effort you put into super-detailing
the interior or detail-painting the various black boxes and instrument panels
will really be for naught. So if you, like me, subscribe to the idea that “if
you can’t see it, I didn’t do it,” all you need to do is get the basic colors
and provide the impression of interior detail.
There is one other point to make about interior detail, and that is the dustbin turret the kit supplies. So far as I know, the Wellington IC didn't carry this, only the Wellington IA. The turret was never extended while the aircraft was on the ground. Since the Wellington IC did have a plate over the turret opening, to make the kit correctly and not waste time on something that can't be seen anyway, merely attach the bottom piece of the turret - without any of the various bits and pieces - to the fuselage. I did this before joining the fuselage halves, which allowed me to superglue it in position on the one side. If you're clumsy like me, you'll appreciate having those two nice thin gun barrels you won't be using on that turret available to replace any guns broken in one of the turrets.
I chose not to pose the bomb bay open, since this involves attaching numerous doors which - for me at least - will result in a model in a constant state of repair over the months it will take before the first door is knocked off and disappears somewhere I can’t find it. I also made this decision after test-fitting a couple bombs in the bomb bay and realizing they won’t be that easily seen unless you flop the model on its back and even then they won’t be all that visible. Thus I made a major contribution to the ordnance spare parts box with all the beautiful British bombs, which can be hung on models in the future where they will be seen and look great. The Wellington has enough trouble looking cool without marring its lines with the doors open.
I also chose to close the flaps because I couldn’t find a photo of a Wellington sitting on the ground with its flaps down. This is more a matter of personal taste than anything else. The flaps look good, with nice interior detail in both the flaps and the upper wing structure, and will fit nicely if you choose to open them. Since they’re silver and the rest of the airplane in that vicinity is black, they can supply a visual splash of color.
The
photo-etch gear wells are a right pain in the patootie. Before you assemble
these, be sure to take a rat-tail file and open all the holes so that the
various parts of the landing gear will slide into position without pressure. You
also need to open up the holes in the plastic structure for the same reason. If
you do this, you will have no 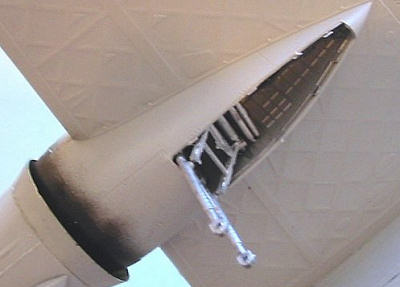 trouble
gluing the gear into one side and fitting the other side in position. You
can leave the wheels off till later, and having the gear attached will allow the
model to sit clear of any surface while paint is drying and such.
trouble
gluing the gear into one side and fitting the other side in position. You
can leave the wheels off till later, and having the gear attached will allow the
model to sit clear of any surface while paint is drying and such.
Do not attach the antenna mast, the pitot tube or the fuel dump pipes until you have completed assembly, painting and decaling. I failed to do this and managed to knock off the antenna and the pitot tube, and the ends of the dumb pipes, from handling the model during further construction and painting.
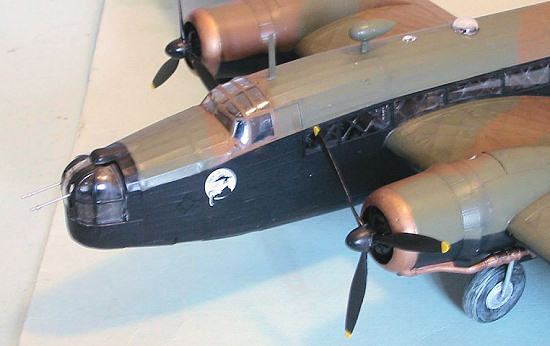
I would also suggest you not attach the front parts of the engine cowlings until you have completed painting. These are a copper color (I used Tamiya “Dark Copper”) and masking them is a pain if you do them first and then paint the rest of the model.
Other than these items, the kit assembles easily and presents no problems. All the parts fit, and I only used a very little bit of Mr. Surfacer along the centerline of the fuselage during construction.
| COLORS & MARKINGS |
Painting:
I
painted the model with Xtracrylix “RAF Dark Earth” and “RAF Dark Green,”
freehanded with my airbrush in accordance with the camouflage pattern shown for
this 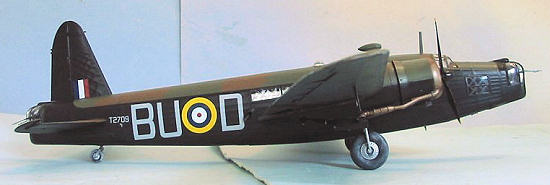 particular airplane in the profile instructions that accompanied the Xtradecals I used. Both colors were lightened and then I went over them to
emphasize the surface detail with “post shading.” The lower surfaces were
painted with Xtracrylix “Night Black” to which I then added a bit of “Dark Sea
Grey” and went back over things to “post shade” the model and break up the
overall large monochromatic area. I then gave the model a coat of Xtracrylix
Gloss varnish.
particular airplane in the profile instructions that accompanied the Xtradecals I used. Both colors were lightened and then I went over them to
emphasize the surface detail with “post shading.” The lower surfaces were
painted with Xtracrylix “Night Black” to which I then added a bit of “Dark Sea
Grey” and went back over things to “post shade” the model and break up the
overall large monochromatic area. I then gave the model a coat of Xtracrylix
Gloss varnish.
Decals:
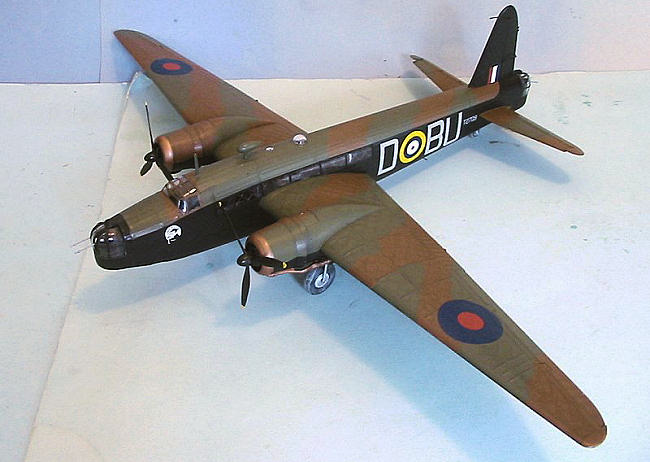
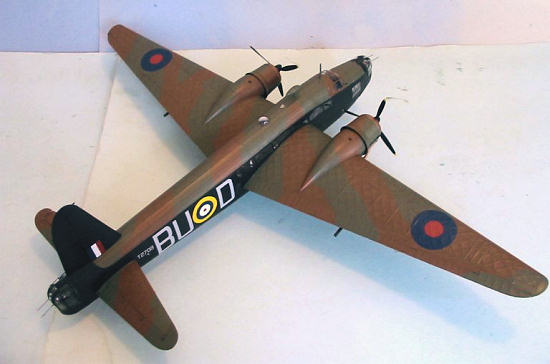
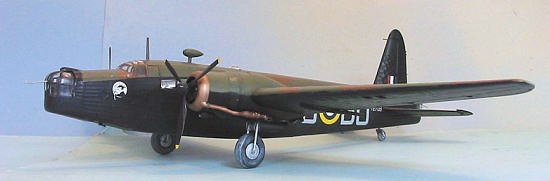
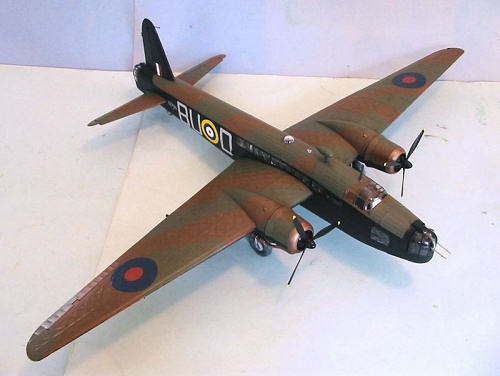
Since the kit decals are so poor, I used the very nice XtraDecal sheet 48-055 to do Wellington IC T2709 of 214 Squadron, which was operational in the fall of 1940. The decals are printed by MicroScale and went on without any problem.
| FINAL CONSTRUCTION |
I gave the model an overall coat of Xtracrylix Flat varnish, then unmasked the turrets, cockpit and various windows. I attached the wheels, which I weathered with “mud” and finished by attaching the propellers. As a fabric airplane, there is not any “dinging” to do.
| CONCLUSIONS |
Let the muddle-duddlers go doodle themselves (it’s what they do best). The kit is accurate, highly detailed, and builds up into an impressive model. As you can see from these photos of the completed model, the “overdone surface detail” looks fine under that well-known “coat of paint.”
 I’ve wanted a good Wellington in 1/48 for a very long time, and this one fills
my bill. It looks very nice sitting next to my B-24, B-17, Catalina, Lancaster,
and Betty.
I’ve wanted a good Wellington in 1/48 for a very long time, and this one fills
my bill. It looks very nice sitting next to my B-24, B-17, Catalina, Lancaster,
and Betty.
Highly recommended. Buy in confidence.
September 2006
Copyright Modeling Madness.com
If you would like your product reviewed fairly and fairly quickly, please contact the editor or see other details in the Note to Contributors.