21st
Century Toys 1/32 F4U-1 Corsair
|
KIT #: |
? |
|
PRICE: |
$10.00 MSRP (now out of production16.98
|
|
DECALS: |
Three options |
|
REVIEWER: |
Tom
Cleaver |
|
NOTES: |
Montex F4U-1
Conversion Set, Eduard Big Ed p.e. set, Quickboost Seats and gun sight.
|
The
Chance‑Vought Corsair was supposed to be the
U.S.
Navy's standard fleet defense fighter for the war everyone in the Navy knew was
coming sooner or later. When it
first flew in 1940, it was the first American fighter capable of speeds in
excess of 400 mph, and might have been the first fighter anywhere to accomplish
that. It was the first
carrier‑based fighter to have a performance that at least equaled any of its
potential land‑based opponents.
Unfortunately, due to such
problems as the relocation of the cockpit even further aft than it had been in
the prototype to allow more fuel in the main tank, which severely restricted the
pilot's view during the all‑important maneuver of landing aboard a carrier,
coupled with overly‑stiff landing gear that had a propensity to bounce severely
when landed aboard by less than an expert pilot,
 the Navy
decided that as good as the airplane was, it was too much of a handful for the
average wartime‑trained Navy fighter pilot to safely and consistently operate
from the restricted deck of an aircraft carrier.
The
U.S.
Marines ‑ who have traditionally been given the equipment the Navy didn't care
to use ‑ felt like B'rer Rabbit in the briar patch when the Navy "cast off" the
Corsair and consigned it to land‑based operation by the Marines.
the Navy
decided that as good as the airplane was, it was too much of a handful for the
average wartime‑trained Navy fighter pilot to safely and consistently operate
from the restricted deck of an aircraft carrier.
The
U.S.
Marines ‑ who have traditionally been given the equipment the Navy didn't care
to use ‑ felt like B'rer Rabbit in the briar patch when the Navy "cast off" the
Corsair and consigned it to land‑based operation by the Marines.
When the
Corsair arrived at
Guadalcanal
in the Spring of 1943, it was "just what the doctor ordered" for the military
campaign being waged in the Solomons.
Flown with the correct tactics ‑ maintain speed and fight in the
vertical, rather than the horizontal, plane ‑ the Corsair was superior to any
Japanese fighter it would meet in combat, and the Marines were soon mowing down
the enemy as fast as squadrons could be re‑equipped with the airplane.
So great was the need throughout the great air battles of the summer,
fall and winter of 1943, no Marine squadron was able to keep its own airplanes.
When a squadron rotated into the theater for a combat tour, they took
over the airplanes of the unit they were replacing. By the time the Japanese
removed their carrier units from Rabaul on
January 25, 1944,
the Corsairs had completed the destruction of trained aircrew that had begun at
Midway. After the losses of the
Solomons, the Japanese Navy was a shadow of its former self.
Building a Solomons‑Based
Corsair:
As far as individual
airplanes belonging to a specific pilot was concerned, while a man might be
assigned an airplane, and while his fighting score might be maintained on that
airplane by its crew, the reality was that pilots flew whatever airplane was "in
service" at the time the mission was scheduled to take off.
Maintenance in the field on the island airfields was limited to what was
necessary to allow the airplane to fly and fight.
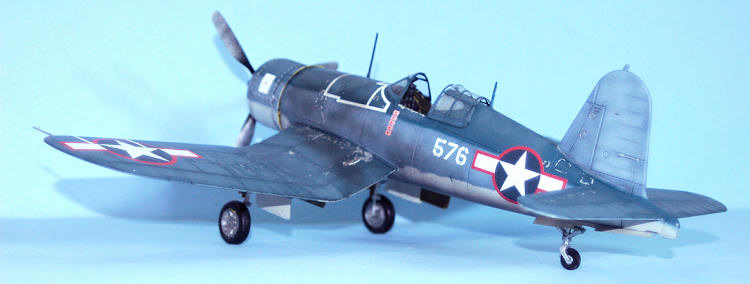
 Paint
faded rapidly under the hot tropic sun, while the "sandblast effect" of
operating from a crushed‑coral or dirt runway did nothing to improve the
appearance of the fighters, not to mention the "dings" that happened as crewmen
climbed over the airplane to service it; exhaust stains and gunfire stains were
not washed off at the conclusion of a mission, while the fact that the gas tank
leaked meant that the airplane's painted surface became even more corroded from
the effects of high‑octane gasoline on it.
Paint
faded rapidly under the hot tropic sun, while the "sandblast effect" of
operating from a crushed‑coral or dirt runway did nothing to improve the
appearance of the fighters, not to mention the "dings" that happened as crewmen
climbed over the airplane to service it; exhaust stains and gunfire stains were
not washed off at the conclusion of a mission, while the fact that the gas tank
leaked meant that the airplane's painted surface became even more corroded from
the effects of high‑octane gasoline on it.
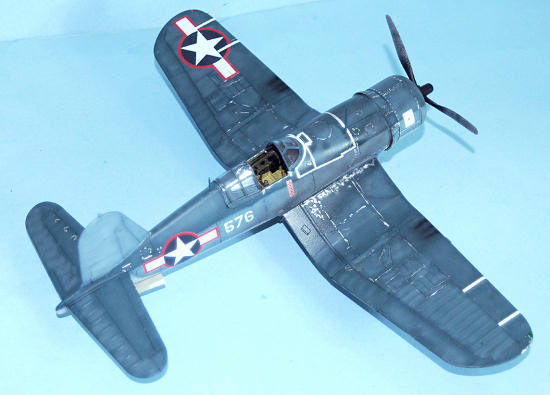
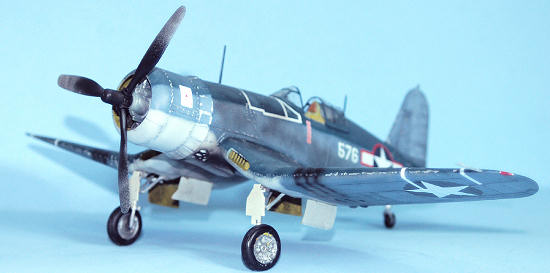
When the Navy introduced the
“Tri-Color Scheme” in May 1943, the majority of F4U-1 Corsairs had been
delivered in the original Blue-Grey over Light Grey scheme.
In the Solomons, some of these aircraft received a field-applied paint
job to comply with the new camouflage, with the Sea Blue color applied over the
original scheme, usually done when the aircraft was down for major maintenance
such as an engine change. Most of
these airplanes can be identified by the fact that the camouflage color did not
“turn down” mid-fuselage to meet the wings.
Since this paint was applied in the field without extensive primer
preparation, it tended to fade and weather more extensively than with the
factory-applied paint.
The result, as can be seen
by even the quickest perusal of contemporary photos of Corsairs in the Solomons
is that creating an accurate representation of one of these airplanes is one of
the few times when "weathering" a model that "too much is not enough" is the
rule to follow, rather than the more usual "less is more."
This F4U‑1A/D kit by 21st
Century Toys is the third early‑model Corsair to appear in 1/32, following the
venerable Revell Corsair from the early 1970s and the newer Trumpeter Corsair
released around 2003.
Interestingly, this Corsair ‑ which is designed as a
 toy ‑ may
be the most accurate of the three in overall shape, though the other two do
present more detail. 21st
Century Toys went out of production with these kits in 2008, though some still
show up on hobby shop shelves and dealers tables at shows. At an original price
of $9.95 - with hobby shop prices as much as $12.95 (probably much more on eBay
now that it is no longer in production), the kit offers excellent value that can
overcome its essential toy‑like nature.
With an application of “some
modeling skill required” the kit can be turned into a very nice model.
The decals are excellent and provide markings for three different
Corsairs ‑ two F4U‑1As and an F4U‑1D.
toy ‑ may
be the most accurate of the three in overall shape, though the other two do
present more detail. 21st
Century Toys went out of production with these kits in 2008, though some still
show up on hobby shop shelves and dealers tables at shows. At an original price
of $9.95 - with hobby shop prices as much as $12.95 (probably much more on eBay
now that it is no longer in production), the kit offers excellent value that can
overcome its essential toy‑like nature.
With an application of “some
modeling skill required” the kit can be turned into a very nice model.
The decals are excellent and provide markings for three different
Corsairs ‑ two F4U‑1As and an F4U‑1D.
Recently, Montex released a
resin conversion set to turn the Trumpeter F4U-1A into an F4U-1 “birdcage”
Corsair. I decided to see if this
would work with the 21st Century Toys kit since I had a couple in the
stash. I also had the Eduard “Big
Ed” photoetch set for the Trumpeter Corsair, and so I decided to do the
conversion using the 21st Century Toys kit and updating it with the
Eduard set.
Like all the other 21st
Century Toys models, the Corsair is more “toy” than “model,” in that it has
simple construction, and simplified parts; this is particularly true in the
landing gear, which is made so that it can be folded.
However, with an application of “some modeling skill required,” this can
be turned into a nice model of the early Corsair without a tremendous effort.
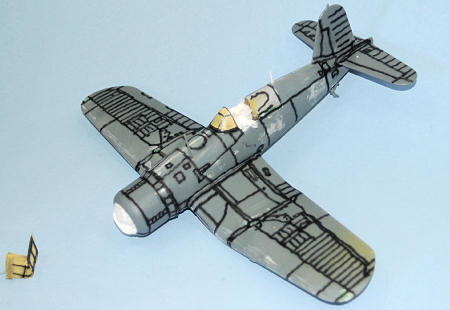
The first thing
I did was fill in the holes where the screws are supposed to be inserted in the
assembly. I used the kit‑supplied
pieces, filling them in with cyanoacrylate glue.
When dry, these places were sanded smooth and then Mr. Surfacer 500 was
applied over them and again sanded smooth to get rid of all evidence of their
ever being there. I also did the
same to all the holes
 in the
lower wing surfaces for pylons and rocket racks and such.
in the
lower wing surfaces for pylons and rocket racks and such.
The wing was
assembled, and all the joints were filled in with cyanoacrylate glue and then
Mr. Surfacer 500 as described above, with panel lines rescribed where necessary.
I also made some pieces from Evergreen sheet to give the forward area of
the wheel well its correct shape.
I used the
Eduard Big Ed set for the Corsair to improve the cockpit, which was mostly
noticeable in using the instrument panels.
I made foot guides from Evergreen strip.
The cockpit was painted per my own instructions in the article “Corsair
101" and the fuselage was assembled.
I used a Quickboost resin gunsight and the Quickboost Corsair seat, which
has molded-in seatbelts and looks much better than the kit-supplied item.
The fuselage
halves were cut off to fit the replacement section by Montex that lowers the
fuselage line and provides the “scallop” rear windows. This fit perfectly.
The Montex replacement for the rear cockpit bulkhead also fit perfectly.
I also had to raise the cockpit sills with Evergreen strip to fit the
different canopy.
The one problem
I had was that the Montex windscreen is a bit “high” and sits about 1/32 inch
above what would be the proper line of the fuselage.
With the canopy posed open, this is not so obvious, and it is likely that
the windscreen may fit perfectly on the Trumpeter kit.
 The
engine is not as detailed as the Trumpeter R‑2800s, but once it is installed in
the cowling it looks good if it has been painted and “shaded” with Tamiya
“Smoke.”
The
engine is not as detailed as the Trumpeter R‑2800s, but once it is installed in
the cowling it looks good if it has been painted and “shaded” with Tamiya
“Smoke.”
The wing and the
horizontal stabilizers were attached, and the joints were smoothed and the seams
filled there and on the fuselage centerline with cyanoacrylate glue and then Mr.
Surfacer 500. When the model was
completely smooth and rescribed, I gave it a light rubdown with Tamiya polishing
compound and it was ready to go to the paint shop.
I used the Scale
Aircraft Conversions white metal landing gear, with scratchbuilt retraction gear
done with Evergreen strip.
Painting:
 I
decided I wanted to do a model that would look significantly different from
other similar models, so I decided to do a field re-painted F4U-1, as would have
been seen on New Georgia or Bougainville during the last 3-4 months of 1943,
during the middle of the Rabaul campaign.
This would be an airplane originally painted in blue-grey over light
grey, with the field applied upper surface color of Non-Specular Sea Blue.
I
decided I wanted to do a model that would look significantly different from
other similar models, so I decided to do a field re-painted F4U-1, as would have
been seen on New Georgia or Bougainville during the last 3-4 months of 1943,
during the middle of the Rabaul campaign.
This would be an airplane originally painted in blue-grey over light
grey, with the field applied upper surface color of Non-Specular Sea Blue.
I began by
preshading the model with flat black over the panel lines. I then painted the
wheel wells and gear door interiors with Tamiya “Yellow Chromate” which is
yellow zinc chromate, and masked that off.
The lower surface was painted with Gunze-Sangyo “Light Gull Grey,” which
was “faded” with white applied to the basic color for post-shading. I used Gunze
Sangyo “Blue-Grey” for the upper color, which was applied to the lower outer
wings, lower fuselage and vertical fin.
This was also “faded” with light grey and then white applied to the
original color and post-shaded. I
used Gunze-Sangyo “Navy Blue” for the upper color, which I did not fade as much
as the other two, since it was theoretically a newer color.
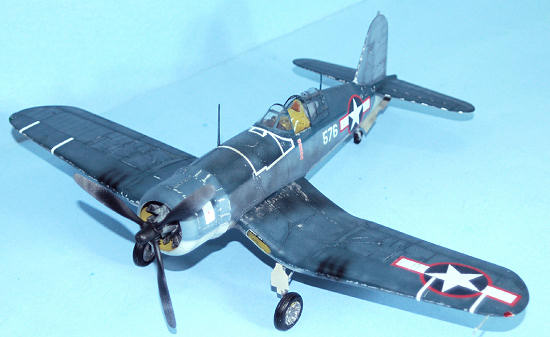
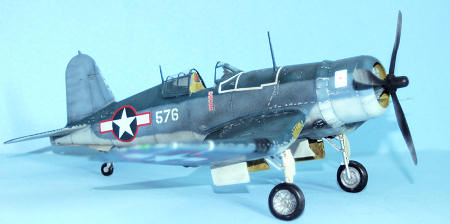 Decals:
Decals came from
the decal dungeon. I applied one
earlier circle star insignia to the lower right wing, as though it had not been
repainted. I used a smaller
red-surround insignia than would have been applied at the factory on a Corsair,
to replicate the earlier circle-star, repainted with the white bar and red
surround; this insignia was also applied further aft than would have been the
case with a factory-applied insignia.
The victory flags represent the airplane’s score, not that of an
individual pilot, since this airplane would have been used by different units as
they cycled through the combat zone.
The white stripe decals replicate tape that was applied around the gas
tank to stop leaks and around the outer wing to keep moisture out of the
structure.
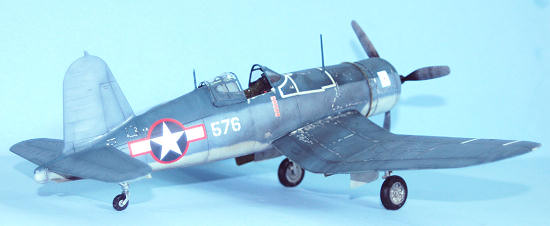
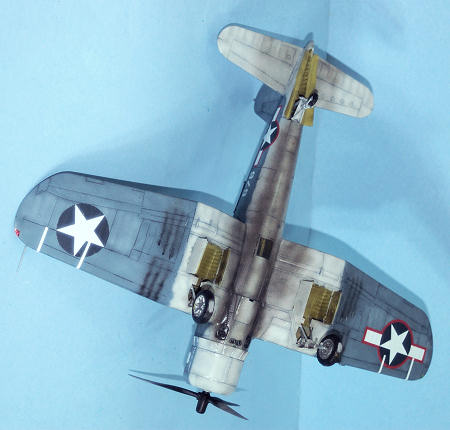 After
some severe “dinging” with Tamiya “flat Aluminum” applied with a 0000 brush, I
weathered the model heavily, using Tamiya “smoke” and Tamiya “Flat Black” to
replicate the heavy exhaust staining on the lower surface, and the oil staining
on the forward fuselage from the engine, as well as gas leaks from the tank.
The prop was oversprayed with flat aluminum to replicate the
sand-blasting effect of operations from a coral strip airfield.
After
some severe “dinging” with Tamiya “flat Aluminum” applied with a 0000 brush, I
weathered the model heavily, using Tamiya “smoke” and Tamiya “Flat Black” to
replicate the heavy exhaust staining on the lower surface, and the oil staining
on the forward fuselage from the engine, as well as gas leaks from the tank.
The prop was oversprayed with flat aluminum to replicate the
sand-blasting effect of operations from a coral strip airfield.
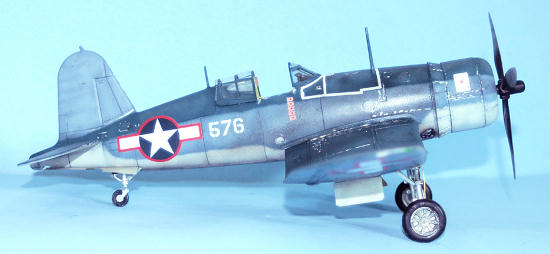
I unmasked the
windscreen and canopy, and attached the canopy in the open position.
I attached the main gear and the gear doors.
There you have it - a $10 model with over $50 worth of aftermarket bits.
This is pretty much the only way a “birdcage” Corsair can be created in
this scale. The model looks great
sitting next to it’s F4U-1A brother kit, as well as my other 1/32 US Navy
aircraft. A fun conversion.
Kit courtesy of
my wallet. Conversion set courtesy
of Montex. Photoetch courtesy of
Eduard.
July 2010
Tom Cleaver
If you would like your product reviewed fairly and quickly, please
contact
me or see other details in the Note to
Contributors.
Back to the Main Page
Back to the Review
Index Page