| KIT #: | ? |
| PRICE: | $24.00 or so MSRP |
| DECALS: | Two options |
| REVIEWER: | Tom Cleaver |
| NOTES: | Lifelike Decals 48-015 “North American P-51 Mustang Pt. 1" used |
| HISTORY |
The P-51 came late to the Pacific Theater, since its long-range
fighting ability was so desperately needed in
 recon
units received F-6Ds the same month.
By the time the Mustangs arrived, aerial combat in the Philippines
was nearly over, with the Japanese Navy and Army air forces having been
thoroughly defeated during the air battles following the invasion in late
October.
recon
units received F-6Ds the same month.
By the time the Mustangs arrived, aerial combat in the Philippines
was nearly over, with the Japanese Navy and Army air forces having been
thoroughly defeated during the air battles following the invasion in late
October.
The Fifth Air Force was, however, able to make use of the range of
the Mustang, and flew missions over the South China Sea to French Indochina,
southern China and Hong Kong, and as far north as Formosa.
Following the invasion of
The 348th fighter Group had been the Pacific Theater’s
equivalent of the 56th Fighter Group in England, being the first
unit to bring the P-47 to the theater where they proved to be a formidable
unit despite the initial displeasure of General George Kenney in being given
a unit flying an airplane he believed had no business being in the Pacific
due to the initial short range of the P-47. However, Colonel Neel Kearby and
his pilots proved their commanding general wrong as they became one of the
top three units in the command, the others being the 49th Fighter
Group and the 475th Fighter Group.
The second-leading ace of the group was LCOL Bill Dunham, one of the
original members of the group.
In December 1943, he had been given command of the 460th Fighter
Squadron, an “extra” unit formed from extra pilots and airplanes, which at
first operated independently but then became a fourth squadron in the 348th.
By January 1945, Dunham was the Deputy Group Commander and had 15
victories scored over
 following
in the steps of Dick Bong, who had done so in 1944 after scoring 27
victories and becoming the second American fighter pilot to equal the World
War I score of Eddie Rickenbacker.
Bong had let it be known when he returned that, had he had such
training before he first came to the Fifth Air Force, he believed he might
have doubled his score.
Amazingly enough, the USAAF had not had a formal gunnery training program
for fighter pilots until early 1944, meaning all the top fighter pilots of
the war had learned this vital skill the hard way on their own while on
operations.
following
in the steps of Dick Bong, who had done so in 1944 after scoring 27
victories and becoming the second American fighter pilot to equal the World
War I score of Eddie Rickenbacker.
Bong had let it be known when he returned that, had he had such
training before he first came to the Fifth Air Force, he believed he might
have doubled his score.
Amazingly enough, the USAAF had not had a formal gunnery training program
for fighter pilots until early 1944, meaning all the top fighter pilots of
the war had learned this vital skill the hard way on their own while on
operations.
Dunham returned to the 348th Fighter Group in early June,
shortly after the unit had moved up to Ie Shima, and resumed his position as
Deputy Group Commander, now flying a P-51K which he quickly had re-equipped
with the superior Hamilton-Standard propeller of the P-51D.
When the 348th began flying missions over
| THE KIT |
 While the decals may be bad on the
One company that is very much still in business is Lifelike Decals in
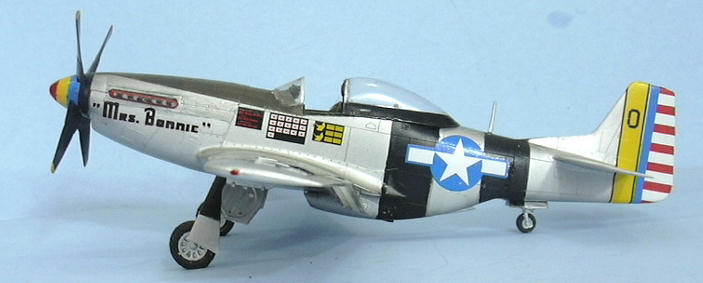
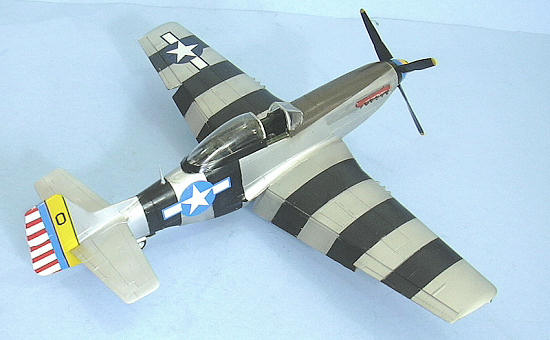
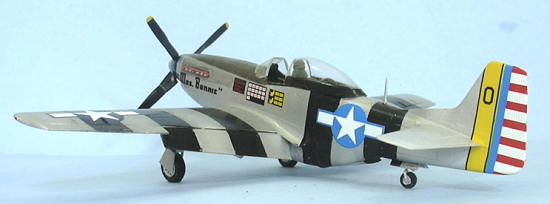
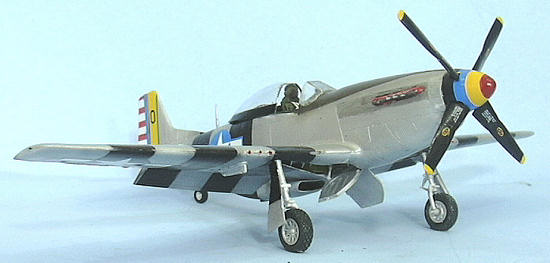
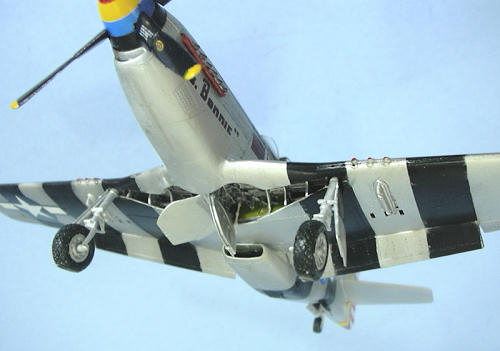
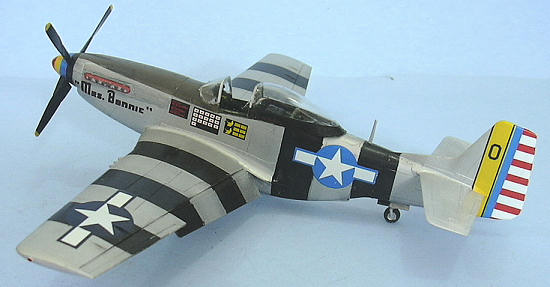
For me, this sheet was a winner because it included Bill Dunham’s well-known P-51K, “Mrs. Bonnie.” Lifelike went to the effort of finding a color photo of the airplane and getting right such things as the aircraft number, which was long incorrectly thought to be “00" rather than the “0" it is. The decals have separate Japanese flags for the victory markings and include stripes to do the multi-color spinner
 Aftermarket items for the P-51D have been around a long time.
I personally think that the True Details resin cockpit, which has
been available since about 1996 that I know of, is the best of the bunch.
It is easy to use, very accurate, and most importantly it is the
least-expensive P-51 cockpit out there.
The cockpit is now currently available from Squadron for about $5.95.
Aftermarket items for the P-51D have been around a long time.
I personally think that the True Details resin cockpit, which has
been available since about 1996 that I know of, is the best of the bunch.
It is easy to use, very accurate, and most importantly it is the
least-expensive P-51 cockpit out there.
The cockpit is now currently available from Squadron for about $5.95.
One thing that has long been needed for a really accurate P-51 is a
resin wheel well, since no kit ever issued has gotten it right, that the
wheel well extends inside the wing back to the main spar, without the wall
all kits have that blank off that area. Sergey Kosachev of Vector has
recently released a wheel well that is designed to be used with the Tamiya
P-51 kits that is so accurate it looks like he hit the real thing with some
kind of shrinking spray. While
this item is expensive enough that those modelers who have 10 P-51s in their
collection (let alone the 50 I think I have!) are unlikely to equip
all with this piece, it is nice to do at least on P-51 up with “all the
trimmings” and definitely worth the effort in the end.
| CONSTRUCTION |
Having finally achieved “critical mass” on the
 The first thing I did was thin the cockpit area of the kit’s fuselage
halves. This is crucial if a
modeler is going to get everything to fit right.
You can always tell a P-51D with the True Details cockpit where this
wasn’t done, since assembling the cockpit that way results in the fuselage
becoming just wide enough that when the wing subassembly is attached, it
will result in a wing with no dihedral.
I also took this time to get rid of all the wheel well detail in the
wings, cutting off the “walls” and removing the ribs, then sanding out the
interior of the wings to thin them as much as possible so the resin wheel
well would fit.
The first thing I did was thin the cockpit area of the kit’s fuselage
halves. This is crucial if a
modeler is going to get everything to fit right.
You can always tell a P-51D with the True Details cockpit where this
wasn’t done, since assembling the cockpit that way results in the fuselage
becoming just wide enough that when the wing subassembly is attached, it
will result in a wing with no dihedral.
I also took this time to get rid of all the wheel well detail in the
wings, cutting off the “walls” and removing the ribs, then sanding out the
interior of the wings to thin them as much as possible so the resin wheel
well would fit.
Next, I cut the True Details cockpit parts off their molding bases,
and sanded the sidewalls smooth on the side that fits to the fuselage part,
and thin enough that I could see light through them.
I also sanded down the cockpit floor to make it as thin as possible
so that it would fit with the resin wheel wells.
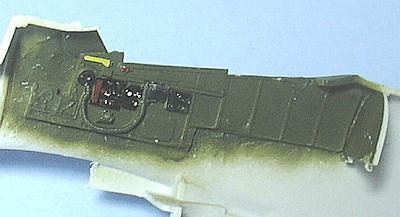
 Following that, I painted the cockpit parts with Xtracrylix “Interior
Green,” using Xtracrylix “Night Black” for the instrument panel and other
details. The floor was painted
with Tamiya “NATO Black” to simulate the non-skid that was painted on the
wooden floor of the real thing.
I used one of my last P-51D instrument panel decals, and then finished up
other details by dry-brushing with Tamiya “Flat Aluminum” and then picking
out various buttons with red, white and yellow to add color.
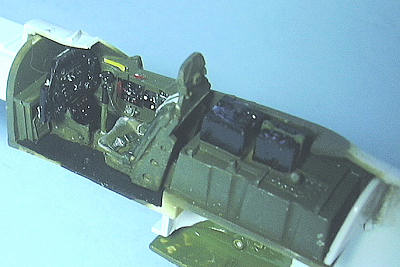
The seat was painted Interior Green with
Following that, I painted the cockpit parts with Xtracrylix “Interior
Green,” using Xtracrylix “Night Black” for the instrument panel and other
details. The floor was painted
with Tamiya “NATO Black” to simulate the non-skid that was painted on the
wooden floor of the real thing.
I used one of my last P-51D instrument panel decals, and then finished up
other details by dry-brushing with Tamiya “Flat Aluminum” and then picking
out various buttons with red, white and yellow to add color.
The seat was painted Interior Green with
Tamiya “Khaki” for the
seat back pad and the lap belts, with the shoulder belts painted Tamiya
“Flat White.”
I then turned my attention to getting the gear well into the wing.
In retrospect, I should have sanded the interior of the lower wing
even thinner, getting completely rid of the “ridge” that is there to guide
placement of the kit central wheel well part.
However, I was able to sand down the resin part till I could see
light through the top, and things fit.
The resin wheel well was painted Tamiya “Flat Aluminum” with the main
spar hand painted with Xtracrylix Interior Green mixed
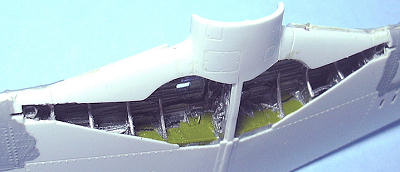 with
yellow to create “Yellow Zinc Chromate.
Then all that great detail was “popped out” with thinned Tamiya
“Smoke.” Once assembled, I
decided to make this wing close to “factory original” by getting rid of all
the panel lines other than for the gas tank and the gun bays, so it
resembled the “puttied wing” as it came off the production line.
I did this with Tamiya’s “Mr. Surfacer” replacement.
with
yellow to create “Yellow Zinc Chromate.
Then all that great detail was “popped out” with thinned Tamiya
“Smoke.” Once assembled, I
decided to make this wing close to “factory original” by getting rid of all
the panel lines other than for the gas tank and the gun bays, so it
resembled the “puttied wing” as it came off the production line.
I did this with Tamiya’s “Mr. Surfacer” replacement.
I then assembled the cockpit and then proceeded to assemble the
fuselage. When done, I mated
wing to fuselage, and - voila! - all that attention to thinning things down
for fit worked - everything came together right.
I attached the upper cowling panel and the horizontal stabilizers,
and was ready for paint.
| COLORS & MARKINGS |
Painting:
I first painted the areas that would have the black ID stripes with
Tamiya “Semi-Gloss Black.”
These were then masked when dry.
The anti-glare panel was painted with Tamiya “Khaki” which was then
lightened for “post-shading of the area.
This was then masked off.
 The wing was painted with Tamiya “Flat Aluminum,” and then masked
off. The rest of the model,
including the flaps and the ailerons and the upper wing gun panels, were
painted with SNJ Aluminum. The
spinner was painted with Tamiya “Flat Yellow.”
The canopy, which was Futured first, was masked off and painted with
“Semi Gloss Black,” with the windscreen frames painted with SNJ Aluminum.
The wing was painted with Tamiya “Flat Aluminum,” and then masked
off. The rest of the model,
including the flaps and the ailerons and the upper wing gun panels, were
painted with SNJ Aluminum. The
spinner was painted with Tamiya “Flat Yellow.”
The canopy, which was Futured first, was masked off and painted with
“Semi Gloss Black,” with the windscreen frames painted with SNJ Aluminum.
When all was complete, I unmasked the model and painted the wings,
the black stripes and the spinner with Xtracrylix Satin Varnish for decals.
Decals:
The Lifelike Decals went on easily. These are very thin, they don’t stick to the first thing they touch. Handle them carefully and there is no problem getting them to settle onto the surface detail with a couple coats of Micro-Sol. When these were set, I airbrushed Xtracrylix Flat Varnish - which is actually a slight semi-gloss finish - over the decals and the stripes.
| FINAL CONSTRUCTION |
I attached the landing gear and the prop blades. Fortunately, the Vector wheel well is molded with the gear leg attachment so that it is impossible to not put the leg at the correct forward angle. The canopy was cut away from its base, and the windshield was attached with white glue. I positioned the canopy in the open position, attaching it with drops of cyanoacrylate glue. ATTENTION MODELERS: the canopy of the P-51D does not slide back into space! This is not a jet!! The canopy slides back on top of the fuselage to the end of the slot. The nice thing about the vacuform canopy is that it is easy as can be to do this correctly since it is thin enough to fit right.
| CONCLUSIONS |
It’s a colorfully-marked P-51D - what’s not to like?
With these extra aftermarket parts, you can put a “definitive” P-51D
in your collection without having to recalculate the national debt to do so.
As to my promise that this is the last one, ehhhh - there are those
nice markings for “American Beauty”...
Kit, True Details
cockpit and wheels, and Squadron canopy courtesy of my wallet.
Lifelike Decals courtesy of Keishiro Nagao.
Vector wheel wells courtesy of Vector.
If you would like your product reviewed fairly and quickly, please contact me or see other details in the Note to Contributors.