Hasegawa 1/32 Kittyhawk I
|
KIT #: |
? |
|
PRICE: |
$?
|
|
DECALS: |
Two options |
|
REVIEWER: |
Tom
Cleaver |
|
NOTES: |
Barracuda Decals
BC32005 “P-40s of 112 Squadron RAF - Part 1" |
The RAF first ordered the Curtiss H-87A-1 Hawk following the prototype’s
first flight in 1940.
These early
aircraft were known in service as the “Tomahawk.” When the H-87A-3, an improved
modification of the earlier design that first appeared as the P-40D in the
summer of 1941, it was ordered as the Kittyhawk I,” with most of these being
P-40E-1 aircraft.
When it was
supplied under Lend-Lease, it was known as the “Kittyhawk
IA.”
The Tomahawk and Kittyhawk replaced the Hurricane as the RAF
air-superiority fighter, with both being considered superior to the Hurricane.
Once Spitfires became available in sufficient numbers in 1943, the
Kittyhawks were used more and more in the close air support role.
The rugged construction of the P-40 meant it had
 little difficulty
operating from primitive desert air strips.
little difficulty
operating from primitive desert air strips.
Clive Caldwell, the leading P-40 ace of the war, said the Kittyhawk had
“almost no vices” when flown properly, though it was “a little difficult to
control in a terminal velocity dive.” He said it was faster going downhill than
any other airplane he flew or fought against.
Hans-Joachim Marseille, “the Star of Africa,” included 101 Tomahawks and
Kittyhawks in his total of 158 victories in North Africa, including 17 shot down
in one mission, an event it took the RAF 20 years to finally acknowledge had
actually happened.
When flown
competently by pilots specifically trained in proper tactics by leaders like
Caldwell, the Kittyhawk fared well against both the Bf-109 and MC-202, and 46
Commonwealth pilots became aces flying the airplane in the North African
campaign, including 12 who scored more than 10 victories each.
In all, 18 RAF squadrons, along with four RCAF, three SAAF, and two RAAF
squadrons, used the Kittyhawk in the
Mediterranean,
while three RAAF and three RNZAF squadrons operated them in the southwest
Pacific.
112 “Shark”
Squadron:
A First World War air defense squadron re-activated in 1929, 112 Squadron
was sent to
Egypt
in June 1940 upon the outbreak of war with
Italy.
Initially equipped with the obsolete Gloster Gladiator, the squadron flew
interception missions against Italian bombers attacking
Cairo.
In January 1941, 112 Squadron was sent to
Greece,
where it took part in the fighting until withdrawn to
Crete
in late April, then on back to
Egypt
following the successful German invasion of
Crete
in May 1941.
In June 1941, 112 Squadron became one of the first RAF units to equip
with the Curtiss P-40 in the shape of the Tomahawk II.
Inspired (as would be the American Volunteer Group that fall) by the
sharkmouth insignia on the Bf-110s of ZG 76, the Haifisch Gruppe, 112
became known as the “Shark Squadron” when they marked their shark-shaped
Tomahawks with a similar insignia. Like the AVG, no two of these sharkmouths
were the same in outline and execution.
The squadron took part in the fighting in
Syria
that fall before returning to the Western Desert in November 1941.
 In December 1941, 112 Squadron re-equipped with the Kittyhawk I, the
export version of the P-40E.
The
unit would use the P-40 in all versions up to the P-40N/Kittyhawk IV until it
re-equipped with the Mustang
III
in
Italy
in June 1944.
In December 1941, 112 Squadron re-equipped with the Kittyhawk I, the
export version of the P-40E.
The
unit would use the P-40 in all versions up to the P-40N/Kittyhawk IV until it
re-equipped with the Mustang
III
in
Italy
in June 1944.
The squadron personnel included pilots from
Poland,
Australia,
Canada
and
New Zealand.
When Clive Caldwell took command in the spring of 1942, he was the first
graduate of the Empire Air Training Scheme to command an RAF Squadron. On
December 5, 1941,
he shot down five Ju-87 Stukas in a matter of minutes, for which he received a
bar to his
DFC,
which had been awarded two days earlier when he shot down and killed
Hauptmann Wolfgang Lippert, Gruppenkommandeur of II./JG 27.
On
December 24, 1941,
he shot down and killed Hauptmann Erbo Graf von Kageneck, a 69-victory experte
of
III./JG
27.
Caldwell
earned his nickname “Killer,” which he personally disliked, from the fact that
he shot enemy pilots who had bailed out in their parachutes, a controversial
practice.
Asked about this, he
replied many years later, "...there was no blood lust or anything about it like
that. It was just a matter of not wanting them back to have another go at us. I
never shot any who landed where they could be taken prisoner."
During his time with 112 Squadron,
Caldwell
became the leading Commonwealth Ace in the P-40, and the highest-scoring P-40
ace in any air force, with 22 victories, including ten Bf-109s and two Macchi
C.202s.
Billy Drake, the leading RAF Kittyhawk ace with 13 victories, also flew
with 112 Squadron, as did Neville Duke, who scored 8 of his 27 victories in 112
Squadron Kittyhawks on his way to being the leading RAF ace of the Mediterranean
Theater.
Hasegawa’s P-40E kit first appeared in 2008.
It is a scale-up of the company’s excellent 1/48 P-40E; with later
releases of the P-40K, P-40N, and Kittyhawk I/III
in this scale, Hasegawa owns the P-40 in 1/32 as it does in 1/48.
This is an
For a full construction guide, I’ll refer you to any of my other reviews
of this kit here at Modeling Madness.
This kit was built to review the new Barracuda Decals sheet for the RAF
Kittyhawk and Tomahawk.
I will note that one new thing I tried in construction was very
successful.
The joint of the upper
wing to the fuselage has long been a bone of contention for mo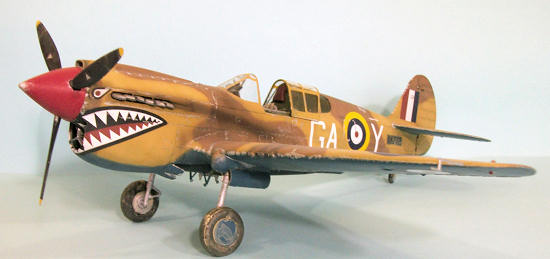 delers, usually
resulting in the application of lots of putty and loss of detail when that is
sanded smooth, with later re-scribing.
I opted with this project to wrap a large rubber band around from wingtip
to wingtip, forcing the wing dihedral up to where the gap was closed.
I then applied a good bit of Tenax-7 glue and let this set up overnight.
When I removed the rubber band, the wing came down to its proper
dihedral, pulling the fuselage out a bit, and allowing me to avoid all use of
putty for seam-filling, other than a bit of cyanoacrylate to smooth out the area
at the immediate leading edge where the wing fits behind the engine cowling. Be
careful when you do this to smooth the glue in the seam while it’s wet, so you
don’t get a “ridge,” and the problem of mating the wing to the fuselage is
solved.
delers, usually
resulting in the application of lots of putty and loss of detail when that is
sanded smooth, with later re-scribing.
I opted with this project to wrap a large rubber band around from wingtip
to wingtip, forcing the wing dihedral up to where the gap was closed.
I then applied a good bit of Tenax-7 glue and let this set up overnight.
When I removed the rubber band, the wing came down to its proper
dihedral, pulling the fuselage out a bit, and allowing me to avoid all use of
putty for seam-filling, other than a bit of cyanoacrylate to smooth out the area
at the immediate leading edge where the wing fits behind the engine cowling. Be
careful when you do this to smooth the glue in the seam while it’s wet, so you
don’t get a “ridge,” and the problem of mating the wing to the fuselage is
solved.
While this project used an original P-40E kit, I replaced the incorrect
windshield supplied in that kit with the correct windshield that comes in the
later Kittyhawk I/III
kit.
I also used the Eduard cockpit
photoetch set for the Kittyhawk, with an RAF Sutton harness rather than the
US-style seat belts.
I do note that with the modular construction required, I attach the tails
and the rear cockpit glass to each fuselage half before finally assembling the
fuselage.
This allows me to work
both sides of the joints and get as tight and smooth a connection as possible.
This reduces the amount of seam filling one has to do, and lessens the
subsequent sanding down and re-scribing of surface detail in those areas.
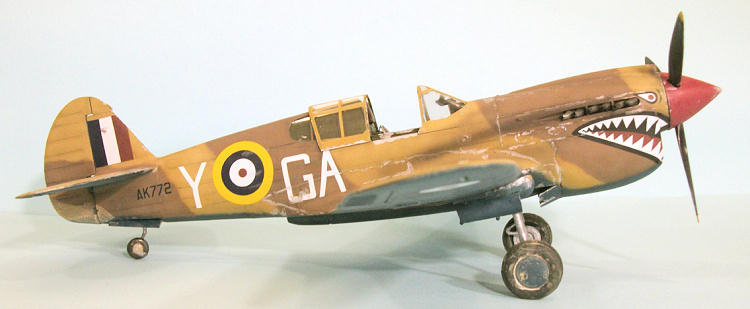
Roy Sutherland explains in the painting instructions in his decal sheet
that the Kittyhawk Is were originally supplied in the US-equivalent RAF
Temperate Scheme of Dark Green, Dark Earth and Sky Grey, using DuPont paints.
The Kittyhawks were repainted in North Africa at the squadron level, with
Middle Stone being applied by spray gun over the Dark Green, and with the Sky
Grey replaced by a blue color.
Usually this was RAF Azure Blue, but due to lack of paint, some aircraft were
painted with other darker shades of blue which were most likely Mediterranean
Blue. AK772 was one of those Kittyhawks with the dark blue
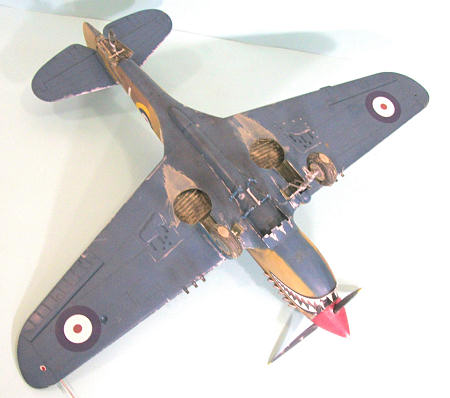 lower surfaces.
I chose to do this airplane specifically because this color would make
the finished model stand out from other P-40s in the collection that are done in
desert camouflage.
lower surfaces.
I chose to do this airplane specifically because this color would make
the finished model stand out from other P-40s in the collection that are done in
desert camouflage.
Roy also states that AK772 was very “worn” in appearance.
For the undersurface color, I used Tamiya “Royal Blue” mixed with Tamiya
“Intermediate Blue” and Tamiya “Flat White” to get a shade of blue that was
close to that in the decal profile.
I lightened this by applying some Tamiya “Light Blue” and going over different
panels.
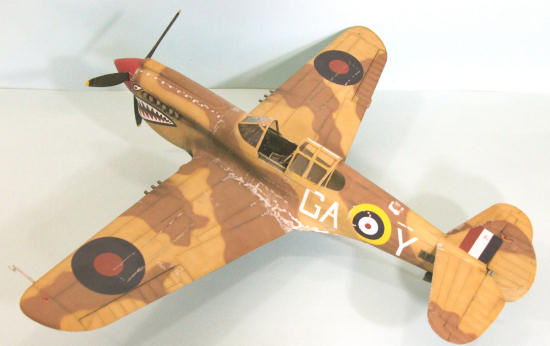
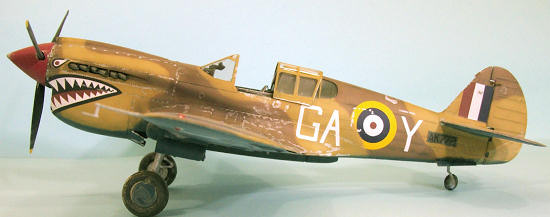
The upper surfaces were painted with Gunze-Sangyo Dark Earth and Middle
Stone.
The Dark Earth was lightened
with Tamiya “Desert Yellow” for a first pass in creating a sun-faded look, with
Tamiya “Flat Yellow” and “Flat White” added in for later passes over the upper
surfaces of the wings and horizontal stabilizer and upper area of the fuselage,
for fading effect, with a bit more “Desert Yellow” added in to go over the
fabric control surfaces.
The Middle
Stone was “faded” with the addition of Tamiya “Buff” and then “Flat White” for
later passes.
I note that the
instructions say that the area behind where the serial number is applied should
be Dark Green.
This is right for
the left side of the fuselage, since that area was originally dark green and the
serial was masked over, but it should not be done on the right side, which was
originally Dark Earth and would have been left alone during the repaint.
When all this was finished, I applied a coat of Xtracrylix Gloss varnish.
Barracuda Decals are printed by Cartograf and went on with no problem
under a coat of Micro-Sol.
I only
applied stencils to the areas that were Dark Earth, since the stencils in the
Middle Stone area were likely not re-applied after painting.
When the national insignia on the left side was set, I painted over the
lower forward quadrant of the yellow ring, which was done to all 112 Squadron
Kittyhawks for reasons unknown to later researchers.
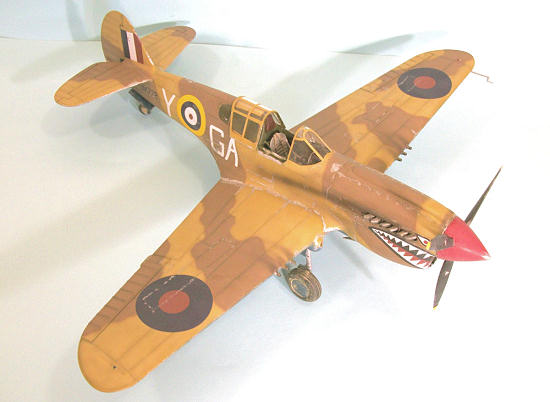
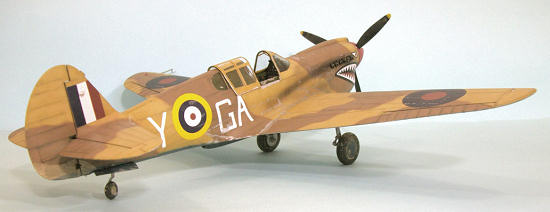
 I “dinged” the model around the cowling, the wing and tail leading edges,
the prop, and the wingwalk areas, in accordance with a photo Roy supplied me of
the airplane.
I also applied heavy
exhaust staining on the fuselage with Tamiya “Smoke,” using that also for
gunfire residue on the wings and oil stains on the lower wing and fuselage.
I “muddied” the tires and the wheel wells, and applied “mud spray” on the
wing aft of the wells and the rudder aft of the tail wheel.
I then applied several coats of Xtracrylix Flat varnish, to which I added
a few brushfulls of Tamiya “Flat Base” to get a dead-flat sunbaked finish.
I “dinged” the model around the cowling, the wing and tail leading edges,
the prop, and the wingwalk areas, in accordance with a photo Roy supplied me of
the airplane.
I also applied heavy
exhaust staining on the fuselage with Tamiya “Smoke,” using that also for
gunfire residue on the wings and oil stains on the lower wing and fuselage.
I “muddied” the tires and the wheel wells, and applied “mud spray” on the
wing aft of the wells and the rudder aft of the tail wheel.
I then applied several coats of Xtracrylix Flat varnish, to which I added
a few brushfulls of Tamiya “Flat Base” to get a dead-flat sunbaked finish.
I then attached the landing gear, the separate exhausts, and the racks
for the drop tank.
I unmasked the
cockpit canopy and posed the sliding section in the open position.
 What can I say?
The Hasegawa
P-40s are wonderful kits. If you take your time to assemble the modular parts,
doing things like attaching the separate tail parts before assembling the
fuselage to get nice close fits, you will not have to use a lot of putty or
surface filler to get rid of the seams.
Roy’s decals are excellent, and allow one to create a distinctive model.
What can I say?
The Hasegawa
P-40s are wonderful kits. If you take your time to assemble the modular parts,
doing things like attaching the separate tail parts before assembling the
fuselage to get nice close fits, you will not have to use a lot of putty or
surface filler to get rid of the seams.
Roy’s decals are excellent, and allow one to create a distinctive model.
Kit courtesy of
my wallet.
Barracuda Decals
courtesy of Roy Sutherland via Da Boss.
Order Barracuda Decals direct at
www.barracudadecals.com
Tom Cleaver
December 2011
If you would like your product reviewed fairly and fairly quickly, please contact the editor or see other details in the
Note to
Contributors.
Back to the Main Page
Back to the Previews Index Page