Kitty Hawk 1/32 OS2U Kingfisher
| KIT #: | 32016 |
| PRICE: | $98.99 SRP |
| DECALS: | Six options |
| REVIEWER: | Tom Cleaver |
| NOTES: | New tool kit |
| HISTORY |
Designed in 1937 by Rex Beisel to meet a requirement for a shipboard observation seaplane to replace the venerable Curtiss SOC Seagull, the Kingfisher was the first of Vought’s aircraft to feature spot welding of the aaluminum skin, which would later be a feature of the F4U Corsair series. The OS2U series (OSN for those aircraft built by the Naval Aircraft Factory) quickly replaced the earlier Seagull aboard battleships, but by the fall of 1941 it was planned to phase out the OS2U in favor of the Curtiss SO2C. The failure of this aircraft to meet performance requirements due to a poor choice of engine led to the Kingfisher being used throughout the war until it was finally replaced by the Curtiss SC-1 at the end of the war.
While Kingfishers flew anti-submarine patrols in the Atlantic and Gulf of Mexico and were responsible for the sinking of two German U-boats as well as the destruction of the Japanese submarine that had earlier shelled Santa Barbara in January 1942, and even shot down an A6M5 Zero during the invasion of Iwo Jima, the airplane was far better known for rescuing downed aviators.
 The
Kingfisher first achieved public fame when “The Bug,” a Kingfisher that had been
aboard the battleship USS
Pennsylvania
at Pearl Harbor, rescued World War I Ace of Aces Eddie Rickenbacker and two
other survivors of the crash of their B-17 on 11 November 1942. Lt (jg) John
Burns set a record for rescuing ten aviators on 2 May 1944 at Truk Atoll while
working with the submarine USS
Tang.
The
Kingfisher first achieved public fame when “The Bug,” a Kingfisher that had been
aboard the battleship USS
Pennsylvania
at Pearl Harbor, rescued World War I Ace of Aces Eddie Rickenbacker and two
other survivors of the crash of their B-17 on 11 November 1942. Lt (jg) John
Burns set a record for rescuing ten aviators on 2 May 1944 at Truk Atoll while
working with the submarine USS
Tang.
The strangest Kingisher rescue was the last rescue of aircrew by the OS2U and involved two Kingfishers from USS North Carolina (BB-55). On 9 August 1945, the day Nagasaki was bombed, the battleship was operating off the northern coast of the main Japanese home island of Honshu, shelling shore facilities in company with other battleships while the fast carriers flew air strikes. The weather was bad, with rain, fog, low ceilings and poor visibility. By the end of the day, eleven pilots had been shot down in the area of Ominato, but it was impossible to launch rescue flights in the bad weather.
At dawn the next day, 10 August, Lt(jg) Almon Oliver and Lieutenant Ralph Jacobs were launched to search for the survivors. Both pilots flew without back-seaters, so they could take rescued flyers aboard and bring them back to the fleet. The two Kingfishers were escorted by four F6F-5 Hellcats and four F4U-1D Corsairs.
Inbound, they took “friendly fire” from an American submarine, which was ironically the lifeguard submarine that was unable to perform the rescue itself, quickly followed by anti-aircraft fire from Japanese shore batteries.
As Oliver remembered, “Upon arrival in the area, one of the fighters spotted a pilot on the beach waving madly. By this time the destroyers at the naval base and anti aircraft fire from the airfield and the nearby Army bases opened up with a fury. There was a strong wind blowing into the beach and the surf was quite high.” They had spotted Lt.(jg) Vernon Coumbe, who had spent a tense night ashore two miles from a major Japanese naval base. Jacobs ordered Oliver to remain airborne and risked high winds and choppy surf to splash down. “There was a strong wind blowing into the beach and the surf was quite high.” Automatic weapons fire reached out for the airplane while shells plunged into the water around the Kingfisher. While Oliver took evasive action overhead, Jacobs taxied near the beach. “From my vantage point it appeared that the pilot was having difficulty getting through the surf and the Japanese were firing what appeared to be 5 inch shells all around the plane on the water. After some time the plane started a take off run, but soon it was porpoising badly and unable to get airborne. I then flew alongside and discovered there was no pilot aboard.”
 What had
happened was that Coumbe, the pilot on the beach, was unable to get through the
surf to board the plane. Faced with the problem, Jacobs climbed out of his
cockpit and stood with one foot in the cockpit and one on the wing as he tried
to throw a line to Coumbe so he could pull him thorough the surf. As he tried,
the blast from a nearby shell caused Jacobs to lose his balance and fall into
the water, in the process knocking the throttle full open. Oliver recalled, “Now
both pilots were waving wildly from the beach. I landed, taxied to the beach,
blipped the engine and backed through the surf onto the beach. I told Jacobs to
help the other pilot into the plane and I would send help for him. This idea
didn’t sit well and I soon had two very large and very wet people crammed into
the back seat. How they managed to get into the cockpit, I’ll never know, but
the alternative was unacceptable at the moment.”
What had
happened was that Coumbe, the pilot on the beach, was unable to get through the
surf to board the plane. Faced with the problem, Jacobs climbed out of his
cockpit and stood with one foot in the cockpit and one on the wing as he tried
to throw a line to Coumbe so he could pull him thorough the surf. As he tried,
the blast from a nearby shell caused Jacobs to lose his balance and fall into
the water, in the process knocking the throttle full open. Oliver recalled, “Now
both pilots were waving wildly from the beach. I landed, taxied to the beach,
blipped the engine and backed through the surf onto the beach. I told Jacobs to
help the other pilot into the plane and I would send help for him. This idea
didn’t sit well and I soon had two very large and very wet people crammed into
the back seat. How they managed to get into the cockpit, I’ll never know, but
the alternative was unacceptable at the moment.”
With the center of gravity so far aft with two passengers in back, the Kingfisher "flew like a pregnant duck," and also burned fuel at an increased rate. Realizing he would have difficulty with navigation, weather, and fuel carrying such an unbalanced load, Oliver decided to land at sea near the lifeguard sub. “After some deliberate thought, however, I decided to try to make it back to some ship in the fleet. Fortunately we picked up the ZB signal and made it back to the ship.” Two and a half hours later, he landed alongside North Carolina with what he later described as "one cup of gas" in the tank. It was a remarkably close call for all three. Oliver had made the only rescue of downed fliers from Japan proper. Both he and Jacobs were awarded the Distinguished Flying Cross for their efforts.
| THE KIT |
The Kingfisher was released in 1/72 scale by Airfix and Lindberg and in 1/48 scale by Monogram back some 50 years ago in the mid-sixties. This kit by Kitty Hawk is the first 1/32 OS2U to be released in injection plastic.
 There
was little but detail difference between the OS2U-1 and the final OS2U-3. Kitty
Hawk’s kit provides markings for a prewar OS2U-1 from VO-1 aboard USS
Arizona
and another aboard USS
Pennsylvania
in pre-war “golden wings” markings; an OS2U-3 based at NAS Corpus Christi in
1942; an OS2U-3 from Pansacola circa 1944; an OS2U-3 operated by the Fleet Air
Arm; and OS2U-3 operated by the Soviet Navy in 1944.
There
was little but detail difference between the OS2U-1 and the final OS2U-3. Kitty
Hawk’s kit provides markings for a prewar OS2U-1 from VO-1 aboard USS
Arizona
and another aboard USS
Pennsylvania
in pre-war “golden wings” markings; an OS2U-3 based at NAS Corpus Christi in
1942; an OS2U-3 from Pansacola circa 1944; an OS2U-3 operated by the Fleet Air
Arm; and OS2U-3 operated by the Soviet Navy in 1944.
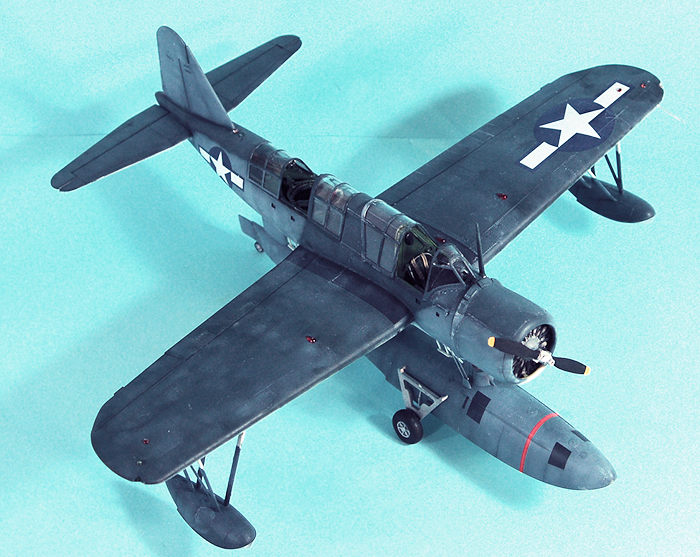
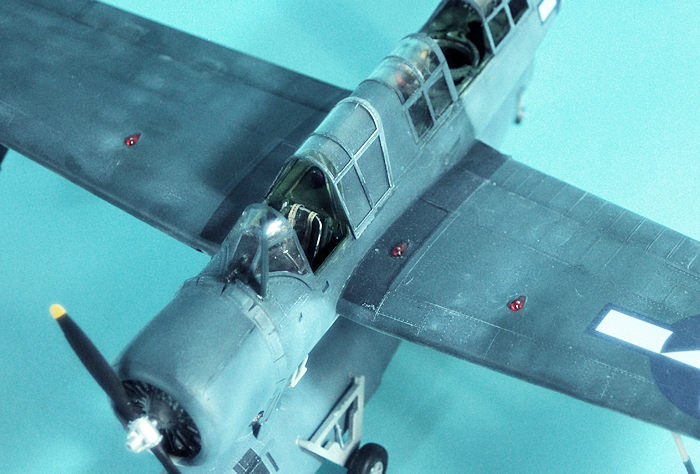
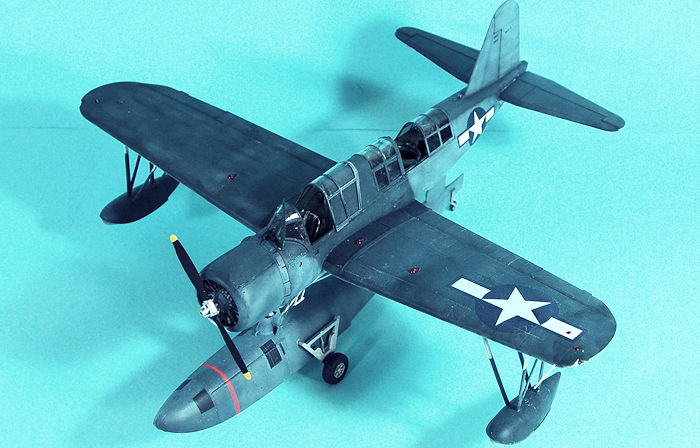
The kit provides detailed front and rear cockpits and a detailed engine with accessory section, which can be displayed with the cowling open. The model can be built with either floats or landing gear. Surface detail is very petite, although the “rivet detail” is wrong for a welded structure; the divots were small enough I didn’t worry about them and they are not noticeable under the proverbial “coat of paint.”
Truthfully, based on my previous experience of Kitty Hawk kits, I had no plans to build this kit. However, when one appeared on my front porch, a gift from my good friend Salvador Sanchez, I was committed to at least looking at it. It didn’t look bad, test-fitting revealed it might work, and so I proceeded.
| CONSTRUCTION |
While this project
was not completely trouble-free, what trouble I did run across was as nothing
compared to the several previous Kitty Hawk kits that now reside in the Los
Angeles landfill, or the two I was actually able to beat into submission and
complete. While the instructions still frequently end up saying nothing about
some essential part of construction (such as exactly how the various parts of
the engine and exhaust come together or the construction of the engine mount)
which leaves one to make
 educated
guesses in the same way you do with a jigsaw puzzle, overall everything fits
right (a first) and the plastic responds to polystyrene cement. I would rate
this the best Kitty Hawk kit to date.
educated
guesses in the same way you do with a jigsaw puzzle, overall everything fits
right (a first) and the plastic responds to polystyrene cement. I would rate
this the best Kitty Hawk kit to date.
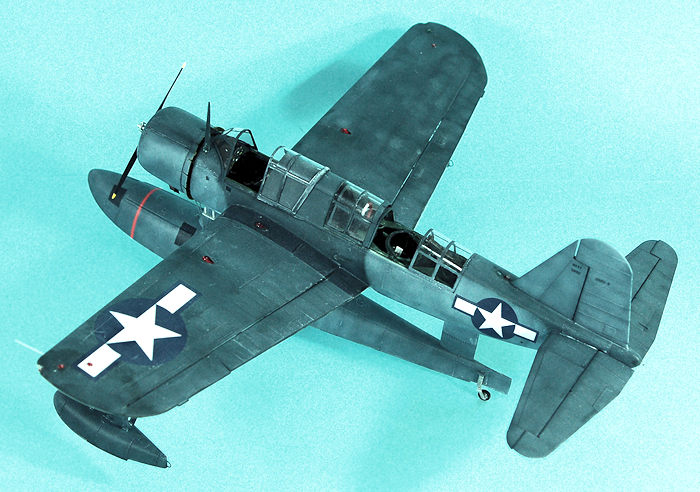
Not being a Kingfisher aficionado, I needed to do some research before proceeding. Googling cockpit photos revealed that the kit instructions to paint the cockpit dull dark green was correct. I used Tamiya “Deep Green” with some additional flat black, and painted all the parts for the cockpit assembly while they were still on the sprues. The same research showed that the engine accessory area was yellow zinc chromate, and those parts were painted that color while still on the sprue.
While that was drying, I assembled the pontoon and floats, and the wings, vertical stab and rudder, and horizontal stabilizers. All the control surfaces are separate, and while they look nice once assembled they have minimal attachment points. I ended up gluing the ailerons and flaps together to get them some strength with the minimal attachment points to the wings, and later glued the inboard end of the flaps to the fuselage for additional strength.
I then proceeded to
paint all the detail parts in black and “pop out” detail with a silver pencil,
then proceeded with assembly. I departed from an OOB build when I used Eduard
seat belts with shoulder harness for the pilot’s cockpit, since the kit only
provides the lap belts used in pre-war/early-war aircraft. While time-consuming
to get all the parts assembled, both cockpits look good when finished. I cut the
radioman’s control stick and mounted in the stowed position, since it would not
have been left in the deployed position unless needed. The attachments for the
assembled cockpits to the fuselage halves is very positive, and it took a little
squeezing to get the halves completely together, along with some rubber
 bands to
hold them together while the glue set up. It took a little trimming of the gun
mount to get the radioman’s machine gun to fit under the sliding canopy (the kit
wants you to have that rear part open, which was done very infrequently).
bands to
hold them together while the glue set up. It took a little trimming of the gun
mount to get the radioman’s machine gun to fit under the sliding canopy (the kit
wants you to have that rear part open, which was done very infrequently).
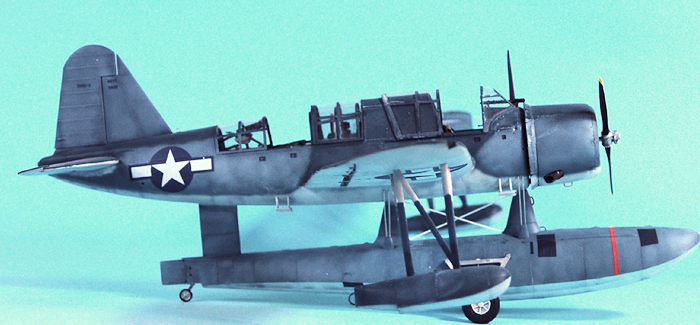
The main pontoon has only a very small mounting pin on each of the struts, to fit to the fuselage, making for a very fragile assembly. I drilled out the two forward struts and the holes in the fuselage, and used some 1/16 Evergreen rod stuck all the way into the pontoon to make stronger joins. I also cut off the bracing wires, which had broken. That isn’t actually the way that was braced, and I replaced it with wire later.
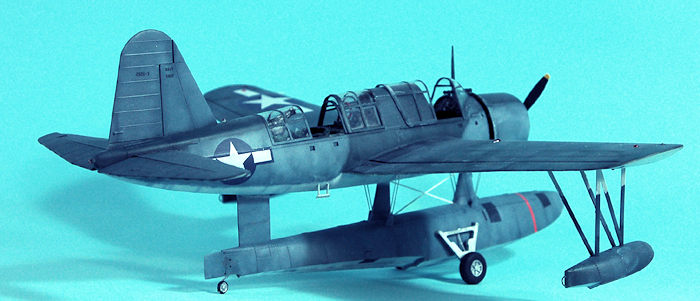
The wings and tail surfaces attached without difficulty. In fact, I only used Mr. Surfacer on the centerline seams of the fuselage and the pontoon. I did not attache the floats to the wing until after I had painted the model.
I broke the very delicate engine mount parts trying to cut them off the sprues. I was glad I had decided to go with the closed cowling. I made an engine mount with 1/16 Evergreen rod, then assembled the cowling around the engine and superglued it to the firewall.
| COLORS & MARKINGS |
If you are doing a
Kingfisher in “tri-color” camouflage, there are two schemes used on Kingfishers.
This camouflage was applied to these airplanes at Norfolk and Pearl Harbor when
they were refurbished from earlier use, since the airplanes were out of
production by the time the scheme was applied. The
 “Norfolk”
scheme has the area of the fuselage above the wing in the upper color of non-specular
sea blue, while the “Pearl Harbor” scheme has that area in Intermediate Blue
with the Sea Blue only on the upper area of the fuselage spine. I was basing
this model on a color photo of an OS2U-3 aboard USS Missouri in 1944, and so did
the “Norfolk” scheme. I used Tamiya Flat White, Medium Blue and Field Blue” for
the colors, and spent some time “sun-fading” the paint and “salt-spraying” it
since these airplanes were not hangared but rather rode out the weather on the
catapults of the ship they were assigned to.
“Norfolk”
scheme has the area of the fuselage above the wing in the upper color of non-specular
sea blue, while the “Pearl Harbor” scheme has that area in Intermediate Blue
with the Sea Blue only on the upper area of the fuselage spine. I was basing
this model on a color photo of an OS2U-3 aboard USS Missouri in 1944, and so did
the “Norfolk” scheme. I used Tamiya Flat White, Medium Blue and Field Blue” for
the colors, and spent some time “sun-fading” the paint and “salt-spraying” it
since these airplanes were not hangared but rather rode out the weather on the
catapults of the ship they were assigned to.
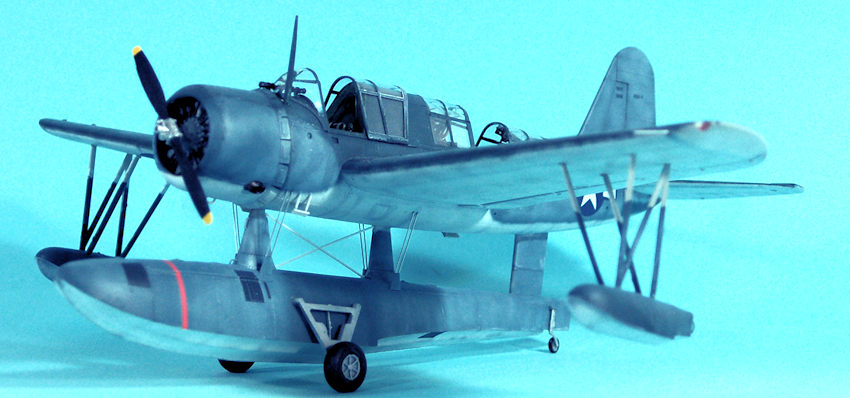
Most of the Kingfishers assigned to ships had no markings other than the national insignia, which is how I did this model, using the kit decals which needed a little persuasion with Solvaset to fully settle into the surface detail.
I then applied several coats of Micro-Scale “Flat” with some Tamiya “Flat Base” mixed in to get the weathered look I wanted.
The canopies were unmasked and attached. I placed the canopy over the radioman’s seat under the forward canopy glass, and it fit perfectly. I then attached the beaching gear.
| CONCLUSIONS |
I am very pleased to report that this is in fact the most problem-free Kitty Hawk kit I have had anything to do with. There were no contortions or industrial-strength pushing and shoving, and the air over the construction bench remained CAVU without a hint of even a violet hue. This is the most accurate and fully-detailed Kingfisher kit OOB available. The kit presents only some limited difficulties in deciphering the instructions in various places and the result looks very nice. The model looks good sitting next to its big brother, the Tamiya Corsair. Recommended for all but beginners.
15 September 2016
Copyright ModelingMadness.com
Review kit courtesy of Salvador Sanchez.
If you would like your product reviewed fairly and fairly quickly, please contact the editor or see other details in the Note to Contributors.