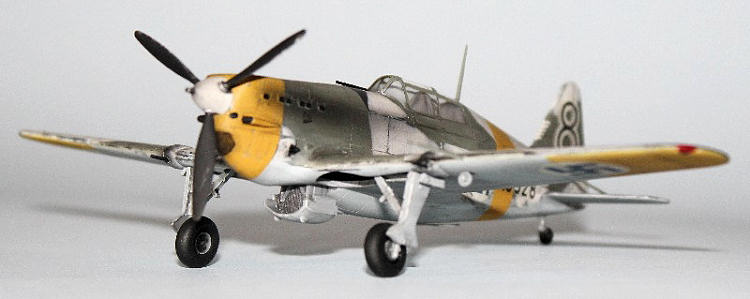
Hasegawa 1/72 MS.406 "Finnish AF"
|
KIT #: |
00925 |
|
PRICE: |
$19.49 SRP
|
|
DECALS: |
Five options |
|
REVIEWER: |
Nathan Stevens |
|
NOTES: |
Limited Reissue |
From kit instructions:
 During the winter of 1939/40
Finland
received 30 MS 406 fighters from
France.
These planes were assembled from parts received via
Sweden
and flown to Finland
in February 1940.
Following the
occupation of France
by Germany, more
MS 406 fighters were received from German booty.
The Finnish Air Force used a total of 87 MS 406/410 aircraft during the
war.
Regarded as a pleasant
aircraft to fly, it had difficulty in gun aiming.
It was slow and lightly armed but had good agility, so equal fighting
against the Soviet I-153 and I-16 fighters was possible; however the MS 406 was
obsolete by 1943 when new Soviet fighters emerged.
In
Finland,
some MS406’s were re-engined with Soviet Klimov M-105P engines and rearmed with
the German Mauser MG-151/20mm cannon.
This modified “Ghost Morane” conversion proved to be a tough opponent,
even for the soviet La-5, but only two became operational prior to the end of
the war.
Using the MS 406 Fighter,
121 aerial victories were achieved.
26 were lost in aerial combat or AAA fire.
Seven pilots scored 5 or more victories and the “Little Giant” Flight
Sergeant U. Lehtovaara scored 14 victories while flying the MS 406.
During the winter of 1939/40
Finland
received 30 MS 406 fighters from
France.
These planes were assembled from parts received via
Sweden
and flown to Finland
in February 1940.
Following the
occupation of France
by Germany, more
MS 406 fighters were received from German booty.
The Finnish Air Force used a total of 87 MS 406/410 aircraft during the
war.
Regarded as a pleasant
aircraft to fly, it had difficulty in gun aiming.
It was slow and lightly armed but had good agility, so equal fighting
against the Soviet I-153 and I-16 fighters was possible; however the MS 406 was
obsolete by 1943 when new Soviet fighters emerged.
In
Finland,
some MS406’s were re-engined with Soviet Klimov M-105P engines and rearmed with
the German Mauser MG-151/20mm cannon.
This modified “Ghost Morane” conversion proved to be a tough opponent,
even for the soviet La-5, but only two became operational prior to the end of
the war.
Using the MS 406 Fighter,
121 aerial victories were achieved.
26 were lost in aerial combat or AAA fire.
Seven pilots scored 5 or more victories and the “Little Giant” Flight
Sergeant U. Lehtovaara scored 14 victories while flying the MS 406.
This is another fine example of typical Hasegawa
engineering.
Finely engraved panel
lines, near flawless fit, crystal clear canopy, and a sparse interior just
begging for aftermarket help.
The 3
main sprues are molded in the typical light gray, with a clear for the canopy
and landing light.
Of course, being
average Hasegawa the decals are temperamental at best but I managed to convince
them to work this time!
 Interior
first, right.
I used neutral gray
as per usual with the French planes.
This was followed with an acrylic wash of black and burnt umber.
Both the instrument panel and seat are a bit heavy and simplified, but
for an out of the box build, it’s business as usual.
The decal fit the panel well enough but with the compound surface it took
a few applications of solvent to get it to settle.
Interior
first, right.
I used neutral gray
as per usual with the French planes.
This was followed with an acrylic wash of black and burnt umber.
Both the instrument panel and seat are a bit heavy and simplified, but
for an out of the box build, it’s business as usual.
The decal fit the panel well enough but with the compound surface it took
a few applications of solvent to get it to settle.
Once the fuselage was closed up, a little light
sanding and just a touch of heavy primer was required to fully dispose of the
seam.
The rear of the lower
wing-to-fuselage butt joint was the hardest to clean up with the complex ribbing
of the fuselage skin.
I generally
leave the tailplanes off and paint them separately but with the braces on top
distinctive of the MS 406, I decided to button things up a little more than
usual.
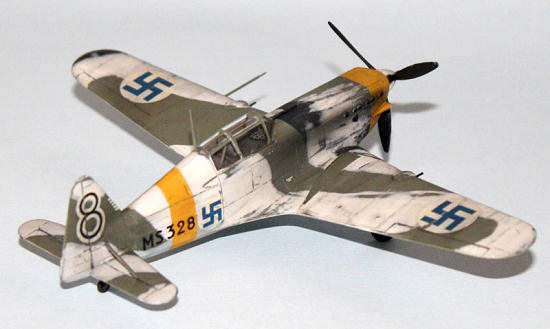
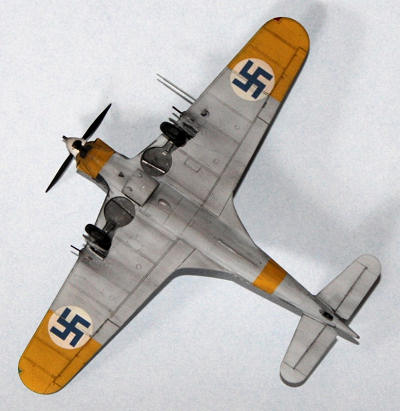
 Of the 5 options in this kit, 3 are in the typical Finnish
scheme of green (I use RLM 71) and black, one of which also has the option of
adding the temporary white ‘wash and the other is in the 3-tone French uppers.
I’m a sucker for white distemper schemes so this was an easy choice.
I started by spraying the nose, outer wing sections and fuselage band RLM
04 yellow.
I like Testors RLM 04
because of the extra pigment, it fills up faster with less coats than the other
Model Master yellows and after weathering, I think it’s ‘dirty’ nature just
looks better.
Next, mask the yellow
and spray the underside in French light blue.
This includes the wells, gear, inner gear doors, and hubs.
After this the lowers were all masked off and the RLM 71 was sprayed.
I then dug out the old silly putty stash to mask and spray the black.
All masking was then removed except for the yellow markings.
I reapplied the silly putty and sprayed the white distemper loosely,
allowing some of the first colors to show through.
Remove the remaining mask.
Of the 5 options in this kit, 3 are in the typical Finnish
scheme of green (I use RLM 71) and black, one of which also has the option of
adding the temporary white ‘wash and the other is in the 3-tone French uppers.
I’m a sucker for white distemper schemes so this was an easy choice.
I started by spraying the nose, outer wing sections and fuselage band RLM
04 yellow.
I like Testors RLM 04
because of the extra pigment, it fills up faster with less coats than the other
Model Master yellows and after weathering, I think it’s ‘dirty’ nature just
looks better.
Next, mask the yellow
and spray the underside in French light blue.
This includes the wells, gear, inner gear doors, and hubs.
After this the lowers were all masked off and the RLM 71 was sprayed.
I then dug out the old silly putty stash to mask and spray the black.
All masking was then removed except for the yellow markings.
I reapplied the silly putty and sprayed the white distemper loosely,
allowing some of the first colors to show through.
Remove the remaining mask.
 By all accounts, this was a ragged job at best
and it looked far too clean.
I took
to a combination of solutions.
I
brush painted some of the edges with more white to get a ‘sloppy’ look.
I then wet sanded with 1200 grit, both with water and alcohol, chipped
away with toothpicks and scrubbed with Q-tips soaked in more alcohol until it
not only looked hastily applied but also well-worn.
Wet sanding with alcohol had some particularly interesting effects as the
alcohol helps soften the paint (yes, enamel) and it tends to scratch and peel
just slightly.
By all accounts, this was a ragged job at best
and it looked far too clean.
I took
to a combination of solutions.
I
brush painted some of the edges with more white to get a ‘sloppy’ look.
I then wet sanded with 1200 grit, both with water and alcohol, chipped
away with toothpicks and scrubbed with Q-tips soaked in more alcohol until it
not only looked hastily applied but also well-worn.
Wet sanding with alcohol had some particularly interesting effects as the
alcohol helps soften the paint (yes, enamel) and it tends to scratch and peel
just slightly.
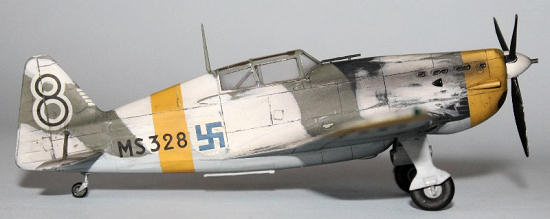
Next came the decals, and the faded, dirty appearance of
nearly all Hasegawa decals was actually welcome here.
With all the wet sanding, Future wasn’t required
anywhere but the underside.
The decals settled in tight with several quick applications of ModelMaster
solvent.
I don’t let solvent sit on
Hasegawa decals too long as they tend react poorly to this.
Once dry, I took to a similar method of weathering, sanding, scuffing and
chipping to match the rest of the surface.
Once complete, Dullcoat was airbrushed over the entire airframe.
To dirty things up a little further, I apply a
water/acrylic wash to a couple panels at a time and then pull the mix either
with a Q-tip, cloth or finger.
I’ve
had good luck doing this over dullcoat as it tends to dirty up the entire
surface slightly while the majority sticks in the panel lines.
I mask my wheel hubs with silly putty as well before
spraying the black.
I’m still
not sold on precut masks.
Putty
is FAR cheaper and reusable.
The radiators were painted black and drybrushed silver.
The wells and all associated landing gear parts were treated to the
same wash as the interior.
The
landing gear is a bit fiddly to get a good ‘lean’ on the wheels (another
MS406 characteristic) so care is needed here.
All the various antennas and gun barrels were added prior to
airbrushing various exhaust, gun, and underside stains.
Done!
 Another nice little kit from Hasegawa that’s
likely to never be eclipsed.
In
fact, there’s really no need.
There
is room for improvement but with or without, it still looks good on the shelf.
Though one must wonder with such a nice little kit of such an obscure
aircraft, why are we still lacking so many of the ‘standards’ in the current
mainstream, such as 109Fs, early P-40s, Yaks and Lavochkins.
Perhaps in time.
Until then,
if looking to add some more variety to your 1/72 shelf, pick one of these up.
You won’t be disappointed!
Another nice little kit from Hasegawa that’s
likely to never be eclipsed.
In
fact, there’s really no need.
There
is room for improvement but with or without, it still looks good on the shelf.
Though one must wonder with such a nice little kit of such an obscure
aircraft, why are we still lacking so many of the ‘standards’ in the current
mainstream, such as 109Fs, early P-40s, Yaks and Lavochkins.
Perhaps in time.
Until then,
if looking to add some more variety to your 1/72 shelf, pick one of these up.
You won’t be disappointed!
Review kit courtesy of daboss.
Nathan Stevens
June 2009
If you would like your product reviewed fairly and fairly quickly, please
contact
the editor or see other details in the
Note to
Contributors.
Back to the Main Page
Back to the Review
Index Page 2016