| KIT: | 1/72 Westland Welkin |
| KIT #: | No info provided |
| PRICE: | No info provided |
| DECALS: | One option? |
| REVIEWER: | Carmel J Attard |
| NOTES: | Vacuformed kit |
| HISTORY |
In general the Westland Welkin has a close resemblance
to the former Westland Whirlwind fighter. There were two principal types of
Welkin produced: These were the Westland Specification F4/40, which later
corresponded to the F1 version, and the later NFII version that was developed in
1946. The subject of the Hallam-Vac scale model is the Welkin F1 version. This
was a single seat day and night fighter capable of fighting at great heights.
The interesting thing as far as modeling is 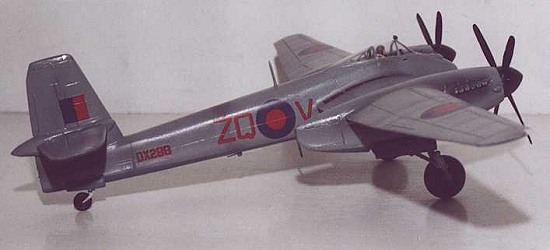 concerned
is that although it was never issued to a squadron, it was the subject of
several colour schemes and markings, which made it all the more
interesting.
concerned
is that although it was never issued to a squadron, it was the subject of
several colour schemes and markings, which made it all the more
interesting.
The prototype welkin DG558, which flew, flew on I-11-42, had a camouflage pattern to the upper surfaces painted similar to that on the Whirlwind of Dark green and ocean Grey with all yellow undersurfaces and an 18-inch sky painted “fighter band” around the rear fuselage. Some sources quote the upper surface camouflage scheme as being of dark green and dark earth. The production Welkin Mk1, e.g. XD278 had the standard fighter camouflage consisting of upper surfaces pattern of Dark green and ocean Grey with all medium sea Grey to undersurfaces. Fuselage band and spinners were sky. After a production of a dozen Welkins was complete, the camouflage scheme was altered to comply with the scheme issued on 7-6-43 for very high altitude fighters that operated by day. This consisted of all medium sea Grey to upper surfaces with PRU blue undersurfaces and spinners. The Welkin arrived at a time when plans were already under way for the prop driven fighter to make way for the Jet fighter. Much development was already in advanced stage for the introduction of the long series of Meteor fighters including the night fighter version as the NF11 and 14 to equip several squadrons of the RAF.
| CONSTRUCTION |
 It is
customary with all vacform kits that first thing I do is to wash the vacform
plastic sheets and dry them before I start work on the kit. This will remove any
film of mould release agent, which can hamper the painting process later on. The
vacform parts spread on a white plastic sheet consisted of: two fuselage
halves, four long wing halves, two parts that form the tail planes, four engine
nacelle parts, two wheel well floors and one cockpit floor, one seat part, and
four wheel halves. Two clear acetate cockpit canopies were supplied thus having
a spare one in case one is lost during trimming of the excess acetate. There are
also nine in number intricate white metal parts and these consisted of two first
class four bladed large propellers complete with large spinners, two
undercarriage oleo parts, four engine exhaust parts and a tail wheel part. All
of these parts had accurate shape and required the minimum of
trimming.
It is
customary with all vacform kits that first thing I do is to wash the vacform
plastic sheets and dry them before I start work on the kit. This will remove any
film of mould release agent, which can hamper the painting process later on. The
vacform parts spread on a white plastic sheet consisted of: two fuselage
halves, four long wing halves, two parts that form the tail planes, four engine
nacelle parts, two wheel well floors and one cockpit floor, one seat part, and
four wheel halves. Two clear acetate cockpit canopies were supplied thus having
a spare one in case one is lost during trimming of the excess acetate. There are
also nine in number intricate white metal parts and these consisted of two first
class four bladed large propellers complete with large spinners, two
undercarriage oleo parts, four engine exhaust parts and a tail wheel part. All
of these parts had accurate shape and required the minimum of
trimming.
 All the vacform
items such as the fuselage halves, wing halves, nacelle halves etc were first
pencilled round and removed from the backing with an exacto knife. The two
fuselage halves were then sanded down on a board that had a rough wet and dry
sanding paper stuck on it with a double-sided tape. These were sanded until the
pencil lines disappeared and the two halves matched the plan size on the drawing
provided with the kit. The cockpit aperture was then cut open on the upper
decking of the fuselage this took the form of a rectangular space that was
sufficiently large to receive the pilot seat. Cockpit sidewalls, instrument
panel and floor as well as decking behind pilot seat were then added from
plastic card and detailed according to reference material and photos of the real
aircraft. A control column was also added to the cockpit interior. These were
all glued in place using liquid cement and allowed to dry. As there was a minor
degree of warping at the rear fuselage close to the fin, I
All the vacform
items such as the fuselage halves, wing halves, nacelle halves etc were first
pencilled round and removed from the backing with an exacto knife. The two
fuselage halves were then sanded down on a board that had a rough wet and dry
sanding paper stuck on it with a double-sided tape. These were sanded until the
pencil lines disappeared and the two halves matched the plan size on the drawing
provided with the kit. The cockpit aperture was then cut open on the upper
decking of the fuselage this took the form of a rectangular space that was
sufficiently large to receive the pilot seat. Cockpit sidewalls, instrument
panel and floor as well as decking behind pilot seat were then added from
plastic card and detailed according to reference material and photos of the real
aircraft. A control column was also added to the cockpit interior. These were
all glued in place using liquid cement and allowed to dry. As there was a minor
degree of warping at the rear fuselage close to the fin, I  have found it an easy task
to cut through one of the fin/rudder part off a fuselage half. The fuselage
halves are then joined together and following that, the fin half that was
removed was then refitted in place and any misalignment was remedied with putty.
This gave a perfect end shape. (See photo of
have found it an easy task
to cut through one of the fin/rudder part off a fuselage half. The fuselage
halves are then joined together and following that, the fin half that was
removed was then refitted in place and any misalignment was remedied with putty.
This gave a perfect end shape. (See photo of  detached parts). During the
process of assembly, the panel lines on the fuselage and wings were carefully
rescribed with a sharp scribing tool.
detached parts). During the
process of assembly, the panel lines on the fuselage and wings were carefully
rescribed with a sharp scribing tool.
A combination of cutting away excess plastic with a sharp knife, subsequent filing and with use of wet and dry sheet was the method I have used to repeat the finishing process on all the other parts. Air intakes on the wing roots were all carefully cut to conform to shape. The interior of the wings in way of the air intake was painted black and following that the wing halves were then assembled and glued together. With other parts such as the engine nacelles, the wheel wells were cut and detail on the inside was added in the form of internal airframe stiffeners, brackets and actuators that correspond with the retractable undercarriage. An accurate 1:72 scale pilot figure was added to give a sound indication of the scale of the aircraft.
 The opening of the
wheel wells was done with a certain amount of care so that the excess parts were
to form the wheel doors. The two engine nacelles halves were then glued together
and allowed to dry. The nacelles were then aligned carefully on the main planes
and assembled in place. These may not have made a perfect fit but a small gap
that was left at the joint was carefully filled with putty and faired over to
bring a continuous smooth surface. The wings were then joined to the fuselage
with liquid polystyrene.
The opening of the
wheel wells was done with a certain amount of care so that the excess parts were
to form the wheel doors. The two engine nacelles halves were then glued together
and allowed to dry. The nacelles were then aligned carefully on the main planes
and assembled in place. These may not have made a perfect fit but a small gap
that was left at the joint was carefully filled with putty and faired over to
bring a continuous smooth surface. The wings were then joined to the fuselage
with liquid polystyrene.
By making reference
to the scale plans provided, details were added to the lower fuselage and the
undercarriage assembly was glued in place.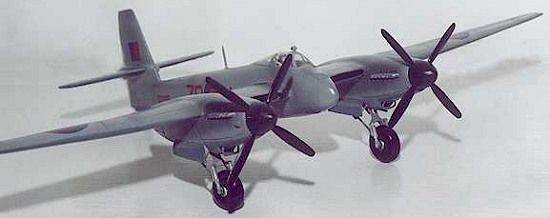
| COLORS & MARKINGS |
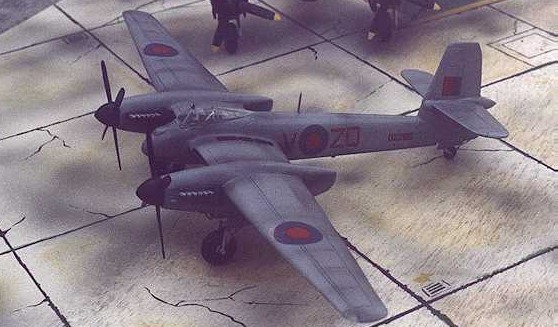
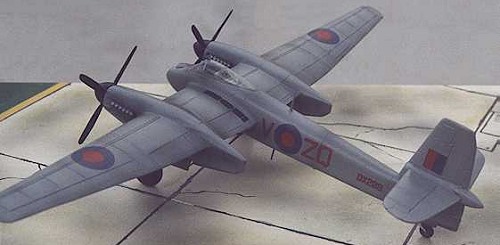
The excellent four view 1:72 scale drawing provided in the kit showed the Welkin in medium sea grey and PRU blue colour scheme. I have opted do mine in this attractive scheme which was then the standard scheme for the days just after the war. This was obviously the colour scheme suggested in the kit supplied for which a complete set of markings and registrations were supplied (mine was in duplicate).
| CONCLUSIONS |
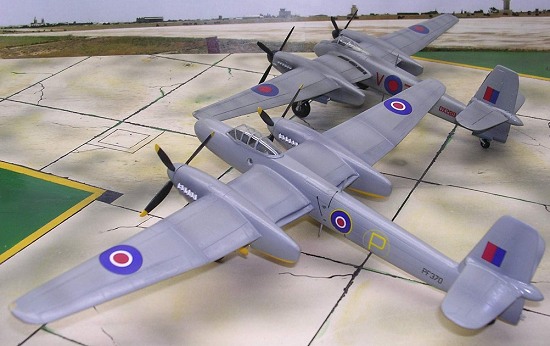 The Welkin was an interesting fighter model that had a unique
shape. It was a worthwhile kit to make and it stands out among other fighters
that were active later in the war, or the time that followed, in view of its
large wingspan adopted on the Welkin to enable it to operate on fighter
intercept missions at excessive height. The experimental flights on the
Welkin proved very fruitful to the development of the post war high
altitude fighter. A Welkin Mk2 also evolved with much improvement. A kit of the
Welkin Mk2 was also released by CMR in resin and having both types built made a
complete set.
The Welkin was an interesting fighter model that had a unique
shape. It was a worthwhile kit to make and it stands out among other fighters
that were active later in the war, or the time that followed, in view of its
large wingspan adopted on the Welkin to enable it to operate on fighter
intercept missions at excessive height. The experimental flights on the
Welkin proved very fruitful to the development of the post war high
altitude fighter. A Welkin Mk2 also evolved with much improvement. A kit of the
Welkin Mk2 was also released by CMR in resin and having both types built made a
complete set.
June 2005
If you would like your product reviewed fairly and quickly by a site that has around 300,000 visitors a month, please contact me or see other details in the Note to Contributors.