Silver Cloud 1/48 Spiteful F.14
|
KIT # |
4801 |
|
PRICE: |
$54.98 MSRP |
|
DECALS: |
One aircraft |
|
REVIEWER: |
Tom Berto |
|
NOTES: |
Short run |
|
HISTORY |
The aircraft proved a disappointment in most respects - because the wing had no washout, stall was abrupt, with the entire wing stalling at once. This was in sharp contrast to the Spitfire, in which the washout of the wing would cause a stall to begin at the roots, allowing the pilot to retain aileron control while mushing downward. The leading edge of the new wing was made more blunt in an effort to gain improved handling at the expense of speed, but with mixed results. Even with the blunt wing, however, the Spiteful was extremely fast - the fastest version, the Mark XVI with a Griffon 101 engine, achieved 494 mph in level flight, the fastest piston-engine aircraft ever flown in Britain, and exceeded at the time only by the P-47J, then decades later by the Unlimited Racing triad of Dago Red, Strega, and Rare Bear.
The elegant broad vertical stabilizer found its way onto the Mark 22 and 24 Spitfires, and the wings and undercarriage were used for the jet powered Supermarine Attacker. The Spiteful otherwise had no useful niche, caught between the Hawker Sea Fury, the continually improving Spitfire and Seafire, and the first jets. Only 19 Spitefuls and 18 Seafangs (the naval variant) were produced. Even out of that small quantity, six were built only to satisfy the production contract, and were never flown. None survive anywhere.
|
THE KIT |
The kit is short-run injection molded, with
thick, soft parts. The thickness and softness came in very useful
when the time came to start carving on the parts. Nicely cast white
metal parts are included for the prop blades, wheels, u/c and u/c
 doors, exhaust
stacks, and cockpit. Decals are included for one aircraft, RB-515.
The panel detail is very fine and recessed, but very little survived the
build.
doors, exhaust
stacks, and cockpit. Decals are included for one aircraft, RB-515.
The panel detail is very fine and recessed, but very little survived the
build.
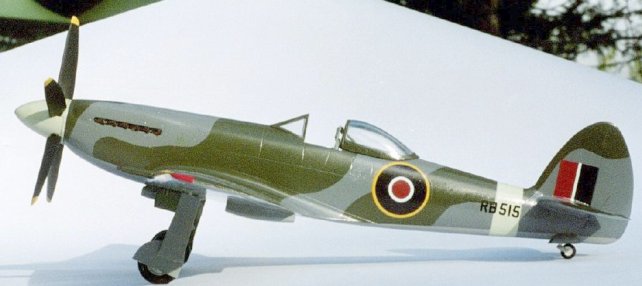
It took less than a minute after opening the box to realize that the beautiful broad tail of the real aircraft was badly rendered. That in the kit does not represent any tail that ever appeared on any Spiteful variant, let alone any Supermarine product that I know of. If anything, it looks like something Sir Geoffrey de Havilland might have designed in the early 1930's.
For me, the Spiteful's looks were the basis of its appeal. The misshapen tail made me consider not building this expensive kit at all. I belatedly started poking around on the web, and found that the tail was only the most obvious of this kit's inaccuracies. However, after pondering the problem for while, I realized that I could fix most of the problems to my own satisfaction - so I proceeded with the build.
|
CONSTRUCTION |
From nose to tail:
Propeller blades: these are thick and have the wrong profile. I scraped and sanded to thin them as much as I dared, then altered the profile to match what I could see in photographs that showed them in plan. I also altered the peg at the root, to allow attachment at a coarser pitch. An alternative approach would be to use the blades from the Cooper Details Mk 22/24 Spitfire exterior upgrade kit.
Spinner: the tip was the only plastic part of the kit that I used without modification! However, the attachment of the propeller to the fuselage was intended as solid, and I like my props to spin, so I had to modify the base of the spinner. It had a boss on the back that was circular, but not concentric with the outside diameter, so I first filed a smaller boss out of it that WAS concentric. I then installed a circular plate on the face of the boss. I captured that assembly between the fuselage halves when I put them together, and was judicious with my use of Tenax near the nose, so as not to wick it into the spinner/fuselage joint. The result was a propeller that will spin, although only by hand (a wind-tunnel test on the freeway, simulating Mach 5.8, failed to turn it aerodynamically).
 Nose: each side is a separate piece, forward of
the rear edge of the engine access panels. I attached each to its
fuselage half, then liberally backed up the joints with plastic sheet.
This left gaps on the centerline, easier to fix, but that became moot
when I noted that the tip of the nose was wider than the base of the
spinner, by about 1/2 mm. To correct this, I wet sanded both sides along
the mating faces, tapering from 1/4 mm at the spinner to zero at
cockpit. I've read that the entire fuselage of this model is too broad
in the beam, but didn't make a global correction.
Nose: each side is a separate piece, forward of
the rear edge of the engine access panels. I attached each to its
fuselage half, then liberally backed up the joints with plastic sheet.
This left gaps on the centerline, easier to fix, but that became moot
when I noted that the tip of the nose was wider than the base of the
spinner, by about 1/2 mm. To correct this, I wet sanded both sides along
the mating faces, tapering from 1/4 mm at the spinner to zero at
cockpit. I've read that the entire fuselage of this model is too broad
in the beam, but didn't make a global correction.
The underside of the nose appeared a bit too bulgy when laid against a scaled photo, so after fuselage assembly, I wetsanded the bulge to take out some of the convexity out of it.
I scooped out the slots for the exhausts to allow the metal stacks to be installed with their characteristic slight downward slope, then backed them up so that I could install the stacks after painting.
Cockpit: my understanding is that the Spiteful cockpit was different from the Spitfire cockpit. My references don't go that far, so I stuck with the kit parts, which went together well, and yielded a Spitfire cockpit! I added the brace that runs from the armored headrest to the rear fuselage deck.
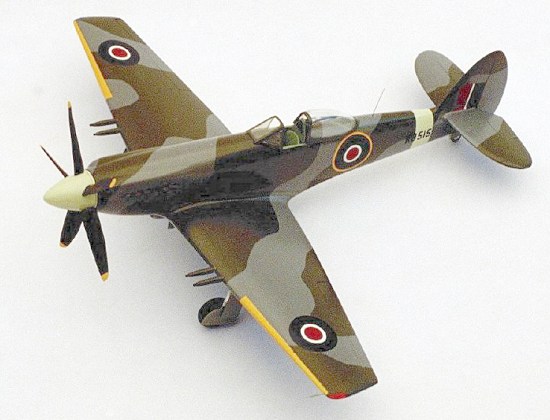
Wings: those on the real aircraft had a 13% thickness to chord ratio. Those on the model were approximately 16% - over 1 mm too fat! To make a fix difficult, the actual wing tapered in thickness in two distinct regions - a moderate taper nearest the fuselage, changing to a more aggressive taper just outboard of the undercarriage attach. In addition, the model's wing roots and fillets are molded into the fuselage, complicating a total fix. The ailerons didn't match the wing thickness well, and the wingtips, molded in one piece as part of the top wing, were too fat where the bottom wing meets them.

My kit building motto is "Fun and done". In keeping with that, when I decided to go ahead with this kit, I decided that I wouldn't completely fix the wing thickness problem. What I did instead was to wet sand up to 1/2 mm in thickness from the top and bottom wing pieces, but leave the root area unaltered so as to avoid having to modify the root and fillets molded into the fuselage. This provided the razor-like appearance of the original, while not required more complicated surgery. The alternative was to soak the wing pieces in boiling water overnight, then step on them.
Very little thickness was left over the wheel wells, but enough remained to maintain the profile and not buckle. Along the way, all the engraved detail disappeared. I restored the panel lines at the cannon access ports, but nowhere else. An unforeseen benefit of removing so much material was that the malformed ailerons and wingtips ended up blending into the wings quite well.
The one piece spar running across the fuselage and forming the back of the wheel wells was too large to fit through the fuselage or into the wings. I cut it down and carved out the fuselage, to allow it to fit, then significantly cut down the outer sections, so that they would slide into the wings.
The wings attached to the fuselage with little in the way of seams to fill. The dihedral looks small, but the original didn't have much at all, so what occurred might be correct. I'm lacking a good face-on view with which to make an accurate determination.
Cannons: the kit parts were not close to circular in profile, nor were the molded-in bases on the wings. I removed the bases as part of my wing fix, bored out the vestigial holes remaining, then replaced the kit parts with appropriately shortened cannons from the Cooper Details Mk 22/24 exterior upgrade kit.
 Wheels: I replaced the kit parts with those
from the Cooper Details Mk 22/24 kit, which were far more crisp. The kit
wheels had four spokes, the Cooper wheels (intended for Spitfire kits)
three spokes. The photos I have show Spitefuls with four and Seafangs
with three spokes, so using the Cooper wheels is not correct - it just
looks better.
Wheels: I replaced the kit parts with those
from the Cooper Details Mk 22/24 kit, which were far more crisp. The kit
wheels had four spokes, the Cooper wheels (intended for Spitfire kits)
three spokes. The photos I have show Spitefuls with four and Seafangs
with three spokes, so using the Cooper wheels is not correct - it just
looks better.
Radiator housings: the underwing radiators had 1 mm thick edges at entrances and exits. I carved these down as far as I dared. The radiators on the Spiteful were shallower, but much wider than those on the Spitfire, which made them wonderful for belly landings.
Rear deck: the rear deck of the fuselage required the most novel surgery. It was about 1.5 mm too high relative to the deck in front of the cockpit. Using my razor saw, I cut a wedge, 2 mm tapering to 0 mm, from each side of the fuselage, with the bottom of each wedge even with the canopy rails. I then glued the remainder of the decks back on to each fuselage side, squeezing them inboard until they met at the original midplane. This was what I thought was the riskiest part of the build, so I did it first - but it worked miraculously well. The only fix needed after that was some filing and sanding just in front of the vertical stabilizer, to take out a broad bump in the profile.
Canopy: although the Spiteful canopy was taller than that of the bubbled Spitfire variants, the kit canopy is perkier still. I had thought that this was a consequence of the need to make it fit the too-high rear deck, and anticipated a struggle in matching the canopy to the dropped rear deck. To my surprise, however, it fit the modified deck almost perfectly. I sanded a tiny bit off the rails and the same amount from the bottom inside of the back, to make it a bit more sleek - otherwise it dropped right on. I couldn't make up my mind about attaching it open or closed, so I settled on strips of double stick tape on the rails, and stuck it on that way.
Rear fuselage: the fuselage, measured to the
rudder, was 3 mm too long, so I hacked that off, then slimmed down the
fuselage by repeating what I had done at the nose: wet sanded both sides
about 1/2 mm each along the centerline, tapering to zero at the cockpit.
I also flat sanded away about 1/2 mm from the bottom of the fuselage, to
make it more slender in profile. The missing 3 mm length made for an
obvious problem with the elevators, which are beveled to allow the rudder
to swing: the notch was now too far aft. Moving them forward would have
made them too close to the front of the vertical stabilizer, equally
glaring. Not having the references to resolve
 how to accurately fix the
problem, I just increased the size of the bevel. Fun and done again.
how to accurately fix the
problem, I just increased the size of the bevel. Fun and done again.
Tail wheel: I moved this forward about 4 mm, to compensate for the fact that I had shortened its well by 3 mm. The tail wheel doors were thick lumps. I fixed one, then the other flicked into a parallel universe while I was fixing it, so I made a replacement from an old 1/72nd scale bomb.
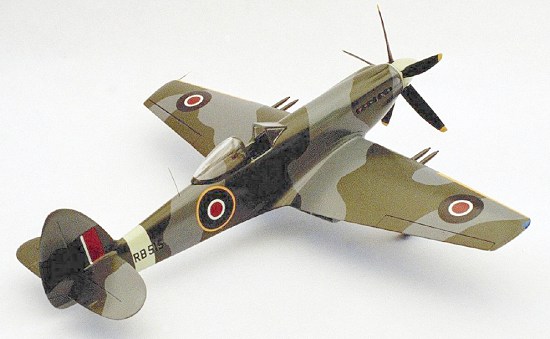
Vertical stabilizer and rudder: all of my profile fixes were done by laying the parts over scaled side view photographs from Jane's 1945-46 and an article in the July 2001 Aeroplane Monthly. Due to foreshortening in the photos, I ended up making the parts about 3% too small - I found out too late that the fin flash is a very handy two foot square size reference! A silly mistake, but the slight size error allowed me to achieve the correct shape entirely by cutting down and thinning the stabilizer, rudder, and the tiny bit of fuselage that extends beneath the rudder, and getting the shape right was most of the battle. An alternative for getting a correct size tail would be sacrificing the tail off the Airfix Mk 22/24 kit, or using the rudder from the Cooper Details kit, and staying with stabilizer molded into this kit.
|
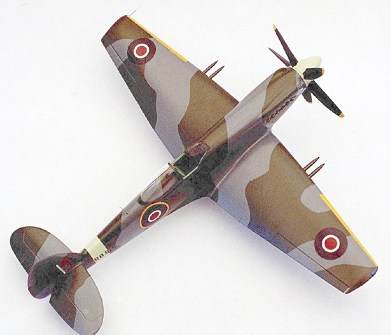
CAMOUFLAGE & MARKINGS |
I used Polly Scale acrylics throughout, Ocean Grey and Dark Green for the topsides, Sea Grey for the undersides, and Sky Type S for the fuselage band and spinner. Future was applied in the areas where the decals would be attached, to eliminate silvering. The decals were of high quality, although by the time I got the leading edge stripes soft enough to wrap around the wing, they were also soft enough to tear...next time out I'll paint those bands. The manufacturer's data for the prop blades were too heavy handed, so I left them off entirely. The kit was then hung from the slots for the exhaust stacks, and given three light airbrushed coats of Future. The real aircraft had a glassy surface, so well polished that the fuselage roundels can be seen reflected in the wings in some photographs. Boundaries between colors were hard-edged, and very little exhaust staining is visible.
|
CONCLUSIONS |
this kit is really only for those that refuse to build a vacuform kit under any circumstances, or who can't find the Falcon vacuform Spiteful, which I've heard (several times) is far more accurate. The amount of time spent releasing the vacuform parts from their sheets would probably be less than that spent doing the surgery and shaping required to get this kit to look approximately the way it should. These problems are perhaps reflected by the fact that, although this is the only available injection molded kit of a very appealing aircraft, and they only made 500, these kits are still available new, and have even shown up on sale new at 25% off.
|
REFERENCES |
Aeroplane magazine, July 2001
Jane's 1945-46
August 2003
Copyright ModelingMadness.com. All rights reserved. No reproduction in any form without express permission from the editor.
If you would like your product reviewed fairly and quickly , please contact the editor or see other details in the Note to Contributors.