| HISTORY |
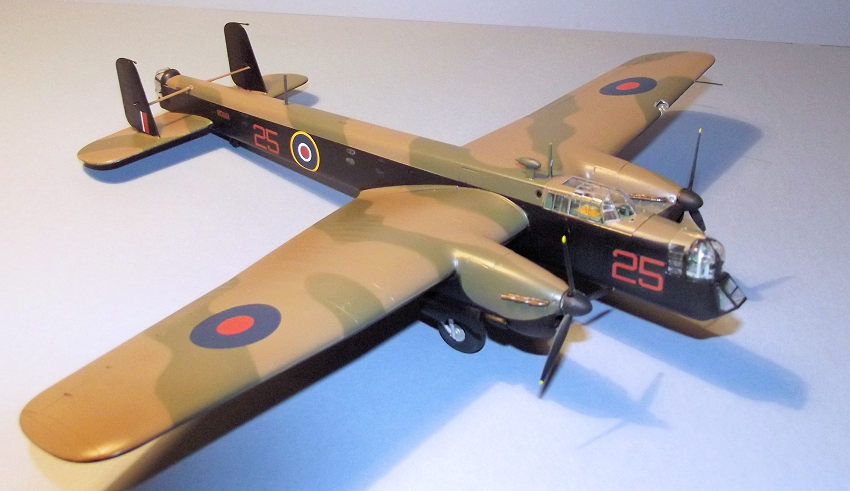
Airfix 1/72 Whitley V (Glider Tug)
| KIT #: | 08016 |
| PRICE: | £30.99 |
| DECALS: | Two options |
| REVIEWER: | Frank Reynolds |
| NOTES: | Xtradecal Sheet 72231. Simple conversion by means of a new paint job and after market decals. |
| HISTORY |
First
flown on 17 March 1936 the Whitley was a typical product of the RAF’s
expansion programme for high performance aircraft to replace traditional
biplanes and when ordered into production it was anticipated that it would
be supplanted by the next generation of bombers by 1939 after about 350 had
been built. The onset of war and delays to it successors meant that 1,466 of
the most developed version were built – the Merlin-engined Mk.V. By 1943 the
Whitley had been eclipsed as a bomber but enough examples were available to
be adapted for special forces’ use as a paratroop transport and as a
paradrop trainer. A circular belly hatch by the trailing edge of the wing
served as a paradropping exit, originally designed to accommodate a ventral
gun turret and there are anecdotes of a signi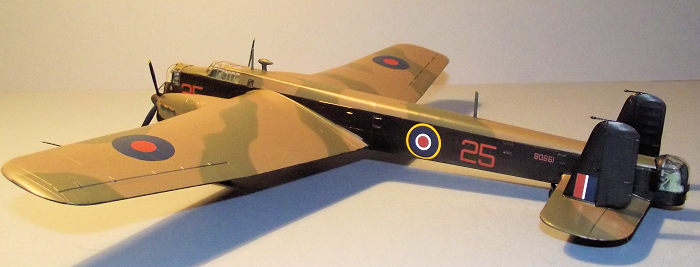 ficant
number of trainees bearing the facial scars of a “Whitley Kiss” as they
clouted their heads on the hatch rim during egress from the aircraft. A
number of airdrop Whitleys were modified as glider tugs for use at the RAF’s
Heavy Glider Conversion Unit, based at RAF Brize Norton, Oxfordshire. The
Whitley Vs were primarily used to tow General Aircraft Horsa gliders.
ficant
number of trainees bearing the facial scars of a “Whitley Kiss” as they
clouted their heads on the hatch rim during egress from the aircraft. A
number of airdrop Whitleys were modified as glider tugs for use at the RAF’s
Heavy Glider Conversion Unit, based at RAF Brize Norton, Oxfordshire. The
Whitley Vs were primarily used to tow General Aircraft Horsa gliders.
| THE KIT |
Supplied in Airfix’s now familiar top opening red box, there are four parts frames in pale blue-grey plastic and one of clear. The components were crisply moulded, with no evidence of flash and feature subtle recessed panel lines together with some of the most subtle fabric detail to the wings. The well printed decal sheet provided the main national insignia, cockpit instrument panels and minimal airframe stencilling. There are options for an extended or retracted undercarriage, open doors and ladders to the rear fuselage and nose and open bomb cells under the centre section, although I chose to model everything buttoned up. I also decided that a training unit aircraft would not carry any guns. The instructions run to twelve pages of pictograms and seventy constructional stages, so a careful study of the instructions is worthwhile.
| CONSTRUCTION |
This evolved as one in my “short series” of builds that seem to occur from time to time when one build leads to another. It began not long ago when Airfix released an irresistible C-47, Italeri a Short Stirling V glider tug, to be followed in short order by tracking down Italeri’s AS.51 Horsa and CG-4 Hadrian gliders, then a Valom Albemarle tug, so when I found that Xtradecal had released a sheet to include a glider tug variant of the Whitley, it was a “must have”. The subject that I chose has added interest for me since it depicts an aircraft from The Heavy Glider Conversion Unit, August 1942, at RAF Brize Norton, Oxfordshire, one of my local airfields and still very much a front line hub of the RAF’s 21st century transport and logistics operations.
The new
generation of Airfix kits tends to be engineered for the parts to have a
very snug fit and I have learned that even a coat of paint can throw
structures out of true, particularly when finished in my favourite Tamiya
acrylics. This has led me to modify my build techniques so as to make up
unpainted sub-assemblies where possible and then when they have set hard to
airbrush the appropriate colours, hand painting any finishing details where
that can be reached - so a little extra
 planning
is required.
planning
is required.
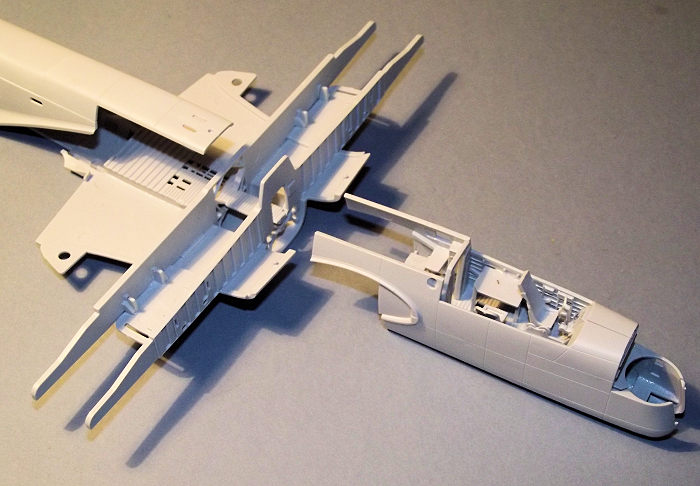
Forward planning is also required to cope with the unusual parts breakdown and structure of this particular kit. I look for sub assemblies that can be put together at an early stage so as to get a feel for the texture of the plastic and how it reacts to glue. The engineering of the Whitley certainly challenges forward planning. The fuselage forward of the wing is split conventionally into left and right sides and Airfix devote the first twelve stages of the instructions to installing the flight deck, flooring and bulkheads. Mindful of the problems with a tight fit of painted parts I assembled the whole interior unpainted.
The fuselage from the cockpit to the tail consists of left and right halves that form the fuselage base and sides but the upper surface is a long inverted U-shape that runs from the cockpit to the rear turret. This design eliminates any seam along the rear fuselage spine and ensures that the joins occur along panel lines.
Joining the unusual front and rear fuselage assemblies requires the construction of the lower wing centre section and two massive inner wing spars that also support a section of flooring over the bomb bay. When building these sub assemblies I did not want any glue squeezing out through the joints so they were carefully and slowly built up by dry fitting and then flowing Tamiya ultra thin cement into the relevant joints. I discarded all of the clear plastic small fuselage windows since I prefer to add such things after final painting using Micro Kristal Klear.
 Once
dry, the interior of these sub assemblies was sprayed with Tamiya XF-81
Interior Green with the aid of Iwata HP-C airbrush. I then backtracked to
pick out smaller interior details by hand painting seat cushions and the
instrument panel and adding seat belts from Tamiya tape. The kit decal sheet
provided instrument dials and a map for the Navigator’s table.
Once
dry, the interior of these sub assemblies was sprayed with Tamiya XF-81
Interior Green with the aid of Iwata HP-C airbrush. I then backtracked to
pick out smaller interior details by hand painting seat cushions and the
instrument panel and adding seat belts from Tamiya tape. The kit decal sheet
provided instrument dials and a map for the Navigator’s table.
Joining the fuselage halves requires these three major sub assemblies to be interlocked, with the front and rear fuselage sections sitting on top of the centre section where some of the interior parts also interlock. For someone who has spent a modelling lifetime joining left and right fuselage halves this certainly seemed a weird way of engineering the kit, especially since some of the joining faces cannot be seen during assembly. I guess it took me about twenty trial fits before I could get the structures to interlock to my satisfaction and even now they seem to be “ as near as”.
The wings were built up with the lower outer panels glued onto the wing spars and the outer upper wing panels glued in place. I then added the half bulkheads and two small sections of tubing structure to the wheel wells. The main structure was put on hold while I built the engine nacelles. Split vertically, the nacelles trap a radiator front and a cooling flap which can be posed open if required. Two small intakes are added to each side of the nacelles, while I set aside the exhausts for installation after the main painting. With the airbrush again loaded with XF-71 Interior Green the accessible areas of the nacelles, wheel bays and wing spars were given a quick blast of colour after which the nacelles were glued in place under the wings. I then went round the whole of the main airframe and glued all of the various doors shut and added the wing flaps in the closed position.
The
tailplane followed, being a fairly conventional structure. The horizontal
tail is split into left and right sections with upper and lower panels and
single piece elevators that can be posed deflected if required – although
the wing ailerons are moulded fixed in place. The ver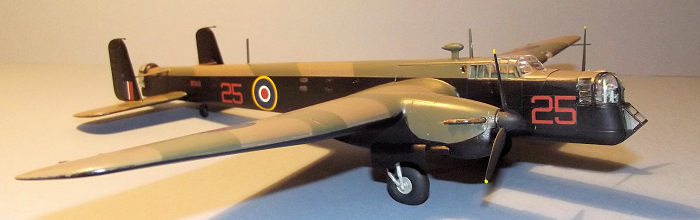 tical
tail fins consist of two parts with one piece rudders. The tail structure
had a positive fit with adequate locating tongues. I chose to leave the
horizontal steadying struts until later in the build so they would not
interfere with masking and painting the upper surfaces. With the addition of
two small deflector plates either side of the rear turret aperture, I could
turn my attention to the turrets and ancillaries.
tical
tail fins consist of two parts with one piece rudders. The tail structure
had a positive fit with adequate locating tongues. I chose to leave the
horizontal steadying struts until later in the build so they would not
interfere with masking and painting the upper surfaces. With the addition of
two small deflector plates either side of the rear turret aperture, I could
turn my attention to the turrets and ancillaries.
I sensed that there could be trouble with the turrets upon reading stage 68 of the instructions “ remove material to achieve a close fit”. The nose turret is faired into the main fuselage with a glazed saddle-type fairing and Airfix suggest that it is shaved down on the inside where it sits on top of the turret.
I could not establish how much
to remove until the turrets were built, so the front and rear turret
interiors were built up from the kit parts, test fitted into the turret
glazing and painted Interior Green. I installed the glazing to the flight
deck and nose of the main airframe then masked all of the fuselage glazing
and gun turrets with Eduard pre-cut masks. The turrets were sprayed matt
black and when dry I tried to juggle the nose t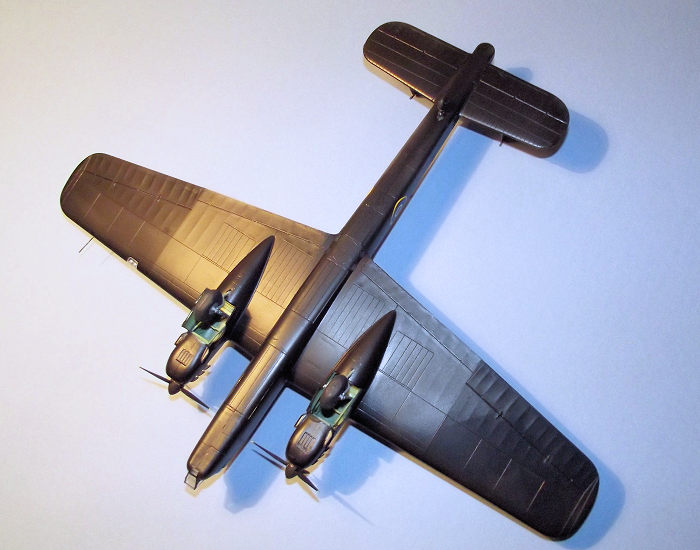 urret
and its fairing into position. Much juggling, fiddling and fettling later, I
settled for cutting off part of the nose turret ring and lower part of the
nose turret interior so that it would sit down far enough for the trimmed
down fairing to fit over the top. It is close, as close as I dare without
risking breaking a glazed part, but it is most unusual for a mainstream
manufacturer to suggest a bit of fettling during construction.
urret
and its fairing into position. Much juggling, fiddling and fettling later, I
settled for cutting off part of the nose turret ring and lower part of the
nose turret interior so that it would sit down far enough for the trimmed
down fairing to fit over the top. It is close, as close as I dare without
risking breaking a glazed part, but it is most unusual for a mainstream
manufacturer to suggest a bit of fettling during construction.
I found early in planning the build that the landing gear could be added to the airframe after painting so as a diversion I painted the gear legs and hubs in Aluminium Silver and the tyres in Tamiya XF-85 Rubber Black.
| COLORS & MARKINGS |
With the glazing suitably masked the airframe was checked over and a few smears of filler were found to be needed - no doubt due to operator error. The turret openings were blocked off with small pieces of plastic sponge.
The airframe was primed with grey auto primer from a rattle can .
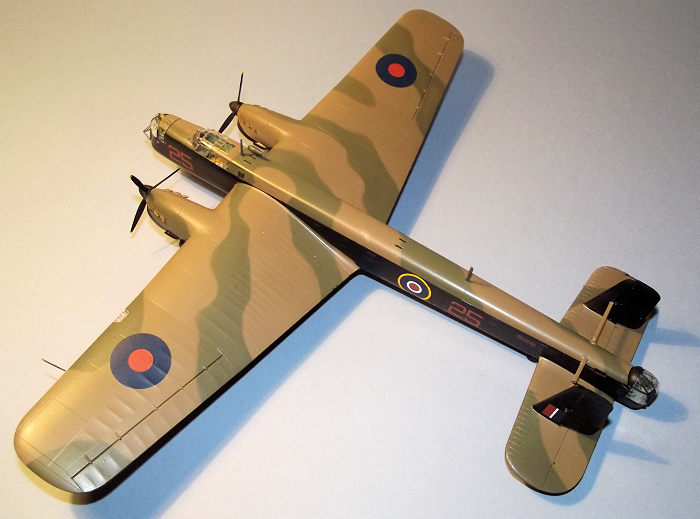
The upper surfaces were painted in Xtracrylix XA 1002 Dark Earth applied by my Iwata HP-C airbrush. The relevant areas were masked off with Tamiya tape and the contrasting camouflage of Tamiya XF-81 Dark Green was applied. When the paint had dried enough the upper surfaces were masked off with Tamiya tape ready for the application of Tamiya X-18 semi-gloss Black to the sides and under surfaces.
On
completion of the paintwork the masking was stripped away with the exception
of the masking to the gla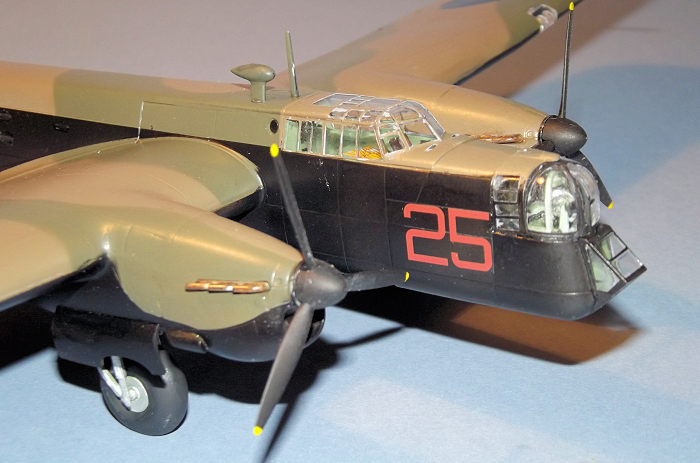 zing
and the whole airframe treated to two hand brushed coats of Future/Klear
floor polish prior to the application of decals.
zing
and the whole airframe treated to two hand brushed coats of Future/Klear
floor polish prior to the application of decals.
The Xtradecals went on easily, assisted with a minimum of Micro Sol and Set and settled nicely onto the subtle surface detail. A final coat of Xtracrylix Matt varnish was sprayed on and the masks to the glazing stripped away. The remaining small windows were glazed with Micro Kristal Klear applied with the tip of a wooden toothpick.
I fixed the nose and tail turrets permanently in place and stripped the masking away. The nose turret fairing had to be glued next to a finished, painted, nose area which I find is not an ideal arrangement because any glue spillage may require a messy repair, but I just about got away with it.
The landing gear was added to the gear bays quite easily, having a positive and sturdy location.
The propellers had been painted black earlier in the build, with the tips picked out with a dab of yellow , they were added to the nacelles together with the exhausts.
Finally the gear doors were added, the tail struts and the radio masts installed.
| CONCLUSIONS |
I found the Whitley to be different and maybe this is no bad thing. It was a small challenge in planning the build but still a satisfactory result. Recent Airfix kits have complex structures and in many ways they are returning to their roots in that much of the interior cannot be seen but it certainly enlightening to see the layout of the crew positions.
I enjoyed building it; this may not be a beginners’ kit, but with care a good result can be achieved.
| REFERENCES |
British Warplanes of World War II, Aerospace Publishing Ltd 1998
Forgotten Bombers of the Royal Air Force, by Ken Wixey. Arms and Armour Press 1997.
7 March 2017
Copyright ModelingMadness.com
This package courtesy of my wallet.
If you would like your product reviewed fairly and fairly quickly, please contact the editor or see other details in the Note to Contributors.