Classic Airframes 1/48 Blenheim I
|
KIT # |
435 |
|
PRICE: |
$54.95 |
|
DECALS: |
See Review |
|
REVIEWER: |
|
|
NOTES: |
|
|
HISTORY |
The progenitor of the Blenheim, the Bristol Type 142, was ordered in 1934 as an 6-seat high-speed transport by Lord Rothermere; its top speed of 285 m.p.h. was 30 m.p.h. faster than the newest RAF fighter, the Gloster Gladiator. When asked by the RAF if they might test his new aeroplane, Lord Rothermere presented it to the service, christening it "Britain First."
 The Bristol Blenheim was the first modern, all-metal, cantilever,
stressed-skin monoplane to be placed in production for the RAF. Acclaimed as a
world-class light bomber and a major step forward in combat aircraft design when
it first flew in 1936, the Blenheim placed the British aircraft industry in the
forefront of modern day bomber design. Its fully-loaded top speed of 281 m.p.h.
at 12,000 feet was only 25 m.p.h. slower than the prototype Hurricane;. The
aircraft set a pattern in light bomber design that would be followed by all
other air forces.
The Bristol Blenheim was the first modern, all-metal, cantilever,
stressed-skin monoplane to be placed in production for the RAF. Acclaimed as a
world-class light bomber and a major step forward in combat aircraft design when
it first flew in 1936, the Blenheim placed the British aircraft industry in the
forefront of modern day bomber design. Its fully-loaded top speed of 281 m.p.h.
at 12,000 feet was only 25 m.p.h. slower than the prototype Hurricane;. The
aircraft set a pattern in light bomber design that would be followed by all
other air forces.
At the time it was taken onto operations by the RAF in 1937, the Blenheim possessed a performance that allowed it to outrun contemporary fighters; it was looked at as the Mosquito would be five years later. The Blenheim I carried a crew of three: pilot, navigator-bombardier, and wireless operator/gunner. Armament consisted of one .303 "K" gun in the port wing and another in as fully-powered dorsal turret, with an internal bomb load of 1,000 lbs. Range, fully loaded at 220 m.p.h. was 1,250 miles, endurance was 5.65 hours, initial climb rate was 1,540 f.p.m., and ceiling was 27,280 ft.
However, such was the revolutionary pace of aircraft design and development during the two years between this event and the outbreak of the Second World War in September, 1939, that the aircraft proved woefully vulnerable to attack by the new fighters powered by high-performance engines. Nevertheless, the Blenheim bore the brunt of the fighting on every front to which the Royal Air Force was committed for the first three years of the war; despite its limitations, it served valorously.
The Mk.If Fighter:
 By the outbreak of war, the Blenheim I served in the bombing role only with
Middle East and Far Eastern-based units. As the Mk.I was supplanted in the
bomber squadrons by the later Mk.IV, 200 were converted to the Mk.IF as a
long-range fighter with 4 .303 machine guns in a ventral pack. Blenheim IFs
undertook the first night intruder missions over Germany on December 21-22,
1939. In the Spring of 1940, these aircraft made daylight missions to Rotterdam
and Amsterdam to confront the Luftwaffe, and served with distinction as
long-range fighters during the evacuation of Dunkirk. They were pressed into
service as night fighters and became the first British aircraft to carry the A.I.
Mk.IV radar. The first successful night kill on July 22, 1940, however was the
result of ground control placing the aircraft within visual range of its victim;
the first kill using A.I. Mk.IV did not come until late August.
By the outbreak of war, the Blenheim I served in the bombing role only with
Middle East and Far Eastern-based units. As the Mk.I was supplanted in the
bomber squadrons by the later Mk.IV, 200 were converted to the Mk.IF as a
long-range fighter with 4 .303 machine guns in a ventral pack. Blenheim IFs
undertook the first night intruder missions over Germany on December 21-22,
1939. In the Spring of 1940, these aircraft made daylight missions to Rotterdam
and Amsterdam to confront the Luftwaffe, and served with distinction as
long-range fighters during the evacuation of Dunkirk. They were pressed into
service as night fighters and became the first British aircraft to carry the A.I.
Mk.IV radar. The first successful night kill on July 22, 1940, however was the
result of ground control placing the aircraft within visual range of its victim;
the first kill using A.I. Mk.IV did not come until late August.
Foreign Use of the Blenheim:
The Blenheim I served with several foreign air forces. Those of the Royal Yugoslav Air Force made valorous attacks against German armored forces, during which the Regimental Commander was killed by fragments from his own bombs.
Finland had been one of the first foreign purchasers of the Blenheim, receiving 12 of the initial production machines in the fall of 1938. During the Winter War, a further 18 ex-RAF Mk.Is were provided to the Finns. The Mk.I was used throughout the Continuation War, with licensed production continuing until the summer of 1944. The last Blenheim Mk. I left Finnish Air Force service in 1953!
|
THE KIT |
The Blenheim series has been eagerly awaited since their impending release was announced by Jules Bringuer of Classic Airframes in late 1999. As usual, the kit has been produced by MPM, and has the standard excellent surface detail with engraved panel lines and good-looking fabric effect on the control surfaces. The kit comes with three large injection sprues with parts that are among the best I have seen from MPM. The quality of the resin detail parts is first-rate. The cockpit canopy and turret are injection-molded clear plastic rather than vacuform, and are very clear; dipping these parts in Future results in glass that is as clear as the best vacuform canopy.
The decals are printed by MicroScale and provide markings for two aircraft: a Mk.IF from 248 Squadron in late 1939, and a Mk.I bomber based at Alor Star, Malaya, on December 9, 1941.
|
CONSTRUCTION |
I was fortunate enough to obtain a second kit, and so I have built a Blenheim Mk.I bomber and Mk.If fighter. So far as construction is concerned, the only difference between the two kits is the addition of the ventral gun pack to the fighter version, so what follows is information applicable to building the kit whichever version is chosen.
 Given the position of the cockpit at the front of the fuselage, this turns
out to be one model where construction does not start with the cockpit.
Given the position of the cockpit at the front of the fuselage, this turns
out to be one model where construction does not start with the cockpit.
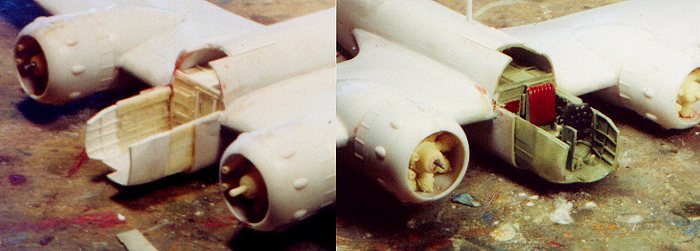
I began with the wings, which means I began with the cast-resin wheel wells. This is one part of the model that should have been done in injection plastic, even as multi-part assemblies, as they would have been far easier. The parts come with a large block of resin on top, which must be sanded down. I mean it must be sanded down! With repeated test-fitting to get this part to fit where it should and have the upper wing fit properly, I sanded down to the point where what was left was paper thin on the upper surface, and actually had to be sanded through to the rear to get it to taper enough to fit. Even then, the fit was forced once the gear wells were fitted in correct position in the lower wing half. I ended up gluing the wing halves together with cyanoacrylate, gluing in sections and applying zip kicker with a pipe cleaner to the section as I went along to get everything to hold together. The final result looks good, with acceptably-thin trailing edges.
The engines are cast resin, with injection-molded cowlings, which all fit easily once the ejector pin marks are cut away from the inner surfaces of the cowling halves. The one fiddly thing with the assembly is the exhausts that go from the cylinders to the collector ring: they are small, and likely to spring out of the tweezers and end in the carpet. I replaced several with bits of Evergreen .030 rod, properly bent. This is the first time I have seen this bit of detail in a kit, and it looks nice. If, however, you have been able to live without these in your Beaufighter model, you can likely pass on them here without harming the overall look of the finished product. Once they were assembled, I painted the entire interior semi-gloss black, which is the proper color for British engines of this period.
I then turned to the fuselage. The rear bulkhead of the cockpit is cast resin, with a large block that is out of sight. If you fit this to the fuselage as the instructions say, there is no fit problem. However, the Pilot Press cutaway drawing I was referring to (a Mk.IV, but the airplanes are the same from this bulkhead aft), shows this bulkhead as being in line with the rear of the cockpit windows, rather than ahead of it. To get this fitted properly, you need to cut off that casting block - or at least take off about 1/16" of either side of it, and then trim the interior of the wing joints, to allow the bulkhead to be fitted properly. This is mostly time-consuming rather than difficult, and there is every possibility that the instructions are right, so you can avoid this altogether and still have a nice result. After gluing in the gunner's seat and gun mount, and the associated bulkheads of the turret area, I glued the fuselage together and was ready to assemble the wings and horizontal stabilizers to it.
Wings and Horizontal Stabilizer Assembly and Alignment:
 This is the one area of the kit that is definitely "fiddly;" it has
to do with alignment. If you assemble the wings and the horizontal stabilizers
to the cockpit with no modification, the result will be that both wings and
stabilizers will be "swept back" about 5 degrees. You need to do a lot
of test fitting here. I ended up using a pencil to emphasize the centerline of
the fuselage, the panel line of the main spar of the wing, and the forward edge
of the elevator, so I would have visual references to obtain proper alignment.
You want the main spar of the wing and the forward edge of the elevator to form
lines that are 90 degrees to the centerline of the fuselage. A lot of sanding
will be necessary on the butt joints of wings and stabilizers to get the proper
angle. Once this is accomplished, wings and stabilizers fit to the fuselage with
no problem whatsoever.
This is the one area of the kit that is definitely "fiddly;" it has
to do with alignment. If you assemble the wings and the horizontal stabilizers
to the cockpit with no modification, the result will be that both wings and
stabilizers will be "swept back" about 5 degrees. You need to do a lot
of test fitting here. I ended up using a pencil to emphasize the centerline of
the fuselage, the panel line of the main spar of the wing, and the forward edge
of the elevator, so I would have visual references to obtain proper alignment.
You want the main spar of the wing and the forward edge of the elevator to form
lines that are 90 degrees to the centerline of the fuselage. A lot of sanding
will be necessary on the butt joints of wings and stabilizers to get the proper
angle. Once this is accomplished, wings and stabilizers fit to the fuselage with
no problem whatsoever.
The Cockpit:
I assembled the sidewalls and floor of the cockpit in position, then test-fit a section of the forward canopy. The result to me was that the cockpit floor for the Mk. I is too short, as well as the sidewalls. Again, this is something one can live with as the final result will look acceptable from what I have seen of the original built-up out-of-the-box model of this kit, which is over at HyperScale.
I decided however to fill up that cockpit, since it is so visible. I used plastic card stock and Evergreen strips to make extensions to the side walls, and utilized the Mk.IV cockpit floor, cut back to the proper length. This involves a lot of test fitting. You should clean up and assemble the entire three-part canopy (after you have Futured all the parts); I found that the plastic the canopy was made of did not want to glue solidly with Tenax, so I ended up gluing them together with cyanoacrylate (which is no problem, since the Future protects the glass from the side effects of the C-A). Once you have the extension parts shaped and assembled, slide them into the canopy and be sure they are bent properly to fit inside. Then attach them to the kit sidewalls, then slide the canopy on over this. When the canopy slides easily into position, you have done everything right.
Once the basics were assembled, I painted the cockpit British Interior Green, with the instrument panel and other "black boxes" painted semi-gloss black. I did the instrument faces with decals from a Pro-Modeler British sheet that gives the generic British panel (bet you didn't realize that the Brits made an instrument panel where each instrument was in the same position, regardless of the aircraft the panel was in, which made transition between types vastly easier for the pilot).
With the cockpit finished, I glued the canopy in position, then masked off all that glass with shiny Scotch transparent tape. This leaves no residue when pulled up if you have Futured the canopy first.
|
PAINT & DECALS |
Painting:
 Call me obtuse, but I had decided not to do the aircraft the kit decals
provided markings for. This decision was aided by the arrival of the July 2000
issue of Scale Aviation Modeler International magazine, which had a long article
on the Blenheim I, with three-view drawings (the drawings that had brought my
attention to the alignment problem) and several color profiles. Looking through
the Decal Dungeon, I discovered enough sheets of Finnish markings to piece
together markings for a Finnish Blenheim I, so this is how I did my bomber
version, in the Continuation camouflage markings of Olive Green (for which I
used RLM83), black, and light blue, with yellow lower wingtips and fuselage
band.
Call me obtuse, but I had decided not to do the aircraft the kit decals
provided markings for. This decision was aided by the arrival of the July 2000
issue of Scale Aviation Modeler International magazine, which had a long article
on the Blenheim I, with three-view drawings (the drawings that had brought my
attention to the alignment problem) and several color profiles. Looking through
the Decal Dungeon, I discovered enough sheets of Finnish markings to piece
together markings for a Finnish Blenheim I, so this is how I did my bomber
version, in the Continuation camouflage markings of Olive Green (for which I
used RLM83), black, and light blue, with yellow lower wingtips and fuselage
band.
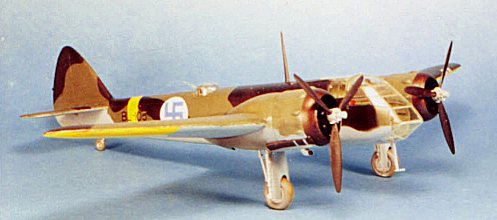
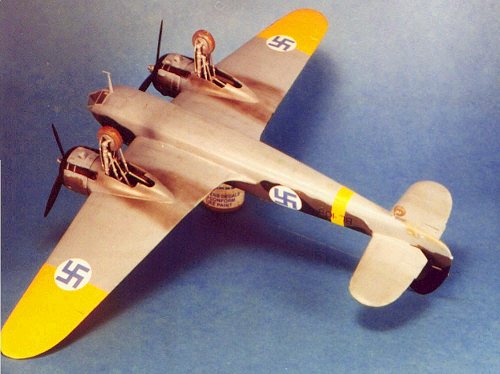
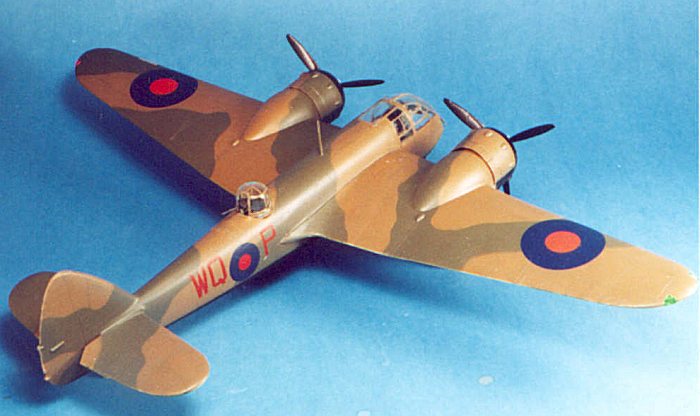
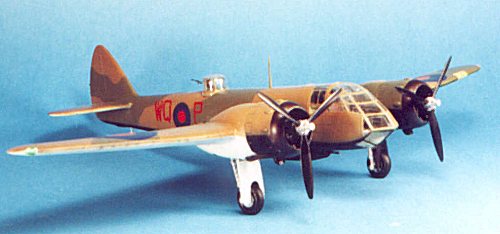
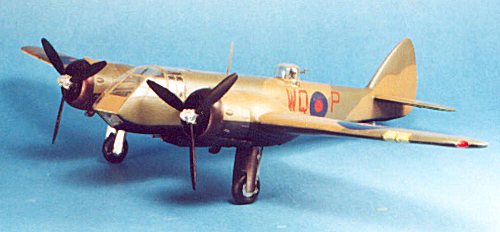
Finding that I had some Type B roundels that were the proper size, and some dull dark red lettering that was the proper size and font, I decided to do the Blenheim Mk.If from 604 Squadron in the SAMI profiles. This was not the simple black/white half and half scheme on the lower surfaces, but rather a white lower starboard wing and horizontal stabilizer, with black cowling, aileron and elevator on that side, with the other side and the entire fuselage black. After one coat of semi-gloss black over those areas, I added a touch of dark grey to the paint and went over some panels of the wing and fuselage, to break up the monotone. The upper surfaces were done in the B-scheme camouflage of Dark Earth and Dark Green.
The collector rings and exhaust pipes for both models were painted with Testors Metalizer "Burnt Metal" and sealed.
Decals:
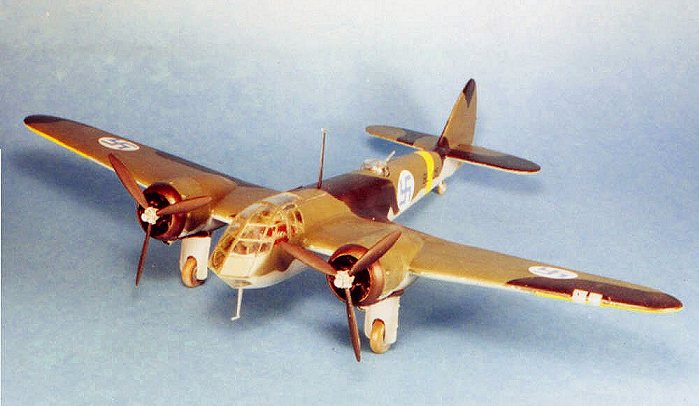
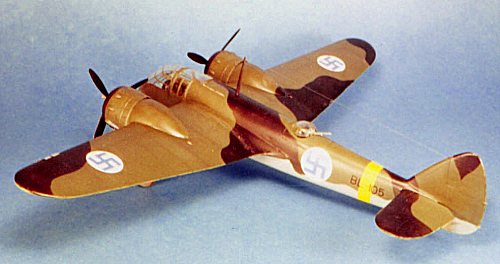
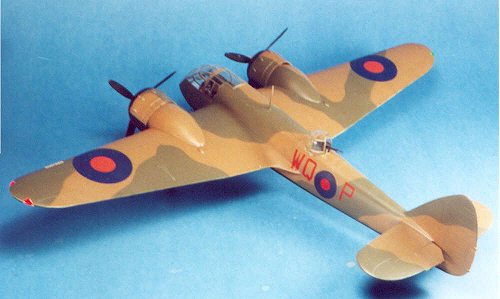
The Finnish bomber was marked with decals from the Aeromaster Fokker D.XXI sheet, with letters cut and trimmed to turn "FR" into "BL." The airplane was done as "BL-105," the second Mk. I of the original Finnish order delivered in 1938, which survived the Winter War, the Continuation War, and was one of the last Blenheims to leave Finnish service in the early 1950s.
The Mk.If used the upper wing roundels from the kit sheet, with Type B roundels from a ModelDecal sheet, and squadron codes from another ModelDecal sheet.
Final Assembly:
 The landing gear is complicated, but the instructions are clear as to what
goes where, and everything assembled easily.
The landing gear is complicated, but the instructions are clear as to what
goes where, and everything assembled easily.
The turret on the Blenheim could be raised for use, or lowered in flight to reduce wind resistance. The turret assembly in the kit allows the modeler to do either position. I therefore lowered the turret for the Finnish bomber and raised it for the RAF fighter.
With regard to weathering, I decided the Finnish version would represent "BL-105" just after the repainting in Continuation War markings in 1941, so there would be little weathering beyond exhaust stains and a few dings. The RAF fighter was as it had been in the Spring of 1939, so it was also cleaner than it would have been a year later, with only exhaust stains and a few dings along the walkway of the upper left wing.
|
CONCLUSIONS |
I think it is fair to say that this is the best kit yet released by Classic Airframes, and is well worth its price. I heave heard rumors that there will be some aftermarket decals released for the kit, and there is a possibility of a further release from Classic Airframes of a "small air forces Blenheim I" that might have Finnish, Yugoslav or Rumanian markings included.
Thanks to Classic Airframes for the review kits.
If you would like your product reviewed fairly and fairly quickly, pleasecontact the editor or see other details in the Note to Contributors.
Back to Reviews Page 2020