
|
KIT # |
460 |
|
PRICE: |
$39.95 |
|
DECALS: |
Three aircraft |
|
REVIEWER: |
|
|
NOTES: |
Multimedia with resin and vacuformed parts |
|
HISTORY |
The Hawker Hurricane was the first monoplane fighter adopted by the Royal Air Force since the Bristol M.1C Scout of World War I, and was also the first fighter in RAF service capable of exceeding 300 m.p.h. The airplane was evolutionary, in that all of its construction techniques were based on the traditional formula of metal airframe with fabric skinning other than the engine cowling and cockpit area.
The first flight on
November 6, 1935, was so successful that the directors of Hawker Aircraft felt
justified in tooling up and ordering material for 1,000 aircraft in advance of
an official production order. Given the timing of the aircraft's arrival on
the scene, its traditional methods of construction were useful, in that it
allowed a rapid production tempo to be built up,
 while squadrons making the
leap from what were basically advanced World War I fighters to modern fighters
were able to maintain and repair their new Hurricanes without extensive
re-training of ground personnel. This was unlike the Spitfire, which was
completely modern in concept and construction, and presented problems in
building up production and in operational maintenance. Had the Hurricane not
existed, and in such numbers, the Battle of Britain would assuredly have had a
far different outcome.
while squadrons making the
leap from what were basically advanced World War I fighters to modern fighters
were able to maintain and repair their new Hurricanes without extensive
re-training of ground personnel. This was unlike the Spitfire, which was
completely modern in concept and construction, and presented problems in
building up production and in operational maintenance. Had the Hurricane not
existed, and in such numbers, the Battle of Britain would assuredly have had a
far different outcome.
111 Squadron - "Treble One" - was the first Fighter Command unit to take delivery of Hurricanes in January 1938, and became the "service trials unit" for the RAF. Moving up from the Gloster Gauntlet, an airplane thoroughly derivative of the technology of the First World War, the pilots were impressed by the size of the Hurricane, the noise associated with its engine, and the marked feeling of speed when airborne in comparison with their previous mount. One thing was discovered fairly quickly: the fabric-covered wing was not up to the performance requirements of high-speed flight. Pilots reported seeing the fabric "ballooning" at maximum speed; fortunately there were no reported fabric failures, which would have led to a catastrophic wing failure. However, Hawkers undertook the design of a metal-covered wing, and many if not most of the early production Hurricanes eventually had their fabric wings replaced during the course of 1940. Archaic as its construction might have been, the very primitiveness of the early Hurricane became Britain's salvation in the Battle of Britain, due to the fact the fabric wings and fuselage were easily patched up when aircraft were recovered from crashes and thus returned to service more quickly than did the more modern Spitfire.
|
THE KIT |
For a look at what comes in the kit, please visit the preview.
|
CONSTRUCTION |
Basically, if you have built the Hasegawa Hurricane in any of its incarnations, this Hurricane kit will present no new difficulties in construction, and because of the superior production design which keeps the break between wing and lower rear fuselage along a panel line rather than through the fabric effect, it will be easier to build.
 The parts of this kit
are almost exactly like their counterparts in the Hasegawa kit, with the
proviso that they are not so crisply-molded, due to the difference in
injection molding technology used. You will need to clean up mold lines on
all the interior parts before proceeding to assemble the model.
The parts of this kit
are almost exactly like their counterparts in the Hasegawa kit, with the
proviso that they are not so crisply-molded, due to the difference in
injection molding technology used. You will need to clean up mold lines on
all the interior parts before proceeding to assemble the model.
I first painted the cockpit parts and the interior of the fuselage British Interior Green, and then glued the fuselage halves together. While all that was drying, I took the resin wheel well and attacked the huge molding block with my Dremel Tool. It was no small effort to hack this off, and I then sanded down the "roof" of the wheel well until I could see light through it, to be sure it would fit inside the wing. When this was done, I assembled the wing and set it aside.
 One thing to note here
is that you must attach the resin radiator intake to the plastic radiator
housing before you glue the radiator housing in position on the wing.
This is because there is otherwise a substantial "step" between the parts. If
you get them right beforehand, you can fill the gap that is then created with
white glue and thereby avoid having to putty over the area, sand it down and
then rescribe the detail.
One thing to note here
is that you must attach the resin radiator intake to the plastic radiator
housing before you glue the radiator housing in position on the wing.
This is because there is otherwise a substantial "step" between the parts. If
you get them right beforehand, you can fill the gap that is then created with
white glue and thereby avoid having to putty over the area, sand it down and
then rescribe the detail.
I then painted and detailed the instrument panel, assembled the cockpit, and used an Eduard p-e seatbelt set to finish off the cockpit. I then slipped the cockpit into position, glued it, then attached the wing to the fuselage.
The elevators and rudder are molded separately. I posed them with the elevators slightly "drooped" and the rudder slightly "cocked." Since I had decided to do a very early Hurricane I, I did not add the ventral fin.
With careful assembly, I only needed a bit of Mr. Surfacer 500 on the centerline seam of the fuselage.
|
CAMOUFLAGE & MARKINGS |
Painting:
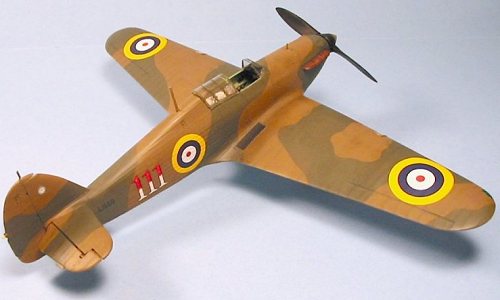
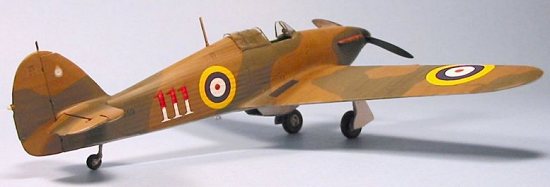
I used Gunze Sangyo RAF Dark Earth and RAF Dark Green for the upper surfaces, and SnJ Aluminum paint for the lower surfaces.
I first preshaded
the entire model with flat black, then applied the SnJ to the lower surfaces.
This was masked off, and then an "A" scheme camouflage pattern was applied to
the model. I masked the pattern, running t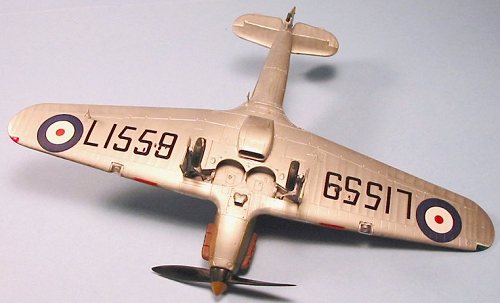 hread
1/16" in from the pattern edge to raise it, which allowed for a "scale"
overspray while avoiding a raised "paint ridge" from paint pooling. When all
was finished, I gave the model a coat of Future.
hread
1/16" in from the pattern edge to raise it, which allowed for a "scale"
overspray while avoiding a raised "paint ridge" from paint pooling. When all
was finished, I gave the model a coat of Future.
Decals:
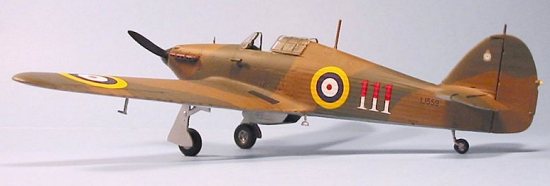
I wanted to do a Hurricane I that was early, with both the fully retractable tail wheel and "kidney" exhausts, from 111 Squadron. The kit decals are for L1555, the record-setting Hurricane flown by Squadron Leader John "Downwind" Gillan, which photos show had the later ejector-style exhausts. Looking through my Hurricane books, I found a photo in the old Camouflage and Markings booklet of several 111 Squadron airplanes taken during their official visit to the Paris Air Show in June 1938. L1559 had kidney exhausts, and all the airplanes had the "111" on their fuselages, with the upper half of the numbers in the flight color.
It was easy to "cut and replace" the kit decals to do the serials for "L1559." I applied the white "111" decals and when they had set up, I hand-painted the upper half of the numbers in red. When that was dry, I sprayed over the numbers with ModelMaster Metalizer Sealer, since it is a lacquer, then applied the black outline decals - that way, I did not take the chance of softening and ruining the paint under the decal solvent. The rest of the kit decals, being printed by MicroScale, went down with no problem.
|
FINAL CONSTRUCTION |
I attached the landing gear, then attached a photo-etch ring sight (these Hurricanes did not yet have the reflector sight), and then attached the vacuformed canopy. I used the early version without the armored windscreen.
 The Watts propeller
needs to be re-shaped to be correct where the blade fairs to the hub. I did
this referring to the Aeroclub white metal Watts propeller (I would have used
it, but it is a scale 12 inches too short - far too noticeable - being done
for the Hawker Demon model)
The Watts propeller
needs to be re-shaped to be correct where the blade fairs to the hub. I did
this referring to the Aeroclub white metal Watts propeller (I would have used
it, but it is a scale 12 inches too short - far too noticeable - being done
for the Hawker Demon model)
Since these were new airplanes, assigned to an elite squadron of the pre-war Royal air Force, I kept the model as clean as photos show the original airplanes to have been.
|
CONCLUSIONS |
This is definitely the best kit yet released by Classic Airframes. Assembly is simple, with no problems or "secret" to be discovered - as has been the case with most of the previous releases. The result is a good-looking model. I will definitely be doing more than one of these great kits.
Thanks to Classic Airframes for the Review Copy.
If you would like your product reviewed fairly and fairly quickly, please contact the editor or see other details in the Note to Contributors.