Warrior Models 1/48 Blackburn Roc
|
KIT # |
? |
|
PRICE: |
$44.95 MSRP |
|
DECALS: |
See review |
|
REVIEWER: |
|
|
NOTES: |
Resin multimedia kit |
|
HISTORY |
How any military service in the late 1930s could call an airplane capable of a maximum speed of 223 m.p.h. (and that for only a minutes while the engine was in overboost) a "fighter" strains credibility. That an organization run by actual veterans of air combat could further conclude that the armament for this alleged "fighter" should be a rotating gun turret incapable of firing ahead of the aircraft - thus requiring it to find a way to pull alongside and exchange broadsides with its foe in the manner of sailing ships in the time of Nelson - is truly mind-boggling. The Blackburn Roc may not be the all-time worst airplane used operationally by the Fleet Air Arm, but it certainly is in the running. Strangely, the only confirmed "kill" of this slowest of all British fighters was a Ju-888A-1, perhaps the fastest of all German bombers at the time, and certainly capable of out-performing the Roc.
 The Blackburn Roc was
developed from the Skua Fighter/Dive Bomber, the first monoplane taken into
service by the Fleet Air Arm in 1938. The Roc was fitted with a turret mounting
four .303 Browning machine-guns, and its production was the responsibility of
the Boulton-Paul, the company which designed and manufactured the turret. Since
it was based on an existing airframe, there was no prototype as such; the first
of 136 Rocs first flew on December 23, 1938.
The Blackburn Roc was
developed from the Skua Fighter/Dive Bomber, the first monoplane taken into
service by the Fleet Air Arm in 1938. The Roc was fitted with a turret mounting
four .303 Browning machine-guns, and its production was the responsibility of
the Boulton-Paul, the company which designed and manufactured the turret. Since
it was based on an existing airframe, there was no prototype as such; the first
of 136 Rocs first flew on December 23, 1938.
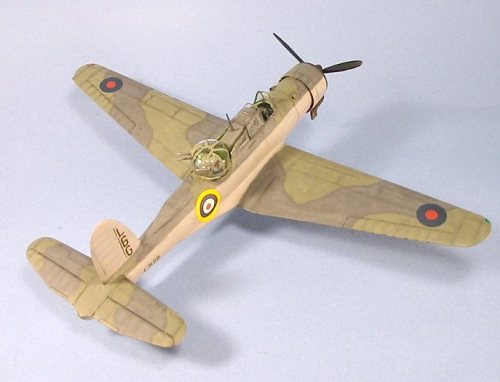
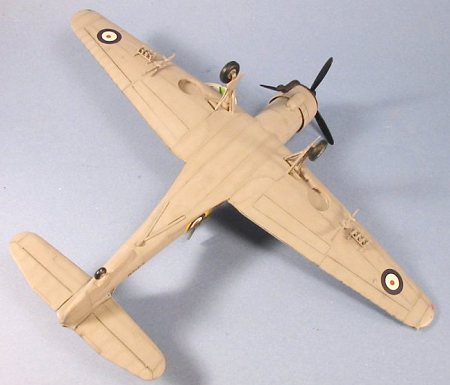
The primary visual difference between Roc and Skua - other than the turret - was the fact the Roc's wings had dihedral, thus doing away with the Skua's upturned wing tips. While the Roc carried no forward-firing armament, it could carry a 250-lb bomb under each wing, and an additional load of light bombs on a "light series carrier." The extra weight of the turret made it even slower than the Skua. One Roc, sent to intercept a Heinkel He-60 seaplane used in the Channel for air rescue was incapable of catching even this slow biplane.
While the Roc was designed to use floats earlier used by the Blackburn Shark, only four Rocs were modified this way and it was found the flying qualities of the float-equipped Roc with floats fitted was poor, even with the later fitting of a large dorsal fin for added stability. This development was the result of a suggestion by the Director of Air Material that a Roc floatplane could be used by the Royal Navy's battleships, with three Rocs each for "Malaya," "Warspite," "Repulse," "Renown," "Queen Elizabeth" and "Valiant," with one Roc for "Rodney."
When the Winter War broke out between Finland and the Soviet Union, the Royal Navy decided to send 33 Rocs to the Finns. Preparations went so far as painting the aircraft in Finnish camouflage and collecting them in Scotland for flight delivery to Finland, though the Winter War ended before this could occur. Given the Finnish reputation for getting the most out of the aircraft they operated, it is interesting to speculate what thy might have done with the Rocs. By all accounts, the performance of the Roc as a dive bomber was far better than as a fighter; if it flew its getaway just above the ground or sea, it would have been a difficult target for enemy fighters, and there would have been a good chance the turret could chase off an attacking fighter.
 Rocs never equipped a
full squadron, but were rather operated with Skuas. Its first use operationally
was for defense of Scapa Flow, and then in defense of the British Fleet off
Norway. On April 23, 1940, 800 and 803 squadrons had 2 and 3 Rocs with them
respectively when they sailed HMS "Ark Royal," to take part in operations in
Norway. The three 803 Rocs were launched twice on April 28 to drive off German
aircraft shadowing the task force. A combined flight of Rocs and Skuas from 806
and 801 Squadrons made a very effective dive-bombing attack in German forces in
Belgium in late May, which allowed several units of the B.E.F. to make their
escape back onto Dunkirk.
Rocs never equipped a
full squadron, but were rather operated with Skuas. Its first use operationally
was for defense of Scapa Flow, and then in defense of the British Fleet off
Norway. On April 23, 1940, 800 and 803 squadrons had 2 and 3 Rocs with them
respectively when they sailed HMS "Ark Royal," to take part in operations in
Norway. The three 803 Rocs were launched twice on April 28 to drive off German
aircraft shadowing the task force. A combined flight of Rocs and Skuas from 806
and 801 Squadrons made a very effective dive-bombing attack in German forces in
Belgium in late May, which allowed several units of the B.E.F. to make their
escape back onto Dunkirk.
The only confirmed kill by a Roc occurred on May 29, 1940, when 806 squadron claimed one Ju-88A shot down and another damaged north of Dunkirk near Ostend. On June 21 and 23, 1940, 801 Squadron's Rocs were involved in dive bombing attacks on Bologne harbor, and in attacks on gun positions on Cap Griz Nez on June 21st, during which one Roc was shot down. After 1940, Rocs were relegated to training and target towing duties, with the turret removed. The last Rocs to go to sea served in 806 Squadron aboard HMS "Illustrious" during her shake-down cruise to the Bahamas, where they were off-loaded and left behind. The last operational Rocs were withdrawn due to lack of spare parts during 1943.
|
THE KIT |
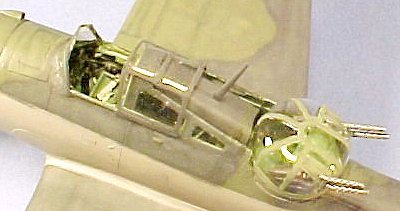
The only other worthwhile kit of the Blackburn Roc is a 1/72 offering from Pavla. This resin kit from Warrior Models in Poland is the only kit available in 1/48, and was quite obviously developed from their earlier Skua. The kit has very delicate surface detail, much of which can be preserved if the modeler takes the special care outlined below in assembling the kit. The cockpit detail is sufficient to provide a good look to the model. Guns, landing gear and propeller are provided in white metal. Two vacuformed pilot's canopies and turrets are provided. The decals are the same incorrect sheet provided in the Skua kit, and can be effectively discarded.
|
CONSTRUCTION |
 Having built the
Warrior Skua kit, I knew that the biggest problem of the kit was the thick
joining surfaces for the parts, which had resulted before in lots of
cyanoacrylate glue and putty being applied to all the joints, with the loss of
much surface detail in the subsequent sanding-down. This time, I opted to use
the Dremel I'd received last Christmas from fellow M2 reviewer Candice Uhlir
(thanks, my friend!), to grind down the interior of the wings till the joining
surfaces were as thin as would be the case with an injection-molded kit. This
resulted in wings that went together easily, with thin trailing edges. Also,
the wings fit to the wing roots on the fuselage with a minimum of C-A and Mr.
Surfacer to smooth the seams. Doing things this way, the petite surface detail
wasn't lost in the clean-up.
Having built the
Warrior Skua kit, I knew that the biggest problem of the kit was the thick
joining surfaces for the parts, which had resulted before in lots of
cyanoacrylate glue and putty being applied to all the joints, with the loss of
much surface detail in the subsequent sanding-down. This time, I opted to use
the Dremel I'd received last Christmas from fellow M2 reviewer Candice Uhlir
(thanks, my friend!), to grind down the interior of the wings till the joining
surfaces were as thin as would be the case with an injection-molded kit. This
resulted in wings that went together easily, with thin trailing edges. Also,
the wings fit to the wing roots on the fuselage with a minimum of C-A and Mr.
Surfacer to smooth the seams. Doing things this way, the petite surface detail
wasn't lost in the clean-up.
I did the same thing to the centerline joint of the fuselage halves, and as well
thinned the walls of the cockpit. The resin cockpit interior parts then
fitted with no other modification, and when the fuselage was glued together it
only took a 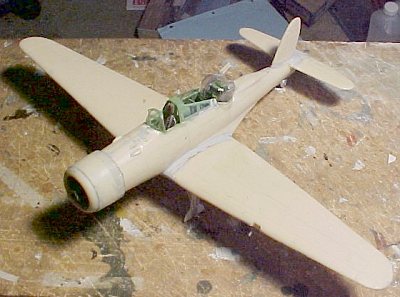 beaded line of
C-A down the centerline to lose the centerline seam.
beaded line of
C-A down the centerline to lose the centerline seam.
The last part to be Dremeled was the rear of the engine cowling, so that it looked realistically thin when attached to the forward fuselage.
I found after I had assembled the fuselage that I was going to have to do even more thinning of the wall around the turret if I was to fit that successfully. I then got the turret in place and decided to leave it there since it was still a very tight fit.
Once the model was assembled, I applied Mr. Surfacer 500 to all the seams, then sanded them smooth and re-scored the engraved panel lines where necessary.
I
then attached the canopy between the pilot's cockpit and the turret, so that I
could putty over the joint of canopy and fuselage and get it smooth. I
discovered I would need some braces for the movable section of the canopy, to
put it in the lowered position. I also cut off the
 windscreen and attached it at
this point.
windscreen and attached it at
this point.
The A-frame tail hook was too big to really fit properly, so I scratched one from plastic sheet and attached it in position.
As a result of my experience with the Skua, I knew the white metal tail wheel was weak and bound to break, so I used an injection-molded plastic tail wheel from the spares box. I also attached the main gear at this point.
Once everything was smoothed up around the cockpit, the model was ready for painting.
|
PAINT & DECALS |
 Painting:
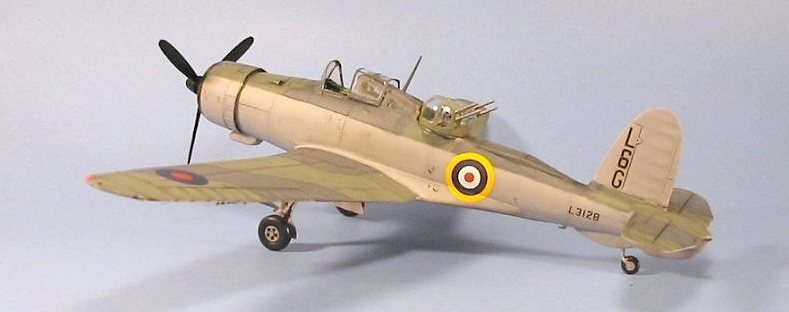
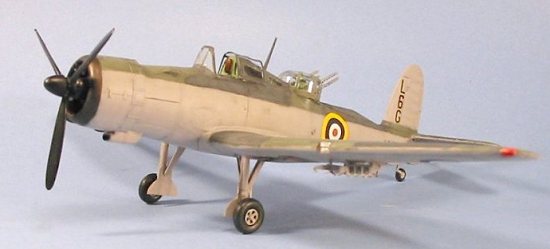
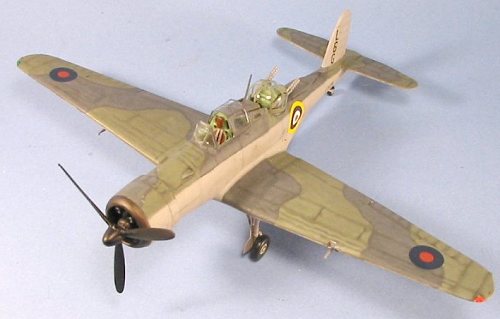
I pre-shaded the model with flat black over the panel lines, then applied the FAA camouflage of Sky Grey lower surfaces, which I then post-shaded after lightening the paint in the airbrush. I freehanded the upper camouflage of Dark Sea Grey and Slate Grey, using Tamiya "Dark Grey" and "RLM Grey" respectively for these colors. They were also post-shaded by adding a bit of white to the paint in the airbrush. When all this was dry, I Futured the model.
Decals:
Using a profile of an 806 Squadron Roc I found on the internet, I used decals from the Decal Dungeon to provide the markings. When the decals were set, I washed the model, applied a second coat of Future, and when that was dry applied several coats of Dullcote to get a "semi-flat" final finish.
|
FINAL ASSEMBLY |
 First, I masked off
the collector ring and exhaust, and painted those with Testor's ModelMaster
metalizer "Burned Metal" and sealed it.
First, I masked off
the collector ring and exhaust, and painted those with Testor's ModelMaster
metalizer "Burned Metal" and sealed it.
I then assembled the turret, using resin machine guns from Classic Airframes, since the kit did not supply four of the white-metal machine guns (which in any case didn't look that good). I cut the canopy (which I had pre-painted), and glued it in position. I then attached the canopy fairing in the lowered position and attached the radio mast (which lowers and tilts back with the fairing), and finished that by attaching the pilot's canopy in the open position.
|
CONCLUSIONS |
If you are a fan of British Fleet Air Arm aircraft, you will want this model in your collection. The kit is accurate (other than the decals), and makes up into a good-looking model. I have mine sitting next to the Skua, and am looking forward to placing a Fairey Fulmar next to them when Warrior produces a kit of that long-sought airplane next year.
Copyright ModelingMadness.com. All rights reserved. No reproduction in any form without express permission from the editor.
Review kit courtesy of Warrior Models.
If you would like your product reviewed fairly and fairly quickly, please contact the editor or see other details in the Note to Contributors.
Back to the Reviews Index Page 2016