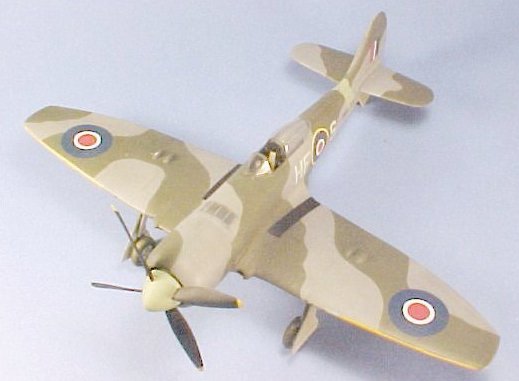
1/48 Tempest II
|
KIT # |
See review |
|
PRICE: |
Eduard $30, Hobbycraft $12.95 |
|
DECALS: |
See review |
|
REVIEWER: |
|
|
NOTES: |
Kitbash |
|
HISTORY |
The Hawker Tempest was the ultimate development of the Hawker piston engine fighter design philosophy. It was fast, highly-maneuverable with its spring-tab ailerons, and heavily armed with four 20mm cannon. During the last year of the war, the Tempest V became the RAF's medium-altitude day air superiority fighter, and demonstrated through its record of accomplishment - from taking on V-1s to knocking down Me-262s - that it was one of the great fighters of the war.
 It didn't start out
that way.
It didn't start out
that way.
The Tempest evolved from the Hawker Tornado, which was co-evolved with the Typhoon and had all the problems that airframe demonstrated without any additional performance to justify its continued development. The problem with the Typhoon/Tornado was the wing, which had been designed thick in order to support the weight and operation of four 20mm cannon - the first time such armament had been proposed for a fighter. The wing became the limiting factor of the Typhoon. With the experience of the Typhoon demonstrating the wing had been "over-built," Sidney Camm suggested a wing of thinner section and greater area, which would promote higher speeds and greater maneuverability. The "thin-wing Typhoon" became the Tempest.
Because there was at this point more experience with the Napier Sabre that powered the Typhoon, the Sabre-powered variant of the Tempest moved ahead in development and operational deployment as the Tempest V. At the same time, the Bristol Centaurus-powered variant was experiencing difficulty with both the powerplant and its mounting, which resulted in excessive airframe vibration and contributed to engine failures. Once the airplane was equipped with engine mounts that had rubber shock-absorbers, the vibration problem was solved.
By 1944, the RAF was
looking forward to increased participation in the war against Japan, and was in
need of a long-range escort fighter. The Tempest II was presumed to have less
problems operating in a tropical environment due to its radial engine than would
be expected with the Sabre-powered Tempest, so it was pushed as the version to
use in the far east. Had the war against Japan extended to an invasion,
squadrons of Tempest IIs would likely have been based on Okinawa, and it is
certain - 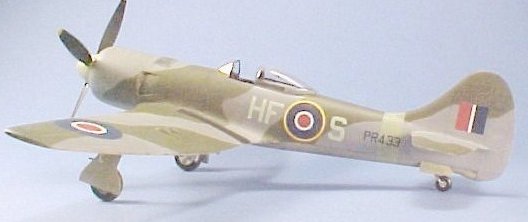 given the
performance parameters of this big fighter - that it would have put in a stellar
performance against the N1K2 "George" or the Ki-84 "Frank."
given the
performance parameters of this big fighter - that it would have put in a stellar
performance against the N1K2 "George" or the Ki-84 "Frank."
As it was, the Tempest II arrived in 54 Squadron just too late to see action in the Second World War. The airplane equipped several RAF squadrons in India after the war, and these were later transferred to the independent Indian Air Force and Pakistani Air Force where they saw combat against each other in the outbreak of fighting between the two states over Kashmir. The Tempest II also equipped squadrons of the British Air Forces of Occupation in Germany, pending re-equipment with jets.
|
THE KITS |
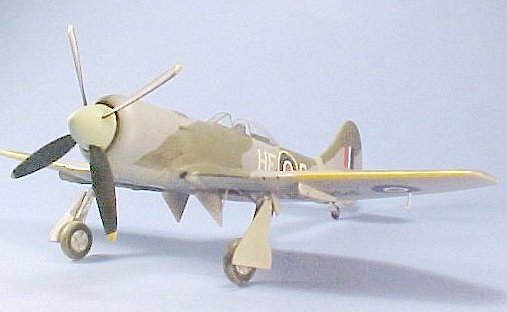
There is no kit of the Tempest II available in 1/48. There is a resin conversion set for creating a Tempest II from the Eduard Tempest V kit, and had that been easily available when I first commenced this kitbash I would likely have used it, and I would recommend now that anyone who wants to have a Tempest II in their collection should use that. However, if you want to exercise your modeling skills, it is possible to kit-bash the Eduard Tempest with the Hobbycraft Sea Fury, as I did here, to a worthwhile conclusion.
|
CONSTRUCTION |
In this case, construction starts with taking a razor saw to the two kits to remove the unnecessary parts and shape the necessary parts to do the conversion. In the case of the Tempest, this involved sectioning the fuselage just aft of the wing-fuselage fairing and extending it 3/16 inch by gluing in a section of Evergreen sheet and using a thicker piece of Evergreen sheet to make the "plug" between the two parts in order to lengthen the fuselage to its correct dimension.
 I also cut off the
upper fuselage forward of the firewall, since this would be replaced with the
radial engine and forward fuselage of the Sea Fury. The forward fuselage of the
Sea Fury was cut off to be fitted to each fuselage half at this point, where the
joints could be reinforced inside with Evergreen sheet. At that point I
suddenly realized things were not going to be so easy, since the Sea Fury
fuselage has an "up angle" to the cockpit that the Tempest does not. I cut the
upper section of fuselage away, re-shaped it properly, and glued it in position
with suitable backing from Evergreen sheet.
I also cut off the
upper fuselage forward of the firewall, since this would be replaced with the
radial engine and forward fuselage of the Sea Fury. The forward fuselage of the
Sea Fury was cut off to be fitted to each fuselage half at this point, where the
joints could be reinforced inside with Evergreen sheet. At that point I
suddenly realized things were not going to be so easy, since the Sea Fury
fuselage has an "up angle" to the cockpit that the Tempest does not. I cut the
upper section of fuselage away, re-shaped it properly, and glued it in position
with suitable backing from Evergreen sheet.
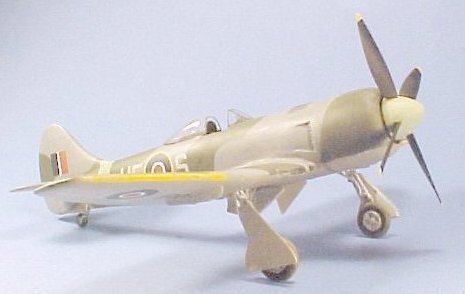
I intended to use the Sea Fury forward wing section with the intake trunking, cutting that section off from right in front of the wheel well. I then cut the wing parts from the Tempest kit to fit, then glued in the Sea Fury parts. Now then, here is a lesson in doing this that I did not actually realize originally until I had assembled and painted the model, when I happened to (finally) give a good look at the photos I was using and realize that the Sea Fury and the Tempest II "mirror" each other on these parts, i.e., the large intake is on the right wing of the Tempest as opposed to being on the left wing of the Sea Fury! Something had to be done. What I did to solve this was to re-cut the right wing to take the large intake, then section the intake so that it's "outer" end as a Sea Fury part would fit to the inner, while I took the "outer" faired parts of each intake, sectioned them from the intake and them moved them to their new location outboard of the now properly-positioned intakes. The lesson here is: look at the darn reference material and be sure you see what's really there. "Assume" really does "make an ass of u and me.
 Further, I realized
that the engine cooling vents that are on the lower forward fuselage of the Sea
Fury are positioned in the upper fuselage just ahead of the firewall on the
Tempest. I cut out that section of the upper fuselage, then made "vents" by
gluing Evergreen strip on a photoetch wire screen I had, then bent it into
position and inserted it. This would have been far more easily done had I done
this while the fuselage halves were still unassembled.
Further, I realized
that the engine cooling vents that are on the lower forward fuselage of the Sea
Fury are positioned in the upper fuselage just ahead of the firewall on the
Tempest. I cut out that section of the upper fuselage, then made "vents" by
gluing Evergreen strip on a photoetch wire screen I had, then bent it into
position and inserted it. This would have been far more easily done had I done
this while the fuselage halves were still unassembled.
And of course, the easiest thing of all would be to use the MDC conversion, which instructs the modeler how to do all this right to begin with.
Once all this had been done and the model assembled, it was time for quite a bit of Squadron Green Putty to be applied to the various areas of "bashing." Squadron Green takes quite a while to set up, but when it is hard it doesn't shrink and can be sanded as smooth as the surrounding plastic. Several sessions with sanding sticks of various grits and applications of Mr. Surfacer 500 over the puttied areas finally resulted in a finished airframe that looked right and needed only some re-scribing to finish off.
Since I had used a "Profipack" Eduard kit, I was able to install the good-looking detailed cockpit with the photoetch parts. Given that the overall color of the cockpit is black, it is not possible to show detail in a photograph, but it can easily be seen in person.
|
PAINT & DECALS |
Painting:
I decided to do one of the early-production airplanes, since this would mean I would not have to put on underwing serials for which I had no suitable decals in the decal dungeon.
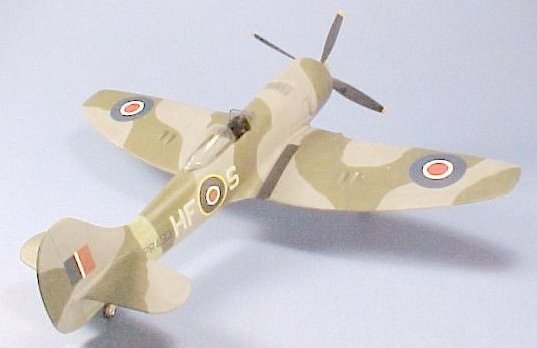
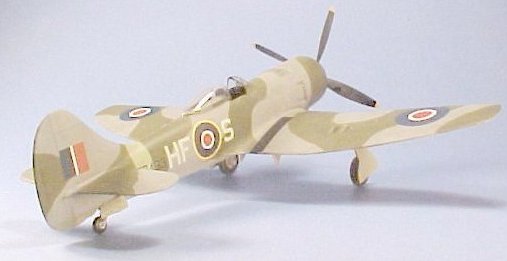 The model was painted
in the standard RAF camouflage of Medium Sea Grey lower (using Tamiya "Medium
Gray"), Ocean Grey (using Gunze-Sanyo "Blueish Grey") and Dark Green (using
gunze-Sanyo "RAF Dark Green") upper camouflage. I had an old Profile
Publication on the Tempest that had a complete camouflage pattern diagram. I
accomplished the "hard edge" camouflage by running thread 1/16" in from the edge
of the cutout pattern on the drafting tape, which allows for a 'scale" overspray
without any paint buiuldup against the edge of the mask. When all was dry, I
gave the model a coat of Future.
The model was painted
in the standard RAF camouflage of Medium Sea Grey lower (using Tamiya "Medium
Gray"), Ocean Grey (using Gunze-Sanyo "Blueish Grey") and Dark Green (using
gunze-Sanyo "RAF Dark Green") upper camouflage. I had an old Profile
Publication on the Tempest that had a complete camouflage pattern diagram. I
accomplished the "hard edge" camouflage by running thread 1/16" in from the edge
of the cutout pattern on the drafting tape, which allows for a 'scale" overspray
without any paint buiuldup against the edge of the mask. When all was dry, I
gave the model a coat of Future.
Decals:
I used the national insignia decals as well as the Squadron codes for 54 Squadron from the Eduard kit, with the serial number pieced together from the decal dungeon.
Final Finish:
Photographs of the Tempest IIs used by 54 Squadron in the first postwar summer of 1945 show them very clean with only a bit of exhaust staining, so that is how I finished this model. I used the Falcon vacuform Tempest canopy, which comes in two sections, suitably Futured for a clear canopy that will stay clear over time.
|
CONCLUSIONS |
I think in its entire career, going back to the days when the company was Sopwith, that Hawker has only produced two ugly airplanes - the Sopwith Dolphin and the Hawker Woodcock. I doubt any other airplane company can make that statement over as many years and through as many different airplanes. This was a fun "kit bash" for me, but I will say it again here: if you want a 1/48 Tempest II in your collection, be sure to get the MDC conversion set. As I understand it, the set includes decals. It's much easier and the result will definitely be more certain.
Copyright ModelingMadness.com. All rights reserved. No reproduction in any form without express permission from the editor.
If you would like your product reviewed fairly and fairly quickly, please contact the editor or see other details in the Note to Contributors.