| KIT: | Airfix 1/72 Spitfire IX |
| KIT #: | 02081 |
| PRICE: | $6.98 MSRP |
| DECALS: | One option |
| REVIEWER: | Daren Cogdon |
| NOTES: |
| HISTORY |
Certainly the Spitfire needs no introduction, and I’m not about to start one here! From what I understand, the Spitfire IX from Airfix has been around for a long time. It’s not the most accurate kit out there of this variant, it certainly is not the most accurate Spitfire model available, but it would provide a good subject for a younger modeller, as there are few parts, not too many tricky decals, and the kit goes together very easily.
| THE KIT |
The kit is basically injection-moulded plastic, light grey in colour, with only a couple of sprues for the airframe, and a one-piece clear part for the canopy. My kit’s canopy was hiding behind a flap in the cardboard of the box, so you have to make sure the canopy isn’t stuck somewhere before throwing out the box!
There really isn’t a lot to it: two wings, tailplane halves, fuselage halves, prop, spinner, radiators, wheels, undercarriage legs, tailwheel, aerial mast, canopy, and pilot. I think there’s only about twenty parts in total!
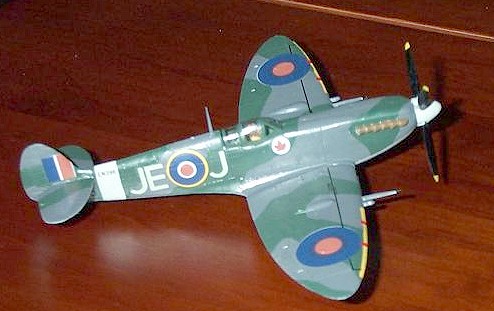
Decals included are for Wing Commander J.E “Johnnie” Johnson’s Spitfire IX, EN398/JE-J, in which he scored 16 out of his total of 38 aerial kills during the war.
| CONSTRUCTION |
 My kit is just a
basic, from-the-box construction, so there were no real attempts to fill or
sand down any parts of it (except those where flash was a bit excessive).
You could look at it as a beginner’s attempt, I guess, without going
overboard to get it “right”.
My kit is just a
basic, from-the-box construction, so there were no real attempts to fill or
sand down any parts of it (except those where flash was a bit excessive).
You could look at it as a beginner’s attempt, I guess, without going
overboard to get it “right”.
The pilot figure was painted whilst still attached to the plastic sprue, until he was cut off before fitting into the cockpit – if you do this, don’t forget to paint over the bald spot on the back of his head!!
While the paint dried on “Johnnie”, I set to work on the fuselage. I painted the interior of both halves of the fuselage around the cockpit with Humbrol cockpit green, and while this dried I assembled the propeller and wings. (More on the prop later.)
The cockpit is basic in the extreme, as there is only the pilot’s seat to be painted and fitted. One could probably fiddle about with it and put in a halfway decent cockpit interior, but as I was building this kit ‘straight’, there was no need.
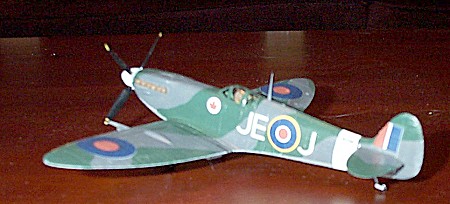
 Once the seat and “Johnnie” were in place, I assembled the fuselage and
prop. This is where I noticed something. The smattering of polystyrene
cement I had applied to the spinner for fixing the prop was quickly melting
the spinner, resulting in what could only be described as a botched
nose-job! What to do?! Clearly some surgery was in order, so I hacked off
the melted spinner and looked around for a suitable donor. Not finding any
spare Airfix MkIX spinners in my spares box, I resorted to cannibalising an
old Matchbox Spit IX. Unfortunately it meant I wouldn’t have a spinning
prop, but that was no biggie. In my opinion, the new prop actually looks
better anyway!
Once the seat and “Johnnie” were in place, I assembled the fuselage and
prop. This is where I noticed something. The smattering of polystyrene
cement I had applied to the spinner for fixing the prop was quickly melting
the spinner, resulting in what could only be described as a botched
nose-job! What to do?! Clearly some surgery was in order, so I hacked off
the melted spinner and looked around for a suitable donor. Not finding any
spare Airfix MkIX spinners in my spares box, I resorted to cannibalising an
old Matchbox Spit IX. Unfortunately it meant I wouldn’t have a spinning
prop, but that was no biggie. In my opinion, the new prop actually looks
better anyway!
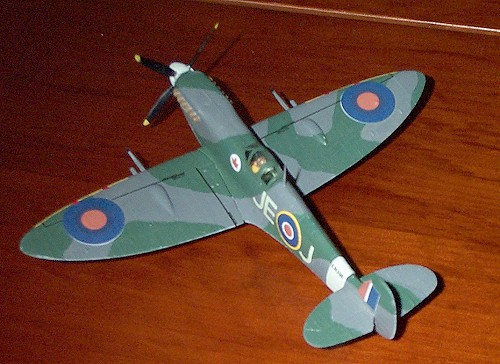
The one-piece wing and tailplane assembly simply push into slots at the correct positions, and afterwards I stood the model on its nose while the glue dried. The result looked pretty good to me, anyway! At first I didn’t notice the gap between the port wing and fuselage, but once painted it doesn’t look too bad. As I’ve said, I built this model “straight” as a beginner might, with no attempt to dress it up.
The undercarriage, on which the wheels can be made to turn, were assembled next. I was a bit ham fisted with the glue on one wheel, with the result that one wheel turns, and the other is stuck! Oh well…
Final bits including the aerial mast and tailwheel were fitted, before leaving the lot to set.
| COLORS & MARKINGS |
All painting of my model was done by hand, with no masking and, admittedly, with colours that I had available (silly me forgot to buy some of the “right” paints before setting to work!!). All paints are Humbrol colours.
 Upper surfaces are dark green (matt 30) and dark grey (matt 27), while the
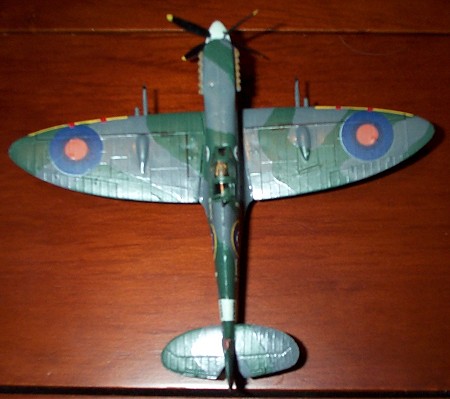
under surfaces were painted with matt 64, light grey. Wing leading edges
were trainer yellow (matt 24) with some duck egg blue (matt 23) for the
spinner and fuselage band.
Upper surfaces are dark green (matt 30) and dark grey (matt 27), while the
under surfaces were painted with matt 64, light grey. Wing leading edges
were trainer yellow (matt 24) with some duck egg blue (matt 23) for the
spinner and fuselage band.
The decals were straight from the box, and most of them went on fuss-free. However, attempting to put the stencilling on the upper wing resulted in one or two decals folding up, rendering them useless. The spares box came in handy with providing some replacements.
My only criticism of the decals is that the upper wing roundels have a dark ring around the red circle, which I probably should have replaced but didn’t.
| CONCLUSIONS |
OK, it’s not the best kit in the world, and is very inaccurate compared to even the most basic of modern kits, but the Airfix Spit IX would probably be a good starting point for the newcomer wanting just a basic Spitfire. I’ve built plenty of them in my time when needing a few Spits to make up a squadron for hanging from the ceiling! I’ve also found the kit to be quite adaptable – I once built a two-seater Spit from it!
A note must be made about the model’s accuracy. What I had never noticed until it was pointed out to me was that the model’s fuselage halves are identical! Yes, if you look closely you’ll see it has two radio hatches behind the cockpit, one either side. The propeller is not correct in shape but, again, I think that the beginner wouldn’t be too fussed about this.
August 2005
If you would like your product reviewed fairly and quickly by a site that has around 300,000 visitors a month, please contact me or see other details in the Note to Contributors.