Special Hobby 1/48 Miles Magister
| KIT #: | 48037 |
| PRICE: | $38.00 |
| DECALS: | Three options |
| REVIEWER: | Patrick Earing |
| NOTES: |
Injection molded with
brass, resin detail parts and clear windscreens.
Vacuformed training canopies included
|
| HISTORY |
 The
Miles Magister was a low wing monoplane using stressed plywood construction.
The Maggie, as the Magister was affectionately called, sported a dual
cockpit design with tandem controls, and provisions for blind flight
training. Additionally, the
Magister was the first purpose built trainer to have landing flaps.
Entering service with the RAF in 1937, the Maggie was an ideal
primary trainer for the high performance Hawker Hurricane and Spitfire
fighters then entering service.
The
Miles Magister was a low wing monoplane using stressed plywood construction.
The Maggie, as the Magister was affectionately called, sported a dual
cockpit design with tandem controls, and provisions for blind flight
training. Additionally, the
Magister was the first purpose built trainer to have landing flaps.
Entering service with the RAF in 1937, the Maggie was an ideal
primary trainer for the high performance Hawker Hurricane and Spitfire
fighters then entering service.
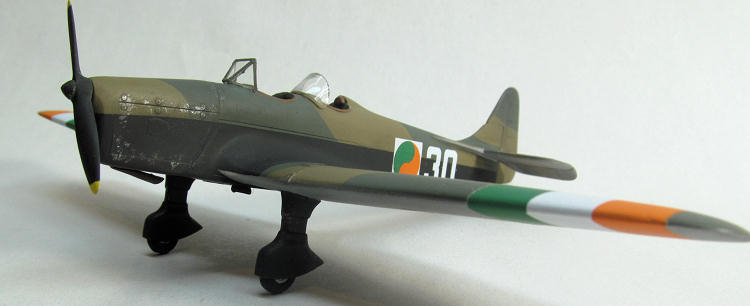
The Irish Air Corps (IAC) procured its first batch of ten Magisters from RAF stocks in 1939 as a result of program expansion that had begun in 1937 to increase the number of short term pilots in the IAC. These air craft were delivered to Irish Air Corps Training Schools numbers 31 and 40 at that time, with an additional 5 being received in 1940. The magister was the only primary trainer used by the IAC throughout WW II. As a result attrition and wear, the Irish Department of Defense ordered an additional 12 aircraft in 1944. Although new airframe construction had ceased in 1941, Miles refurbished airframes from surplus RAF stocks to meet the order. Delivery of these final twelve aircraft began in 1946 and they remained in service with the IAC until 1952.
| THE KIT |
 The
Special Hobby Miles Magister is a gem of an injection molded kit; and with the
added resin and brass detail parts included with the High Tech boxing, it
becomes spectacular. The kit comes
in a typical Special Hobby end flap box.
Inside is a single plastic bag containing two full injection molded
sprues covering the major components of the airframe and a smaller sprue with
additional main landing gear legs.
Additionally, the kit includes two additional bags containing selected resin
parts; most of which are direct replacements for injected pieces found in the
kit, two etched brass frets and clear injection molded windscreens.
The kit also contains small vacuformed pieces that represent the rear
cockpit canvas cover in the deployed position.
The decal sheet is produced by DEAD Design and includes markings for two
RAF aircraft and one Irish Air Corps aircraft. The
sheet looks spot on for color and register.
Instructions are included and are adequate including color and decals
placement guides.
The
Special Hobby Miles Magister is a gem of an injection molded kit; and with the
added resin and brass detail parts included with the High Tech boxing, it
becomes spectacular. The kit comes
in a typical Special Hobby end flap box.
Inside is a single plastic bag containing two full injection molded
sprues covering the major components of the airframe and a smaller sprue with
additional main landing gear legs.
Additionally, the kit includes two additional bags containing selected resin
parts; most of which are direct replacements for injected pieces found in the
kit, two etched brass frets and clear injection molded windscreens.
The kit also contains small vacuformed pieces that represent the rear
cockpit canvas cover in the deployed position.
The decal sheet is produced by DEAD Design and includes markings for two
RAF aircraft and one Irish Air Corps aircraft. The
sheet looks spot on for color and register.
Instructions are included and are adequate including color and decals
placement guides.
| CONSTRUCTION |
The Miles Magister represents the second
of my Irish Air Corps theme builds for 2012.
Starting with a Max Decals sheet, I decided that I would try and get my
monies worth and build as many of the aircraft provided for as possible;
however, the Magister represents an outlier, and I had planned to scavenge
enough decals to mark it from the various marks of aircraft I wasn’t going to
build as provided on the decal sheet.
Imagine my surprise and glee when I realized that the kit from Special
Hobby included the appropriate markings for an Irish Air Corps bird! Score!
My kit was purchased from Squadron out of convenience, and showed
 up in
an uncharacteristically smashed box.
Fortunately, little was damaged beyond easy repair, however, the
vacuformed canvas hood sections were crushed beyond recognition-but, as I did
not plan on modeling the aircraft in this configuration it did not represent a
loss.
up in
an uncharacteristically smashed box.
Fortunately, little was damaged beyond easy repair, however, the
vacuformed canvas hood sections were crushed beyond recognition-but, as I did
not plan on modeling the aircraft in this configuration it did not represent a
loss.
After looking over the contents of the
box I washed all of the resin parts with dish soap and started construction by
spraying Model Master enamel RAF Interior Green on all the cockpit parts,
including the fuselage side walls and inner engine cowlings.
Starting with the seats, I attempted to remove the large casting blocks
from the bottom of the two alternate resin seats provided by Special Hobby.
Unfortunately, I trimmed too close on one and destroyed it.
Oh well, I still had the injection seats as included in the kit.
I detailed the one resin seat I had successfully removed with the
beautiful pre-painted brass seatbelts.
Looking through a couple of sources it came to my attention that the
seats in Magisters were painted either interior green or black, so why not mix
it up on my model? An additional
benefit of mixing the colors was that is effectively hid the casting differences
represented by using one resin and one plastic seat.
Using the resin floor and bulk heads I began assembling the cockpit;
again, by removing the modest casting blocks from these parts.
Unfortunately, pictures looking down into Magister cockpits are as rare
as hen’s teeth and as such I struggled with how to place the seats properly.
The kit instructions show the seats attaching to the cockpit bulkheads;
however, after a couple of false starts it became apparent that the seats sit
behind the cast ‘beam’ in the floor on a small ‘perch’, not directly up against
the bulkheads as shown.
Additionally, the oval indent in each bulkhead needs to be opened up to allow
the seatbelt harnesses to pass through and attach out of sight on the back of
these bulkheads. Painting the
provided brass belts with an appropriate khaki color I installed them without
incident and moved on.
Once through this rather dubious start,
things began to go smoother. I
painted and attached all of the small etched details for the interior side
walls, followed by painting and sandwiching the instrument panel brass together,
and then attaching these assemblies to the provided injected panels for
additional thickness to provide enough surface area to attach them into the
fuselage. Again, fixing the
instrument panels into the fuselage requires no small amount of guesswork-beware
that the instrument panel(s) are lined up not only for side to side but also
that you do not ‘turn’ them too far down the curve of the
 fuselage
as it will be very noticeable later when the bulkheads are installed if they are
out of plumb. For contrast and to
show wear I used a mixture of black, brown and grey pastels to dirty up the
interior surfaces. Next I attached
the mostly completed interior into the left fuselage half and began the process
of ‘narrowing’ the resin cockpit parts to overcome the sizable 3/16 inch gap
their rotund state had created. In
short order things were right and I closed the fuselage up using a mixture of
Tenex and CA glue.
fuselage
as it will be very noticeable later when the bulkheads are installed if they are
out of plumb. For contrast and to
show wear I used a mixture of black, brown and grey pastels to dirty up the
interior surfaces. Next I attached
the mostly completed interior into the left fuselage half and began the process
of ‘narrowing’ the resin cockpit parts to overcome the sizable 3/16 inch gap
their rotund state had created. In
short order things were right and I closed the fuselage up using a mixture of
Tenex and CA glue.
Things really started to progress at this
point. I carefully painted the
false engine front and installed it into the nose cone.
Attaching the two side cowlings required some patience, but be
warned-they do not fit well; nor are they supposed too!
Scanning images of the real aircraft it becomes apparent that there are
sizable gaps and mis-alignment on both sides and bottom where the cowling meets
the fuselage; however, care must be taken that the parts are true to the
centerline of the fuselage, and that there is an equal amount of overhang on
each side. I used Tenex to ‘attach’
the parts which with its slower dry time allowed some wiggling around for best
fit. I then added the nose piece
and wiggled everything around some more and set it for good with an additional
application of Tenex.
Unfortunately, I ended up with a small step at the bottom of the nose to cowling
joint, possibly due to a small bump of plastic on the inner face of the nose
that I missed. Once everything was
set and dry a small amount of sanding corrected the step and all looked well.
Remember, although gaps and steps are appropriate at the back edge of the
cowling, the front joints should line up well and fit flush-as on the real
aircraft.
Next I carefully assembled the wing
halves with Tenex. Unfortunately, the lower left wing part had acquired some
considerable damage from the shipping process at the wing root, and not only did
not mate well, but also came up quite short for length.
As I looked at gluing the wings on it became apparent that the left wing
would require some additional shimming to create the proper angle as seen from
the front. Magisters’ have no
dihedral at the roots, only tipping upward outboard of the landing gear.
I installed 20 thousands card stock along the entire lower edge using
Tenex and carefully trimmed the excess.
In the end I should have used 30 thousand card stock or slightly sanded
the top of the right wing as the left wing came up a tad “cocked” look as seen
from the front. I ‘hid’ the
discrepancy through careful trimming when I attached the landing gear, evening
out the sit. At this point I also
added the rudder, and horizontal tail surfaces using Tenex.
The bottom fuselage seam needed a liberal
coat of 3M green acryl spot putty, and after sanding everything smooth, I primed
all of the seam/joints with my usual acrylic lacquer (automotive) primer.
 At this
point I turned my attention to the landing gear.
For the IAC Magister’s, it depends on the time period whether they wore
wheel pants or just had the bare gear legs.
The kit includes detailed bare gear legs and a detailed pair of resin
wheels, neither of which are used for the ‘panted’ option.
Instead a set of mediocre plastic wheels are sandwiched into the wheel
pants, these being the parts I used.
Once dry and the seams cleaned, I ‘tacked’ the legs to the wings and
attempted to level the sit by sanding one tire bottom a tad and them further
carving additional material from the top mounting edge of the same assembly.
Satisfied that everything looked right I permanently attached the legs
with liberal amounts of Tenex.
At this
point I turned my attention to the landing gear.
For the IAC Magister’s, it depends on the time period whether they wore
wheel pants or just had the bare gear legs.
The kit includes detailed bare gear legs and a detailed pair of resin
wheels, neither of which are used for the ‘panted’ option.
Instead a set of mediocre plastic wheels are sandwiched into the wheel
pants, these being the parts I used.
Once dry and the seams cleaned, I ‘tacked’ the legs to the wings and
attempted to level the sit by sanding one tire bottom a tad and them further
carving additional material from the top mounting edge of the same assembly.
Satisfied that everything looked right I permanently attached the legs
with liberal amounts of Tenex.
Cleaning up the seams between the
fuselage and the wings required multiple applications of primer and sanding.
Maggie’s had a smooth, flush transition that is difficult to achieve with
the limitations of plastic molding and a glued butt joint.
Once finished and ready for paint, I rescribed a few lost details,
cleaned the dust and got ready for color.
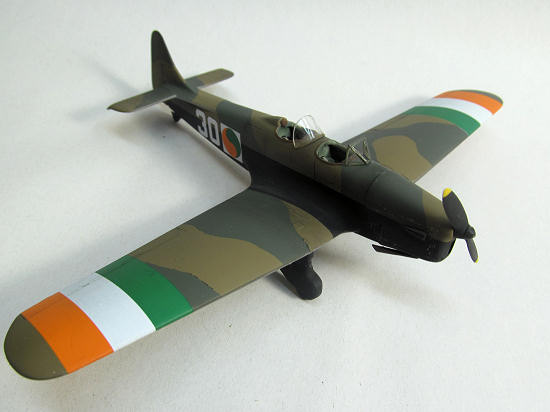
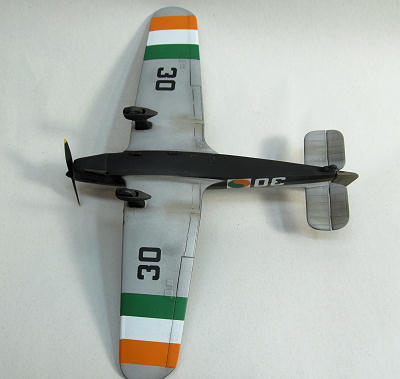
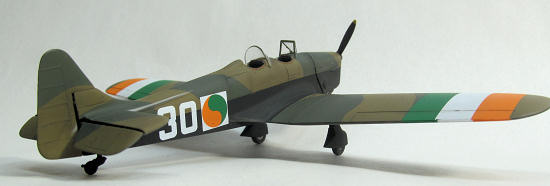
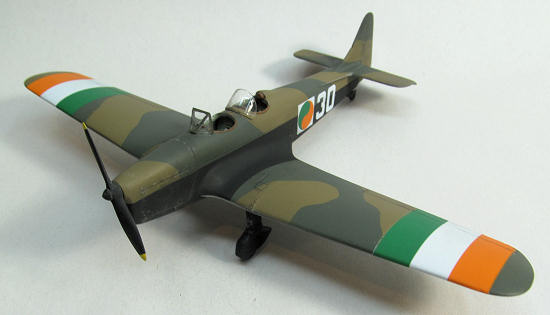
| COLORS & MARKINGS |
The IAC Magisters wore numerous color schemes
from their stunning black and polished aluminum initial trainer colors, to a
more subdued wartime garb of camouflage.
After stuffing the cockpits with tissue,
and taping the engine front I began by painting in reverse; dark colors to
light. Using my trusty Iwata TR-1 I
covered the entire model with Floquil Engine Black.
Once dry, I masked a line half way down the fuselage
 sides
and out to the landing gear supports on the top of the wings.
I then sprayed the top surfaces with Model Master Dark Earth enamel.
Again, after a spell to dry I used frisket paper to create the camouflage
pattern and sprayed MM Dark Green.
Removing the masking I then masked the fuselage and sprayed the bottom of the
wing and tail surfaces (including the fuselage strakes) with Floquil Old Silver.
Finally, I over sprayed the entire model with Testors Glosscoat from a
spray can in preparation for decals.
sides
and out to the landing gear supports on the top of the wings.
I then sprayed the top surfaces with Model Master Dark Earth enamel.
Again, after a spell to dry I used frisket paper to create the camouflage
pattern and sprayed MM Dark Green.
Removing the masking I then masked the fuselage and sprayed the bottom of the
wing and tail surfaces (including the fuselage strakes) with Floquil Old Silver.
Finally, I over sprayed the entire model with Testors Glosscoat from a
spray can in preparation for decals.
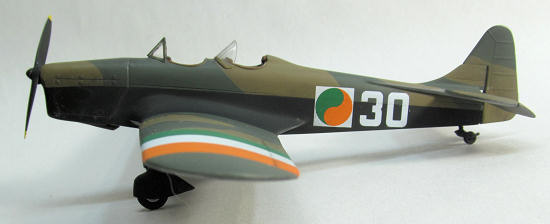
One area of contention existed regarding
what color the wheel pants should be.
My primary resource, The Irish Air
Corps: An Illustrated History states that the wheel pants were painted the
same silver as the under wing surfaces.
However, in direct contrast to this the text includes a picture of
Magister No. 33 with clearly painted and much chipped wheel pants.
It is unclear from the image what color-black, or one of the upper
camouflage colors that had been used.
I chose black for nothing more than symmetry.
The kit decals include a logo from DEAD
Design who I assume to be the creators.
I know nothing about DEAD Design; however, their decals are fantastic!
Everything was spot on for color and register.
Additionally, the decals were tough enough to be moved around on the
model, but layed down as thin as the best fro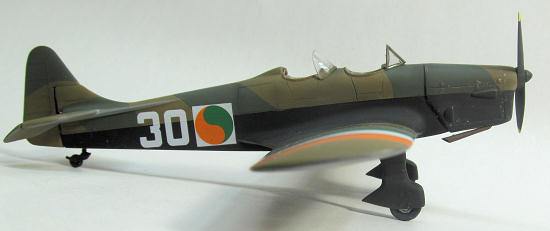 m
Cartograf with no silvering and a solid response to MicroSol setting solution.
Because of the time period I wanted to portray, the kit provided aircraft
numbers were slightly modified by removing the 1 from 130 and making the
registration number a fictious 30.
Although not absolutely correct in size and font, the tradeoff for having
wheel pants more than offsets the inaccuracy in my opinion; and the real crux is
that I have nothing of a correct font in my stash anyway.
Once everything had a few days to dry I top coated the entire model with
Testors Dullcoat and removed all the remaining masking.
m
Cartograf with no silvering and a solid response to MicroSol setting solution.
Because of the time period I wanted to portray, the kit provided aircraft
numbers were slightly modified by removing the 1 from 130 and making the
registration number a fictious 30.
Although not absolutely correct in size and font, the tradeoff for having
wheel pants more than offsets the inaccuracy in my opinion; and the real crux is
that I have nothing of a correct font in my stash anyway.
Once everything had a few days to dry I top coated the entire model with
Testors Dullcoat and removed all the remaining masking.
I finished up construction by installing
the last few etched detail parts, tail wheel, the windscreens, and the
propeller. Finally, I used raw
umber and black pastels to slightly weather the model followed by some chipping
around the cowling and wheel pants using MM enamel Steel and an OOO brush.
| CONCLUSIONS |
The Special Hobby Miles Magister is an
entertaining build of a unique aircraft.
Although the kit does not present any real building difficulties, because
of its limited run nature, resin and etched parts it will take some experience
to tease out the gem hidden within.
Recommended.
| REFERENCES |
Maxwell, Joe and Patrick J. Cummins
The Irish Air Corps: An
Illustrated Guide. W &G Baird,
Ireland. 2009
Wikipedia
Google Images
February 2012
Copyright ModelingMadness.com. All rights reserved. No reproduction in part or in whole without express permission from the editor.
If you would like your product reviewed fairly and fairly quickly, please contact the editor or see other details in the Note to Contributors.