Magna Models 1/48 Miles Martinet
| KIT #: | 0148 |
| PRICE: | $54.00 USD from Hannants |
| DECALS: | Several options |
| REVIEWER: | Patrick Earing |
| NOTES: |
Resin and white metal kit with vacuformed canopy. |
| HISTORY |
Imagine for just a moment that you are flitting through a beautiful blue sky
enjoying the pure pleasure of flying, when suddenly you come under attack from
six high performance fighter aircraft.
Each attacker calmly taking the time to line up behind you and then,
peeling off with guns blazing in your direction.
Sounds like a combat nightmare.
The war is over, and peace has reigned for five years! Yet,
unfortunately, here they come again with guns blazing!
No worries, really; just another day as a target tug pilot!
Can you imagine purposely going up to be shot “down”?
 I
personally have never given the target towing community much thought, until
recently. Beginning construction on
a new model project always involves some component of research, and in the case
of the Miles Martinet, ‘some’ became considerable as I knew nothing at all about
the aircraft. Using a Google search
I stumbled upon a fascinating and informative site focused on the Fighter
Leader School Milfield during World War II where the Martinet was used.
The site included many stories and testimonials from actual veterans and
proved highly invaluable for not only images but descriptions of aircraft,
procedures and routines of a school dedicated to producing fighter pilots.
I have included the web site address in the reference section and
recommend a visit, as the stories are fascinating and really enrich
understanding for the process that young men undertook to get ready for combat.
Needless to say, even the pilots at home took considerable risks to get
their jobs done on a daily basis.
I
personally have never given the target towing community much thought, until
recently. Beginning construction on
a new model project always involves some component of research, and in the case
of the Miles Martinet, ‘some’ became considerable as I knew nothing at all about
the aircraft. Using a Google search
I stumbled upon a fascinating and informative site focused on the Fighter
Leader School Milfield during World War II where the Martinet was used.
The site included many stories and testimonials from actual veterans and
proved highly invaluable for not only images but descriptions of aircraft,
procedures and routines of a school dedicated to producing fighter pilots.
I have included the web site address in the reference section and
recommend a visit, as the stories are fascinating and really enrich
understanding for the process that young men undertook to get ready for combat.
Needless to say, even the pilots at home took considerable risks to get
their jobs done on a daily basis.
In regards to
| THE KIT |
The Miles Martinet is only available in 1/48 scale as a resin kit by Magna
Models, as far as I know. Because I
have chosen to build only Irish aircraft this year, it was a natural; if not a
tad more obscure, step to go from one Magna kit (the Miles Master) to this one
of the Martinet. I have to say that
one thing I really like Magna Models is the boxes that they use to package their
kits. The cardboard is thick and
sturdy, and really protects the insides for the long haul.
For the Martinet kit, the box contained seventeen cast resin parts for
the major airframe components and interior bits.
An additional small plastic bag contains the white metal parts such as
propeller blades, exhaust pipes, landing gear legs and further detail parts.
Magna also includes two canopies and
 landing
light covers in clear vacuformed plastic.
For the Martinet, a small decal sheet is also included, although of such
dubious quality that I cannot imagine using it.
landing
light covers in clear vacuformed plastic.
For the Martinet, a small decal sheet is also included, although of such
dubious quality that I cannot imagine using it.
The instruction sheet is comprised of four photo copied sheets of eight and a
half by eleven paper. Two full
pages are given to construction notes and small (but useful) diagrams.
The final two pages include 21 side views of
various markings for the Martinet as well as one top and bottom plan with wing
tip scrap views. The resin is a
creamy white color and although the panel line detail is petite, the whole
effect is marred by an over abundance of small pin holes.
Some are very deep, where others are simply little divots that can be
sanded down or filled with primer.
Unfortunately, these pin holes are everywhere, and in many instances impossible
to fill or fix due to the cast detail that would be lost.
Casting blocks are surprisingly minimal and logically placed; a detail
that will aid with their removal.
Interior details are a bit heavy, but here again damaged by pinholes.
The holes here are not as easy to repair, and as with many of the smaller
parts it will just be easier to replace them with scratch built or aftermarket
items, than to fix them. The white
metal parts are well done and of a typical quality for this type of kit; lots of
flash and heavy casting seams. A
plus is that for the most part the round castings are round, and they do not
have overly large steps to be removed.
The exhaust pipes are solid, and may present a challenge to drill out for
a three dimensional effect.
Overall, on first glimpse the Martinet looks to be a very well thought out and
presented kit except for those pin holes.
| CONSTRUCTION |
Construction on resin kits all start with a soapy bath.
I wash the resin component with dish soap, and then let things sit for a
few days to dry. Before any
construction took place I block sanded the two fuselage halves flat with 220
grit sandpaper on a flat surface. I
then sprayed all of the identified interior parts, resin and white metal with
Model Master RAF Interior Green. At
this point I kind of stopped and took stock of what the kit provided for the
interior, and what the interior of the real Martinet looked like.
As usual, there were compromises made, but I had already decided that I
wanted to do this build with the canopy open, so I
 proceeded
to remake those areas that I felt were lacking the most.
proceeded
to remake those areas that I felt were lacking the most.
The front cockpit was sufficient as supplied.
The seat is well cast with very petite belt details included.
The side wall detail was sufficiently busy, so I only painted and
detailed what was provided. Use
caution when installing the instrument panel that it is aligned with the axis of
the cockpit; it is easy to get it cocked.
One of the prominent items carried by the Martinet was a rather large winch. There were two primary ‘types’ of winches carried-wind driven and electric. For my IAC build the aircraft carried a wind driven winch. The provided resin bits sort of looked like the real thing, if you looked hard and imagined. Visiting the afore mentioned web site I was able to view some good images of what the winch should look like and I was able to recreated a Type B winch from bits of Plastruct, wire and etched brass. Ultimately the most difficult part of making the winch was finding good images of what it should look like. Further work in the back included making eight or so folded tow targets made from foil that I painted bright red; a new life raft from clay painted orange, as well as various other small items . The final bit of work entailed cutting open the aft area of the fuselage and recreating the ribbing, radio, and radio mount. At this point I carefully glued the fuselage together with CA glue.
Next I cleaned up the large wing castings by carefully cutting away the mold
blocks and attached them to the fuselage using fine stainless wire pins for
added support. My method for
this is to drill a hole in either the wing or the fuselage, and prior to
inserting the pins, carefully align the wing and make a mark with a fine point
sharpie on the side I have not drilled for exact horizontal alignment.
I then measure down however far I need for the vertical alignment and
drill the other holes, insert the wire, and attach the wing.
I had luck getting the wings to fit very tightly with this method;
although, it is not as accurate or nice as the newer Magna system I encountered
when building the Master kit. Next,
I attached the tail planes and rudder making sure to leave the appropriate gap
as the Master/Martinet rudders did not fit flush along the vertical edge.
Magna casts a reasonable representation of the
Now for the real work; dealing with plethora of pin holes present on the Magna
castings. Magna’s resin is
‘different’ than others that I have worked with, being almost soft and compliant
like plastic. Unfortunately,
whatever system they use to pour it creates lots of pin holes in the exterior
surface. This is relatively easy to
fix on the big open areas, but a bearcat in tight detail ridden areas such as
around the landing gear openings and the cowling.
I lightly sanded the whole thing with 400 grit sand paper and primed
heavily with automotive lacquer primer.
I then re-sanded the whole thing with 400 grit paper, and re-primed where
 necessary.
In some spots due to the size of the holes I filled them with CA glue and
re-primed.
necessary.
In some spots due to the size of the holes I filled them with CA glue and
re-primed.
Happy with the body work I then attacked the vacuformed canopy which is a sizable greenhouse on the Martinet. Before cutting any vacuformed part from its sheet I use a fine point sharpie and outline the edges of the part as formed. The marks on edges allow me to cut far enough away from the actual frame so as to not end up undersized-although, there are times when the canopy is so far off that you get burned even being careful. I begin cutting with small, sharp scissors, leaving about 1 mm of extra material so I can trim for best fit. In this case, the canopy fit was excellent to the formed canopy rails, and I trimmed until my pen lines were gone and it fit perfectly. For final trimming I use a new #11 blade freehand without a holder to get everything fitted just so. I have to say; however, that these were some of the worst canopies I have run into in a while; very different from the experience I had with the Miles Master kit and they tried my patience to the breaking point. The problem stems from the fact that the canopies in my kit had been over heated, and over stretched. This situation makes for a nearly impossible trimming session, as the plastic is so thin that it has no resistance to the cutting blade; and because it is so thin it flexes and turns making accurate cuts nearly impossible to achieve. Additionally, the plastic was thick at the top, thus very hard to cut and almost nonexistent at the bottom edges, making it very hard to hold onto-the opposite of most poorly formed canopies I have experienced.
Because I had to separate all of the canopy sections I had to cut every canopy
section accurately-sounds obvious, but it was a real test of wills to
accomplish. I was able to save the
center and rear cockpit canopy sections on the first of the two canopies
provided. The windscreen was
already damaged one this one, so I took the forward and rear ‘windscreen’ from
the second canopy in the kit. Both
forward cockpit canopy sections were misshapen so I used the leftover canopy
from my previous Miles Master build (as it had a similar profile) to make an
acceptable forward canopy section for my Martinet.
At least the landing-light cover fit well this time!
Here I painted the light well with MM RAF Interior Green and installed
two 2 mm MV lenses and permanently installed the cover with CA glue.
Now that the canopy was cut and acceptable, I dipped the sections in
Future and set them aside to dry.
While waiting for the canopy to be ready for installation I decided to finish up
the bottom of the model. First I
cleaned up the metal castings for the landing gear, drilled and installed the
main legs at the wacky cocked 5 degree rearward angle and the extremely splayed
outboard angles. To ensure that
everything looked right I drilled and installed True Detail four spoke Spitfire
resin wheels first (the kit wheels being badly marred by pin holes.)
I used the metal forked retraction parts, but made new outboard braces
from small Plastruct rod 13 mm long.
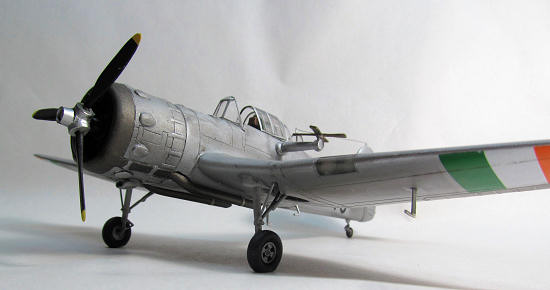
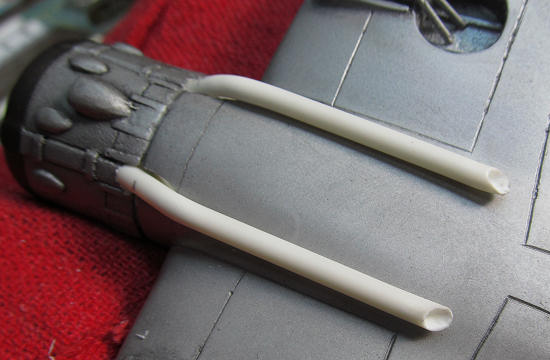 Next I made
new exhaust pipes. Again, grabbing
some Plastruct tubing the diameter of the kit metal parts (1/4 inch) I first
inserted the next slide fit size down into the tube and bent a sharp horseshoe
around the handle of an Exacto knife.
The reason for the inner plastic tube is to keep the outer tube shape
round rather than ‘squashing’ as I make the bend.
Once cut apart at the center of the ‘U’, I pulled out the smaller tubing
pieces and used a sharp #11 blade to thin the tubing to scale.
Happy with the shape of my bends, and the look of the pipes, I drilled
appropriately sized holes into the flattened cowling component of the exhaust
system on the bottom of the model and then carefully bent the drill down to
recess the fuselage to accept my newly created pipes.
I used a tad more of the slide fit tubing, once the pipes were cut to
length, to ease the bends made near the front, where the pipes make a slight
bend into the fuselage and into the newly drilled holes.
All of this careful bending yields the illusion of a continuous exhaust
pipe system. Finally, I took a
small 1/2 inch Forsner bit and created a 3/16 inch deep circular ‘opening’ in
the fuselage behind the wing. This
was the window that the crew used to reach through the fuselage and attach
targets to the cable from the winch.
I next cut a card stock disc to fit and glued it into the circle for a
nice, smooth door.
Next I made
new exhaust pipes. Again, grabbing
some Plastruct tubing the diameter of the kit metal parts (1/4 inch) I first
inserted the next slide fit size down into the tube and bent a sharp horseshoe
around the handle of an Exacto knife.
The reason for the inner plastic tube is to keep the outer tube shape
round rather than ‘squashing’ as I make the bend.
Once cut apart at the center of the ‘U’, I pulled out the smaller tubing
pieces and used a sharp #11 blade to thin the tubing to scale.
Happy with the shape of my bends, and the look of the pipes, I drilled
appropriately sized holes into the flattened cowling component of the exhaust
system on the bottom of the model and then carefully bent the drill down to
recess the fuselage to accept my newly created pipes.
I used a tad more of the slide fit tubing, once the pipes were cut to
length, to ease the bends made near the front, where the pipes make a slight
bend into the fuselage and into the newly drilled holes.
All of this careful bending yields the illusion of a continuous exhaust
pipe system. Finally, I took a
small 1/2 inch Forsner bit and created a 3/16 inch deep circular ‘opening’ in
the fuselage behind the wing. This
was the window that the crew used to reach through the fuselage and attach
targets to the cable from the winch.
I next cut a card stock disc to fit and glued it into the circle for a
nice, smooth door.
Now I began masking all the canopy sections using Tamiya yellow frisket tape. Framing was cut out using a sharp #11 blade free hand-a nerve-wracking process due to the incredibly thin material being masked. Next I attached the front and rear windscreen sections and the middle canopy section with CA glue. I also cut and manufactured navigation light lenses from a clear tooth brush handle. The next project was to clean up and mount the wind driven winch propeller mount onto the left side of the fuselage. Unfortunately, Magna did a pretty poor representation of this rather obvious and detailed part. I cleaned the seams from the white metal part provided, and then proceeded to find an appropriate aerodynamic fairing for the foot. Digging through the spares box, I found a long forgotten plastic bit that fit the bill, drilled it out and mounted the mess to the kit. Re-doing some of the masking I called it done and it was off to the paint booth.
| COLORS & MARKINGS |
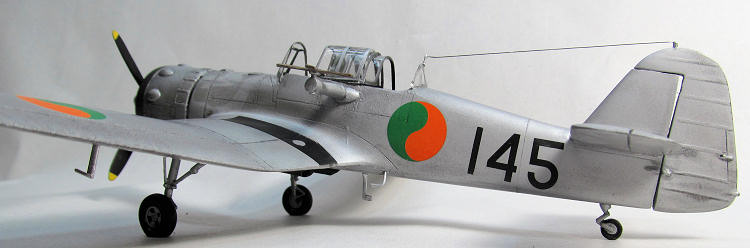
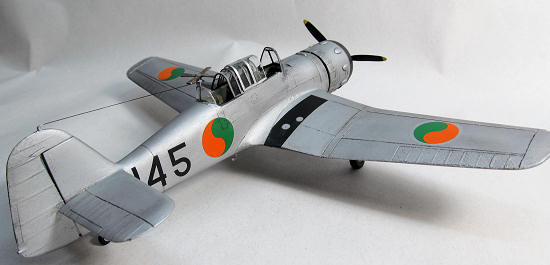
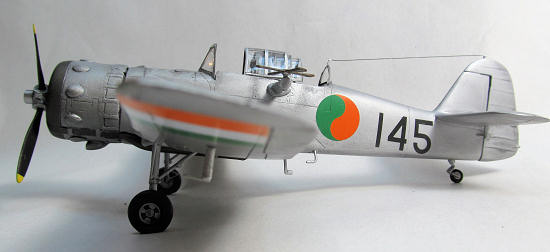
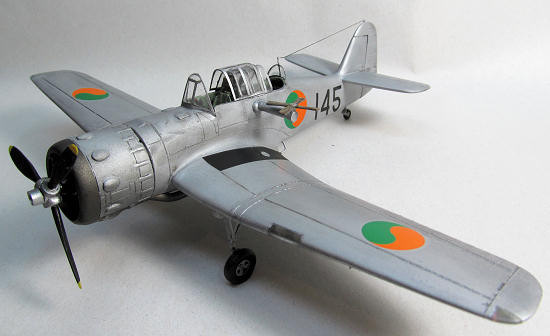
Both of the Irish Martinets were painted in an overall bright silver finish;
although, all of the pictures I have seen show them to be weathered and somewhat
thrashed looking. To achieve this
used finish I chose to start with Floquil Engine Black.
I preshaded the entire airframe and coated the wing roots for coverage on
each side. Once dry, I masked the
two narrow wing walk areas and
 top coated
the entire model with Floquil Bright Silver.
When tacky, not completely dry, I removed the masking from the walk ways
and top coated the entire model with MM Glosscoat (lacquer system) from a rattle
can. I love this clear.
It covers fast, I do not have to clean the airbrush and the gloss is
fantastic. Additionally, by
covering before the silver is set, it ‘moves’ the silver metallic in the base
coat; literally, weathering the finish for me as the black preshading underneath
becomes more visible, especially at edges and valleys.
I now let things sit and thoroughly dry for a couple of days.
top coated
the entire model with Floquil Bright Silver.
When tacky, not completely dry, I removed the masking from the walk ways
and top coated the entire model with MM Glosscoat (lacquer system) from a rattle
can. I love this clear.
It covers fast, I do not have to clean the airbrush and the gloss is
fantastic. Additionally, by
covering before the silver is set, it ‘moves’ the silver metallic in the base
coat; literally, weathering the finish for me as the black preshading underneath
becomes more visible, especially at edges and valleys.
I now let things sit and thoroughly dry for a couple of days.
I did not have any dedicated decals for this build.
I did have roundels left over from other Max Decals sheets, and enough of
the tri stripe decal to make due; however, the Martinets had funky roundels that
saw the orange (or green, depending on one’s point of view) on both the wing and
fuselage markings pointing the same direction.
This is non-standard and luckily I had two sets of just that type of
roundels in the right size. I am
also glad I was sharp enough to catch that little detail!
Ultimately, the real decal crux was finding appropriate fuselage call
numbers in the right font, color and size.
Looking through the spares box I located an old sheet for a Classic
Airframes De Havilland Hornet that had an index with both a four and a five in
the correct font. Bingo!
Armed with my decals I spent a calm morning finishing up placement and
once dried and cleaned I sprayed the entire model with a custom semi-gloss top
coat made from a 40/60 mix of MM Dullcoat and Glosscoat.
| FINAL CONSTRUCTION |
 Once dry I
unmasked the canopies and installed the rear section most of the way into the
center, and the forward section not quiet all the way open.
I made small antenna for the top of the rudder and top center of the rear
windscreen from stretched sprue.
Using 6.2 lbs. test 4x (.007 diameter) fishing line I fashioned a cable and
stretched it taught with the head of a hot match.
The propeller on the IAC aircraft did not have a spinner, but all that
was included for the Martinet was one with a spinner.
Luckily, the Master kit came with both and I had a left over hub that
could be used. The hub was of a
size that looked correct, but lacked any detail.
I jazzed it up some with card stock, drilled and mounted the kit provided
white metal blades and painted the hub MM steel and the blades Engine Black.
Also, at this point I painted a wood grain on the provided white metal
winch propeller and mounted it to the arm.
Finally, I made the guide tower where the crew attached the banners near
the window underneath. A light wash
with burnt sienna and black artist acrylics and another IAC bird was ready for
the shelf.
Once dry I
unmasked the canopies and installed the rear section most of the way into the
center, and the forward section not quiet all the way open.
I made small antenna for the top of the rudder and top center of the rear
windscreen from stretched sprue.
Using 6.2 lbs. test 4x (.007 diameter) fishing line I fashioned a cable and
stretched it taught with the head of a hot match.
The propeller on the IAC aircraft did not have a spinner, but all that
was included for the Martinet was one with a spinner.
Luckily, the Master kit came with both and I had a left over hub that
could be used. The hub was of a
size that looked correct, but lacked any detail.
I jazzed it up some with card stock, drilled and mounted the kit provided
white metal blades and painted the hub MM steel and the blades Engine Black.
Also, at this point I painted a wood grain on the provided white metal
winch propeller and mounted it to the arm.
Finally, I made the guide tower where the crew attached the banners near
the window underneath. A light wash
with burnt sienna and black artist acrylics and another IAC bird was ready for
the shelf.
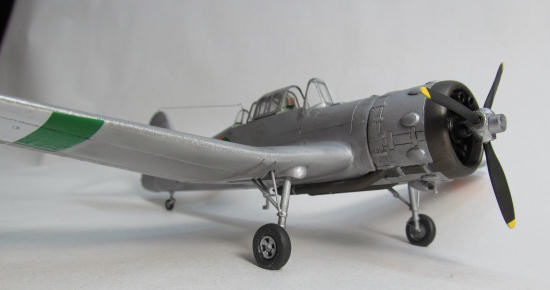
| CONCLUSIONS |
Silver and kind of beat up. Just
like the pictures I have seen of the real thing.
I am happy with the results-it looks great; however, I am now officially
done with Magna Models kits… I really want a Sea Prince in 1/48, and maybe like
kidney stones I will forget the pain, but for now I really do not have the
patience for another. Overall the
kits (Master and Martinet) build very straight forward; but, the pin holes are
over whelming. Alone they add
hours to a build and if you need a good base for a metal or silver finish,
eliminating them can easily double the completion time.
On the flip side, where else are you going to get these more obscure
aircraft? Recommended to modelers
with experience scratch-building and working with limited run resin kits.
| REFERENCES |
Maxwell, Joe and Patrick J. Cummins
The Irish Air Corps: An Illustrated Guide.
W &G Baird, Ireland. 2009
http://www.milfield.org.uk/fighter_leader_school_milfield.htm
Patrick Earing
May 2012
If you would like your product reviewed fairly and fairly quickly, please contact the editor or see other details in the Note to Contributors.