Airfix 1/72 Fairey Swordfish
| KIT #: | A05006 |
| PRICE: | $22.00 SRP |
| DECALS: | Two options |
| REVIEWER: | Ryan Grosswiler |
| NOTES: | Eduard photoetch, masks, and Quickboost exhaust |
| HISTORY |
A more unlikely war-winner can hardly be imagined.
As a result, I've always been fascinated by this big, clattering biplane as a weapons system and the lesson it has to offer about tactical thinking. Seemingly ridiculously obsolete at the outbreak of the Second World War, it could nonetheless reliably carry a substantial warload and this being any combination of torpedo, bombs, depth charges, and rockets...thus leading to its nickname, "Stringbag" (a sort of canvas duffel closed at the top with a length of twine, apparently common for personal schlepping back in the day). The resulting design was all lift and all drag, so much so that maintenance crews didn't even bother removing bomb racks and similar for sorties where they weren't being used. Low speed, though, would be very helpful--in this era before naval R/F early-warning systems and an enemy with no carrier forces of its own--for precision placement of ordinance on target. It would mean easier carrier recovery for new pilots. Fabric-over-metal-framework meant easy maintenance and repair at sea.
 These days, as the USAF wrestles to replace the A-10 with the F-35, the
field data from elsewhere in the world shows an even older aircraft, the
OV-10 Bronco, to be proving most relevant and lethal on a battlefield
where the enemy has no air power, while being far more operationally
flexible and almost incomprehensibly more economical. The lesson is that
tactical context always changes, and tactical context is everything.
These days, as the USAF wrestles to replace the A-10 with the F-35, the
field data from elsewhere in the world shows an even older aircraft, the
OV-10 Bronco, to be proving most relevant and lethal on a battlefield
where the enemy has no air power, while being far more operationally
flexible and almost incomprehensibly more economical. The lesson is that
tactical context always changes, and tactical context is everything.
Thus, while so many "modern" aircraft such as Fairey's own Battle and (more directly) the Douglas Devastator would prove to be complete death-traps in the face of 1941 aerial warfare, the humble Swordfish would by tactical fluke just keep on keepin' on, outlasting its Albacore replacement and only sidelined by the Barracuda and Grumman TBF at the very end of the war.
On the downside, that slow speed would also give crews plenty of time to
ponder what lay ahead as they huddled against that freezing slipstream
en route to target.
I recently watched the 1960 B&W movie, Sink the
Bismark! The Swordfish attack is depicted with a low-budget special
effect: head-on silhouettes of the aircraft projected on a translucent
screen to show the Bismark's-crew-view of the attacking biplanes, with
little flashes (flak explosions) popping up on sa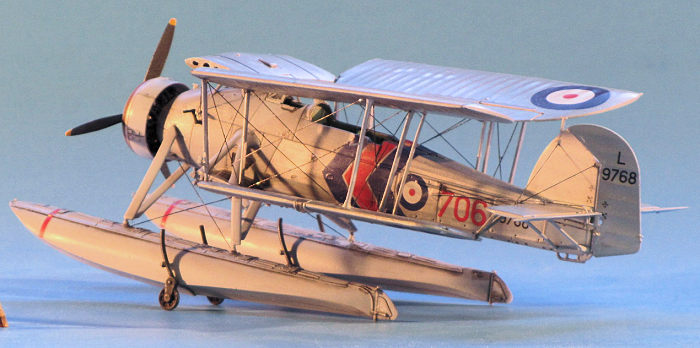 me. My following thought
process: I at first naturally recoiled, snobby 21st-century sensibilities
regarding Correct Depiction Of Aircraft In Film leading me to look down on
it--but then in a few seconds changed my mind and smiled: such a slow
airplane coming in to attack would seem to just
hang there, a cluttery shadow floating in space, before a small circle
underneath dropped and disappeared in a little splash: the torpedo on its
way in. Much more effective and understated than the overproduced CGI
sequence that would run in its place today.
me. My following thought
process: I at first naturally recoiled, snobby 21st-century sensibilities
regarding Correct Depiction Of Aircraft In Film leading me to look down on
it--but then in a few seconds changed my mind and smiled: such a slow
airplane coming in to attack would seem to just
hang there, a cluttery shadow floating in space, before a small circle
underneath dropped and disappeared in a little splash: the torpedo on its
way in. Much more effective and understated than the overproduced CGI
sequence that would run in its place today.
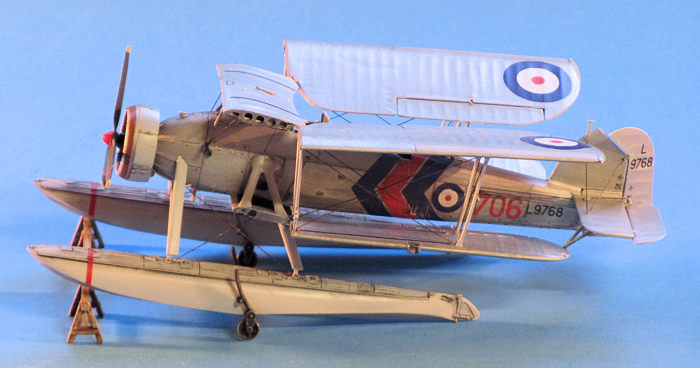
While the many exploits of the the land plane Swordfish are well-known, from crippling the Bismarck, the daring raid on the Italian fleet at Taranto, the Channel Dash and lots of antisubmarine work in the Atlantic, I really don't know much about what this airplane did on floats besides a lot of yeoman general reconnaissance/observation work at the beginning of the war. Apparently they weren't seen much on them after 1942.
| THE KIT |
This is the same plastic as the land plane version reviewed elsewhere, plus an extra sprue for the floats and their accessories.
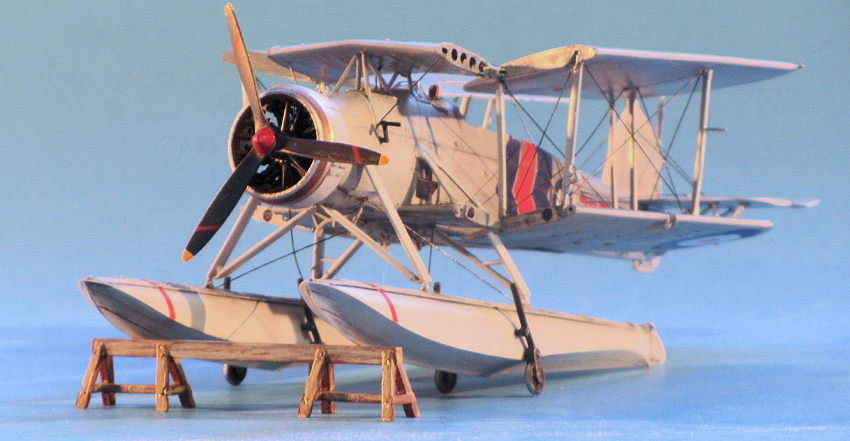
For decades, we had kits from Matchbox, old Airfix, and Frog to serve us this subject in 1/72. All built up into reasonable depictions of the Swordfish, but were products of the era ruled by the 33-1/3 LP record and a tad crude and lacking in detail. Then New Airfix blew us all away several years ago with this inspired all-new mold and its innovative engineering, fine detail, and fun diorama accessories (torpedo trolley, inertial starter crank, beaching gear, and wooden sawhorse float stand). It's an excellent kit at a fair price.
| CONSTRUCTION |
Excellent does not equate to easy, however! There's some complex assembly here, and by no means should this be the modeler's first biplane. If you're at all unsure choose the extended-wing option.
Having chosen the folded-wing option (being somewhat lacking in wisdom), I went through Airfix's thorough instructions and carefully crossed out all steps related to the extended wings with a blue Crayola crayon, courtesy of my little girls doing artwork across the table from me. I also noted steps where assembly should stop prior to painting with a red "X", also with a crayon (this one with a picture of Elsa and Anna on the label). I also really took some time to ponder every phase of the project ahead. This is important: there are steps to skip, holes to drill, parts to be left disassembled until after painting. And...oh, yeah...there's no rigging diagram. Some of the attachments points are depicted in the molding, but most will need to be found in reference photos or drawings and drilled.
Airfix's instructions are otherwise so good I'll only point out where I deviated from them and some handy tips. I also used Eduard's photo etch set for this kit, but mostly only the parts specific to the floats and wing fold. The cockpit is mostly obscured (except for straight above) by the folded wings, and I could save these parts for a future project.
 My one alteration: I started by assembling the float halves and
filling/sanding/priming the deeply engraved panel lines on their sides while I
proceeded with the rest of assembly. These don't appear to be related to any
actual panel or fastener lines and actually detract from
the floats' finished appearance.
My one alteration: I started by assembling the float halves and
filling/sanding/priming the deeply engraved panel lines on their sides while I
proceeded with the rest of assembly. These don't appear to be related to any
actual panel or fastener lines and actually detract from
the floats' finished appearance.
Step #11: photographs show that the forward .303 gun was usually left off before the war, so I did so and stuck a small plastic disk over the hole. The observer's Vickers .303 was likewise left off: I figured a folded-and-parked aircraft would have the weapon dismounted and secured elsewhere.
Steps #13 & #15: do these in short order, or while the cement is still setting from #13. There are three main parts that make up the fuselage and I found it useful to be able to do some adjusting before any of it fully cured.
Steps #16 & #17: mask the fuselage windows before adding the lower wing center-section struts!
Step #28: Assemble the individual parts which make up the engine, cowl, and prop, but leave these subassemblies apart until after painting.
Step #46: Stop before this step if you're painting the model and skip to Step 47.
Steps #53 and #55: Skip these steps for reason above.
Step #59: Drawings and photographs showed that for floatplane operations, the tailhook and crew step were left off, the former being replaced by a blanking plate. I simply filled in the slots/holes in the kit part and sanded them flush.
There are a few do-dads on the fuselage that the Airfix mold makers omitted for
some reason, namely fuel system accessories under the top wing center section
and some access panels and sti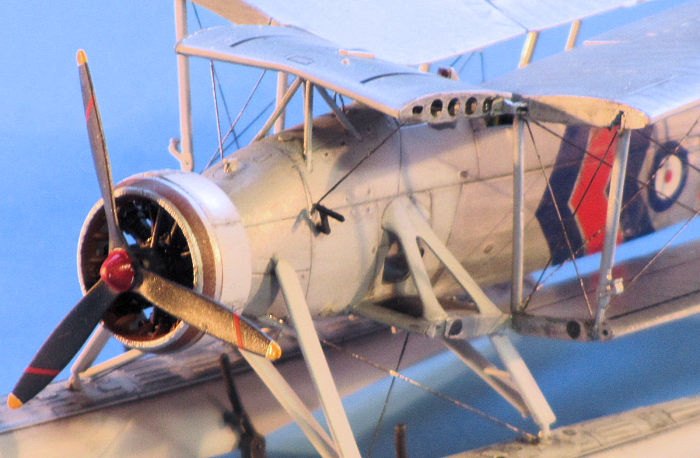 ffening stringers underneath. Being noticeable,
these were duly depicted with bits of plastic, scribing, and stretched sprue. G.
Cox's outstanding and exhaustively annotated drawings were referenced for this
and the later rigging (and throughout the build in general), and I very much
recommend you find yourself a set of these if you intend to do anything other
than an OOB build. They're found, among other places, in the Argus Books title
listed in the references below for less than $10 online, and go a long way to
demystifying the Stringbag's busy airframe.
ffening stringers underneath. Being noticeable,
these were duly depicted with bits of plastic, scribing, and stretched sprue. G.
Cox's outstanding and exhaustively annotated drawings were referenced for this
and the later rigging (and throughout the build in general), and I very much
recommend you find yourself a set of these if you intend to do anything other
than an OOB build. They're found, among other places, in the Argus Books title
listed in the references below for less than $10 online, and go a long way to
demystifying the Stringbag's busy airframe.
I also left off all the stores and bomb racks, the chosen aircraft's role in 1938 probably being a gun-spotter and I couldn't find pictures of the external fuel tank in pre-war shots. I started to assemble Eduard's lovely empty flare racks, but lost one of their bases to the carpet monster so omitted that detail. I chose also to glue the struts to the floats while only dry-fitting them to the fuselage while curing for alignment. This was so they could remain separate subassemblies for finishing while simplifying final assembly a little.
Missing is the vertical antenna mast on the top wing center section, offset to the right. I might add this later.
The upper wing roots on the Eduard photetched parts correctly depict lightening
holes, but these were normally faired over with fabric and dope at sea.
| COLORS & MARKINGS |
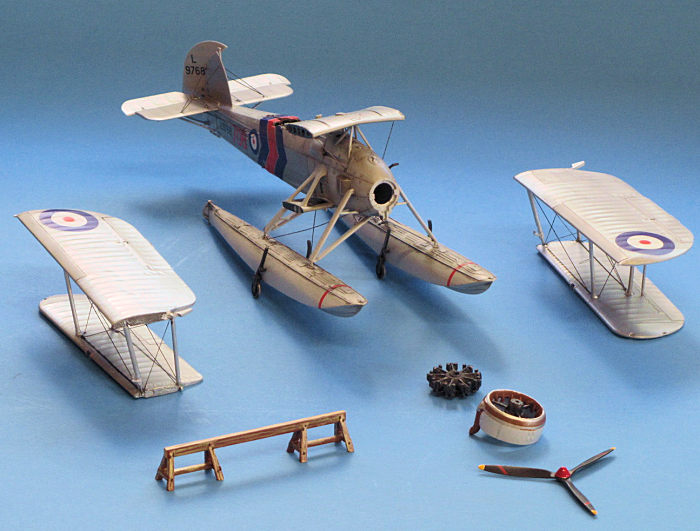
Construction had to this point left me with a fuselage/tail unit, engine parts, top wing center section, the floats, and outer wing assemblies.
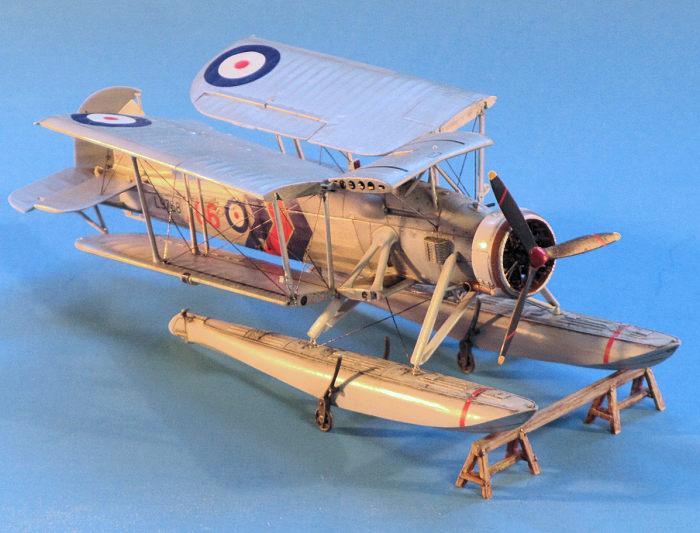
The fabric areas were then shot with Testor's Metalizer Aluminum, masked,
followed by the sheet me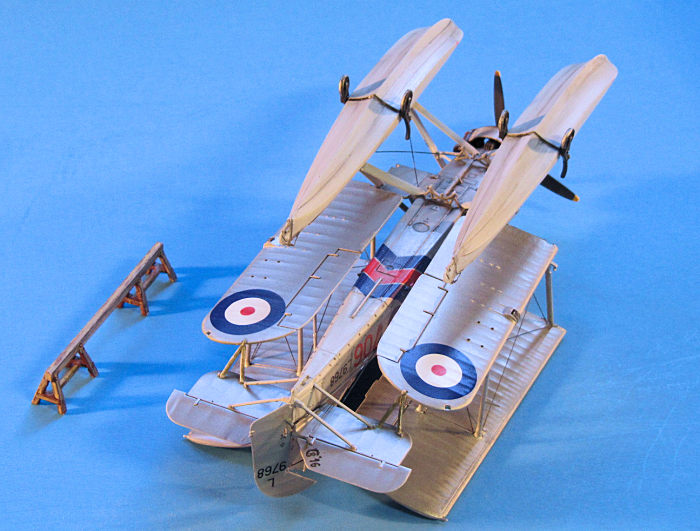 tal panel areas with a light gray, both then sealed with
a coat of Future. Decals then went on the still-separate subassemblies. I was
concerned about the big fuselage bands and how they might actually conform, they
being presented only as left-and-right segments wrapped over lots of
aforementioned fuselage doohickies. I slid the left one on first, brushed with
Micro-Set, then followed by my usual barrage of Micro-Sol. I took the precaution
of making a vertical slice immediately aft of the ballast inspection window
(that prominent vertical slit-bulge on the bottom of the fuselage
sides immediately aft of the gunner's station). Over the next hour, as I made
supper, I kept returning to the Swordfish every ten minutes or so to brush a
little more solvent and "work" the decal into all the nooks and crannies with a
brush.
tal panel areas with a light gray, both then sealed with
a coat of Future. Decals then went on the still-separate subassemblies. I was
concerned about the big fuselage bands and how they might actually conform, they
being presented only as left-and-right segments wrapped over lots of
aforementioned fuselage doohickies. I slid the left one on first, brushed with
Micro-Set, then followed by my usual barrage of Micro-Sol. I took the precaution
of making a vertical slice immediately aft of the ballast inspection window
(that prominent vertical slit-bulge on the bottom of the fuselage
sides immediately aft of the gunner's station). Over the next hour, as I made
supper, I kept returning to the Swordfish every ten minutes or so to brush a
little more solvent and "work" the decal into all the nooks and crannies with a
brush.
The next morning revealed a fuselage band that looked painted on. Intrigued, and this being a kit review, I attempted to do it without the slice for the other side. This didn't work out so well, and I salvaged it with some eleventh-hour work with a fresh X-Acto blade and my decal brush. So, in the end, the fuselage bands do need at least one slice aft of that protrusion. Still--pretty impressive, Airfix! The rest of them went on without issue: I didn't even bother trimming the borders.
| FINAL CONSTRUCTION |
I returned to Step #46 and used Airfix's neat jigs to cement the top wing center section in an aligned position. Floats were cemented on next. The came the process of rigging, done by cutting lengths of Minimeca steel wire and CA'ing them into the holes I'd drilled back before assembly began. Wires were then painted dark gray and dry-brushed silver.
 Engine/cowl/prop went together and on the fuselage without problems. Then
came what was I think the diciest modelling operation I've done in years:
sticking those wing panels on in their correct folded position! I ended up
propping the fuselage on its side, getting the wing into place, brushing a
good dose of liquid cement into the two root attachment points and shoving a
pencil between wing and fuselage to support it. With the glue setting, the
triangular storage bracket was positioned between stabilizer and wing tip,
adjusting the pencil's placement to get the alignment right, and more liquid
cement brushed on to the bracket's joints with the brush held in my third
hand. The resulting assembly was left overnight to cure, then flipped to
repeat the process with the remaining wing.
Engine/cowl/prop went together and on the fuselage without problems. Then
came what was I think the diciest modelling operation I've done in years:
sticking those wing panels on in their correct folded position! I ended up
propping the fuselage on its side, getting the wing into place, brushing a
good dose of liquid cement into the two root attachment points and shoving a
pencil between wing and fuselage to support it. With the glue setting, the
triangular storage bracket was positioned between stabilizer and wing tip,
adjusting the pencil's placement to get the alignment right, and more liquid
cement brushed on to the bracket's joints with the brush held in my third
hand. The resulting assembly was left overnight to cure, then flipped to
repeat the process with the remaining wing.
| CONCLUSIONS |
I'll happily join the chorus of voices singing in praise of this kit, but
don't take that to mean this is a project for any other than the experienced
modeler! Tackle a couple of other biplanes before going after this one and if
you're still a little unsure leave those wings extended. I'll certainly be doing
so when I build the landplane version...
| REFERENCES |
No author; various draftsmen. Bombers of World War II. Argus Books, 1988
6 March 2017 Copyright ModelingMadness.com
If you would like your product reviewed fairly and fairly quickly, please contact the editor or see other details in the
Note to
Contributors.