Eastern Express 1/72 Hotspur
|
KIT # |
? |
|
PRICE: |
AUD $8.00 |
|
DECALS: |
Two aircraft |
|
REVIEWER: |
|
|
NOTES: |
Ex-Frog Mold. |
|
HISTORY |
|
THE KIT |
The survival of
Eastern Express kits from a mail order shop is solely reliant on the
skill of the person that is packing the kits up at the other end, Eastern
Express boxes barely manage to stay together let alone protect the kit
parts being rather flimsy
 and prone to
falling apart at the seams.
and prone to
falling apart at the seams.
Eastern Express has long been known to re-box other manufacturer’s kits such as Dako, Toko and Frog. The Hotspur having its roots with Frog and has been kitted on and off for more than 35 years and the molds are now starting to show their age with lots of flash, sink marks and misaligned molds, causing nasty stepping on the undercarriage. The instruction sheet is printed on low quality newspaper with exploded diagrams and Russian to (sometime humorous) English translations but with only 25 parts the model is a bit of a no-brainer although the paint instructions leave a lot to be desired as Eastern Express only give you the port side profile for painting and leave you to guess the rest of the camo patterns and decal placements. Decals consist of generic roundels and two different tail codes, the decals are rather poorly printed and slightly out of register and I would recommend finding some replacements.
|
CONSTRUCTION |
Construction of the Hotspur starts with building up some detail in that rather empty cockpit, all EE give you is a floor and two generic seats to fill up quite a large area. Some of my homemade ‘generic’ side panels and stretched sprue made a big difference. Seatbelts were made out of masking tape and the whole lot painted Humbrol 105 green and dry brushed to bring out the detail, no point going over board as the canopy is very thick and cloudy so not a lot will be seen anyway.
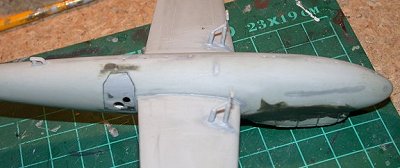 The Hotspur comes
with separate access doors that doesn’t fit partially well so once dry
they were completely filled in and new lines scribed. The fuselage was
then glued together and although the fit as excellent a lot of filler was
needed on sink marks as seen in the photo, one particularly bad mark
extended along the front fuselage on both sides. These were filled with a
homebrewed version of Mr Surfacer made with Tamiya filler and nail polish
remover and sanded down smooth.
The Hotspur comes
with separate access doors that doesn’t fit partially well so once dry
they were completely filled in and new lines scribed. The fuselage was
then glued together and although the fit as excellent a lot of filler was
needed on sink marks as seen in the photo, one particularly bad mark
extended along the front fuselage on both sides. These were filled with a
homebrewed version of Mr Surfacer made with Tamiya filler and nail polish
remover and sanded down smooth.
The wings needed
the trailing edges thinned down somewhat along with the separate control
surfaces. Fit of these parts was good with very little work needed apart
from removing a small amount of flash from the tailplanes. The raised
detail was sanded off at this point and rescribed using a pin chucked
into the handle of an old model knife. I didn’t try to rescribe around that circular fuselage as I would have
screwed it up and being plywood I doubt whether there would be any joints
noticeable anyway.
I didn’t try to rescribe around that circular fuselage as I would have
screwed it up and being plywood I doubt whether there would be any joints
noticeable anyway.
At this point the canopy was fitted to the fuselage and the fit was well BAD, a Falcon vac canopy is a must for this project but as I build MM supplied review models ‘outa-da-box’ (hey, he actually asked for this kit....ed) I used the kit supplied canopy and spent a fair amount of time and putty fairing it in and hiding the gaps, while not perfect It’s a big improvement on the way it first fitted. I had left the supplied fuselage windows out as I had planed on replacing them with Kristal Klear once painting was completed, but had forgotten to cover up the holes while sanding the filler, course the dust worked it’s way into the fuselage and Murphy being Murphy all the dust stuck itself to the inside of the canopy arrrrgggg.
|
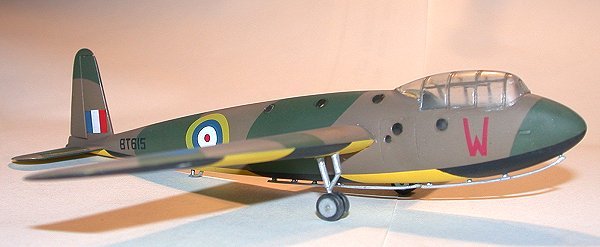
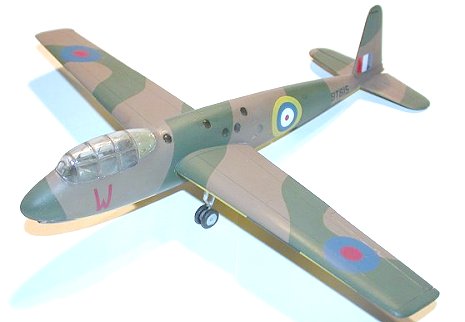
CAMOUFLAGE & MARKINGS |
Being a trainer the
Hotspur is quite colorful with wide yellow and black stripes on the
underside and standard Green/Dark brown camouflage topside. First order
of the day was to spray the underside matt Tamiya silver to act as an
undercoat for 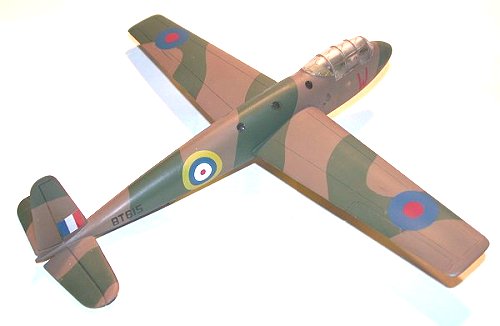 the
yellow. 6 or 7 light coats of yellow where misted over the silver over a
few hours until the desired color depth had been achieved, once dry the
yellow was masked off and the Matt black stripes were airbrushed on and
left for a few days to harden up. The sides where masked up and the
Tamiya Dark Earth was applied, I used masking tape to mask off the dark
Earth and finished off with the Tamiya Olive Green with a dash of Humbrol
105 added. The masking tape was carefully removed and the usual little
touch up jobs done on the overspray, with the major painting out of the
way it was time to remove the nasty mold step in the undercarriage legs
and tidy up the rather toy looking wheels.
the
yellow. 6 or 7 light coats of yellow where misted over the silver over a
few hours until the desired color depth had been achieved, once dry the
yellow was masked off and the Matt black stripes were airbrushed on and
left for a few days to harden up. The sides where masked up and the
Tamiya Dark Earth was applied, I used masking tape to mask off the dark
Earth and finished off with the Tamiya Olive Green with a dash of Humbrol
105 added. The masking tape was carefully removed and the usual little
touch up jobs done on the overspray, with the major painting out of the
way it was time to remove the nasty mold step in the undercarriage legs
and tidy up the rather toy looking wheels.
I decided to stray from the tried and true method of gloss coating and applying the decals, I had heard of one modeler who polished the area to be decaled with a polisher chucked in a Dremel and affixing the decals onto a small ‘puddle’ of wet future, well I tried this and I think the results for me anyway turned out slightly better than the normal way, the Eastern Express decals sucked down well onto wet future and I didn’t get the normal silvering that plagues me when it come to decals. I has since used this method on two more models with great success and found it to be particularly useful in getting those horrible Academy decals to conform and stick. And before the Decal police ring in, I know the nose code is wrong for the tail code, I errr... ummm... misread the instructions and used the wrong tail codes and didn’t notice it until it was too late.
|
FINAL CONSTRUCTION |
 Final assembly
consisted of thinning down and cleaning up the skids and attaching them
to the fuselage. As the Hotspur was used a glider trainer and didn’t have
an engine I kept this particular model clean and factory fresh, I didn’t
try to hide all my construction mistakes with ‘weathering’ like I
normally do
J
Final assembly
consisted of thinning down and cleaning up the skids and attaching them
to the fuselage. As the Hotspur was used a glider trainer and didn’t have
an engine I kept this particular model clean and factory fresh, I didn’t
try to hide all my construction mistakes with ‘weathering’ like I
normally do
J
|
CONCLUSIONS |
If I were to do another one I would certainly invest in a vacform canopy for it, this is probably, along with the decals, the weakest point with the kit. A very nice model can be made if you have the skills and don’t mind spending time on improving what Tamigawa give you out of box; thin trailing edges, good cockpits, nice wheels, etc. Saying that, the Frog Hotspur is three decades old and I doubt whether anyone else will kit a glider trainer in the near future.
Recommended for its interesting place in history
|
REFERENCES |
www.rblharwell.freeserve.co.uk/ GliderPilots/hotspur.htm
http://www.pointvista.com/WW2GliderPilots/GliderInfantry.htm
Copyright ModelingMadness.com. All rights reserved. No reproduction in part or in whole without express permission.
If you would like your product reviewed fairly and quickly, please contact the editor or see other details in the Note to Contributors.