Tamiya 1/48 Supermarine
Spitfire Mk.Vb Trop
| KIT #: | 35 |
| PRICE: | AUD$35.00 |
| DECALS: | Two Options |
| REVIEWER: | Brad Gaff |
| NOTES: | Aftermarket Seatbelts and Decals |
| HISTORY |
The Supermarine Spitfire would be one of only a few aircraft to remain in front
line service from the start to the finish of WW2 (and beyond). The Spitfire Mk V
was introduced in an attempt to increase the power and punch of the Mk 1. Main
improvements were the more powerful Merlin 45 engine and two 20mm cannons (at
the expense of 4 .303 machine guns) mounted in the wings. The
 Mk V was
eventually outclassed by the Focke Wulf 190 in
Mk V was
eventually outclassed by the Focke Wulf 190 in
In the years immediately after WW2 conflict quickly broke out in the
| THE KIT |
 Moulded
in light sand and typically flash free, the Tamiya Spitfire looks great in the
box. Multiple extras are included; clipped and standard wingtips, alternate
wheel hubs, Vokes and Aboukir air filters, large ferry fuel tank, alternate
canopies/windscreen and round or square rear vision mirror.
You don’t get the later multiple stack exhausts though and to build some
Egyptian Mk Vb’s, you will need these.
Moulded
in light sand and typically flash free, the Tamiya Spitfire looks great in the
box. Multiple extras are included; clipped and standard wingtips, alternate
wheel hubs, Vokes and Aboukir air filters, large ferry fuel tank, alternate
canopies/windscreen and round or square rear vision mirror.
You don’t get the later multiple stack exhausts though and to build some
Egyptian Mk Vb’s, you will need these.
The side access door is moulded shut however it is very easy to cut open, with a replacement provided. Decals look good but a little thick with white background decals provided, but I’ve never actually used these on a model.
| CONSTRUCTION |
As usual I started construction with the cockpit. It is quite well fitted out,
however as I was planning to cut open the side door I thought some aftermarket
seatbelts would look good. I used a set of etched metal RAF seatbelts from Red
Roo. Being etched metal, I heated them under a candle until red hot, cooling
them in water. This makes them much easier to manipulate. I painted the cockpit
with Humbrol 30 green, picked out the details with black, washed and dry brushed
the cockpit before gluing the fuselage t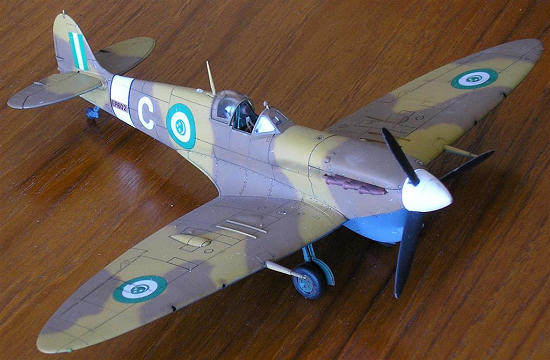 ogether.
Now, what I forgot to do was paint the bottom of the fuselage green too! I only
realised that you could see the bottom through the floor when I took a picture
with the flash on...oops.
ogether.
Now, what I forgot to do was paint the bottom of the fuselage green too! I only
realised that you could see the bottom through the floor when I took a picture
with the flash on...oops.
Not too much trouble was encountered with the rest of construction.
However you must take some care when gluing the Vokes filter together as
the panel lines don’t quite match up. The wings fit flawlessly to the fuselage
with the only a light sanding needed around the leading and trailing edges.
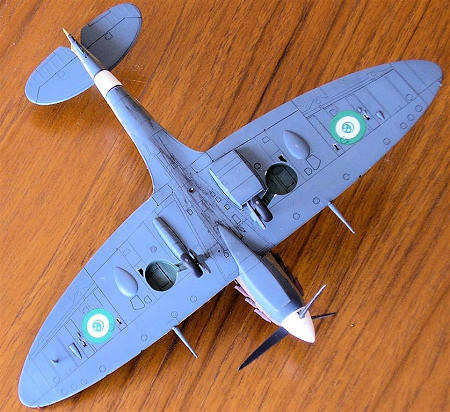
The oil cooler and radiator fairings both slot into their depressed spots on the
wing. I found them both to sit a little too high so I sanded down the mating
surface. This resulted in them sitting flush with the rest of the wing. I found
the holes for the prop blades were a touch too small and needed to have a #11
blade twisted around inside them so you’re not trying to force the blades into
the nicely painted spinner (like I was trying too). Also, give the undercarriage
pins a quick ounce over with some sand paper as mine were more than a tight fit.
The prop, canopies, side door and undercarriage were all left off until I finished the Matt Cote.
| COLORS & MARKINGS |
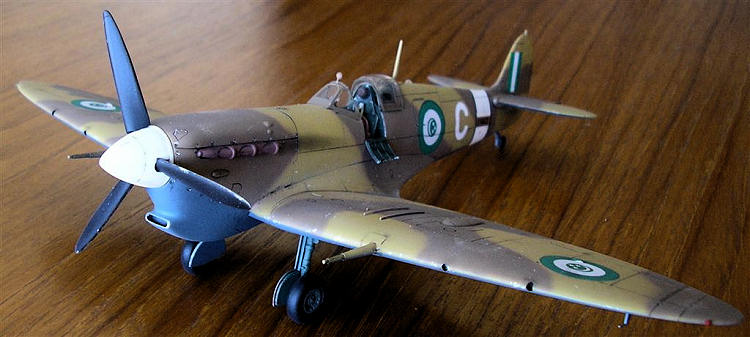
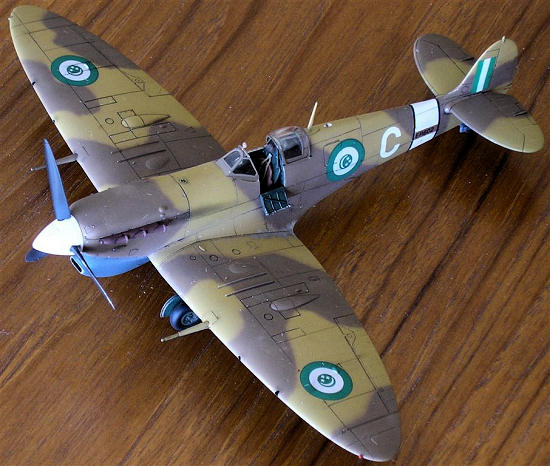
Still in my Middle Eastern phase of modelling, I decided on the Spitfire ‘ER602’
or ‘white C’ as pictured in Alex Yofe’s
‘Spitfire: Star or
With the basic colours on, I turned to the fuselage identification band. I
masked it by eye and proceeded to paint it and the spinner Gunze white. I left
this dry for a day before masking the two black edges, but this met with
disaster. When pulling off the Tamiya tape, the Gunze paint had not dried
completely and pulled off....ugh! So I sanded back the fuselage and did a
partial repaint,
 masked
up and sprayed white again, this time using Humbrol. After this I painted a dark
earth section on the band where the serial number would go. I’m not sure what
that colour was, but dark earth seemed as good a guess as any.
masked
up and sprayed white again, this time using Humbrol. After this I painted a dark
earth section on the band where the serial number would go. I’m not sure what
that colour was, but dark earth seemed as good a guess as any.
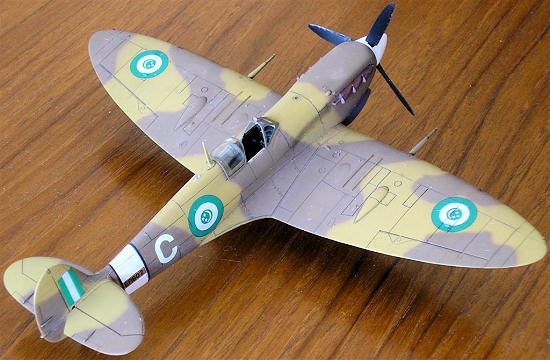
With that disaster out of the way, it was on the decals and weathering. I used
Humbrol gloss cote and while that dried, I started the hunt for decals. The
roundels came in some
Weathering was now accomplished with a black pastel wash. I ground up some
pastel and mixed it with some water and dish washing detergent. I applied it
sparingly to the panel lines and left it to dry for around 20 minutes. I used a
damp lint free rag to wash off the excess in the direction of the air flow.
Don’t wash it all off, leave a little streaked on the surface to represent
grime. Spitfires usually got very messy under the fuselage. To accomplish this,
I simply splashed copious amounts of this black wash just behind the Vokes
filter, let it dry then smeared it back.
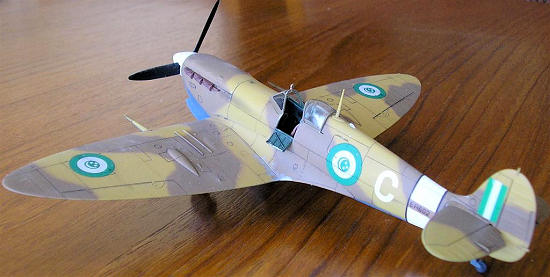
At this stage I also used my silver gel pen to add paint chips to the gun
access hatches and engine cowling fasteners along with other randomly placed
scratches to the airframe.
Finally I hit it all with Humbrol Matt Cote. Once dry I added some dust to the wheels, gear doors and exhaust stacks along with the exhaust staining on the fuselage.
| CONCLUSIONS |
 This was
a great model to build, barring my own screw ups. If you are looking at building
an Egyptian Mk Vb, please note that my wing roundels may be a touch small, fin
flash is a little skinny and my ‘C’ not quite round enough. However it was all I
had in the decals box. Also, it appears that the aircraft had its serial written
in the white band just about the letters in tiny Arabic script. Lacking a decal
and a steady enough hand to paint this on, I’ve omitted this until I can come up
with a suitable solution.
This was
a great model to build, barring my own screw ups. If you are looking at building
an Egyptian Mk Vb, please note that my wing roundels may be a touch small, fin
flash is a little skinny and my ‘C’ not quite round enough. However it was all I
had in the decals box. Also, it appears that the aircraft had its serial written
in the white band just about the letters in tiny Arabic script. Lacking a decal
and a steady enough hand to paint this on, I’ve omitted this until I can come up
with a suitable solution.
| REFERENCES |
Alex Yofe, Spitfire - Star Of Israel, Ventura Publications, New Zealand, 1996
November 2009
If you would like your product reviewed fairly and quickly , please contact me or see other details in the Note to Contributors.