Trumpeter 1/32 Swordfish
| KIT #: | ? |
| PRICE: | 60 Euros from a shop in Germany |
| DECALS: | Two options: 815 and 816 Squadron. |
| REVIEWER: | Roger Hardy |
| NOTES: |
| HISTORY |
| THE KIT |
 I built the Tamiya 1/48
Swordfish some years ago and thought it the best kit ever produced, but
expensive. To
add insult to financial injury, the photo-etch bracing wire set was extra. When
I saw the Trumpeter kit of 1/32 scale, it was a must-have. When I opened the
box, I had a feeling of déjà vu: it was the Tamiya kit scaled up. Now
that was good news because I have made a few Trumpeter kits and, whilst I
applaud their efforts, their products are a bit hit-and-miss. This
one, however, is right on target. Of
course, the Tamiya kit was a perfect starting point and I decided to make
this straight-from-the-box.
I built the Tamiya 1/48
Swordfish some years ago and thought it the best kit ever produced, but
expensive. To
add insult to financial injury, the photo-etch bracing wire set was extra. When
I saw the Trumpeter kit of 1/32 scale, it was a must-have. When I opened the
box, I had a feeling of déjà vu: it was the Tamiya kit scaled up. Now
that was good news because I have made a few Trumpeter kits and, whilst I
applaud their efforts, their products are a bit hit-and-miss. This
one, however, is right on target. Of
course, the Tamiya kit was a perfect starting point and I decided to make
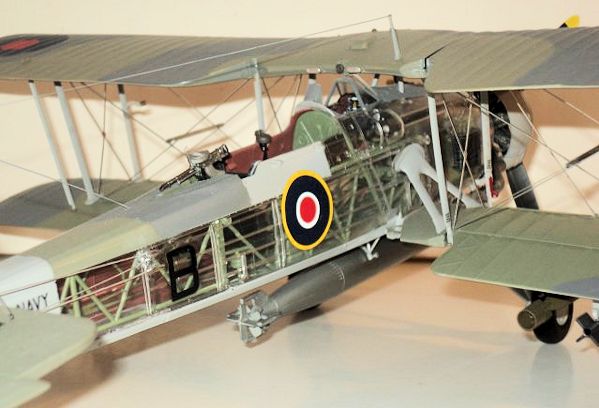
this straight-from-the-box.  wing alignment easy but….see below. The
instrument panel was a puzzle. They
give you a clear panel and a decal. Huh? The
decal is meant to go on the front, so why bother with making it clear? The
panel is too thick to put the decal on the back. In
the end, I decided that, as the panel was buried deep under the coaming, I
would put the decal on the front. To
my surprise, and with a lot of Microset and Microsol, it settled down well
and actually looks good. I
put some drops of clear varnish for the glass and moved on. There’s
little else to be said about the build although I was frustrated by the
complexity of the under-wing stores carriers which are fiddly and rather
weak. Superglue
to the rescue.
wing alignment easy but….see below. The
instrument panel was a puzzle. They
give you a clear panel and a decal. Huh? The
decal is meant to go on the front, so why bother with making it clear? The
panel is too thick to put the decal on the back. In
the end, I decided that, as the panel was buried deep under the coaming, I
would put the decal on the front. To
my surprise, and with a lot of Microset and Microsol, it settled down well
and actually looks good. I
put some drops of clear varnish for the glass and moved on. There’s
little else to be said about the build although I was frustrated by the
complexity of the under-wing stores carriers which are fiddly and rather
weak. Superglue
to the rescue. | CONSTRUCTION |
 throw it together. I
painted the different assemblies as I went on and this worked well.
throw it together. I
painted the different assemblies as I went on and this worked well. | COLORS & MARKINGS |
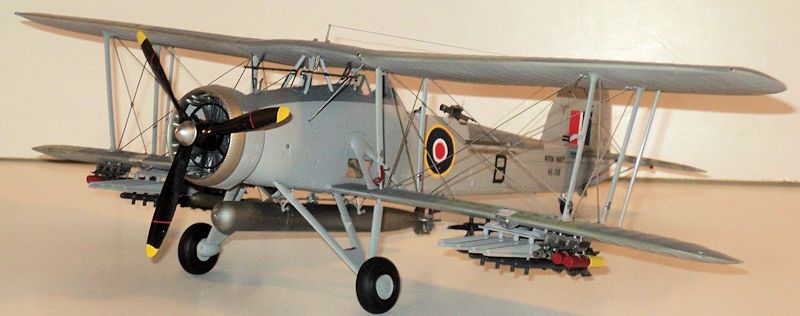
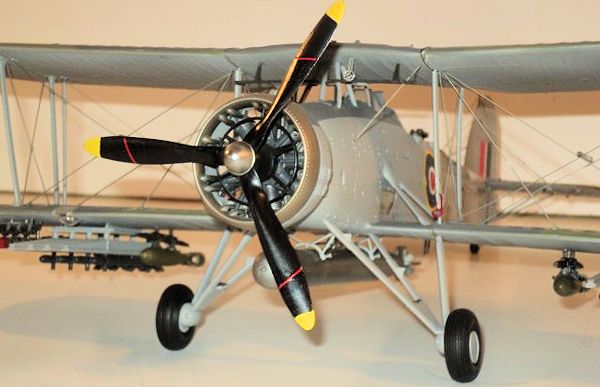 The colour instructions are incorrect; the camouflage
should be Dark Sea Grey and Slate Grey, not Dark Green. Slate
Grey is a lighter tone that Dark Sea Grey whereas Dark Green is darker. Technically,
the lower wing should have lighter tones but I didn’t bother with that. There
is also some confusion as to the underside colour…white, Sky or Sky Grey? The
instructions say Sky but there is a lot of evidence that they were Sky
Grey. There
are few colour pictures of these aircraft and I chose Sky Grey. Maybe
it should have been Sky, I don’t know, but it looks fine and I’m not losing
sleep over it. I
mixed my own colours from the Tamiya range, including a slightly flat satin
varnish and sprayed using an Aztek airbrush.
The colour instructions are incorrect; the camouflage
should be Dark Sea Grey and Slate Grey, not Dark Green. Slate
Grey is a lighter tone that Dark Sea Grey whereas Dark Green is darker. Technically,
the lower wing should have lighter tones but I didn’t bother with that. There
is also some confusion as to the underside colour…white, Sky or Sky Grey? The
instructions say Sky but there is a lot of evidence that they were Sky
Grey. There
are few colour pictures of these aircraft and I chose Sky Grey. Maybe
it should have been Sky, I don’t know, but it looks fine and I’m not losing
sleep over it. I
mixed my own colours from the Tamiya range, including a slightly flat satin
varnish and sprayed using an Aztek airbrush.| CONCLUSIONS |
May 2013
If you would like your product reviewed fairly and fairly quickly, please contact the editor or see other details in the Note to Contributors.