
|
KIT # |
02053 |
|
PRICE: |
£ 4.00 |
|
DECALS: |
two options |
|
REVIEWER: |
Ant Harrington |
|
NOTES: |
Kit depicts a Mk II |
|
HISTORY |
The Westland Lysander was the first RAF aircraft designed specifically for the role of Army Co-Operation, all previous aircraft being adaptations of existing designs. In 1934, the Air Ministry issued a specification (A.39/34) for an aircraft that would replace the Hawker Hector biplane. Westland’s proposal was accepted, and the designation P.8 was adopted for the type in June 1935. The prototype underwent taxiing trials at Westland’s factory airfield at Yeovil, before being transported by road to Boscombe Down, from where the first flight was made on June 15th 1936.
After a short period of
development flying, during which only minor modifications were made, the
aircraft was ordered into production as the Lysander and the first
deliveries (to 16Sqn at Old Sarum) began in June 1938. By the outbreak of
war some seven Lysander squadrons were operational. Four of these were
soon despatched to France in support of the British Expeditionary Force (B.E.F.),
and spent the first winter of the war living and operating under very
harsh conditions. A fifth
 squadron was dispatched to France early in the
New Year. When the German Blitzkrieg finally came in the spring of 1940, Lysanders were heavily committed in support of Allied forces and suffered
heavy losses to ground fire and Luftwaffe fighters. Despite the type’s
agility, the aircraft was too slow and poorly protected to survive when
there was aerial opposition-on one occasion, 14 out of 16 aircraft
despatched on a supply mission to Calais failed to return. Around 120
Lysanders were lost in the Battle of France, and the type was withdrawn
from the Army Co-Op role in Europe almost immediately. However, ‘Lizzies’
did continue in this role in North Africa, Greece and in the Far East,
where the type was also used to supply resistance groups and regular Army
patrols deep in the jungles of South-East Asia, either dropping supply
canisters, or operating from small jungle airstrips.
squadron was dispatched to France early in the
New Year. When the German Blitzkrieg finally came in the spring of 1940, Lysanders were heavily committed in support of Allied forces and suffered
heavy losses to ground fire and Luftwaffe fighters. Despite the type’s
agility, the aircraft was too slow and poorly protected to survive when
there was aerial opposition-on one occasion, 14 out of 16 aircraft
despatched on a supply mission to Calais failed to return. Around 120
Lysanders were lost in the Battle of France, and the type was withdrawn
from the Army Co-Op role in Europe almost immediately. However, ‘Lizzies’
did continue in this role in North Africa, Greece and in the Far East,
where the type was also used to supply resistance groups and regular Army
patrols deep in the jungles of South-East Asia, either dropping supply
canisters, or operating from small jungle airstrips.
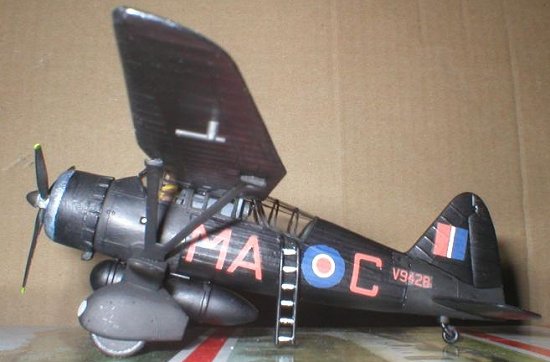
But the role which the aircraft is perhaps most famous for is that of ‘Spy Taxi’, flying SOE agents and resistance fighters into and out of occupied Europe. Flying at night, the Lysanders of 138 and 161Sqns operated in great secrecy from secluded airstrips in southern England, dropping supplies to the resistance or flying to make-shift airstrips to drop off or pick up secret agents, or to evacuate members of the resistance and escaping POW’s. The aircraft were fitted with a long-range fuel tank under the belly to increase their endurance, not only to increase overall range, but also to allow pilots to fly meandering routes to their destinations (flying a direct course would have given away the intended drop zones and it might also have been easier for the Germans to track and shoot down the Lysander.) A ladder with white painted rungs was provided for the rear cockpit to make climbing aboard in the pitch darkness both quicker and safer.
Other roles the Lysander undertook included search and rescue, smoke screen laying and target towing. Lysander production exceeded 1000 examples, 225 of which were Canadian built. The type was exported in limited numbers to Ireland, Finland, Turkey, Egypt, South Africa and France. The last user of the Lizzie was the RCAF, who kept a small number for target towing duties into the early 1960’s.
|
THE KIT |
Airfix have produced three different 1:72 Lysander kits over the years and my kit was the most ‘modern’ one (first released in about 1982.) A WORD OF WARNING- the earlier kits were quite seriously inaccurate and aren’t really worth bothering with. They still turn up on places like e-bay occasionally, but my advice would be to avoid them at all costs. You can recognise the earlier kits as they have a decal option depicting a Lysander in the markings of ‘LX-L’, and many of them came in a plastic bag with no box.
I remember attempting to build the ‘new’ kit when I was a kid, perhaps as many as 20 years ago now, and when I saw this kit in the Imperial War Museum shop I decided I just had to do it again for old times’ sake. The kit consists of around 40 parts moulded in grey and clear plastic, with two decal options- Mk. II L4752 of 4sqn based at RAF Odiham in 1938 and Mk. III SD V9428 of 161sqn at RAF Tempsford in 1942.
As you’d expect with an Airfix
of this age, raised panel lines and exaggerated rivets abound, although I
think the age of the moulds has made these subtler than they would have
been originally. The majority of parts also had liberal amounts of flash.
 Sadly, this kit has one or two errors, one of these being the positioning
of the tailplanes. On the real aircraft, the tailcone extends a few
inches beyond the trailing edge of the elevators, but on the kit the tail
is shorter by the equivalent of about a foot. Another serious inaccuracy
is the positioning of the small window in the rear fuselage under the
fin, which was used on the real thing to check the ballast weights, the
Lizzie being very sensitive to changes in her Centre of Gravity, which
would vary depending on the load carried and whether there was anyone in
the rear cockpit. It should be positioned directly under the leading edge
of the fin, adjacent to the root of the forward fin spar. On the kit it
is positioned ahead of the fin, which on the real thing would have been
two or three feet too far forward and it’s really quite noticeable. It
may be possible to fill in the existing holes and cut new ones in the
correct location, but I was intending to build the Special Duties
version, which had these windows over-painted so it didn’t really matter.
Sadly, this kit has one or two errors, one of these being the positioning
of the tailplanes. On the real aircraft, the tailcone extends a few
inches beyond the trailing edge of the elevators, but on the kit the tail
is shorter by the equivalent of about a foot. Another serious inaccuracy
is the positioning of the small window in the rear fuselage under the
fin, which was used on the real thing to check the ballast weights, the
Lizzie being very sensitive to changes in her Centre of Gravity, which
would vary depending on the load carried and whether there was anyone in
the rear cockpit. It should be positioned directly under the leading edge
of the fin, adjacent to the root of the forward fin spar. On the kit it
is positioned ahead of the fin, which on the real thing would have been
two or three feet too far forward and it’s really quite noticeable. It
may be possible to fill in the existing holes and cut new ones in the
correct location, but I was intending to build the Special Duties
version, which had these windows over-painted so it didn’t really matter.
The other major problem, and one that I didn’t realise until it was too late, is that this kit is of the Bristol Perseus powered Mk.II (there’s no indication on the box of which mark of Lizzie the kit depicts, it merely says ‘Westland Lysander’). The dimensions and overall appearance of the engine and it’s cowlings is different to the Bristol Mercury powered Mk.I’s and III’s, the Perseus being shallower front to back, but mounted further forward, giving the illusion that the nose is the same length. The Mk.II cowling also lacks the bumps on the cowling, which made room for the air to circulate around the cylinder heads of the Mercury. I’d already started building the kit to Mk. III standard before I noticed all of this, so there was no going back! If you want to make an accurate Mk. III out of this kit, it may be possible to fit the Mercury engine/cowling from an Airfix Blenheim, if you happen to have one spare, which unfortunately I didn’t.
One unusual and rather cool feature of this kit is that it includes a spy figure in a ladder-climbing pose, complete with raincoat, briefcase and trilby hat!
|
CONSTRUCTION |
Cockpit:
Construction begins with the cockpit area. Two seats, figures and back plates are provided with the kit, and that’s it! I know Airfix cockpits are usually pretty spartan, but it was quite surprising in this case considering the extensive canopy glazing on the Lizzie, making it easy to see into the cockpit. I decided very quickly that some scratch building would be in order!
The Lizzie’s main fuel tank is positioned between the front and rear cockpits, which is visible above the level of the cockpit sill. I took one half of an old F2H Banshee wing-tip tank, cut it down to fit and then sanded it flat on the top. I used odd bits of scrap from my spares box to represent radio and instrument panels and other bits and pieces on the cockpit walls and to create a floor for the rear cockpit. I also made a spade-grip control column with an old D/F loop. The cockpit walls were painted with Gloy USAAF Medium Green (a very close match for the colour used for the interior of the Shuttleworth Collection’s example) whilst the seats and cockpit floor were painted in Humbrol 53 Gun Metal and the back-plates and fuel tank were painted Revell 72 Medium Grey. I decided to busy-up the cockpit even further by including a pilot, who was painted with artists’ acrylics. I didn’t use the second crew figure and left the rear seat vacant, as there was no second crewman on SOE Lizzie’s.
Fuselage:
Before fixing the cockpit parts in place, some work was needed on the fuselage halves to open up the holes for the external fuel tank and ladder of the SD version. I also had to carve out the socket for the right hand undercarriage leg, as mine had been moulded without one. This was an extremely tricky job but with some patience and careful cutting I managed to make something that resembled an undercarriage socket. I don’t know if this gremlin crops up on other kits, but my guess is that it does.
I glued all the cockpit parts into the left hand fuselage half and taped the two halves together to keep everything in place whilst the glue set. Once this was done, the halves were parted again and the small ballast-checking windows were fixed in place with plenty of cement. This was to try and make sure that the windows fitted without a seam so that they looked flush when they were over-painted (the windows are a poor fit, so it’s probably just as well that they didn’t need to be clear).
Having double-checked that everything had been placed inside, and that all the right holes had been opened up, I glued the two halves together. The fit was good, and once all was dry I scraped and rubbed away the few uneven areas.
Wings:
 The wings come in the
conventional two halves, although unusually they have ‘female’ sockets at
their roots. Some moulding imperfections on the inside faces needed to be
dealt with before the wings would dry-fit nicely, and once they were
glued together it was apparent that the two halves of each wing didn’t
quite match, the lower wings having a marginally broader chord, which
meant scraping away the excess from the trailing edge. The plastic was
rather soft, so it would’ve been easy to cut into a wanted bit of wing,
so care had to be taken when doing this.
The wings come in the
conventional two halves, although unusually they have ‘female’ sockets at
their roots. Some moulding imperfections on the inside faces needed to be
dealt with before the wings would dry-fit nicely, and once they were
glued together it was apparent that the two halves of each wing didn’t
quite match, the lower wings having a marginally broader chord, which
meant scraping away the excess from the trailing edge. The plastic was
rather soft, so it would’ve been easy to cut into a wanted bit of wing,
so care had to be taken when doing this.
The wings were glued and then painted Humbrol 33 Matt Black whilst the upper halves of the wings were still attached to the frame, which meant that I didn’t have to worry about getting paint on the canopy when the wings were in place. Happy with the painting, I removed the wings from the frame, which were joined to it at the wing-roots. Some flash needed scraping away from the roots of the wing and I took particular care in doing this, not wanting to damage the face of the joint. It’s important to clear up all the imperfections on the roots and maintain the correct profile to make sure of a snug fit when the wings are attached to the canopy-you can’t go smothering the root with filler on this one!
Unusually, the next step was the canopy, or at least it’s middle section. This comes in upper and lower halves, the upper having the ‘male’ flanges at either side for the wings’ root sockets. I painted the frames of almost all of the canopy pieces whilst they were still attached to their frame, save for the windscreen, which would be easy enough to paint when it was on the model. The wings and their support struts would’ve made painting the rest of the canopy very difficult if I had tried to do it with the canopy glued in place.
I removed the upper half of the middle canopy from the frame and dry fitted the wings to it. I had been worried that final assembly of the Lizzie would be a bit of a juggling act, getting the wing struts, undercarriage etc in the right places as the wings went on. Happily, the wings fit perfectly onto this upper section of canopy- even the dry fit was snug. Having glued the wings in place, the whole assembly can simply be put to one side and left flat on the desk to set.
Undercarriage:
The undercarriage, which comes in four halves, had plenty of flash and dry fitting showed that they didn’t go together well. A fair amount of careful scraping was needed to get them to fit together presentably, but even then they were still going to need liberal amounts of cement to fill the gaps. The Lizzie had removable stub-wings mounted on the undercarriage legs for the carriage of stores, and holes for these had to be pushed through from the inside before the legs were assembled. There is also a landing light mounted on the front of each wheel fairing which should’ve been sandwiched between the two halves of the leg, but the instructions were not clear and suggested that the lights could be inserted from the front after the leg had been assembled, so I decided to leave them out until after painting, which was a mistake in hindsight.
With that, it was time to glue the halves together, sandwiching the wheel in place. I applied clothes pegs and used plenty of cement to try and fill the gaps, and it worked pretty well, although a fair amount of work was still required to neaten up the join once the glue had set.
Engine:
The engine cowling is moulded as one part, into which the engine is inserted from the back. The cowling is unconvincing and it took some time to scribe some cooling gill and exhaust collector-ring detail into it. As I mentioned earlier, this is the wrong sort of engine for a Mk. III, but I had gone so far with the kit that I just had to live with it. I painted the cowling matt black overall and when that had dried I applied tape around the cowling to act as a mask for the painting of the exhaust pipe and collector ring. This was painted Humbrol 53 Gun Metal enamel, and when dry I applied a wash of Humbrol Silver acrylic over the top, which made for a good metallic effect.
The engine itself is reasonably detailed, so I simply painted it Gun Metal without adding any detail and glued it in place inside the cowling. The propeller comes with the hub and blades moulded as one piece with the tiny prop spinner moulded separately. The prop hub was painted silver and the blades Matt Black. The prop is attached via the conventional ‘pin’, which is inserted through the back of the engine. With the prop in place, the assembly looks convincing so you wouldn’t have to add the spinner if you didn’t want to (many Lizzie’s flew without spinners, although most SOE examples appear to have been fitted with them.) I added the spinner and painted it matt black. The engine assembly was then put to one side, as it doesn’t need to be fitted until final detailing.
|
COLORS AND MARKINGS |
Painting:
 I had already decided to finish
the model in the 161sqn scheme but I didn’t stick with the colour scheme
recommended in the instructions, which specified green and brown
camouflaged upper surfaces and black undersides rather like an RAF Bomber
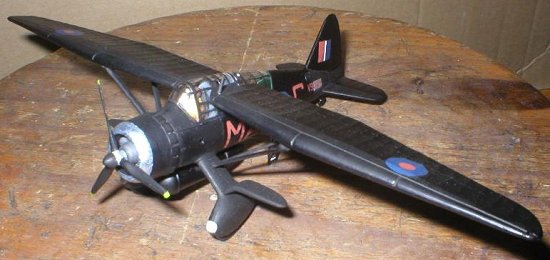
Command aircraft. I decided instead to paint my model in an overall black
scheme, as worn by a number of 161sqn aircraft during Operation Apollo in
December 1942. I’ve tried searching books and websites for details of the
Apollo operations, but nothing has yet come to light, which makes me
wonder if perhaps all the records of this operation were destroyed. If
anyone knows any details of Operation Apollo, I’d be happy to hear from
you.
I had already decided to finish
the model in the 161sqn scheme but I didn’t stick with the colour scheme
recommended in the instructions, which specified green and brown
camouflaged upper surfaces and black undersides rather like an RAF Bomber
Command aircraft. I decided instead to paint my model in an overall black
scheme, as worn by a number of 161sqn aircraft during Operation Apollo in
December 1942. I’ve tried searching books and websites for details of the
Apollo operations, but nothing has yet come to light, which makes me
wonder if perhaps all the records of this operation were destroyed. If
anyone knows any details of Operation Apollo, I’d be happy to hear from
you.
Before painting the fuselage, I added the tailplanes, tailwheel and the belly tank (which itself needed some clean-up work when it was assembled). Holding the fuselage by the cockpit headrests, I was able to paint the entire thing in one go. I had previously discovered by chance that the fuselage could safely be stood vertically on it’s firewall and this meant that it could be left in this pose until the next day to dry, after which I applied a second coat.
|
FINAL ASSEMBLY |
With painting of all the major assemblies complete, it was time to bring them together. I dry fitted all the canopy parts to make sure that they would all fit, which thankfully they did nicely. I glued the upper centre section of the canopy (with wings attached) onto the lower centre section and once dry, glued the whole to the fuselage. All the canopy pieces went on with little hassle and no marks or smears-phew! Next came the undercarriage legs, which I had previously dry fitted to check the quality of my improvised undercarriage socket. Both my improvised socket and the correctly moulded one were poor fits and it was clear they would need filling. I glued them in place with plenty of cement, with the wing struts dry fitted to make sure the legs were at the correct angle. This required a keen eye and a steady hand, but it turned out ok. The wing struts themselves were then removed and cleaned up, there being a lot of flash and mould lines on them which needed attention before they were glued in place.
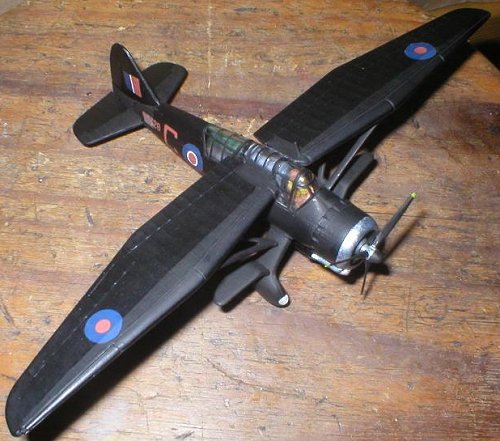
I decided to add the stub wings to my model as these were often fitted to SOE Lysanders for supply-dropping missions. The examples in the kit were moulded in one piece, with exaggerated raised details and a large ejector pin mark on the one side that needed a considerable amount of sanding before it was smoothed away. I removed the raised detail by scraping with a narrow chisel-like blade. They were then glued in place (carefully checking that they set straight.) Having filled and carefully sanded the gaps at the roots of the legs, I painted all the recently added parts Matt Black.
Decals:
Oh Dear. I have to say that this was the worst set of Airfix decals I’ve ever had to deal with, and one of the worst from any manufacturer. I think the guy who made these decals must’ve been cross-eyed! The yellow ring around the fuselage roundel was hopelessly off centre and a number of decals had white borders around the edges. Not only were they poorly printed but they were seriously thick too. I’d say they compared to very early Revell or very late Matchbox decals in terms of their thickness and ‘filmy’ appearance.
 Thankfully, the Lizzie’s on
Apollo had the yellow ring around the fuselage roundel omitted, so I
trimmed the yellow areas off the decals before I applied them.
Thankfully, the Lizzie’s on
Apollo had the yellow ring around the fuselage roundel omitted, so I
trimmed the yellow areas off the decals before I applied them.
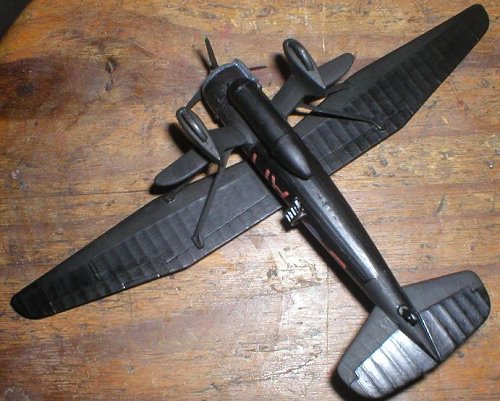
The rear fuselage has a lot of lines running along its length to simulate the stringers under the skin and there is also a substantial canopy runner on each side. The fuselage roundel would not settle itself down nicely over these runners so I had to resort to cutting a knick into them to take the tension off the decal and get it to settle. All the decals had a misty appearance, which was particularly noticeable on the code letter and serial number decals but thankfully a coat of Humbrol 135 Satin applied later saved the day!
I applied Satin only to what would’ve been the canvas-covered areas of the aircraft, e.g. rear fuselage, control surfaces etc and I’m happy with the effect.
I finished off the model by adding the ladder, pitot probe and of course the engine! The ladder needed a bit of persuading, but the other bits fitted fine.
I mentioned earlier that I had left out the landing lights until final detailing and this is where I discovered the mistake. I could only make the lights go into their sockets by filing and sanding away at the clear parts. This allowed them to go most of the way in, but after the glue had dried I still had to file away at the rim of the lamp to make it follow the contours of the undercarriage spat. Whilst this sounds drastic (and was) it didn’t really detract from the appearance of the lights as they now have a frosty appearance similar to the real thing. In hindsight I’m quite pleased I made the mistake!
|
CONCLUSIONS |
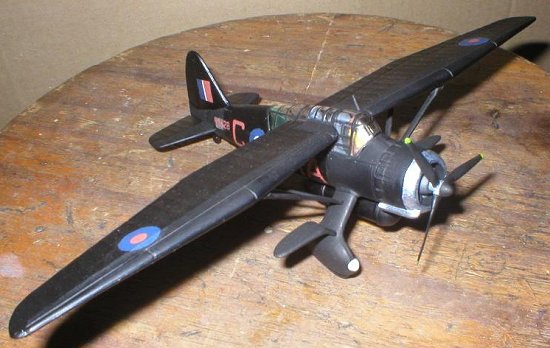
Well, it looks like a Lysander and for me that’s good enough, despite the wrong type of engine. The other marking option is for an attractive pre-war Army Co-Op Mk.II and I think if I were to do this kit again I’d go for that option now knowing that the kit is supplied with the wrong sort of cowling for the Mk.III.
I would only recommend this kit to you if you are used to the moulding and build quality of an Airfix kit- if you like 100% accuracy and snug joints then perhaps the 1:48th offering from Revell would be more your thing. Space limitations mean that I’m usually limited to building in 1:72 scale so the Airfix kit was really my only option. I hadn’t built a Lizzie in years so the kit was still an enjoyable build despite it’s flaws and drawbacks.
If you’ve got your heart set on this kit, I would suggest that you buy or make sure that you have some spare decals that you can apply to this kit, as the ones that were supplied with mine were a bit of a nightmare. OH IF ONLY AIRFIX COULD PULL THEIR FINGERS OUT AND SORT OUT THE POOR QUALITY OF THEIR DECALS!
|
REFERENCES |
www.shuttleworth.org : The website of the Shuttleworth Collection.
Pilot magazine, May 2003- Article on flying the Shuttleworth Lysander by the collection’s chief pilot Andy Sephton, including close up and internal detail pictures (of the aeroplane, not Andy!)
“British Warplanes of World War Two” edited by David Donald and published by Aerospace Publishing.
January 2004
If you would like your product reviewed fairly and fairly quickly, please contact the editor or see other details in the Note to Contributors.