High Planes 1/72 Hawker Fury I (conversion)
| KIT #: | 72033 |
| PRICE: | AUD $25.00 |
| DECALS: | Three options |
| REVIEWER: | Peter Hobbins |
| NOTES: | Conversion to Griffon powered prototype. |
| HISTORY |
With his proven design record at Hawker – having created the
biplane Fury, plus the Hurricane, Typhoon and Tempest – Sydney Camm’s 1942
proposal to create a ‘Tempest light fighter’ was well received by the British
Air Ministry. Essentially he took the wings of a Tempest and joined them along
the centreline, with minor adjustments to keep the inner guns clear of the
propeller 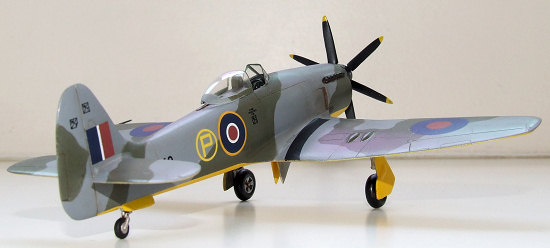 disk. To this was mated a somewhat redesigned fuselage with the option
of mounting three powerplant choices: the radial Bristol Centaurus, the inline
Napier Sabre or the V12 Rolls-Royce Griffon. Specification F.2/43 was raised to
cover this new type and in February 1943 the name Fury was bestowed (despite the
fact that the preceding biplane Fury had barely left RAF service).
disk. To this was mated a somewhat redesigned fuselage with the option
of mounting three powerplant choices: the radial Bristol Centaurus, the inline
Napier Sabre or the V12 Rolls-Royce Griffon. Specification F.2/43 was raised to
cover this new type and in February 1943 the name Fury was bestowed (despite the
fact that the preceding biplane Fury had barely left RAF service).
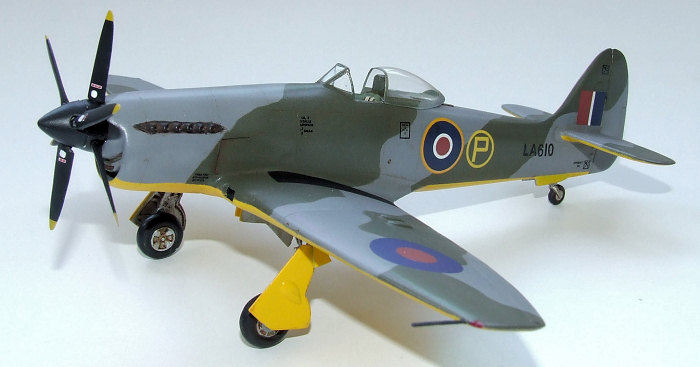
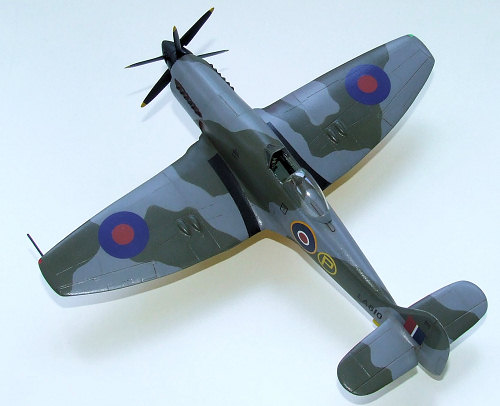
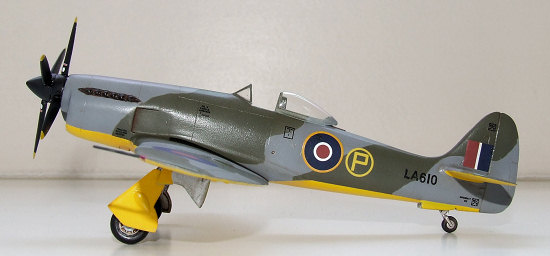
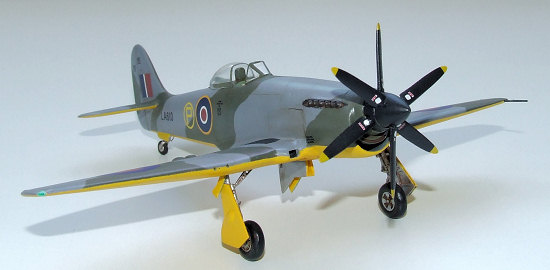
The Centaurus-engined Fury (NX798) flew first, in September 1944, with the Griffon-engined variant (LA610) taking to the air on 27 November 1944. The Centaurus XII-powered aircraft performed extremely well and a navalised version was soon ordered by the Royal Navy as the Sea Fury. The Fury prototype with the Griffon 85 appears not to have flown very often and LA610 was later converted to receive the Sabre VII, which was intended to be the production engine for the RAF variant. However, that prototype did not fly until April 1946, by which stage the RAF’s order for the type had slipped from 200 to 50, with the entire contract being cancelled in August of that year. Hawker did sell some Centaurus-engined Furies to overseas customers, and eventually 660 Sea Furies were produced, fully vindicating Camm’s imaginative venture despite the subsequent emergence of jets.
| THE KIT |
There is of course no dedicated kit of the Griffon-engined Fury, although 1:72 Sea Fury kits abound. Since I had chosen to build Special Hobby’s Sea Fury, and their T.61 boxing contained a number of spare resin cockpits, I decided to use the High Planes Sea Fury as the basis for this conversion project.
 In my opinion High Planes Models have earned an unfair
reputation with modellers as being ‘difficult’ kits. I have always found them to
be spot-on in terms of shape and detail – especially the beautifully scribed
panel lines. While the limitations of their low-pressure injection moulding show
on some of the finer details, the kits are quite buildable and generally come
with excellent decals. (I should declare an interest here in that I made the
masters for the High Planes resin kit of the deHavilland Moth Minor.)
In my opinion High Planes Models have earned an unfair
reputation with modellers as being ‘difficult’ kits. I have always found them to
be spot-on in terms of shape and detail – especially the beautifully scribed
panel lines. While the limitations of their low-pressure injection moulding show
on some of the finer details, the kits are quite buildable and generally come
with excellent decals. (I should declare an interest here in that I made the
masters for the High Planes resin kit of the deHavilland Moth Minor.)
The Sea Fury to me typifies a High Planes kit. The parts are moulded in their typical pale-blue plastic, reminiscent of 1960s Airfix kits. Sprue gates are heavy but this is not a problem as the plastic is relatively soft. In fact, the thick, soft plastic of this kit was perfect for conversion work, as it could be carved and sanded with impunity. Surface texture is generally good with the odd rough patch, and panel lines are very nicely done – certainly better than the Special Hobby kit. The propeller and spinner are moulded in one piece which would take a lot of cleaning up to use, and the cockpit tub is unfortunately quite soft in detail. Conversely, the white-metal pieces such as the undercarriage legs and arrestor hook are well detailed and quite solid, and the vacform canopy is also well formed and comes up sparkling after a quick dip in Future. The instructions comprise four A4 pages including an adequate assembly diagram and colour schemes for the three options. The decals are beautifully printed and in register, but most uncharacteristically, these exploded on contact with water and had to be junked.
| CONSTRUCTION |
I entered this project with what could be called minimal documentation: a few photos and a general arrangement drawing that could in no way be called ‘accurate plans’. However, knowing that the Fury was largely the same airframe as the Sea Fury gave me confidence that the job was not insurmountable. In fact, in converting the Sea Fury to a Griffon Fury there were ‘only’ three key steps that I had to tackle, so I undertook them in increasing order of difficulty.
Firstly, the fin of the Fury was shorter than the Sea Fury
but somewhat wider, especially at its top. I sat my Sea Fury fuselage halves on
the outline diagram and cut the tail to shape, but now that the model is
completed I don’t feel that it quite captures the
 right feel – I think I should
have added a fillet to really bulk out the upper part of the fin. The rudder on
the High Planes kit is luckily the landplane type (i.e. without the cut-out for
an arrestor hook), so I just had to round off the bottom surface to match the
plans. Finally, unlike the Sea Fury, the Fury does not have a rudder ‘block’
projecting into the fin: the rudder carries through as a straight line.
Therefore, I had to fill, sand and rescribe the rudder line for this kit – the
exact opposite of what I had to do to correct Special Hobby’s Sea Fury!
Interestingly, it seems that both Centaurus and Griffon Furies had shorter-span
tailplanes than the Sea Fury, so I shortened the kit’s parts at the root by a
few millimetres.
right feel – I think I should
have added a fillet to really bulk out the upper part of the fin. The rudder on
the High Planes kit is luckily the landplane type (i.e. without the cut-out for
an arrestor hook), so I just had to round off the bottom surface to match the
plans. Finally, unlike the Sea Fury, the Fury does not have a rudder ‘block’
projecting into the fin: the rudder carries through as a straight line.
Therefore, I had to fill, sand and rescribe the rudder line for this kit – the
exact opposite of what I had to do to correct Special Hobby’s Sea Fury!
Interestingly, it seems that both Centaurus and Griffon Furies had shorter-span
tailplanes than the Sea Fury, so I shortened the kit’s parts at the root by a
few millimetres.
Secondly, the wing folds had to be removed. This was a case of assembling the mainplanes, filling the wing fold lines with super glue, and sanding back. This process was straightforward enough, especially as I masked off most of the wings to stop me from removing too much extra detail. It is fair to note that the rear surfaces of the wings need to be sanded down quite a lot on the inside to make a crisp trailing edge; this is something I never seem to get right, so I ended up having to do some judicious exterior sanding as well. The other wing change was to chop away the oil cooler from the port wing root and fill the gap, as the Griffon Fury had symmetrical small air scoops on both sides of the fuselage. Again, High Planes’ soft, thick plastic was perfectly suited to this adaptation.
Thirdly – gulp! – came the really tricky part: how to tackle the new nose. At first I thought I might be able to append an annular radiator cowling from an Avro Lincoln or Shackleton. However, looking at photos and the plans, it is clear that the cross-section of the Griffon Fury’s curious ‘beard’ radiator was more of an asymmetric oval or even slightly egg-shaped. In the end, I took two of Academy’s inaccurate B-24 cowlings and joined them end-to end after cutting the face off one. I then found an old Matchbox Meteor engine intake which was hacked and scraped until it fit at the front of the cowlings to form the protruding attachment for the propeller. The entire assembly was held together with liberal quantities of super glue and then slathered with an el-cheapo epoxy putty that dries as solid as the Rock of Gibraltar. I then went hammer and tongs at this basic shape with some heavy-duty sanding sticks, until I achieved the basic cross-section and profile. I also sanded back the propeller attachment point until it matched the Aeroclub Rotol contra-prop that I had bought (originally intended for late-mark Spitfires).
Then came the really fun stage – attaching the new nose to
the fuselage. I cut off the Sea Fury’s nose just aft of the exhaust ducts
(unfortunately these did not match the position of the Griffon’s coolant flaps),
then joined the fuselage halves together. With much
 trial and error, I used some
styrene beams to span the gap between the new nose and the rear fuselage, around
which I built in the new coolant flaps and the missing pieces of fuselage from
scrap plastic. Thereafter followed a great deal of further puttying, sanding, Mr Surfacer, scribing, more Mr Surfacer and finally, I had grafted a new nose onto
the aircraft. In particular, I checked that I had achieved the Fury’s
characteristic straight line from the canopy almost all the way to the
propeller, as opposed to the pronounced ‘kink’ where the Centaurus joins the
fuselage on the Sea Fury.
trial and error, I used some
styrene beams to span the gap between the new nose and the rear fuselage, around
which I built in the new coolant flaps and the missing pieces of fuselage from
scrap plastic. Thereafter followed a great deal of further puttying, sanding, Mr Surfacer, scribing, more Mr Surfacer and finally, I had grafted a new nose onto
the aircraft. In particular, I checked that I had achieved the Fury’s
characteristic straight line from the canopy almost all the way to the
propeller, as opposed to the pronounced ‘kink’ where the Centaurus joins the
fuselage on the Sea Fury.
I knew how messy this ‘nose job’ would be, so I hadn’t bothered to install a cockpit before this stage. Now I added the spare Special Hobby resin and photoetch pieces through the underside of the fuselage and painted them in situ, before joining the mainplane to the fuselage. This took a little bit of slicing at the wing roots and more filler: the fit problem here probably stems from my abuse of the fuselage more than any specific problem with the High Planes kit. The tailplanes were butt-joined to the fuselage and the whole airframe was sprayed with Mr Surfacer from a can, followed up with several rounds of sanding and Micro-Mesh polishing before I could head to the paint shop.
| COLORS & MARKINGS |
The Fury prototypes (Centaurus, Griffon and Sabre) all
carried identical camouflage schemes, so between them I had enough photos to
create an accurate markings diagram. Like most British prototypes they wore
yellow undersides, so these were sprayed white to give the yellow a good base,
then followed up with Gunze US Navy Blue Angels yellow (FS23538) which matches
British trainer yellow. This was masked off and the upper surfaces were sprayed
with Gunze RAF dark sea grey and dark green, both
 followed with subtle
post-fading of the panels. The camouflage scheme was cut out from my plans and
held slightly off the surface with Blu-Tac to give the hint of a soft edge to
the demarcation. The propeller was painted Gunze tire black and then the whole
airframe sprayed in Future for decaling.
followed with subtle
post-fading of the panels. The camouflage scheme was cut out from my plans and
held slightly off the surface with Blu-Tac to give the hint of a soft edge to
the demarcation. The propeller was painted Gunze tire black and then the whole
airframe sprayed in Future for decaling.
The decals were from the spares box but hailed primarily from an Aeromaster late-war Spitfire sheet. The prototype ‘P’ in circle markings are sold by Red Roo Models; the specific style of lettering and the width of the circle aren’t quite right, but you can’t have everything! Various spare stencils were added to the airframe and some Italeri UH-1 decals provided the prominent propeller logos. When all were in place they were snuggled down with Gunze Mr Mark Softer. For the first time I found that this reacted with the Future, leading to a ‘fogging’ almost like that produced by super glue. At first I groaned at the thought of stripping the model and repainting it, but then I followed my instincts and brush-painted over the fogged areas with more Future. Yay! It worked. I then sprayed the airframe with another coat of Future and applied a thinned raw umber oil paint wash. I do find that this tends to come up off the Future when I wipe it away later, so I’ll have to adjust my technique to ensure that the wash actually stays in the panel lines when I remove the excess. In this case I wasn’t too bothered as the Fury prototype stayed pretty clean, which is why I kept the scuffing and weathering to a minimum after adding the final coat with Gunze flat clear.
| CONCLUSIONS |
Seeing what at first seems to be a Sea Fury in camouflage is
an odd sensation, especially when one notices the contra-prop (in fact, the Sea
Fury was originally going to have a contra-prop bu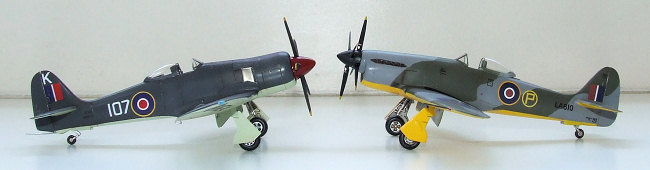 t this was dropped in favour
of the eventual five-bladed unit). It’s a nice enough aircraft, although perhaps
not as attractive as the later Sabre-engined version of LA610. I just wish I’d
paid more attention to the tail profile, but I’ll know for next time …
t this was dropped in favour
of the eventual five-bladed unit). It’s a nice enough aircraft, although perhaps
not as attractive as the later Sabre-engined version of LA610. I just wish I’d
paid more attention to the tail profile, but I’ll know for next time …
The High Planes kit was a great basis for this conversion, as it was accurate and yet robust enough to handle my fairly aggressive chopping and sanding. The plastic really took well to all sorts of glues and fillers and never crazed or cracked. I do wonder whether I’ll attempt LA610 in its later guise; if so, I will certainly use another High Planes kit as my starting point. While most modellers will now be looking to the Trumpeter release for a standard Sea Fury, don’t overlook this High Planes offering, especially if you have a somewhat more adventurous outcome in mind!
| REFERENCES |
Tony Buttler. British Secret Projects: Fighters & Bombers 1935–1950. Hinckley: Midland Publishing, 2004.
Chaz Bowyer, Arthur Reed and Roland Beamont. Mosquito Typhoon Tempest at War. Enderby: Promotional Reprint Company, 1995.
February 2008
If you would like your product reviewed fairly and fairly quickly, please contact the editor or see other details in the Note to Contributors.