Matchbox 1/72 Hawker Tempest II/VI
|
KIT # |
PK 23 |
|
PRICE: |
$3.99 |
|
DECALS: |
Two aircraft |
|
REVIEWER: |
|
|
NOTES: |
OOP |
|
HISTORY |
There’s a lot that can be said about the Hawker Tempest. Developed
late in the war, it was essentially a beefed up Typhoon with cleaner lines,
and much more speed (438mph). It’s speed and armament of 4 20mm cannons made
it ideal for interception and destruction of V-1 rockets, as well as a great
fighter-bomber. The Indian Air force purchased the Tempest
II which, with its Bristol Centaurus radial engine, attained slightly higher
speeds (442 mph) and could take more punishment. (Just FYI, the Tempest II is
pretty close to a land-based Sea Fury with a lot of similar airframe parts and
equipment, ed) The Tempest remained in
service of the IAF until the 1950s and took part in attacks on Pakistani
tribesmen in the Kashmir region, a conflict which, sadly, hasn’t been settled
even up to today.
|
THE KIT |
Ah, Matchbox kits. Most of us grew up on a steady diet of Frog,
Airfix, and Matchbox. Some of us still succumb to the charm of those relics
from plastic-modeling’s formative period. I’m a sucker for nostalgia, and I
love the sleek lines of the Tempest, so when I saw this kit at my hobby shop
for under $5.00 (US) I had to pick it up. As I drove home I giddily kept
telling myself that I would put aside all my other projects and build this
little guy straight out of the box, with zero frills and with a big smile on
my face. When I got home, that is exactly what happened. I cleared off my shop
desk/card table opened the box and got straight to work. That was Saturday
around noon. By Sunday afternoon the Tempest was finished. I haven’t finished
a kit this quickly since I was a kid. In fact building this model flooded me
with memories of a more innocent time, when airbrushes were a mysterious tool
of the experts, and words like putty and masking simply didn’t exist in my
young vocabulary. This was actually the third time I’ve built this kit; the
first when I was nine, went unpainted and was played with, and the second in
my misspent teen years turned out like crap. But enough about the aural
aspects of this model. Let us get to the nitty-gritty.
 The kit contains parts to build two late variants of the Tempest, with
the awkward “Firefly “ like wing (both options) and radial engine (Tempest
II). What you get here is typical Matchbox fair. Two sprues of chunky plastic
parts with very deeply engraved panel lines (trenches) with a few sink marks
here and there. Minimal detail, bad instructions, and of course two colors are
also present. In this case the fuselage parts are in a forest-green, and the
flying surfaces in light-gray. There is also a semi-thick bubble canopy, and a
small decal sheet. Unlike some other British manufacturer, the Matchbox
Tempest has boxed in wheel wells, and other details not often found on kits of
this age.
The kit contains parts to build two late variants of the Tempest, with
the awkward “Firefly “ like wing (both options) and radial engine (Tempest
II). What you get here is typical Matchbox fair. Two sprues of chunky plastic
parts with very deeply engraved panel lines (trenches) with a few sink marks
here and there. Minimal detail, bad instructions, and of course two colors are
also present. In this case the fuselage parts are in a forest-green, and the
flying surfaces in light-gray. There is also a semi-thick bubble canopy, and a
small decal sheet. Unlike some other British manufacturer, the Matchbox
Tempest has boxed in wheel wells, and other details not often found on kits of
this age.
A word about Matchbox’s instructions, while the assembly steps are
mostly clear, you’re in the dark as far as paint colors, or markings go. The
instructions themselves only provide you with “Matchbox Paint” numbers for
detail parts and interior components. Personally I’ve never seen Matchbox
Paint, but I’m sure its much like Humbrol. Despite this the color callouts
are generic and do not necessarily apply to all variants which the modeler
wishes to build. For camouflage and markings you must rely on the pictures on
the back of the box. These proved to be problematic due to their inaccuracy,
but more on that later.
|
CONSTRUCTION |
Matchbox doesn’t want to bother us with too many parts , since this is a kit that was designed more for a young modeler. With that in mind, construction begins with a simple interior consisting of a seat and pilot. As usual I left out the figure and simply glued in the seat and a fashioned a cardboard instrument panel. All this was painted RAF interior green, and the panel black with details drawn with a silver marker. Before this even had a chance to thoroughly dry, the fuselage halves were closed. The fit here was good, and only a little bit of sanding was required on top.
 Next I chose which option of
engine I wanted. You get a more common Tempest VI with its inline engine and
chin radiator, or the Tempest II with its radial Bristol Centaurus. Obviously
I chose the radial engine, and so I glued the two halves of it together and
then glued down the backing plate for the prop spinner. (You can choose to
make a movable prop by inserting it at this point and attaching a plug from
the inside). This assembly was then attached to the fuselage and the seam on
its top was cleaned up. Up to this point the fit was really great, and I was
expecting a putty-less model, but trouble was just around the corner.
Next I chose which option of
engine I wanted. You get a more common Tempest VI with its inline engine and
chin radiator, or the Tempest II with its radial Bristol Centaurus. Obviously
I chose the radial engine, and so I glued the two halves of it together and
then glued down the backing plate for the prop spinner. (You can choose to
make a movable prop by inserting it at this point and attaching a plug from
the inside). This assembly was then attached to the fuselage and the seam on
its top was cleaned up. Up to this point the fit was really great, and I was
expecting a putty-less model, but trouble was just around the corner.
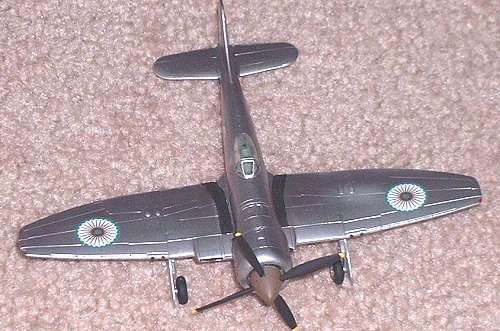
Both wings come in upper and lower halves, and these were glued
together without any trouble.
The bottom portions of these wings, when glued to the fuselage meet at the
center to make the bottom portion of the plane complete. Here there was a
very very wide gap. I’d say at least about .15mm. There were also narrower
gaps at the top of the wing root. So out came the card stock and the putty.
These gaps were filled, and while the putty dried I attached the horizontal
stabilizers, which went on without a hitch, and also the tail wheel, its
doors, and the main landing gear legs and outer doors. The leg is molded
attached to the door part. The smaller section of inner and outer gear door
must be cut from the alternate gear covers which can be used to make a wheels-up model. The inner gear doors were left off for now to facilitate sanding of
putty. It was now about two PM, I let the model sit and dry until evening.
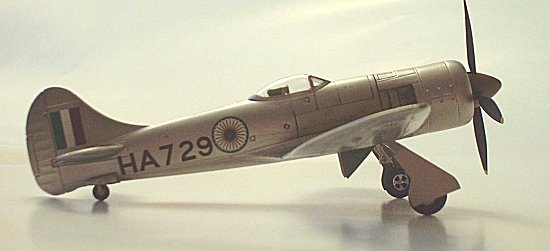
Once dry (mostly) the putty was sanded smooth, and the inner gear doors were glued on. I then glued down two round canister like objects just aft of the seat. I don’t know what these are, they look like oxygen bottles, and are required only on the Tempest II. The canopy was then masked and glued on. The model was ready for the paint shop.
|
PAINT & DECALS |
Since this was going to be a natural metal finish I decided to precede
painting by spraying down the whole aircraft with a coat of Future to hide
some of the sand marks. I let this dry for a half hour and by 11pm I was ready
to paint. This was the first time that I ever made a natural metal finish, so
it was quite a learning experience for me. I did not want to bother myself
with any masking because I don’t know how metalizer paints react to tape, so I
did the whole finish with Model Master non-buffing aluminum metalizer, and
didn’t bother using different shades to pick out any of the panels. The metalizer was quick to dry, and once it did I sprayed it down with
a coat of Future. This both sealed in the paint, and slightly subdued the
Matchbox trenches. The model was then set aside for the night.
When Sunday morning came I unmasked the canopy and started to paint
the detail parts. This consisted of painting the navigation lights on the
wingtip, and painting the insides of the gear-doors and gear bays. I guess I
really shouldn’t have done this; I found photos of IAF Tempests and the
insides of the gear were left in natural metal. Oh well, it may not be
entirely accurate, but its not impossible, so lets pretend this Tempest got an
anti-rust coat of RAF interior green in its landing gear. At this time the
wheels were also painted silver with black tires and were then glued on. I
then made a feeble attempt to paint the black wing walks by hand. I began by
drawing in the shape on the wing root with a fine tipped black sharpie, and
then painted the area in with black paint. As you can see the results are not
bad, but nothing to write home about either. When it comes to stuff like that,
I really wish I had a steadier hand.
 The four cannon were given a coat of gunmetal and the propeller was painted
black with yellow tips (I hate doing those). Finally the spinner was painted
Polly S dark earth in order to best match the brown on the tail-flash decals.
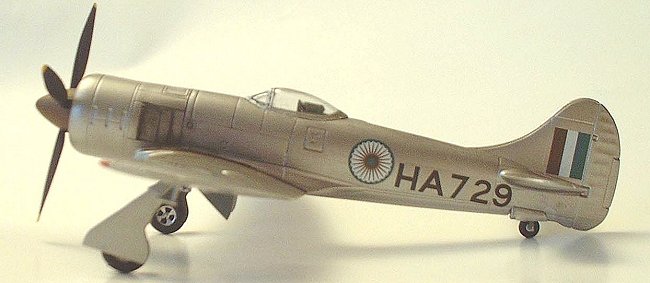
Matchbox provides us with two options for the Tempest. The first is
for a postwar Tempest VI in standard grays and green for no.6 squadron in
Nicosia, November 1945. The Tempest II option is for a Royal Indian Air Force
machine stationed in Poona India in 1949. I chose the second option because
the Tempest II is much cooler looking in my opinion, and the Ashoka Chakra
roundels will really stand out from the numerous crosses and swastikas in my
modeling shelf.
The four cannon were given a coat of gunmetal and the propeller was painted
black with yellow tips (I hate doing those). Finally the spinner was painted
Polly S dark earth in order to best match the brown on the tail-flash decals.
Matchbox provides us with two options for the Tempest. The first is
for a postwar Tempest VI in standard grays and green for no.6 squadron in
Nicosia, November 1945. The Tempest II option is for a Royal Indian Air Force
machine stationed in Poona India in 1949. I chose the second option because
the Tempest II is much cooler looking in my opinion, and the Ashoka Chakra
roundels will really stand out from the numerous crosses and swastikas in my
modeling shelf.
The decals themselves are surprisingly good. The kit is from 1974, but the decals must be newer, and are printed by Revell. They went down snuggly and are very opaque. They are also a bit thick, but its nothing to loose sleep over. As mentioned earlier the back of the box serves as the decal guide, and it doesn’t do its job that well. I had trouble figuring out where the larger roundels went, and I could not fit the codes under the tail as suggested in the pictures.
After the decals were on, I did some chalk weathering behind the exhaust stubs and glued on a stretched-sprue mast antenna on the planes spine. I avoided the usual wash to accent panel lines since I didn’t think it would look good here due to the panel line depth and the silver finish. Besides, I’m beginning to have second thoughts about panel line washes.
|
CONCLUSIONS |
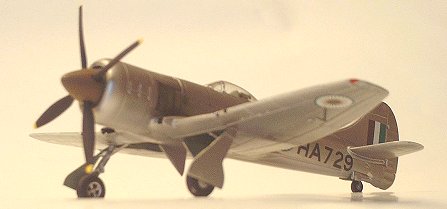
After about 6 hours of work the model was done. Like I said before, I haven’t finished anything this quick since I was a child. This is a fun and rewarding little weekend project. I often use kits like this to learn new skills, in this case it was my first natural metal finish. I like how it turned out, and had great fun with it. I can’t comment on how accurate the plane is dimensionally, but judging from the photos I have, the detail looks right. The landing gear is much more accurate than anything I’ve seen on other kits of this age, and the lack of an interior is no big loss since the canopy is so thick and distorted.
Definitely go out and pick this kit up if you can
find it. If you’re like me, this wont be the first time you’ve built it, and
the nostalgia of building this little gem is worth the $3.99. Also, if you’re
a first time builder, then this is a good kit to begin with. I’ve grown tired of building bombers and
Luftwaffe aircraft, so this
was a nice side-step. Up next? I think I’ll build a helicopter
*please note, the antenna broke off before I had a chance to take pics. It was
on for a whole two hours*
Copyright ModelingMadness.com. All rights reserved. No reproduction in any form without express permission from the editor.
If you would like your product reviewed fairly and quickly, please contact the editor or see other details in the Note to Contributors.
Back to Reviews Page 2017