| KIT #: | 60320 |
| PRICE: | $159.95 SRP |
| DECALS: | Three options |
| REVIEWER: | Dan Lee |
| NOTES: |
| HISTORY |
Bobby Gibbes was
born in a rural community in
 Gibbes served
briefly with No. 450 Squadron RAAF, which arrived in
Gibbes served
briefly with No. 450 Squadron RAAF, which arrived in
Gibbes departed
In April 1945, now
a temporary wing commander and stationed at No. 80 Wing Headquarters of the
Australian First Tactical Air Force in the Dutch East Indies, Gibbes took part
in the "Morotai Mutiny". He was one of eight senior pilots, including
As a former
jackaroo, one sortie that involved attacking cattle especially upset him: "I
felt horrible about it, being an ex bushy ... at about lunch time I went out and
darned if I didn't have to turn butcher. And Heavens, it was butchering too, in
every sense of the word. No--not the Japs. Cattle ... If we are to get the Japs
out of this area without loss of human lives, starvation will be our main
weapon ... God, I hated doing it but could do nothing else. Felt as sick as
hell."
 Following his
discharge from the RAAF in January 1946, Gibbes was initially employed as a
stock and station agent in
Following his
discharge from the RAAF in January 1946, Gibbes was initially employed as a
stock and station agent in
Gibbes spent most
of the 1970s in the Mediterranean, sailing his catamaran Billabong. He returned
to Sydney in 1979, and began building his own twin-engined plane, eventually
taking it to the air in 1990. In
1994, Gibbes published his autobiography, You Live But Once. He continued to fly
until forced to give up his civil aviation license at the age of 85.
In 2002, he appeared in an episode of Australian Story dedicated to
fellow No. 3 Squadron ace Nicky Barr.
Gibbes was awarded the Medal of the Order of Australia in 2004 for his
work in New Guinea. He died of a
stroke at Mona Vale Hospital in Sydney on 11 April 2007. Aged 90, he was
survived by his wife and two daughters.
Info taken from
Wikipedia.
| THE KIT |
See Tom Cleaver’s
preview of the kit.
| CONSTRUCTION |
I did not follow
the instruction build order as I began assembling the landing gear, ailerons,
stabs and rudder first. These were
a combo of steel wire, PE and plastic.
They seem to be over engineered but they are very useful if one wants the
flaps to be dynamically posed.
 Next done were the
wings. The inner wheel wells and
interior of the wing were painted AS-12 Aluminum from the spray can.
Once dry the wing assembly was put together.
A word of advice, follow the part build order in the instructions or you
might have a problem assembling follow on parts.
I kept the flaps up and saved myself a bit of work (also historically
accurate.)
Next done were the
wings. The inner wheel wells and
interior of the wing were painted AS-12 Aluminum from the spray can.
Once dry the wing assembly was put together.
A word of advice, follow the part build order in the instructions or you
might have a problem assembling follow on parts.
I kept the flaps up and saved myself a bit of work (also historically
accurate.)
The various prop,
cockpit and fuselage parts were painted white, red, black, aluminum and XF-71
Mitsubishi Interior Green (Tamiya recommended paint for British Interior Green.)
Most of the cockpit parts were hand painted additional details and/or dry
brushed silver. The cockpit was one
of the most complex cockpits I have put together, but it is pretty easy to build
if you follow the build order. The
hardest part, but not that hard, was placing the seat belts in place (and it is
a bit tricky using only a small amount of CA glue to hold the belts in place.)
When the black
paint on the prop was dry, I masked off the tips and painted them white then
chrome yellow. The prop was then
glued onto the base of the prop hub (with the polycap) and then the prop hub
cone was glued in place. The prop
was left off till final assembly.
The fuselage was
glued together (no real issues there) and then mated to the wing without any
major adjustments required. The
model was put in the box and left for a couple of weeks so the glue could cure.
 A couple of weeks
later, I filled and sanded the seams on all the parts.
There were no surprises.
Once done to my satisfaction they were polished with various grits polishing
cloths (1800-3600) and any lost/damaged detail was rescribed.
A couple of weeks
later, I filled and sanded the seams on all the parts.
There were no surprises.
Once done to my satisfaction they were polished with various grits polishing
cloths (1800-3600) and any lost/damaged detail was rescribed.
I assembled the
engine with most of the parts as I wasn’t sure if I was going to expose the
engine and leave the panels off. I
decided to just close it up and added the panels around the engine using the
mounting tabs to align everything up.
I added the left engine panel first, then the bottom panel and then the
right engine panel. I made sure
that everything lined up before gluing on the top panel.
I ended up using a bit of filler around some of the joins, but nothing
too dramatic.
Next I added the
guns (after sanding to remove the mold marks) to the wing.
At this point, the
various interior sections were masked off and the Spitfire was ready for
painting.
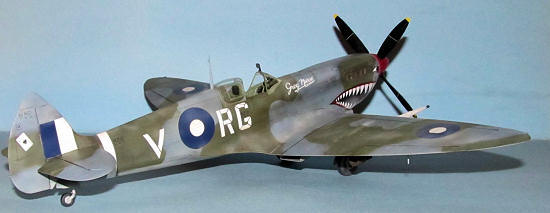
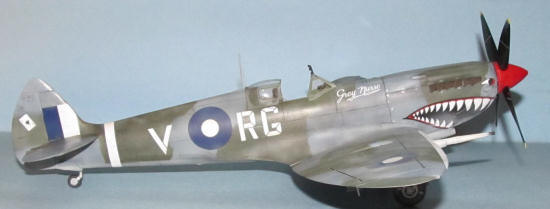
| COLORS & MARKINGS |
The cockpit and
fuselage ID light were covered up with cut foam pieces and then it was preshaded
flat black along the panel lines. I
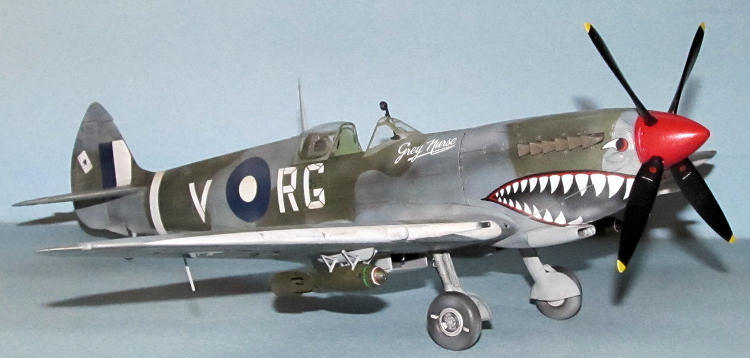
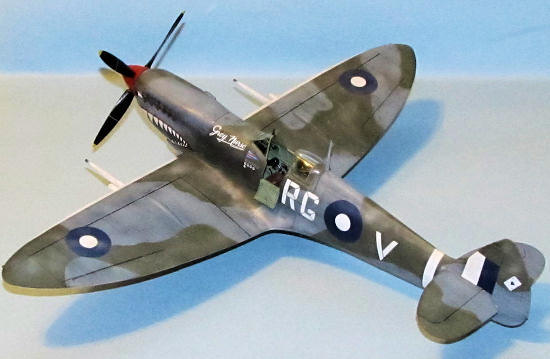
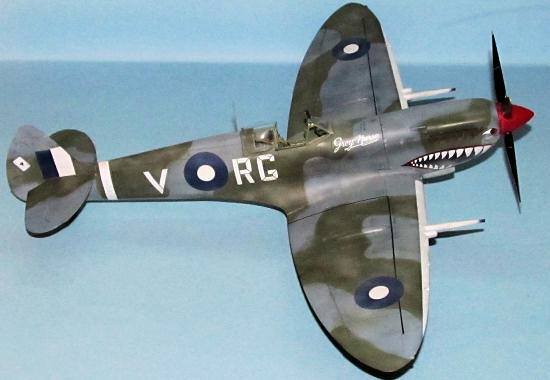
wanted to do the markings of Wing Commander Robert Gibbes’ Grey Nurse with the
shark mouth and Ocean Grey/Dark Green over Medium Grey camo.
I first sprayed on a thin coat of the underside color (XF-83 Medium Sea
Gray) so that some of the preshading showed through.
When the underside
color was dry, it was masked off with low tack painters tape at the demarcation
lines specified by the paint guide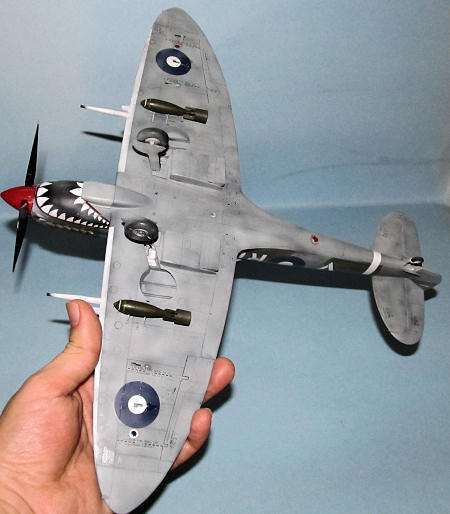 and I sprayed on Tamiya Ocean Grey XF-81 over
the areas specified to be Ocean Grey.
In the past I’d just spray over the entire area with the lighter color
and then spray on the dark color but I usually ended up covering up the
preshading. I also did some post
shading with Medium Sea Grey over the flat areas which would get the most sun
exposure. Once the Ocean Grey was
dry, I masked off the Dark Green areas using a combination of low tack painter’s
tape and Tamiya Tape. I also did
some post shading after the initial coat of Dark Green using JGSDF Green (which
is lighter) to represent sun fading over selected flat areas of the Dark Green.
This time I did not get any bleed through, but I had to do some touch up
because I screwed up the masking shapes.
and I sprayed on Tamiya Ocean Grey XF-81 over
the areas specified to be Ocean Grey.
In the past I’d just spray over the entire area with the lighter color
and then spray on the dark color but I usually ended up covering up the
preshading. I also did some post
shading with Medium Sea Grey over the flat areas which would get the most sun
exposure. Once the Ocean Grey was
dry, I masked off the Dark Green areas using a combination of low tack painter’s
tape and Tamiya Tape. I also did
some post shading after the initial coat of Dark Green using JGSDF Green (which
is lighter) to represent sun fading over selected flat areas of the Dark Green.
This time I did not get any bleed through, but I had to do some touch up
because I screwed up the masking shapes.
Once the paint was
dry, I sprayed on several coats of Tamiya Gloss coat and when that was dry I
rubbed the model down with 3600 and 6000 grit polishing cloths to smooth paint
down. I sprayed on a very thin
dusting of flat black to represent the exhaust stains.
Tamiya supplies
canopy masks that you need to cut out with scissors.
These went on without any issue.
I sprayed on the interior color first and when I painted the Dark Green
on the plane I painted the canopies as well.
The last major
painting task I needed to do was mask off the wing leading edges and spray on
the white ID stripe using Tamiya Flat White.
Tamiya provides
both a stencil guide and marking guide for the Mk
I used a watercolor
wash to bring out the detail, but I tried not to make it took too dirty; the
excess wiped away with wet Q-tips.
Next I sprayed on a thin coat of 50/50 thinner/Tamiya Buff over the tires,
leading edges, walkways and underside to represent coral dust and sun fading.
Next I did some dry brushing with Tamiya Chrome Silver to show wear and
dings and then I used the Tamiya Weathering kit to provide cordite stains.
Finally, I sprayed
on a couple of coats of Xtracrylix Flat all over the model for the final coat.
| FINAL CONSTRUCTION |
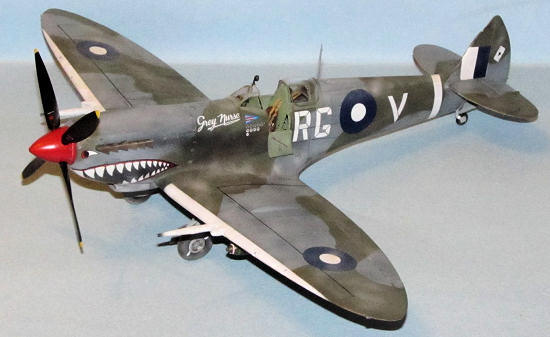
 The last bits
including the formation lights, bomb shackles and bombs were painted and glued
in place. The only thing that
needed to be done was build the stand and the external fuel tank.
The last bits
including the formation lights, bomb shackles and bombs were painted and glued
in place. The only thing that
needed to be done was build the stand and the external fuel tank.
I glued together
the various plastic and metal pieces of the larger external fuel tank so that it
can be mounted on the supplied stand (it is mounted on the Spitfire using kit
supplied metal pins) and painted the external fuel tank Medium Grey (no
preshading) then screwed the tank onto the stand.
| CONCLUSIONS |
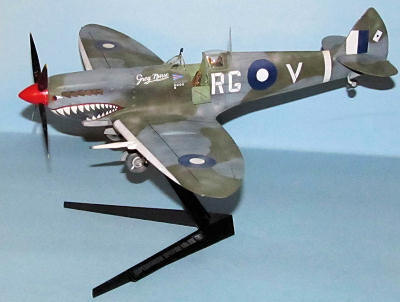 I am quite
impressed with the Tamiya 1/32 Spitfire despite its expensive price.
I wonder if Tamiya could provide a version without an engine so the kit
would be a bit cheaper and a bit easier to build.
I am quite
impressed with the Tamiya 1/32 Spitfire despite its expensive price.
I wonder if Tamiya could provide a version without an engine so the kit
would be a bit cheaper and a bit easier to build.
The stand is a nice
touch as it helps reduce the rather large shelf footprint of a 1/32 Spitfire.
The pins and the polycaps make it easy to attach and remove the model off
the stand.
The Tamiya Spit isn’t exactly a kit I would recommend for a newbie, but I certainly do for someone who has a few kits under their belt, somewhat comfortable with PE and would like to tackle a large scale project.
| REFERENCES |
Dan Lee
March 2012
If you would like your product reviewed fairly and fairly quickly, please contact the editor or see other details in the Note to Contributors.