Tamiya 1/48 Swordfish I
| KIT #: | 61068 |
| PRICE: | around $75.00 MSRP |
| DECALS: | Three options |
| REVIEWER: | Scott Lyle |
| NOTES: |
| HISTORY |
Antiquated by the time the Second World War began, the Swordfish would go on to be one of the most successful naval strike aircraft of all time. Stable, easy to fly and maintain, the “String bag” was popular among both its crews and those who had to keep them flying. It was also one of the few aircraft of the war that could boast that it was in front-line service when the war began and ended.
| THE KIT |
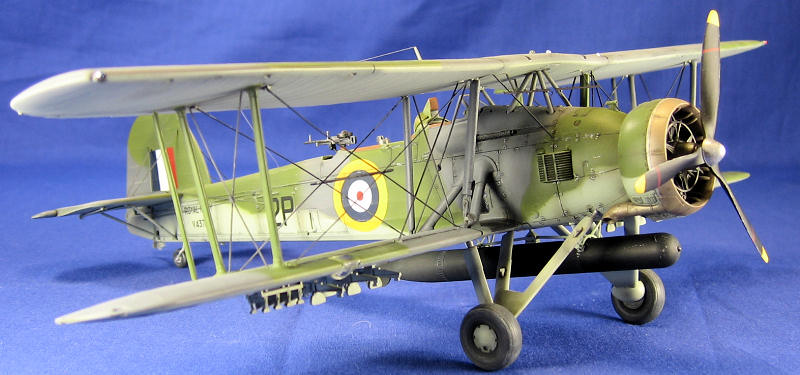
 Tamiya’s Swordfish is highly detailed, includes
many options, and builds into a good-sized model.
The modeler can elect to build it with the wings spread or folded.
He can also equip it with different loads of ordnance, and decals are
provided for three different aircraft.
Tamiya separately sells a photo etch fret that provides rigging and other
details for the model, which I used with this build.
I also added a color photo etch set from Eduard.
Tamiya’s Swordfish is highly detailed, includes
many options, and builds into a good-sized model.
The modeler can elect to build it with the wings spread or folded.
He can also equip it with different loads of ordnance, and decals are
provided for three different aircraft.
Tamiya separately sells a photo etch fret that provides rigging and other
details for the model, which I used with this build.
I also added a color photo etch set from Eduard.
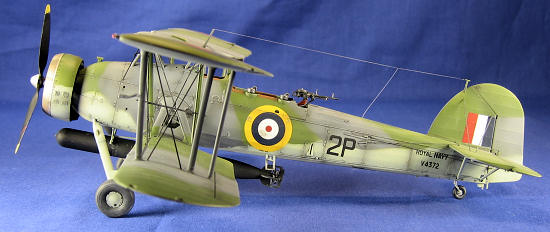
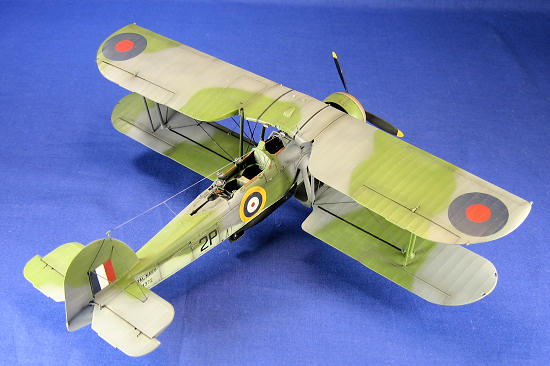
One of the decals options the kit provides is for the Mk. I of Sub. Lt.
Anthony Beale, a Distinguished Service Cross winner who participated in the
dramatic attack on the infamous German battleship
| CONSTRUCTION |
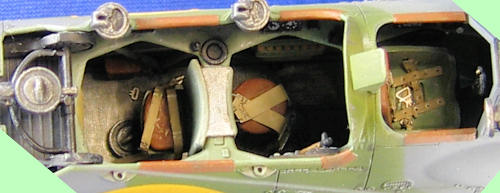 Construction began with the cockpit, and
Tamiya’s rendition is beautiful.
The delicate tubular structure that supports the pilot’s seat and makes up the
sidewalls is gracefully recreated, and many details for the sidewalls,
radioman’s station, and rear gunner’s station are provided.
Tamiya even molded the cockpit interior surfaces to look like either
sheet metal or fabric, depending on what they really were.
I painted the sheet metal surfaces Testors Acrylic RAF Interior Green and
the fabric surfaces Testors Acrylic Sand, and then gave everything a 50/50 wash
of black/raw umber oil paint. This
was followed by dry-brushing some lightened shades of RAF Interior Green and
Sand onto the appropriate areas.
The rudder pedals, control stick, seat surfaces, and various instrument boxes
and switches were picked out by hand.
All three seats received color PE seatbelts from the Eduard fret, and
then all of the parts were glued together and set aside to dry.
I sanded the details off of the Tamiya instrument panel and then glued
the Eduard PE panel on to it. With
the cockpit and instrument panel glued to the right fuselage half, the fuselage
was closed up. It’s a very solid
fit, and true to what one expects from Tamiya, the fuselage seams were very
minor. This is also a nice point to
appreciate your work for a moment.
The Swordfish’s crew compartment is very open and visible from above, and the
better you make the
Construction began with the cockpit, and
Tamiya’s rendition is beautiful.
The delicate tubular structure that supports the pilot’s seat and makes up the
sidewalls is gracefully recreated, and many details for the sidewalls,
radioman’s station, and rear gunner’s station are provided.
Tamiya even molded the cockpit interior surfaces to look like either
sheet metal or fabric, depending on what they really were.
I painted the sheet metal surfaces Testors Acrylic RAF Interior Green and
the fabric surfaces Testors Acrylic Sand, and then gave everything a 50/50 wash
of black/raw umber oil paint. This
was followed by dry-brushing some lightened shades of RAF Interior Green and
Sand onto the appropriate areas.
The rudder pedals, control stick, seat surfaces, and various instrument boxes
and switches were picked out by hand.
All three seats received color PE seatbelts from the Eduard fret, and
then all of the parts were glued together and set aside to dry.
I sanded the details off of the Tamiya instrument panel and then glued
the Eduard PE panel on to it. With
the cockpit and instrument panel glued to the right fuselage half, the fuselage
was closed up. It’s a very solid
fit, and true to what one expects from Tamiya, the fuselage seams were very
minor. This is also a nice point to
appreciate your work for a moment.
The Swordfish’s crew compartment is very open and visible from above, and the
better you make the
 area look, the more you will be rewarded.
Construction continued by attaching the horizontal stabilizers and
rudder. Next up were the wings, and
I knew from previous biplane experience that if you’re going to be painting a
camouflage scheme, it’s best to leave the wings off at this point.
After poking holes in the wings per the instructions for the photo etch
rigging and ordnance racks, I attached the lower wing “middle” section to the
fuselage, but left the upper wing “middle” section detached.
I built the left pair of wings (upper
and lower) and right pair of wings (upper and lower) as subassemblies.
Tamiya’s kit engineering here is excellent, as the struts between the
upper and lower wings are sturdy and glue into deep recessed pockets in the
wings, creating a strong biplane structure.
I attached the rigging wires from Tamiya’s PE set at this point, and then
added the ordnance racks, completing the two wing subassemblies.
The final construction step revolved around the engine.
Tamiya provides a very detailed engine, which was assembled and glued
into the rear section of the cowling.
I left the front portion of the cowling separate to make painting easier.
With the fuselage, left wing subassembly, right wing subassembly, torpedo, engine, and left and right landing gear struts assembled, I masked off the cockpit and exposed parts of the engine and headed for the airbrush booth.
| COLORS & MARKINGS |
I sprayed a primer coat of Mr. Surfacer 1000 onto the aircraft and then
manually filled in any remaining gaps and seam lines.
All panel lines were preshaded with Tamiya XF-69 NATO Black, and then the
lower surfaces were sprayed with Testors Acrylic Sky
 Type “S” in light coats so
the preshading would show through.
Before painting the upper surfaces I temporarily glued the wings to the fuselage
with some rubber cement. This would
allow me to spray the camouflage patterns continuously over the wings instead of
having to break it up into sections.
Type “S” in light coats so
the preshading would show through.
Before painting the upper surfaces I temporarily glued the wings to the fuselage
with some rubber cement. This would
allow me to spray the camouflage patterns continuously over the wings instead of
having to break it up into sections.
Tamiya provides a 1/48 scale camouflage diagram with the kit, so I used
that to mask the lower Sky portions of the aircraft.
To create the “soft” demarcation lines between the camouflage colors I
looped a piece of masking tape onto itself, stuck it onto the back of the mask,
and then stuck the mask onto the model.
This makes the mask stand off the surface by a couple of millimeters and
then when you airbrush over it, you get a slightly faded line as opposed to a
sharp line. With the lower surfaces
masked I sprayed Polly S British Dark Slate Gray (actually a dark green shade)
onto the exposed upper surfaces. I
then masked off the dark green areas and sprayed Testors Gunship Gray onto the
remaining exposed areas. After
removing all of the masks I mixed a lightened shade of the green and the gray
and sprayed random blotches on their respective colors to create a faded effect.
I had to touch up a couple of the lower Sky areas that had some overspray
on them.
I preshaded the front section of the engine cowling and the exhaust pipe
Testors Leather, and then over-sprayed them with some Alclad Burnt Metal.
Finally I brush-painted the small strip around the cowling Testors
Aluminum.
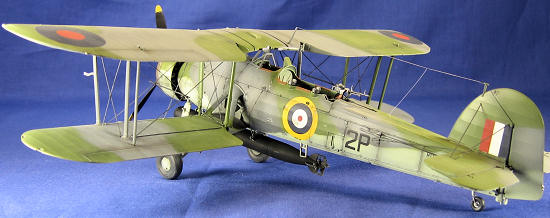
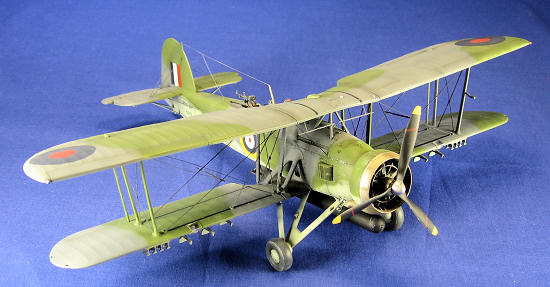
Now that the camouflage patterns were all painted, I could glue the wings
to the fuselage, and once you do you really begin
 to appreciate the size of the
model. I’ve built quite a few WW1
biplanes, and compared to those this bird is not small!
Once the wings had cured overnight I airbrushed Future over the whole
model, and set it aside for a couple of days.
In the meantime I airbrushed the prop and torpedo Tamiya XF-69 NATO
Black, and hand-painted the smaller details like the tires and machine gun.
to appreciate the size of the
model. I’ve built quite a few WW1
biplanes, and compared to those this bird is not small!
Once the wings had cured overnight I airbrushed Future over the whole
model, and set it aside for a couple of days.
In the meantime I airbrushed the prop and torpedo Tamiya XF-69 NATO
Black, and hand-painted the smaller details like the tires and machine gun.
Applying the decals was very simple.
I used the kit-provided decals for Beale’s aircraft #2P, and they worked
very well with Walthers Solvaset solution.
Once they set I airbrushed a coat of Future over the whole model again to
seal the decals, and once that had dried I applied a thin wash of 50/50 Lamp
Black/Raw Umber oils to all of the recessed panel lines.
That was followed by airbrushing a thin mix of the same over all of the
panel lines, engine exhaust areas, and machine gun areas – again keeping it very
subtle.
The big biplane was really coming along, and at this point I glued on the
tail wheel, landing gear, and main wheels.
Up next was an airbrushed coat of Testors Lacquer Flat Finish, sprayed
straight out of the bottle. I left
that to dry overnight and then dry-brushed Testors Neutral Gray and Testors
Faded Olive Drab over the raised details on the respective dark gray and dark
green surfaces on the wings, fuselage, and tail.
I then added some paint chips around the nose cowling and cockpit area
using a Silver Berol pencil, making sure I was chipping only metallic surfaces
as opposed to cloth surfaces! A few
final oil streaks were added here and there before the wingtip lights were
painted. Finally, I glued on the
prop, torpedo, machine gun, antenna and any other fragile bits, and the model
was done.
| CONCLUSIONS |
 Tamiya’s Swordfish is a beauty of a kit.
Their legendary kit engineering makes assembling a big, somewhat imposing
biplane not only easy, but genuinely fun.
The end result is a rare but great-looking aircraft that is also
surprisingly large and heavy. My
only complaint would be that the box doesn’t feature Tamiya’s usual excellent
and dramatic artwork on the cover – but this is about as minor of a complaint as
one can have. What would I give for
them to come out with a 1/48
Tamiya’s Swordfish is a beauty of a kit.
Their legendary kit engineering makes assembling a big, somewhat imposing
biplane not only easy, but genuinely fun.
The end result is a rare but great-looking aircraft that is also
surprisingly large and heavy. My
only complaint would be that the box doesn’t feature Tamiya’s usual excellent
and dramatic artwork on the cover – but this is about as minor of a complaint as
one can have. What would I give for
them to come out with a 1/48
| REFERENCES |
-
Squadron/Signal Publications, Aircraft in Action #175, “Fairey Swordfish in
Action”
- Wikipedia, the Online Encyclopedia
March 2010
Copyright ModelingMadness.com. All rights reserved. No reproduction in any form without express permission from the editor. If you would like your product reviewed fairly and quickly, please
contact
the editor or see other details in the
Note to
Contributors.