Trumpeter 1/48 Wellington Mk.Ic
| KIT #: | 2808 |
| PRICE: | $125 or so SRP. Less from most places |
| DECALS: | Two options? |
| REVIEWER: | Scott Lyle |
| NOTES: |
Decals Carpena #48.78, Codes RAF
“Grey” Bombers
|
| HISTORY |
To me one of the fun aspects of our hobby is
the planning, specifically planning which kits to build and planning in what
order to build said kits. I tend to
build simil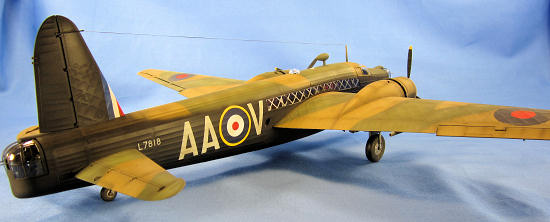 ar
subjects in groups – I’ll try to do a few fighters in a row, than armor kits,
etc. Right now I’m working on some
bombers, and being the planner that I am, I have to admit that the
ar
subjects in groups – I’ll try to do a few fighters in a row, than armor kits,
etc. Right now I’m working on some
bombers, and being the planner that I am, I have to admit that the
| THE KIT |
 I’d
never built a Trumpeter kit before, and having read reviews of several different
Trumpeter kits, it seemed like their quality was all over the map.
I bought the kit and was dubious of what I was getting myself into, but
upon opening the box my fears were began to subside.
Several sprues of light gray injection molded parts, all individually
wrapped in protective plastic, were just the beginning.
The kit also provides a photo etch fret, white metal landing gear with
metal axles, rubber tires, and a full color fold-out painting guide.
An impressive ordnance load is included, allowing you to load out your
I’d
never built a Trumpeter kit before, and having read reviews of several different
Trumpeter kits, it seemed like their quality was all over the map.
I bought the kit and was dubious of what I was getting myself into, but
upon opening the box my fears were began to subside.
Several sprues of light gray injection molded parts, all individually
wrapped in protective plastic, were just the beginning.
The kit also provides a photo etch fret, white metal landing gear with
metal axles, rubber tires, and a full color fold-out painting guide.
An impressive ordnance load is included, allowing you to load out your
| CONSTRUCTION |
If you enjoy modeling bomber interiors, you
won’t be disappointed by this one.
Trumpeter provides a full cockpit station, bomb bay, and the stations above the
bomb bay; all nicely detailed. The
geodetic framework pattern of the 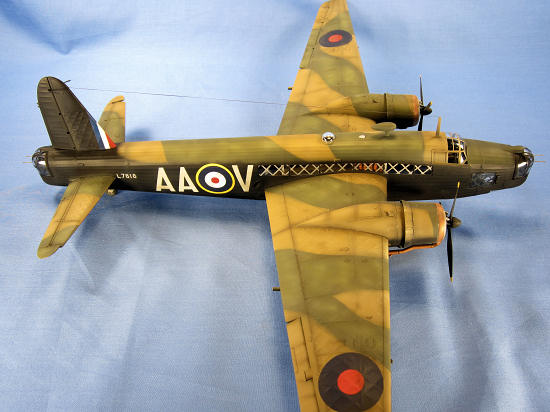 picking
out the individual details with a brush.
Trumpeter provides a printed instrument panel which I glued to the back
of the transparent instrument panel.
I then masked off the dial faces with Micro Mask and then sprayed the
panel Flat Black. I sourced some
photo etch seat belts from my spares box, and moved on to the next assembly.
picking
out the individual details with a brush.
Trumpeter provides a printed instrument panel which I glued to the back
of the transparent instrument panel.
I then masked off the dial faces with Micro Mask and then sprayed the
panel Flat Black. I sourced some
photo etch seat belts from my spares box, and moved on to the next assembly.
The fuselage interior should be painted a brick red color to represent
the fabric that it was covered with, and for that I used Tamiya XF-9
The nose, ventral, and tail turrets are intricate little assemblies and
are assembled next. They are also
unfortunately painted all black, making it hard to see the nice details they
contain. After that the engines are
assembled next, and they are highly detailed assemblies as well.
If anyone ever wanted to channel their inner Sheperd Paine and build a
diorama of a
Moving on, the next step was to add the interior modules onto one of the
fuselage halves and then close them up.
Keeping the turrets lined up in their grooves while closing up the
fuselage halves was a little tricky, but once they were nudged into position
there was only a minimal seam to clean up.
I set that aside to cure and started the landing gear wells.
Trumpeter provides nicely detailed photo etch panels to replicate the
sidewalls of the wheel wells, and those glue to plastic pieces that once glued
together, trap the white metal landing gear struts in between them.
This sturdy wheel well assembly snaps in turn into place in the lower
wing half. Before closing up the
wings you have the option of moveable control surfaces and either closed or open
landing flaps. I chose to keep my
Wellington’s flaps closed, but left the control surfaces at subtle angles – one
side up and one side down. The wing
halves then go together nicely, again with a minimum of seam work.
The
 same
is true for the elevators and rudder, all of which have separate control
surfaces – very nice! I angled my
elevators downward to add some variation to the model.
The engines attach to the wings next, followed by their cowls.
You have the option of displaying the rear cowling flaps open or closed –
I chose to leave mine open.
same
is true for the elevators and rudder, all of which have separate control
surfaces – very nice! I angled my
elevators downward to add some variation to the model.
The engines attach to the wings next, followed by their cowls.
You have the option of displaying the rear cowling flaps open or closed –
I chose to leave mine open.
Cruising right along, it was now time to attach the wings to the fuselage
and here Trumpeter has come up with a clever solution.
First you glue a box-like part onto the wing root portion of the
fuselage. That part has a snap tab
on it. You then slide the wing over
that box part until the snap tab grabs and locks in place – which it does, quite
nicely! Running liquid cement into
the seam all around the wing-fuselage joint resulted in a rock solid structure,
with no seams to clean up! I think
that may be the first time in my model airplane modeling life that I’ve never
had to fuss over that seam.
The elevators attached to the fuselage nicely as well, needing only a
quick swipe of Mr. Surfacer to cover a small gap.
The last major part was the bomb bay door.
Trumpeter gives you the option of modeling the bomb bay doors open or
closed. If you wish to leave them
open, you have to paint and glue on – I hope you’re sitting down – 30 different
small doors. If you wish to model
them closed, Trumpeter provides a single large part to cover the entire bomb
bay. Yes, I went with the closed
option. There were some gaps around
that part, but none that couldn’t be dealt with.
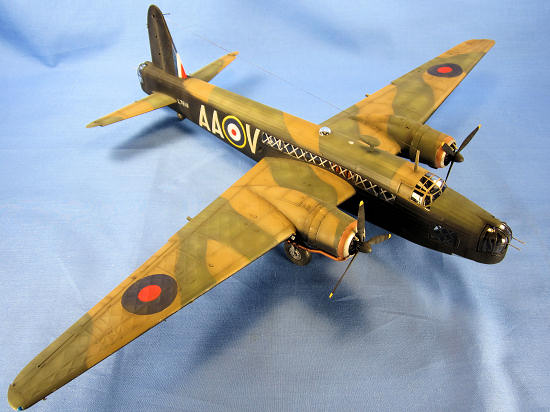
The Wellington has a plethora of transparencies all around it, and they were added next, all fitting nicely. After adding a few more small parts that I hoped to not knock off during the painting process I masked the transparent parts with the Eduard set, and the model was ready for paint.
| COLORS & MARKINGS |
My
first step was to wipe down the model with Polly S’s “Plastic Prep” and then
airbrush a primer coat of Mr. Surfacer 1000 onto the model.
After doing some minor seam touch-up work I preshaded the model’s panel
lines with Tamiya Flat Black XF-1.
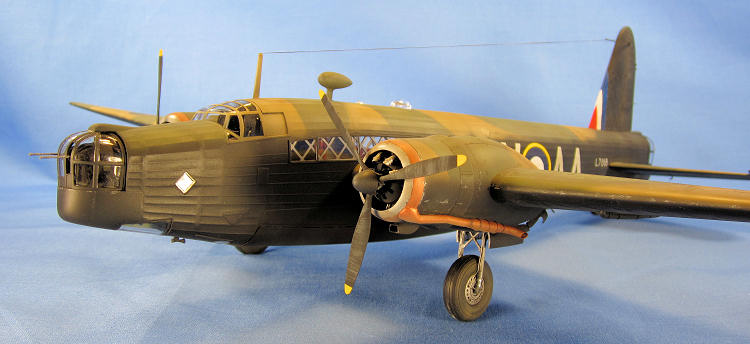
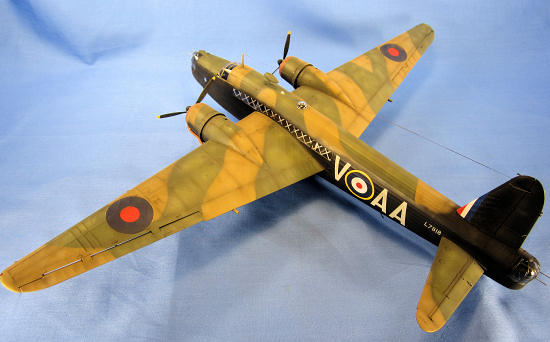
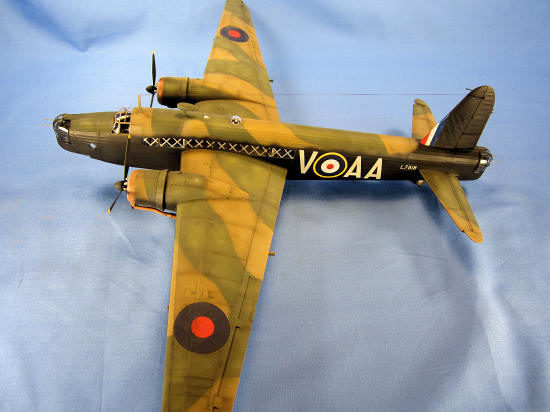
The Wellington I was modeling was painted for night-bombing duty, so that
meant that the entire aircraft was black except for the tops of the fuselage and
the wings.
 The
first color to go on was the Dark Earth shade, and for that I used Testors
Acrylic Dark Earth. I then masked
that by looping pieces of Tamiya masking tape onto pieces of scrap paper that I
had cut to match the Wellington’s camouflage pattern.
With the edges of the paper held slightly above the plastic surface by
the masking tape you’ll get a nice soft edge between the two colors when the
next color is airbrushed. For the
RAF Dark Green shade I stuck with the Testors line and used their Acrylic RAF
Dark Green. I next removed all of
the masks and subtly sprayed a lightened shade of each color in splotches onto
the surfaces to provide a fading effect.
The
first color to go on was the Dark Earth shade, and for that I used Testors
Acrylic Dark Earth. I then masked
that by looping pieces of Tamiya masking tape onto pieces of scrap paper that I
had cut to match the Wellington’s camouflage pattern.
With the edges of the paper held slightly above the plastic surface by
the masking tape you’ll get a nice soft edge between the two colors when the
next color is airbrushed. For the
RAF Dark Green shade I stuck with the Testors line and used their Acrylic RAF
Dark Green. I next removed all of
the masks and subtly sprayed a lightened shade of each color in splotches onto
the surfaces to provide a fading effect.
Up next was the black, and I sprayed that free-hand using Tamiya XF-1
Flat Black. Using the profile of
L7818 in the Squadron/Signal book as a reference, I brought the black fairly
high up the sides of the fuselage, basically to the top of the fuselage windows.
When that was finished I “splotched” some Tamiya XF-69 NATO Black
randomly onto the black surfaces for some more fading effects.
After that the obligatory Future coat was applied, and the model was set
aside for a couple of days to cure.
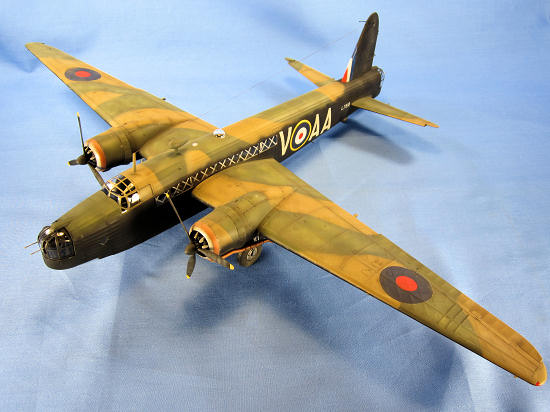
There weren’t many decals to apply, just the fuselage codes and roundels,
the roundels on the wings, and the small serial code.
Once they had set I sealed them with a coat of Future, and then applied a
thin wash of Mig Productions “Dark Wash” to all of the recessed panel lines on
the upper surfaces. With the lower
surfaces being so dark, I didn’t apply any panel line wash to them.
 A coat of Testors Model Master Flat Finish was airbrushed on next, and
then I brush-painted the wheel wells, wheel hubs, and landing gear with Testors
Aluminum. I then masked off the
tail to airbrush the red, white and blue fin flash that this aircraft wore at
the base of its tail. Once that was
finished I attached the rubber tires to the wheels and then the wheels to the
landing gear using the tiny metal axles the kit supplies – very sturdy!
A coat of Testors Model Master Flat Finish was airbrushed on next, and
then I brush-painted the wheel wells, wheel hubs, and landing gear with Testors
Aluminum. I then masked off the
tail to airbrush the red, white and blue fin flash that this aircraft wore at
the base of its tail. Once that was
finished I attached the rubber tires to the wheels and then the wheels to the
landing gear using the tiny metal axles the kit supplies – very sturdy!
The next weathering step was to airbrush a very thin mix of 50/50 Tamiya
XF1 Black and Tamiya XF64 Red Brown over all of the panel lines and engine
exhaust areas. This is an effect
I’ve really grown fond of and on this model I tried a technique that I read
about in a modeling magazine. To
get a grease streaking effect from a seam, just cover the forward part of the
seam with a piece of scrap paper, and then airbrush a light streak from the seam
towards the rear of the airplane.
You’ll get a nice streak that has a defined “source”, like a greasy control
surface hinge or similar.
Moving right along I removed all of the window masks next.
I thought about doing some subtle dry-brushing to bring out the geodetic
structure that Trumpeter molded into the surfaces, but decided that it looked
prominent enough as it was.
I added some paint chips on the leading edges
of the wings and around the engines using a Silver Berol pencil and then gave
the wheels, wheel wells and landing gear a wash using Mig Productions “Dark
Wash”.
All that was left to do was to paint the wingtip lights and then add the props and machine gun barrels. Once that was done I used EZ Line for the antenna leading from the mast to the tail, and the model was done.
| CONCLUSIONS |
 This is a fantastic kit, one that I enjoyed building from start to
finish. The kit engineering is
superb with plenty of detail and no major assembly issues to deal with
whatsoever. One cannot quibble with
what Trumpeter provides in the box, or the number of options they give you with
which to build your Wellington.
They really put a lot of thought and effort into this kit, and the modeler reaps
the reward with a fun, fast, and trouble-free build of a fairly big bomber.
This is a fantastic kit, one that I enjoyed building from start to
finish. The kit engineering is
superb with plenty of detail and no major assembly issues to deal with
whatsoever. One cannot quibble with
what Trumpeter provides in the box, or the number of options they give you with
which to build your Wellington.
They really put a lot of thought and effort into this kit, and the modeler reaps
the reward with a fun, fast, and trouble-free build of a fairly big bomber.
Being my first Trumpeter kit I was very impressed and I look forward to
building many more. I only hope
Trumpeter continues to tackle more 1/48 scale bombers – I won’t mention any
names as any of us who follow the various modeling blogs have seen them on wish
lists for years now. But generally
they start with a “B” and are followed by a two-digit number…
| REFERENCES |
-
Squadron/Signal Publications, Aircraft in Action #76, “Wellington in Action”
- Wikipedia, the Online Encyclopedia
October 2011
If you would like your product reviewed fairly and quickly, please contact me or see other details in the Note to Contributors.