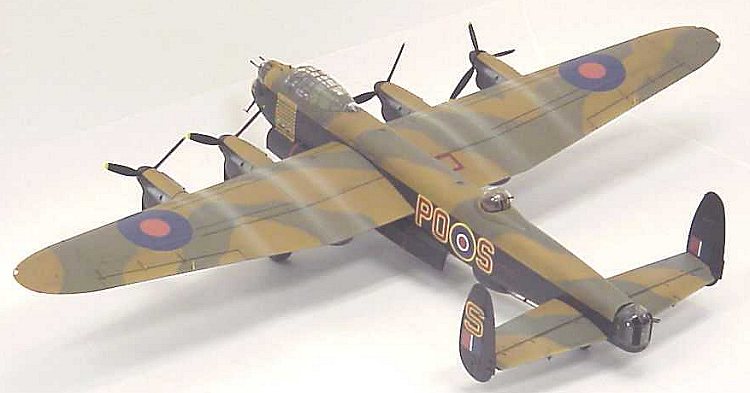
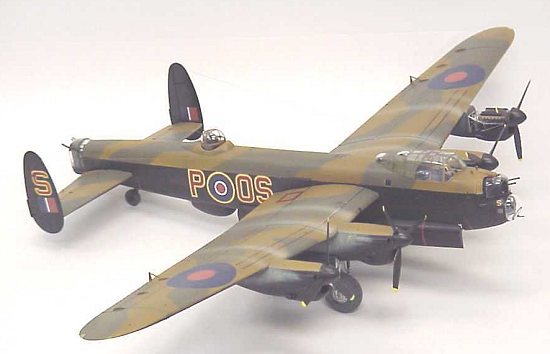
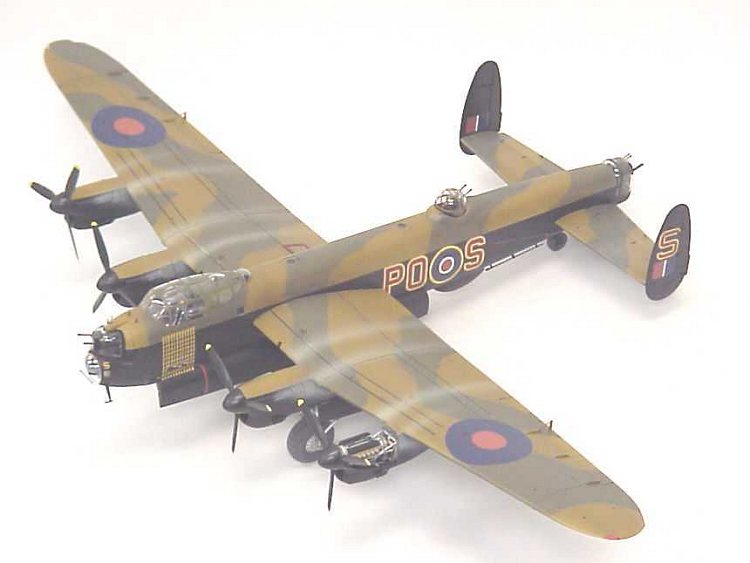
Lancaster B.III, PO/S "S for Sugar"
No. 467 Squadron, No. 5 Group, Late 1944 - May 1945
|
KIT # |
61020 |
|
PRICE: |
$57.00 |
|
DECALS: |
See review |
|
REVIEW : |
Mark Mallinson |
|
NOTES: |
Lancaster B.III, PO/S "S for Sugar"
No. 467 Squadron, No. 5 Group, Late 1944 - May
1945
|
THE KIT |
This is the mid-70’s vintage Tamiya Lancaster B.III in 1/48 scale. Little need be said to this audience about the role the Lancaster played in Bomber Command’s offensive during WW2, so let’s talk styrene and paint instead. I’d seen these kits occasionally for sale in our local hobby shops, but none in several years. So when I saw an opportunity to pick one up for what seemed a reasonable price, I went for it. A few problems of my own making were encountered along the way, and I thought some of you could benefit from hearing about them.
|
CONSTRUCTION |
 Armed with some tips and warnings from those who’d
previously built this kit, I set off with my limited technical references and
began a model I knew would take me months to finish. At first, I planned to
build the B.I version with dropped flaps, but as I learned more about details
relating to the flap structure and actuator mechanisms, I decided against it. I
also changed my mind on building the ‘pregnant’ B.III version rather than
the cleaner looking B.I.
Armed with some tips and warnings from those who’d
previously built this kit, I set off with my limited technical references and
began a model I knew would take me months to finish. At first, I planned to
build the B.I version with dropped flaps, but as I learned more about details
relating to the flap structure and actuator mechanisms, I decided against it. I
also changed my mind on building the ‘pregnant’ B.III version rather than
the cleaner looking B.I.
Interior
The interior is the first area to be completed and I found the
level of detail a bit lacking when compared to Tamigawa’s more recent
offerings. The engineer’s and radio operator’s panels as well as the cockpit
instruments were represented with decals. While the radio panel is all but lost
in the interior of the finished model, the engineer’s control panel and the
cockpit instruments are particularly visible. In order to try to
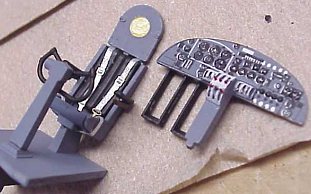 give these more
depth, I put a drop of Future over each dial and used it to glue some Waldron
instrument bezels around them. This added simulated glass instrument covers and
a little more of a 3-D effect to what would otherwise be perfectly flat panels.
give these more
depth, I put a drop of Future over each dial and used it to glue some Waldron
instrument bezels around them. This added simulated glass instrument covers and
a little more of a 3-D effect to what would otherwise be perfectly flat panels.
After checking period cockpit photos, True Details harness hardware along with ~1.5mm strips of their belt material were used to simulate the pilot’s seat belts. None of the references showed photos of the navigator’s seat in any detail, so I went ahead and outfitted his seat with belts as well. These simple additions helped bring a fairly dull cockpit a little bit closer to the real thing.
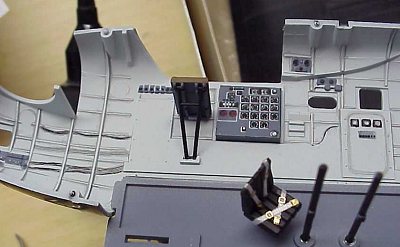 A nagging question concerning Tamiya’s directions for this
kit is their call-out for "sky" colored interior. Most period photos
show dark gray or black interiors. Not knowing what was correct, I painted the
interior walls with Polyscale Sky acrylic, which looks a lot like white with a
few % of cobalt blue added. The one advantage of this light color scheme was
when I washed the stringers and frames with diluted Night Black acrylic and a
little dish soap. The contrasting colors helped bring out the interior
structural detail, though most of it is hidden when assembled. Before assembling
the two fuselage halves, I added extra tabs made of shaped sprue to help the
inadequate number of alignment pins.
A nagging question concerning Tamiya’s directions for this
kit is their call-out for "sky" colored interior. Most period photos
show dark gray or black interiors. Not knowing what was correct, I painted the
interior walls with Polyscale Sky acrylic, which looks a lot like white with a
few % of cobalt blue added. The one advantage of this light color scheme was
when I washed the stringers and frames with diluted Night Black acrylic and a
little dish soap. The contrasting colors helped bring out the interior
structural detail, though most of it is hidden when assembled. Before assembling
the two fuselage halves, I added extra tabs made of shaped sprue to help the
inadequate number of alignment pins.
Wings and Engine Nacelles
Previous builders of this kit warned of wing to nacelle fit
problems, so 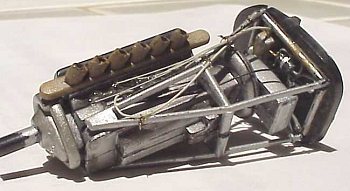 they weren’t a surprise when I encountered them. Careful sanding,
putty and diluted white glue filled those gaps.
they weren’t a surprise when I encountered them. Careful sanding,
putty and diluted white glue filled those gaps.
The original plan was to drop the flaps, but eventually I chickened out after considering the time required to scratch build the tapered and holed frames, torque tubes and numerous flap actuator links. This is where the Paragon and/or Flightpath photo-etch detail sets would have changed my mind if I had known of them.
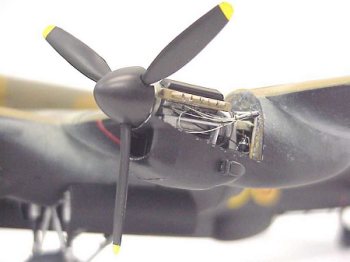
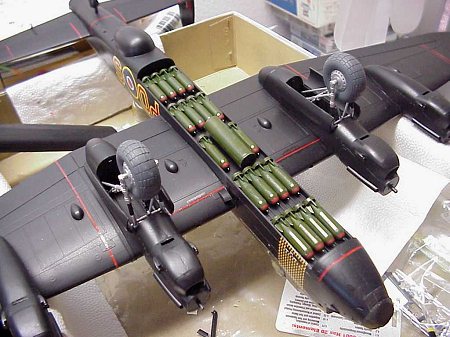
Engine Details
Tamiya gives the modeler two rather Spartan Merlin XX engines
to install on either side of the Lanc (they recommend both engines on one side).
Using the 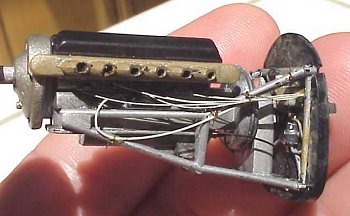 Squadron Spitfire in action book, model photos and advice from Brian
Cauchi, I made an amateur’s attempt to add detail to one of these sparse power
plants. Brian advised to add detail in a series of layers, and this technique
seemed to work out. I began by adding various oil filters and black boxes to the
firewall and fastening them down with white glue and brackets made of foil. Once
set, pieces of painted copper wire were shaped and plumbed according to my
reference photos. Stretched sprue was used to simulate the spark plug cables,
but next time I’d use more realistic wire. Before the engine bearers were
glued to the firewall, I slopped a little thinned light gray and rust acrylic to
the firewall to add some engine exhaust weathering effect. I can’t attest to
the authenticity of my engine details, only to say that they helped add a little
more realism to a bare bones Merlin.
Squadron Spitfire in action book, model photos and advice from Brian
Cauchi, I made an amateur’s attempt to add detail to one of these sparse power
plants. Brian advised to add detail in a series of layers, and this technique
seemed to work out. I began by adding various oil filters and black boxes to the
firewall and fastening them down with white glue and brackets made of foil. Once
set, pieces of painted copper wire were shaped and plumbed according to my
reference photos. Stretched sprue was used to simulate the spark plug cables,
but next time I’d use more realistic wire. Before the engine bearers were
glued to the firewall, I slopped a little thinned light gray and rust acrylic to
the firewall to add some engine exhaust weathering effect. I can’t attest to
the authenticity of my engine details, only to say that they helped add a little
more realism to a bare bones Merlin.
|
PAINT & DECALS |
Painting
The kit includes a nice color illustration of "S for
Sugar", one of the few Lancs to fly more than 100 operational missions and
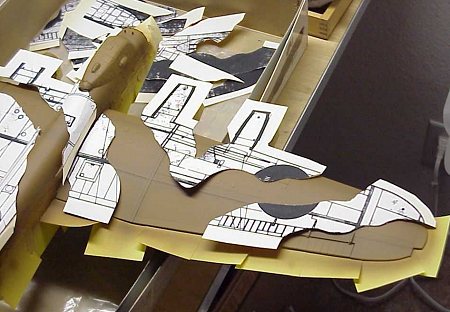
I decided to represent this aircraft. A question that came up when planning this
effort was the demarcation of the RAF dark earth and dark green camouflage
colors. Some models and a few photos showed feathered transitions between green
and brown while others showed a much sharper, masked transition like that
between the camouflage and black fuselage sides. For the first time, I threw a
question out to the Hyperscale discussion group and got some very helpful
comments and facts 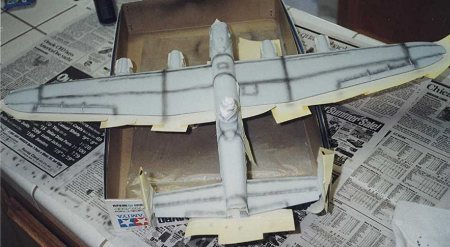 in response (thanks guys). According to these people, the
green/brown camouflage was sprayed with large masks that were laid on top of the
aircraft. Instances where period photos show feathered transitions can be
attributed to field repairs and touch-ups.
in response (thanks guys). According to these people, the
green/brown camouflage was sprayed with large masks that were laid on top of the
aircraft. Instances where period photos show feathered transitions can be
attributed to field repairs and touch-ups.
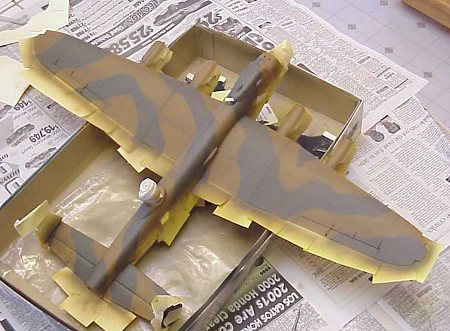
The first step in painting this large kit was to prime the fuselage seams to show any areas that needed further puttying and sanding. Once satisfied, I primed the entire upper surface with light gray acrylic. I’ve found this color to be easier to spray through my airbrush than white acrylic. Panel lines were pre-shaded using the undersurface color Polly Scale Night Black acrylic and the whole thing sealed with several layers of Future.
 The first phase of the topside camouflage was to paint Model
Master Dark Earth enamel over the entire wing, tail and fuselage upper surfaces,
being careful not to completely cover the pre-shading.
The first phase of the topside camouflage was to paint Model
Master Dark Earth enamel over the entire wing, tail and fuselage upper surfaces,
being careful not to completely cover the pre-shading.
The advice I’d received from the Discussion group gave me an idea on how to paint the dark green camouflage scheme. I measured the dimensions of the kit and compared them to the instruction’s plan view and found the kit to be close to 300% larger. Using a copier, I blew up the top plan view by 300%. I then used a glue stick to paste the thin copy paper onto thick construction paper. The dark green mask sections were then cut out with extra paper over the edges to help mask off the sides of the fuselage and wings. My goal was to create a very slightly feathered transition between the colors. By taping the masks to the surfaces with small ~2mm offsets and spraying the Model Master Dark Green enamel perpendicular to the masks at ~15psi, I was more or less able to achieve the desired effect.
Painting Problem and Solution
 After painting and sealing the bulk of the camouflage, I was
still left with one little piece to paint that would prove to be one of the most
annoying parts on the entire model. This part, the Front Turret Shroud, was
poorly molded and quite twisted. I used hot water to soften the part and torqued
it close to its correct shape. Having left this part and the three Turrets off
of the model while painting, I figured it would be easy to spray and drop into
place. After priming the Shroud like the rest of the fuselage, I used the same
Dark Earth enamel and sprayed this small part. To my consternation, the color
that slowly developed with each thin coat was markedly different (darker) than
what had developed on the rest of the model. After stripping and repeating the
process, I still wound up with this considerably darker shade of brown. It was
like comparing dark semi-sweet chocolate with light milk chocolate regardless of
the number of paint layers.
After painting and sealing the bulk of the camouflage, I was
still left with one little piece to paint that would prove to be one of the most
annoying parts on the entire model. This part, the Front Turret Shroud, was
poorly molded and quite twisted. I used hot water to soften the part and torqued
it close to its correct shape. Having left this part and the three Turrets off
of the model while painting, I figured it would be easy to spray and drop into
place. After priming the Shroud like the rest of the fuselage, I used the same
Dark Earth enamel and sprayed this small part. To my consternation, the color
that slowly developed with each thin coat was markedly different (darker) than
what had developed on the rest of the model. After stripping and repeating the
process, I still wound up with this considerably darker shade of brown. It was
like comparing dark semi-sweet chocolate with light milk chocolate regardless of
the number of paint layers.
In a panic, I went again to the Discussion Board and confided
my problem to the experts. Several people came forward and really helped me
figure out, mostly by the process of elimination, what
 was really going on
(thanks Russ!). The solution dawned on me as I was thinking, not in the macro
world of pressure settings, paint mixes or layers, but in the micro world of
paint droplet size and density. When spraying the bulk of the model, I used a
coarse spray and higher than normal pressure in order to cover the large surface
area evenly and in a reasonable time. The paint droplets from my trusty old
Paasche H thus would have been relatively large, but with a low density of
droplets per unit area due to the higher than normal pressure and distance of my
spray nozzle to the surface. When I sprayed the little Turret Shroud previously,
I used the same air pressure and paint mixture, but adjusted the paint flow rate
way down and sprayed quite close to the small part. This produced very small
paint droplets of a relatively high density. This was the reason the same bottle
of paint and thinner could produce such different colors. I tested my hypothesis
on a similarly primed sheet of Evergreen, and found that I was correct. With
another primed sheet and Turret Shroud, I blew them the same way as the rest of
the kit and now the Shroud’s color matched the rest of the Lanc. Mystery
solved.
was really going on
(thanks Russ!). The solution dawned on me as I was thinking, not in the macro
world of pressure settings, paint mixes or layers, but in the micro world of
paint droplet size and density. When spraying the bulk of the model, I used a
coarse spray and higher than normal pressure in order to cover the large surface
area evenly and in a reasonable time. The paint droplets from my trusty old
Paasche H thus would have been relatively large, but with a low density of
droplets per unit area due to the higher than normal pressure and distance of my
spray nozzle to the surface. When I sprayed the little Turret Shroud previously,
I used the same air pressure and paint mixture, but adjusted the paint flow rate
way down and sprayed quite close to the small part. This produced very small
paint droplets of a relatively high density. This was the reason the same bottle
of paint and thinner could produce such different colors. I tested my hypothesis
on a similarly primed sheet of Evergreen, and found that I was correct. With
another primed sheet and Turret Shroud, I blew them the same way as the rest of
the kit and now the Shroud’s color matched the rest of the Lanc. Mystery
solved.
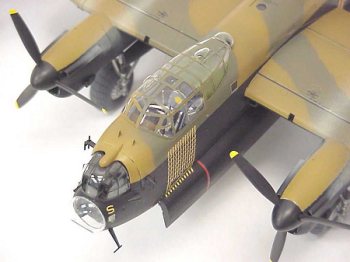
Decals
 I was warned that the kit decals silvered badly and in some
cases were the wrong color. To solve this problem, I bought the AeroMaster sheet
and used the wing and fuselage roundels. In order to prevent silvering, I
pre-coated the model with several layers of Future, then used Future as a
setting solution for some of the decals. This helped to hide the clear film on
several of the decals. On the large fuselage side letters, I removed the sizable
areas of clear film prior to application (easy on the P’s and O’s, but a bit
tougher on the S’s).
I was warned that the kit decals silvered badly and in some
cases were the wrong color. To solve this problem, I bought the AeroMaster sheet
and used the wing and fuselage roundels. In order to prevent silvering, I
pre-coated the model with several layers of Future, then used Future as a
setting solution for some of the decals. This helped to hide the clear film on
several of the decals. On the large fuselage side letters, I removed the sizable
areas of clear film prior to application (easy on the P’s and O’s, but a bit
tougher on the S’s).
After applying the roundels and letters, I was faced with a little problem of missing decals. The kit was either missing or did not come with the various black walkway, and red undersurface stripes. ‘Al’ down at D&J Hobby came to the rescue with some generic Microscale 1/16" thick decal stripes in both colors. Also missing was the famous quote from Luftwaffe chief Hermann Goering; "No enemy plane will fly over the Reich Territory". If any readers just happen to have this decal lying in the bottom of their spares box, let me know.
Weathering
 Restraint was used when weathering this model. Period photos
of the Lanc showed that the engine exhaust flowed along the black nacelles and
up and over the wings on all but the outermost engine manifolds. Only in a few
cases did photos show small amounts of exhaust flowing over the wings from these
outer-most manifolds, while the rest of them produced nearly opaque parallel
flows of thick chalky residue. The engine exhaust was a combination of
airbrushed tan acrylic and brush-applied gray artists pastels.
Restraint was used when weathering this model. Period photos
of the Lanc showed that the engine exhaust flowed along the black nacelles and
up and over the wings on all but the outermost engine manifolds. Only in a few
cases did photos show small amounts of exhaust flowing over the wings from these
outer-most manifolds, while the rest of them produced nearly opaque parallel
flows of thick chalky residue. The engine exhaust was a combination of
airbrushed tan acrylic and brush-applied gray artists pastels.
Final Exterior Details
I blatantly copied a feature of Graham Green’s wonderful 1/72 Manchester by adding wire hydraulic lines to the landing gear and washing them with diluted black acrylic and liquid soap. The radio antennas were made using invisible nylon thread. Holes were drilled into the solid one-piece tail fins and CA glued into place. Then they were stretched taught and taped to the canopy and glued to the two small knobs on top.
|
CONCLUSIONS |
Enough of this guy’s hot air, let’s hear the bottom line! Well, if I could turn the clock back about 6 months, I would have waited for the SAM Lancaster modeler’s guide which I’m sure would fill in many of the holes in my research. With one of the good after-market detail sets, I think this kit could be made into a very attractive and fairly accurate representation of this WWII classic, raised panel lines and all. The only problem facing the modeler after completing this behemoth, is where to find enough tarmac to land this baby. It won’t fit into my spacious office model display case, so it now sits in a bit of a precarious open spot where unsanctioned handling and breakage is a real threat. I’ll just have to banish my bosses and co-workers from my office.
|
REFERENCES |
Avro Lancaster Portfolio, A Brooklands Aircraft Portfolio Motorbooks International Inc. ISBN 1-869-826-167 Warbirds of Canada & the United Kingdom, Volume 2 1992.
Very late note: Readers have pointed out to me that the code presentation on the right side is incorrect. The squadron code was PO with S as the individual aircraft letter so it should be PO*S and not P*OS as shown. This could have been an Aeromaster instructions error and not Mark's doing. Ed
Copyright ModelingMadness.com. All rights reserved. No reproduction in part or in whole without express permission from the editor.
If you would like your product reviewed fairly and fairly quickly, please contact the editor or see other details in the Note to Contributors.
Back to Reviews Page 2016