| KIT #: | A04053 |
| PRICE: | $15.99 SRP |
| DECALS: | Two options |
| REVIEWER: | Bill Michaels |
| NOTES: |
First release, with
decals for pre-war and |
| HISTORY |
On the night of
The night attack was very successful.
The first wave consisted of 12 Swordfish, while the second wave consisted
of nine planes. For a loss of two
planes shot down, the British disabled three of the six Battleships, which was a
huge swing in the naval balance of power, giving the British Mediterranean Fleet
the upper hand for the next six months.
 The
Swordfish on the
The
Swordfish on the
Charles Lamb served in the FAA from the start
of the war until the end. He flew
all sorts of missions against the Germans and Italians, spent time in an Italian
POW camp, and ended the war flying against the Japanese as part of the British
Pacific Fleet. In addition to “typical” missions, he also flew strikes from a
secret airstrip high in the Albanian mountains, and, while based on
Ever since I read his autobiography, I’ve
wanted to do one of Lamb’s aircraft.
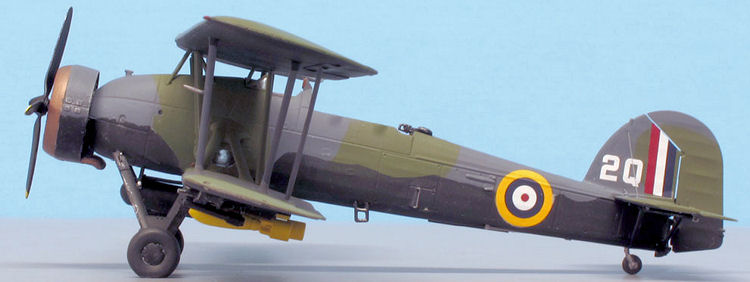
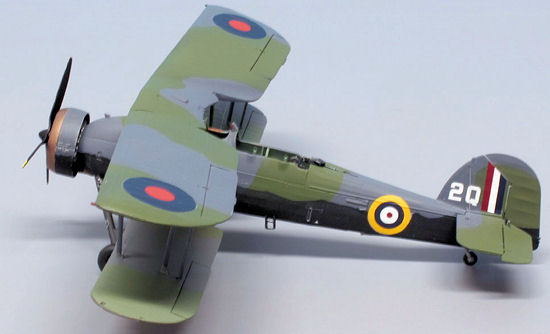
According to the book, he flew “Q for Queenie” as a member of 815 Sqdn
off of HMS Illustrious during the Taranto raid. I went looking through the decal
stash to see if I had any suitable markings, and found a copy of the Eagle
Strike “Fleet Air Arm Part 1”, which includes a Swordfish from 815 Squadron.
According to that sheet, the 815 Sqdn planes received a quick coat of
black paint on the undersides for the
| THE KIT |
Scott’s preview of the kit, published here on MM several months ago, covers the basics of the kit. Read Scott’s preview of the kit here.
Scott’s preview does a great job of describing
this nice kit-- but there are a
couple of other things that came to light once I built the model. First off, the
kit gives you more than the instructions suggest.
If you build the kit OOB, and use the markings provided,
 you
can build a pre-war (all silver) torpedo-armed plane, or a bomb/flare laden
plane from the
you
can build a pre-war (all silver) torpedo-armed plane, or a bomb/flare laden
plane from the
·
Scott mentioned that you can build the kit with
the wings folded, but I discovered that the kit also includes a set of special
jigs to make sure the center section of the top wing is properly aligned, if you
pick this option.
·
The wheels are molded with weighted tires, and
the axles are keyed so the flat spot lines up at the right angle.
· There are little dimples molded in the wings to mark the locations for the rigging- it makes it easy to drill them out with a #80 bit.
| CONSTRUCTION |
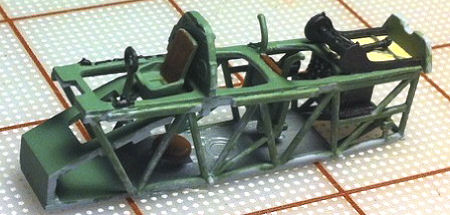 The
instructions include over 40 well-illustrated steps.
Before you start, however, you should decide which version of the
aircraft you’re building, and whether or not you’ll be folding the wings.
I went through and marked off all the sections that didn’t apply.
The
instructions include over 40 well-illustrated steps.
Before you start, however, you should decide which version of the
aircraft you’re building, and whether or not you’ll be folding the wings.
I went through and marked off all the sections that didn’t apply.
Like most biplane projects, I painted the model
before the top wing was installed.
| COLORS & MARKINGS |
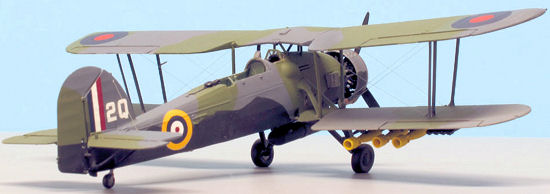 To do
Lamb’s plane, I painted it in the standard colors as called out by Airfix for a
Taranto raid aircraft. I used
PollyScale acrylics throughout. The aircraft had light gray undersides, with
dark gray (PS Extra Dark Sea Gray) and
dark green (PS Dark Slate Gray) camouflage.
Note that the lower wing is “counter shaded”—it was painted with lighter
versions of the grey and green used on the rest of the upper surfaces.
I used PS Ocean Gray for the gray, but had to mix up a custom green.
To do
Lamb’s plane, I painted it in the standard colors as called out by Airfix for a
Taranto raid aircraft. I used
PollyScale acrylics throughout. The aircraft had light gray undersides, with
dark gray (PS Extra Dark Sea Gray) and
dark green (PS Dark Slate Gray) camouflage.
Note that the lower wing is “counter shaded”—it was painted with lighter
versions of the grey and green used on the rest of the upper surfaces.
I used PS Ocean Gray for the gray, but had to mix up a custom green.
After the main colors were painted,
I went back and masked the model, and then used “Night Black” to
overpaint the light gray on the underside.
According to the decal sheet instructions,
this was a temporary paint job, and likely had gaps and missed spots.
(A bad paint job—now that’s right up my alley!)
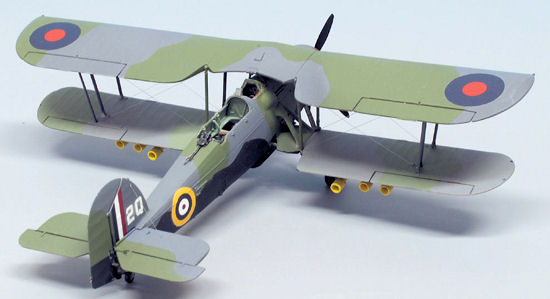
Installing the Top Wing
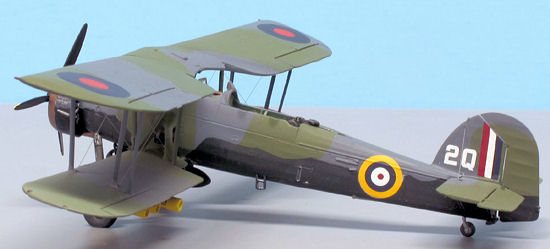 Sometimes,
I find it easier to decal a biplane before installing the top wing.
But in this case, it found it easier to leave them for the end, after the
wing was installed. (If you’re building the model with the wings folded, you’ll
need to do your decaling and flat coating before installing the wings.)
When building the “wings out” version, it is pretty easy to install the
top wing. The way the struts
are engineered, the wing is easy to install and align properly.
Sometimes,
I find it easier to decal a biplane before installing the top wing.
But in this case, it found it easier to leave them for the end, after the
wing was installed. (If you’re building the model with the wings folded, you’ll
need to do your decaling and flat coating before installing the wings.)
When building the “wings out” version, it is pretty easy to install the
top wing. The way the struts
are engineered, the wing is easy to install and align properly.
I let the wing dry overnight, and then it was
time to apply the decals. I didn’t
need any of the kit decals, but I’m sure they would have been fine if I had.
I’ve built a few of Airfix’s recent releases, and found the decals to be
of uniformly good quality.
I brushed on a coat of Future to prepare for
decaling. Doing the model as Lamb’s
plane made it an easy model to decal—there are no markings on the underside, and
the serial number was covered by the black paint.
The Eagle Strike decals I did use went down well, reacting well to
MicroSet and MicroSol as needed.
| FINAL CONSTRUCTION |
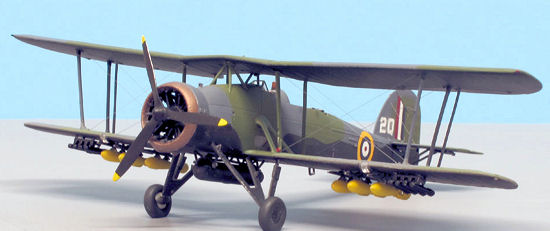
 Once
the decals were applied, it was
time to rig the model. While I had
had to deal with the extra line while assembling and painting,
their presence really paid off at rigging time.
Rigging was definitely made easier by having the wing lines
pre-installed, as described earlier.
Once
the decals were applied, it was
time to rig the model. While I had
had to deal with the extra line while assembling and painting,
their presence really paid off at rigging time.
Rigging was definitely made easier by having the wing lines
pre-installed, as described earlier.
Once the rigging was done, I went ahead and airbrushed the flat coat. By waiting until now, I was able to get a flat coat over the base paint and the little touch up spots that every model seems to need, all in one even coat. The final step was to mount the last of the details, such as the rear gun, prop, wheels, etc.
| CONCLUSIONS |
Highly recommended.
 This
is another winner from Airfix—a very nicely engineered kit at a reasonable
price. The kit isn’t perfect- but
it is nicely done. Also, it is so much nicer than any of the old kits available
in this scale—I think it makes the others essentially obsolete.
This
is another winner from Airfix—a very nicely engineered kit at a reasonable
price. The kit isn’t perfect- but
it is nicely done. Also, it is so much nicer than any of the old kits available
in this scale—I think it makes the others essentially obsolete.
Review kit courtesy of my wallet. When the kit
first hit the market, it was hard to find here in the USA. I ended up getting
mine thanks to a friend who was traveling to the UK—he was able to pick one up
for about 14 pounds. Since then,
I understand it has pretty much sold out,
but do not despair.
The kit is now available in two new boxings—first came one with some acrylic
paints, and now currently you can also get it as a floatplane.
Special thanks to Pip Moss of the IPMS Patriot
Chapter in Bedford, Massachusetts for taking all the great pictures.
| REFERENCES |
To War in a Stringbag by Commander Charles Lamb
November, 2012
Correction to information regarding Charles Lamb’s Swordfish on the Taranto raid:
“According to my references (The Swordfish Story, by Sturtivant and Fleet Air Arm Camouflage and Markings by Lloyd), at Taranto, C. B. Lamb flew aircraft L5B, of 819 Squadron (L5). It was a replacement aircraft, and he had a substitute observer from Eagle.
It appears that the first and second wave were not made up of squadron specific aircraft, but rather a mixed lot due to replacement aircraft, as many others were out due to mechanical problems. So while Lamb may have been in 815 Squadron, he flew a replacement aircraft from 819 Squadron. According to Lloyd, there is a good deal of confusion as to the exact aircraft flown, as latter corrections and notations were made to the official records. It is quite possible that Lamb may have flown L4B, in which case a black underside would be on the aircraft.
Only the aircraft in 815 Squadron (L4) had the underside painted black, all others had the standard S1E scheme with counter shading on the lower wings. The Sky Grey would have been carried about 3/4 up the fuselage. Note that the full codes were not carried at the time. L5B aircraft had "5B" on the fin in black with full height narrow flash on the fin. If the aircraft was L4B, then the 4B was carried on the fin in white, as it appears that the black was applied to the fin and rudder, which would have been Sky Gray, as in the case of 819 Squadron. The black was applied prior to Taranto when 815 Squadron was flying night duties.
The bomb load on Lamb's aircraft was 4x250lb and 16 parachute flairs.”
My thanks to Steve for providing this info.
If you would like your product reviewed fairly and fairly quickly, please contact the editor or see other details in the Note to Contributors.