I built the kit as a diversion from another kit that was getting the better of me. Also, it's fairly well known, so I'll just direct you here if you want a little history on the type: http://www.nasm.si.edu/research/aero/aircraft/hawker_mkiic.htm
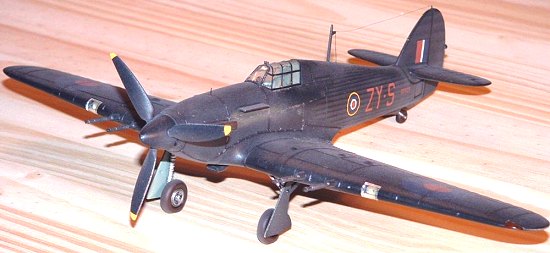
The aircraft markings I chose from the decal sheet depict the aircraft flown by . . . wait a tic! I just realized that the description from the decal instructions must be from the other sheet (Pt 1), as the aircraft serial and codes referenced are not for these decals!
|
THE KIT |
I originally picked up this kit on eBay when I was
in the throes of a budding interest in Russian aviation from WWII. It
was the 1/48 Hobbycraft “Russian Front” Hurricane, and for $6, how could
you go wrong? Well, the kit arrived, and upon opening the box, it was
apparent that the kit had been passed down more than once. At some point,
at least one of its prior owners contemplated a build as the main parts
were off their sprues. And the canopy was cracked right down the top.
It was classic older Hobbycraft – good general shape, vague detail, but
with very good fit of the parts. The cockpit was there but
 very generic.
The landing gears were pretty amusing in that the support struts were
actually too short to reach anywhere in the landing gear bay. Anyway, it
was nothing spectacular, but it was also only $6.
very generic.
The landing gears were pretty amusing in that the support struts were
actually too short to reach anywhere in the landing gear bay. Anyway, it
was nothing spectacular, but it was also only $6.
So, the next thing to do was to research the scheme. I know – usually this is done beforehand. But this was an impulse, garage-sale buy on eBay, and I wasn’t all that concerned about it. Looking at some references made one thing abundantly clear – this was NOT a kit for the Russian Hurricane shown on the box. The aircraft featured on the box as a Russian bird was a MkIIB. What you get in the box is a MkIIC – sort of. At least the box artist knew which version the Russians flew! You could say the kit is definitely more of a MkIIC than, say, a B-model, but some of the lines for the C are also wrong. (Yes, I know there is a review on MM that tells you that.) It looks like this was a case of Hobbycraft trying to make one model fill the role of different variants all at the same time, with the result being that none of them would be entirely correct. Fairly standard early Hobbycraft. The dead giveaway that it’s a IIC are the four 20mm cannon, the lack of any molding for in-wing machine guns, and the engraved ammo access panels in the top of the wing that are for the 20mm cannon vice the machine guns. And, oh by the way, these access panels are a good example of how some panels lines are not entirely right.
The Hobbycraft decals also left a lot to be desired. They were not very crisply printed (putting it mildly), flat finished, and very thin. At this point I was thinking about binning the kit and just writing off the $6. Then one day before work, as I was sitting at the table eating cereal, I pulled the kit out and played with fitting the main pieces together that were already off the sprues. The fit was really good. So, I printed off some line drawings from “The Hawker Hurricane Site” (www3.ns.sympatico.ca/hurricane ) and looked the thing over. Overall, it looked ok. The kit was simply missing more panel lines than it had lines that were wrong, so at that point I decided I would build it as a quickie. I felt that I could make a sufficiently recognizable Hurricane by just adding the missing lines and leaving the not-so-right ones alone. Since the kit was a MkIIC, I decided not to go against fate and attempt to convert it back to a B. I would build it as a MkIIC, which meant that I needed some new decals and would have to scribe some panel lines, which would be easy enough.
 So, I ran down to
the local shop, where I immediately found the Eagle Strike Night
Hurricanes Pt II decals for the Hurricane MkIIC. How much better could
it get? An all-black scheme for my quickie! Super. So, the sheet was
for $8 with four complete schemes. That’s $2 worth of decals (the rest
belonging to other kits), bringing my total for the project up to $8.
Next I went over to the detail case to see if there was anything I could
pick up cheaply that would add to the build. Being as you can’t really
see half of the stuff in the cockpit from the full PE set and I was
trying to keep the cost at a minimum, I opted for just the pre-painted
belts. I know some people would consider this cheating, but my eyes
would pop if I tried to paint the stitching in the webbing,
so I let the machines at Eduard handle this. If you have never noticed
that the stitching is painted on these things, get a magnifying glass and
have a look. It’s amazing. Any other cockpit detail I would add
myself. So, 4 sets of belts at $8, for another $2 to the project for a
total of $10. Next was a set of True Details resin wheels at less than
$2, but we’ll call it a total of $12 to account for use of the black
paint that I’ve had on hand since 1996. Don’t ask me why this paint is
still good because I have no idea.
So, I ran down to
the local shop, where I immediately found the Eagle Strike Night
Hurricanes Pt II decals for the Hurricane MkIIC. How much better could
it get? An all-black scheme for my quickie! Super. So, the sheet was
for $8 with four complete schemes. That’s $2 worth of decals (the rest
belonging to other kits), bringing my total for the project up to $8.
Next I went over to the detail case to see if there was anything I could
pick up cheaply that would add to the build. Being as you can’t really
see half of the stuff in the cockpit from the full PE set and I was
trying to keep the cost at a minimum, I opted for just the pre-painted
belts. I know some people would consider this cheating, but my eyes
would pop if I tried to paint the stitching in the webbing,
so I let the machines at Eduard handle this. If you have never noticed
that the stitching is painted on these things, get a magnifying glass and
have a look. It’s amazing. Any other cockpit detail I would add
myself. So, 4 sets of belts at $8, for another $2 to the project for a
total of $10. Next was a set of True Details resin wheels at less than
$2, but we’ll call it a total of $12 to account for use of the black
paint that I’ve had on hand since 1996. Don’t ask me why this paint is
still good because I have no idea.
|
CONSTRUCTION |
“Construction began quite naturally in the cockpit.” I sprayed all the inner parts and cockpit main pieces with British interior green. Then I put the tub together. I drilled a small hole in the pilot’s headrest and installed the shoulder harness. This was a nice addition, and I was happy with the detail on the tub. I moved on to the cockpit sidewalls (molded in the fuselage sides) and scratch built various knobs and levers based on careful review of cockpit photos I found on the web. For throttle levers and the like, I used small snippets of 6 lb. test fishing line with a little dab of white glue on the end as the knob. After some detail painting, a dark wash and some dry brushing with 3-4 shades of silver, I took a bottle of Acryl clear gloss and applied small drops to all the gauges on the dash to give a glass-like look to them. You could also use Future in the same way. This small step is very easy and dramatically improves the realism and appearance of the instruments. Now the fuselage halves were ready to go together. Fit was very good and a light sanding was enough to eliminate any seams on the fuselage. There was one very slight sinkhole on the lower front of the fuselage that I did fill and sand.
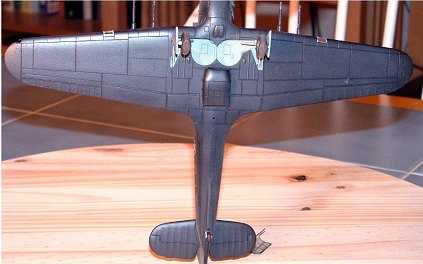
The wings were a very uncomplicated affair. I needed only to give the same treatment to the separate wheel well (previously painted British interior green) that I gave to the cockpit and install it. I checked into the matter of what color the wheel wells should be, and got answers for both grey-green and unpainted metal. The instructions in my RoG (ex-Hasegawa kit) called for the grey-green, and since I had painted it that way already, that’s what I went with. I found Hobbycraft’s use of a separate wheel well to be something of an unusual innovation for a kit of this type. As I had already planned to display this model glued to a base in a case, I elected not to fill the cluster of ejector pin marks in the gear bay. I’m emotionally sound enough to be able to live with myself for this. But why can’t these people ever seem to understand that they should make it so these marks are on the BACK side of the pieces?!? I guess for the same reason they just ball-parked the panel lines and put a MkIIC in a MkIIB box – they really didn’t care all that much. And that’s why you can get them for $6, so I’ll shut up now and get on with the build.
 I painted the gear struts with metalizer and
polished them slightly. I applied a dark wash for some relief. I
painted the wheel hubs of the True Details resin wheels burnt metal, and
then dry-brushed successively lighter shades of silver until I was using
neat silver. I masked the hubs off and painted the wheels with Testors
“rubber”. Then I glued the wheels onto a toothpick so that I could spin
the wheels ‘round on their normal rotational axis. Then I shot
thinned-out light gray onto the outer edge of the wheel carefully as I
spun it around. This gave a nice, feathered appearance of contact with
the ground while leaving the sidewalls alone. I set these parts aside
for later.
I painted the gear struts with metalizer and
polished them slightly. I applied a dark wash for some relief. I
painted the wheel hubs of the True Details resin wheels burnt metal, and
then dry-brushed successively lighter shades of silver until I was using
neat silver. I masked the hubs off and painted the wheels with Testors
“rubber”. Then I glued the wheels onto a toothpick so that I could spin
the wheels ‘round on their normal rotational axis. Then I shot
thinned-out light gray onto the outer edge of the wheel carefully as I
spun it around. This gave a nice, feathered appearance of contact with
the ground while leaving the sidewalls alone. I set these parts aside
for later.
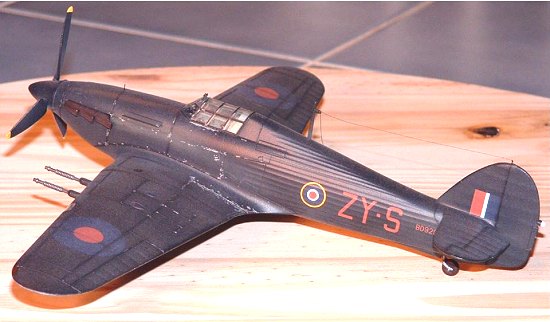
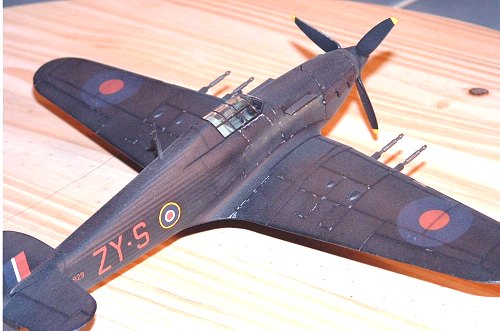
I also elected to mount the 20mm cannon at this point, since clean plastic glued to clean plastic will result in a stronger union versus trying to scrape paint off later. I assumed the risk of breaking them with so much handling left to do, and they stayed on even when I accidentally bumped them a few times. I love it when a plan comes together. Oh, and another bonus to gluing the cannon on with the wing off is that you can align the four barrels better, as there are no holes in the wing to receive them. Anyway, with the wings together, I filled the painted wheel wells with tissue paper to prepare for painting of the wings.
At this point, with the wings and fuselage assembled
but not yet together, it was time to do some scribing. It’s been a while
since I did this build, and Russian vodka really helps a man forget a lot
of things, but I’ll see what I can come up with here. I
 busted out the
plans mentioned above and began planning what lines would go where. I
remember scribing a line across the top of the fuselage behind the
cockpit. There was a panel line on the top of the wings that needed
adding (crossing where the roundels go, I think), and pretty much all the
square-like panels across the leading edges needed adding. More than
anywhere else, the bottom of the wings needed the most attention. The
area at the bottom-back edge of the wing where it joins the fuselage was
almost bare, so I scribed this detail in. I added a line or two to the
wing underside, and then scribed the wingtip detail to include some
access hatches with the help of a template. For this, as in most
cases, I used a combination of Verlinden templates and Tech-Star
templates. I find these two sets compliment each other very well.
Basically, I took the line drawings and added any lines or details that
were AWOL. The stuff that was there but a little out of place, I left
alone.
busted out the
plans mentioned above and began planning what lines would go where. I
remember scribing a line across the top of the fuselage behind the
cockpit. There was a panel line on the top of the wings that needed
adding (crossing where the roundels go, I think), and pretty much all the
square-like panels across the leading edges needed adding. More than
anywhere else, the bottom of the wings needed the most attention. The
area at the bottom-back edge of the wing where it joins the fuselage was
almost bare, so I scribed this detail in. I added a line or two to the
wing underside, and then scribed the wingtip detail to include some
access hatches with the help of a template. For this, as in most
cases, I used a combination of Verlinden templates and Tech-Star
templates. I find these two sets compliment each other very well.
Basically, I took the line drawings and added any lines or details that
were AWOL. The stuff that was there but a little out of place, I left
alone.
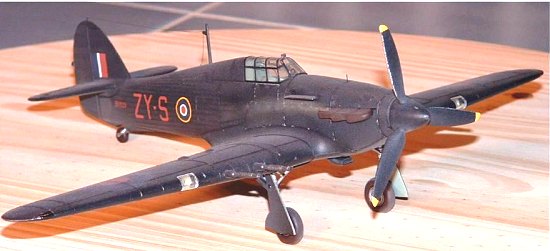
At this point, I started looking to add the exhaust
shields typical of the Hurricane night fighter. Naturally, I consulted
some references and some acquaintances that might be able to help. At
first, I was given an exact scale specification for this
 shield in 1/72,
which I would then only have to convert to 1/48 and glue on. When I
started looking at pics to determine where exactly to glue these pieces,
I noticed that these shields were all different lengths, widths, and they
were even mounted in slightly different positions on the cowl from one
bird to the next. This made sense to me in hindsight, as I understand
these shields were a field modification in many cases. So, then I lucked
out and Bill Ficner was kind enough to send me a picture from the
Squadron "In-Action" series of the exact aircraft I was modeling.
Money! I did some quick measuring and cut two strips from some plastic
stock and glued them on where they were in the pic of the real aircraft.
Also missing from the kit was the little stick on the cowl in front of
the canopy that is presumably some kind of crude manual aiming
reference. I thought about it a while and decided that another snippet
of 6lb test fishing line would give the best scale representation of this
very thin piece. I super glued the snippet on, which was a real fun time
and that was that. I did the same thing for the radio aerial attachment
on the vertical stab.
shield in 1/72,
which I would then only have to convert to 1/48 and glue on. When I
started looking at pics to determine where exactly to glue these pieces,
I noticed that these shields were all different lengths, widths, and they
were even mounted in slightly different positions on the cowl from one
bird to the next. This made sense to me in hindsight, as I understand
these shields were a field modification in many cases. So, then I lucked
out and Bill Ficner was kind enough to send me a picture from the
Squadron "In-Action" series of the exact aircraft I was modeling.
Money! I did some quick measuring and cut two strips from some plastic
stock and glued them on where they were in the pic of the real aircraft.
Also missing from the kit was the little stick on the cowl in front of
the canopy that is presumably some kind of crude manual aiming
reference. I thought about it a while and decided that another snippet
of 6lb test fishing line would give the best scale representation of this
very thin piece. I super glued the snippet on, which was a real fun time
and that was that. I did the same thing for the radio aerial attachment
on the vertical stab.
Gluing the wing to the fuselage went very smoothly, requiring only a very little bit of filling and sanding. The horizontal stabs had a peculiar fit that gave a somewhat forward rake to them. I decided that this couldn’t be seen from any angle but straight overhead, and that filling, sanding and re-scribing would leave me having to attempt a restoration of the fabric surfaces, so I left it alone. At this point, I took the inaccurate rearview mirror from the kit and cut away the base, which was ok. I made my own slightly more accurate mirror out of scrap plastic, glued it to the old base and then attached my modified mirror to the canopy. The crack in the canopy was also not visible from anywhere but dead overhead, and so really presented no problems as far as I was concerned. After careful masking with Tamiya tape, I glued the canopy to the fuselage.
|
COLORS AND MARKINGS |
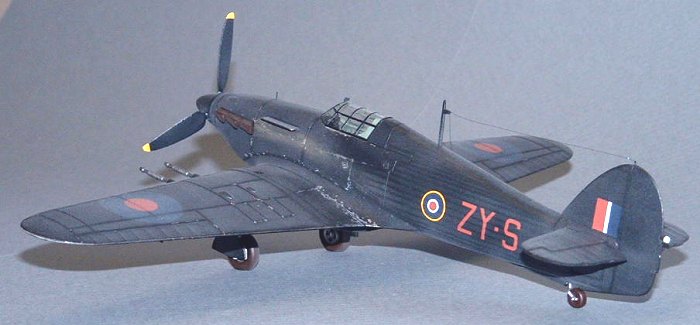
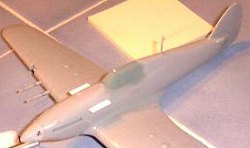
Well, here we are at the initial stages of painting. In order to get an effective-looking canopy frame, the first paint was a shot of British Interior grey-green right on the masked canopy. Next was the overall black paint. I lightened it a little with a few drops of white for that “scale effect”. I used gloss paint, since you need gloss to put the decals on anyway. And on that note, I still do not understand why anyone even makes flat colored paints anymore. It just adds a step to the process that can be avoided, IMHO. So, the base coat went on beautifully.
 Being as this was a one-color paint scheme, that
was pretty much it. Time for decals - my favorite part! It’s when you
put on the decals that the plane starts to take on its true character.
The Eagle Strike decals were great. Good choice of subjects, good
printing, nice and thin . . . a breeze! The decals went on perfectly and
responded well to the usual double-tap of Micro-Set/Micro-Sol. Using an
assembly-line process of application in stages, I had all the decals on
in roughly 45 minutes. It goes something like this. Drop the decal in
water. Brush some Micro-Set on the airframe. Pick decal from water,
drop it back in. Dig for tweezers in model box and fish out decal.
Place decal on puddle of Micro-Set, dry excess solution. Dip brush in
Micro-Set, re-wet decal surface, then apply the rest where the next decal
goes. Continue this process, only by the third decal, you should break
out a second brush and begin applying Micro-Sol to the first decal.
Continue on down the line at whatever pace is good for you. I’m sure
there are variations on this out there, but the bottom line is that
there’s no reason you need to spend days or even hours putting decals on
the average model. Stencil-laden monsters like the F-4 are obvious
exceptions.
Being as this was a one-color paint scheme, that
was pretty much it. Time for decals - my favorite part! It’s when you
put on the decals that the plane starts to take on its true character.
The Eagle Strike decals were great. Good choice of subjects, good
printing, nice and thin . . . a breeze! The decals went on perfectly and
responded well to the usual double-tap of Micro-Set/Micro-Sol. Using an
assembly-line process of application in stages, I had all the decals on
in roughly 45 minutes. It goes something like this. Drop the decal in
water. Brush some Micro-Set on the airframe. Pick decal from water,
drop it back in. Dig for tweezers in model box and fish out decal.
Place decal on puddle of Micro-Set, dry excess solution. Dip brush in
Micro-Set, re-wet decal surface, then apply the rest where the next decal
goes. Continue this process, only by the third decal, you should break
out a second brush and begin applying Micro-Sol to the first decal.
Continue on down the line at whatever pace is good for you. I’m sure
there are variations on this out there, but the bottom line is that
there’s no reason you need to spend days or even hours putting decals on
the average model. Stencil-laden monsters like the F-4 are obvious
exceptions.
Now came time to seal the decals. I had a can of that Testors “gloss cote” stuff handy, so I hit it with that. BIG MISTAKE. I cleaned the nozzle the way I usually do and then sprayed. Or rather tried to. The stuff came sputtering out in large, sticky blobs, putting a nice Dura-Stone “faux pebble” finish on what was otherwise a perfect paint job. I threw the can in trash immediately and resolved to use the airbrush from now on. I waited for the Dura-Stone to dry completely, and depression over ruining the finish helped immensely with the wait. Once dry, I took fine sandpaper to the Dura-Stone to knock it down a little. After that, I hit the model a few times with a proper layer of gloss from the airbrush, and I was pretty much back where I was before the Dura-Stone treatment.
At this point, I took on the task of putting in
some landing lights. Hobbycraft did a fairly good job of setting the
modeler up for success by molding in a notch in the wing where the lights
should go and including clear lens covers. That’s about where that
hook-up ends. The “landing lights”, as molded by Hobbycraft, are
perfectly round spheroids that look more like badly
 installed DuPont
breast implants than a light. So, out come the Dremel bits and needle
files. I didn’t actually use the Dremel, but just twisted the bits with
my fingers for a little extra control and minimization of the “oops”
factor. What I did was grind away these bumps and then grind a shallow,
conical socket into the wing. I continued the grinding until I had worn
away a pinhole in the back of the plastic at the base of the depression I
made. This would serve as the light “element”. Now I painted the
depression with Testors Metalizer polished aluminium (a nod to my Brit
homies) to give it a nice reflector-like appearance. When this was dry,
I filled the depression with drops of Testors clear parts maker. This
stuff is like white glue, only with balls. I use it for tons of things
now, and I love it as a general, temporary adhesive. I learned from this
experiment that when applied in quantity, the stuff tends to yellow. It
took weeks for it to dry clear, and probably did so because I stopped
applying it before I was really ready to. I was going for a convex
shape, but had to settle for a concave one and hoped that the light
reflection would fool the eye. To some degree, this succeeded. The
little holes in the base of the sockets did a fair job of looking like
elements in the “lights”.
installed DuPont
breast implants than a light. So, out come the Dremel bits and needle
files. I didn’t actually use the Dremel, but just twisted the bits with
my fingers for a little extra control and minimization of the “oops”
factor. What I did was grind away these bumps and then grind a shallow,
conical socket into the wing. I continued the grinding until I had worn
away a pinhole in the back of the plastic at the base of the depression I
made. This would serve as the light “element”. Now I painted the
depression with Testors Metalizer polished aluminium (a nod to my Brit
homies) to give it a nice reflector-like appearance. When this was dry,
I filled the depression with drops of Testors clear parts maker. This
stuff is like white glue, only with balls. I use it for tons of things
now, and I love it as a general, temporary adhesive. I learned from this
experiment that when applied in quantity, the stuff tends to yellow. It
took weeks for it to dry clear, and probably did so because I stopped
applying it before I was really ready to. I was going for a convex
shape, but had to settle for a concave one and hoped that the light
reflection would fool the eye. To some degree, this succeeded. The
little holes in the base of the sockets did a fair job of looking like
elements in the “lights”.
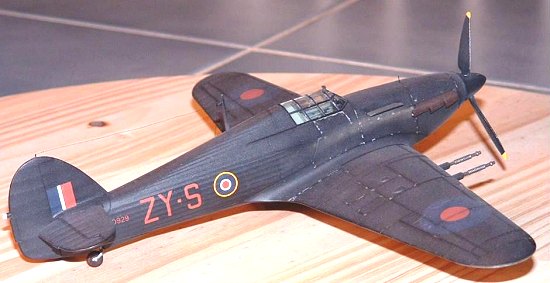
It was at this point that I noticed an oversight on my part. I had intended early on to grind away the little molded-in wingtip marker lights, which as standard on cheaper kits were nothing more than a small panel line added to the wingtip. Well, after deciding to do that, I promptly forgot all about it. Now the plane was fully painted and decals were all applied, so I was resistant to the idea of grinding away on the wing with a Dremel. What I ended up doing was applying clear red and clear green to the black already on the wing. Then I painted over that with some Acryl clear gloss (love this stuff), which mixed with the clear colors applied earlier and brought them out ever-so subtly. This wasn’t my ideal solution, but as a Plan B, it worked pretty well.
Now all I had to do was apply some “weathering”. I
used a technique that I used on an earlier build to give an uneven, faded
appearance to the black paint. I settled on this technique because it
was quick and basically one step, as opposed to some of the torture I
read about some other modelers putting themselves through. Now, I don’t
discount some of the other methods, and I’ll probably give them a go on
other builds. Anyway, I used Floquil “dust”, thinned about 50% and
sprayed all over the aircraft. The beauty here is that all you need to
do is see that you’ve hit the whole plane with it and then stop. If you
 go at it with any speed and in a somewhat random manner, then what you’ll
end up with is an uneven, faded finish, which is good. So, now you have
unevenly faded, slightly dirty black paint in one easy step. From here,
I just ran a little thinned Sepia oil wash in the panel lines and applied
a little ground-up neat black pastel around the edge of moving surfaces
with a small brush. I sealed the pastels in with a fine spray of clear,
and it was time for the finishing touches.
go at it with any speed and in a somewhat random manner, then what you’ll
end up with is an uneven, faded finish, which is good. So, now you have
unevenly faded, slightly dirty black paint in one easy step. From here,
I just ran a little thinned Sepia oil wash in the panel lines and applied
a little ground-up neat black pastel around the edge of moving surfaces
with a small brush. I sealed the pastels in with a fine spray of clear,
and it was time for the finishing touches.
Next, I used a silver artist’s pencil to chip paint to indicate wear and tear. I probably put the lion’s share of the wing wear on the wrong side, but this build was more to practice some skills on than to produce a museum-quality, 100% accurate model. If I were going for that, I wouldn’t be doing it with a $6 Hobbycraft kit. Anyway, satisfied with the paint chipping, I borrowed some of the spouse’s hair to make some radio aerial wire with. This seemed like a good idea, as hair is very uniformly thin and strong as well. However, it changes tension according to relative humidity, so one day it’s taught and another slack as can be. In other words, my Hurricane has bad hair days.
Last, I hollowed out the barrels of the cannon with the tip of a hobby knife. They were painted black before, so I dabbed a little gunmetal Metalizer on a Q-tip, then rubbed the barrels down with it pretty good. This is basically dry brushing without risking the brush. The Q-tip worked fine for the rubbed-on Metalizer.
|
CONCLUSIONS |
So that’s it. My goal was to produce a good looking model with reasonable accuracy from a $6 garage-sale kit, fine tune some skills, and try out a few new ideas. Oh, and have FUN. For a total of $12 invested, I think it turned out pretty good. Not a contest winner, but it sure got a lot of attention sitting on my desk at work!
March 2004
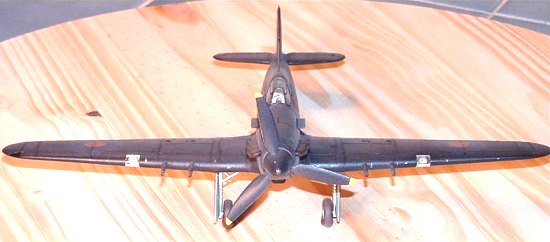
Editor's Note: I've deliberately lightened all of John's photos so that you can see the details.