Italeri 1/72 Sunderland I
| KIT #: | 1302 |
| PRICE: | £39-99 |
| DECALS: | Six options |
| REVIEWER: | Frank Reynolds |
| NOTES: | Eduard Masks CX 343 |
| HISTORY |
The
Short Sunderland represents the zenith of development of the British military
flying boat. It embodied the constructional and aerodynamic features of its
predecessor, the commercial C class boat from the same factory and was the first
RAF flying boat to have power operated turrets in the nose and tail. It was a
typical British design for a typically British purpose, intended to range far
over the oceans in support of a Navy that served a World-wide
Empire and be sufficiently self-contained that it could
represent British interests if the navy was not present. Such was the thinking
that still prevailed when the Sunderland commenced trials in 1938.
 Having been
developed from a civil airliner design there was ample room in the bulbous hull
for the all the equipment associated with its military role, to the extent of
having unusual weapons racks that could be winched out under the inner wings for
the delivery of bombs or depth charges. Defensive armament initially consisted
of a single .303 machine gun in the bow turret, single hand-held .303s in each
of the beam gun positions and four .303s in the tail turret.
Having been
developed from a civil airliner design there was ample room in the bulbous hull
for the all the equipment associated with its military role, to the extent of
having unusual weapons racks that could be winched out under the inner wings for
the delivery of bombs or depth charges. Defensive armament initially consisted
of a single .303 machine gun in the bow turret, single hand-held .303s in each
of the beam gun positions and four .303s in the tail turret.
The
first production model the Mk.1 was powered by four Bristol Pegasus XXII
supercharged engines of 1,010 HP each. The typical cruising speed was 170mph
with a combat range of
1,750 miles. It was introduced into service with No 230
squadron in 1938 at Singapore, and 210 squadron at Pembroke Dock, Wales, swiftly
followed by Nos 204 and 228 Squadrons. The Sunderland was being rapidly
introduced into service at the outbreak of World War 2, with No 95, 101 and 270
squadrons. The aircraft first came to public prominence in September 1939 when
two aircraft from No 228 and 204 Squadrons rescued the entire crew of a
torpedoed merchant ship, the Kensington Court. On January 30 1940, the
Sunderland obtained its first U boat kill when an enemy vessel was scuttled
after attack by one of No 228 Squadron’s aircraft.
Seventy five Sunderland Is were built, before giving way on the production line
to the Mk.II, which flew in August 1941.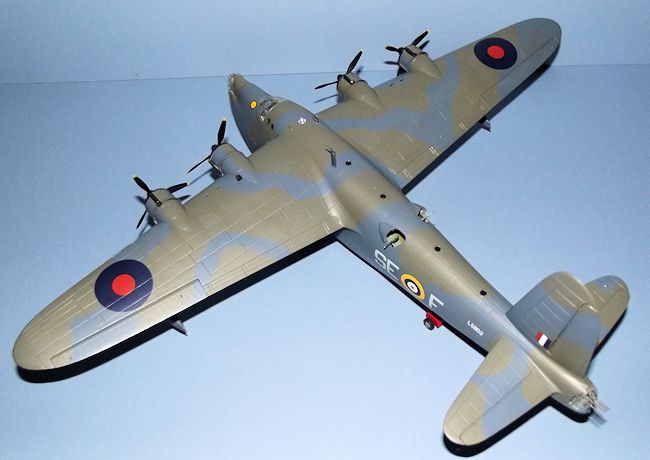
The
Sunderland was an outstanding machine of its time, rugged, reliable and
spacious. It could be operated independently for long periods of time and it had
a good record in suppressing and killing enemy submarines. It was not the
fastest or the best flying boat of World War 2, but it ranks among them.
A
Sunderland is preserved as a walk through exhibit in the Royal Air Force Museum
at Hendon, London. Although it is late war Mk V, it general layout is typical of
the breed and it demonstrates the fundamental differences between a flying boat
and land based maritime aircraft of the same period. The RAF Museum has neatly
arranged a tour that begins with access through the door in the side of the
forward hull portside and exits through the starboard side towards the tail.
Essence of shipping appears everywhere; there is an anchor, windlass, mooring
bollards and boat hooks. Much of the flooring consists of pierced metal grilles.
The crew has a galley and rest bunks. The midships bomb room is remarkable for
the fact that the bombs are suspended over the crew rest area. There is a small
workshop area with a bench and vice. The whole nose turret and fairing is
retracted to demonstrate how the crew can moor up to a buoy. It is a brilliant,
dramatic and evocative exhibit and the inspiration for this build.
| THE KIT |
Italeri’s offering is supplied in a glossy top opening box with a traditional
illustration of a Sunderland over a foaming sea and an exploding enemy
submarine. There are five parts frames in grey plastic, reasonably crisply
moulded and one of clear offering all of the transparencies and a plethora of
porthole windows. There is a rather thick fret of etched parts for small
details, the instrument panel and to detail the beaching gear. A sheet of good
quality Cartograf decals offers six options, all RAF aircraft, as follows.
No
210 Squadron, Oban Scotland, 1941. Camouflaged in Extra Dark Sea Grey and Dark
Slate Grey over Aluminium under surfaces.
No
210 Squadron Oban, 1940, camouflaged Dark Green and Dark Earth over Aluminium.
No 95
Squadron, Freetown, Sierra Leone, 1941 Grey and Green over Aluminium
No
204 Squadron, Bathhurst, Gambia 1941/42 Grey and Green over Sea Grey Medium.
No
230 Squadron, Eastern Mediterranean, 1940. Green and Earth over Night Black.
No
230 Squadron, Eastern Mediterranean, 1941, Grey and Green over Sky type S.
 This is an
intelligent selection of colour schemes offering a choice of upper surfaces in
the early war emergency camouflage of Brown and Green upper surfaces or the
later type of sea camouflage in Grey and Green. Italeri have also covered four
different under surface colours in Aluminium, Medium Grey, Black and Sky. Four
of the aircraft feature the upper surface camouflage wrapped around under the
rear fuselage boom. Six colour side profiles are set out on the box tray. This
range of options was to cause me some self-inflicted problems as the result of
brain freeze, as noted below.
This is an
intelligent selection of colour schemes offering a choice of upper surfaces in
the early war emergency camouflage of Brown and Green upper surfaces or the
later type of sea camouflage in Grey and Green. Italeri have also covered four
different under surface colours in Aluminium, Medium Grey, Black and Sky. Four
of the aircraft feature the upper surface camouflage wrapped around under the
rear fuselage boom. Six colour side profiles are set out on the box tray. This
range of options was to cause me some self-inflicted problems as the result of
brain freeze, as noted below.
The
kit is one of Italeri’s deluxe packages that includes the etch, as noted, the
good choice of colour finishes and a 24 page detailed reference manual with a
selection of photographs and sketches. This useful manual has photos which
contradict Italeri’s interpretation of this big boat’s surface detail since the
real thing is remarkably smooth in appearance
Assembly instructions consist of a 20 page A4 booklet in greyscale, setting out
24 stages of construction and finishing, with CGI rendered exploded views.
Colour call outs give FS numbers, Model Master paints or Italeri’s own.
Surface detailing on the main parts, the wings, fuselage and tail, is heavy,
obvious and quite dramatic, with quite deeply engraved panel lines. There are
few kits in my experience that exhibit this extreme of detailing, it is almost
in low relief. Each hull panel is edged with tiny engraved rivets and the upper
surface of the wing appears quilted from certain angles. There has been some
dramatic discussion on the web about whether this is acceptable or renders the
kit “unbuildable” and it is certainly more than I would choose, but for the
purposes of this review I have left it “as is”.
| CONSTRUCTION |
This
is one kit that benefits from a careful read-through of the assembly
instructions and a degree of pre-planning. The interior provides three separate
cabin areas, with appropriate bulkheads, arranged around those parts of the
interior that might be seen through the various openings in the hull. So
construction begins with the interior, the majority of which I airbrushed in
Xtracrylix XA1010 (British) Aircraft Grey-Green. The main flight deck consists
of a stepped floor with a bulkhead to the navigator/engineer’s position. The
main instrument panel can be optionally built with an etch instrument panel or
the kit decal that I used. Etch seat belts are provided for the two pilot’s
seats, together with rudder pedals. Two control wheels are fixed to convincing
pedestals and the seats have a rear framework of folded pierced etch. The rear
bulkhead has a moulded in folded curtain across the
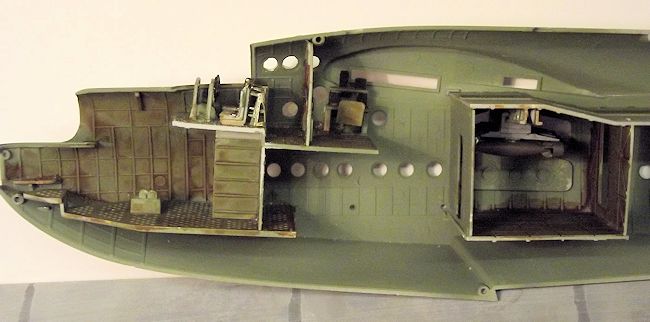 doorway to
the rear cabin that contain the radio operator’s position and two further
decal-type instrument panels. This is all built as a sub-assembly that sits on
top of the lower forward compartment, which consists of a pierced floor with a
rear bulkhead and centre staircase that leads to the flight deck. Assembly of
these units certainly emphasise the “upstairs-downstairs” nature of the bulky
Sunderland. An anchor and hawser is provided for those who wish to decorate this
area together with a boat hook.
doorway to
the rear cabin that contain the radio operator’s position and two further
decal-type instrument panels. This is all built as a sub-assembly that sits on
top of the lower forward compartment, which consists of a pierced floor with a
rear bulkhead and centre staircase that leads to the flight deck. Assembly of
these units certainly emphasise the “upstairs-downstairs” nature of the bulky
Sunderland. An anchor and hawser is provided for those who wish to decorate this
area together with a boat hook.
The
instructions next invite you to glue some 35 pieces of glazing to the portholes.
I had already planned to make this glazing from Micro Kristal Klear after the
painting stage, so the injected items were discarded. Two large panels are
provided to cover the openings to the bomb room, located under the centre
section. I fixed these as retracted inside the hull for deployment of the
weapons.
The
nose compartment sub assembly was glued into the right fuselage half and
attention turned to the next major interior structure.
There
is a cranked floor to the upper fuselage section, below which is a floor, with
front and rear bulkheads to form the bomb room/ crew accommodation. Two rails
are moulded in to accommodate the bomb racks when the armament is stowed
internally. This unit was glued into the right fuselage half. This was a
convenient time to assemble the bomb racks so that one set could be fixed
internally leaving the other to be added externally towards the end of the
build. The underwing bomb racks are a mixture of plastic and etch parts which
are assembled with plastic glue and cyano. Eight bombs are provided as the sole
offensive armament and were painted Olive Drab. The interior was given a
weathering wash of water based Dark Brown paint from the Games Workshop range.
The crew doors to the fuselage nose and amidships were glued shut.
 Attention
now turns to the components that must be trapped between the fuselage halves
when they are closed up, being the nose and tail turrets and the fight deck
glazing. The turrets are small with complex curves and multiple glazing panels.
The Eduard pre-cut paint masks are indispensable for this stage. Each turret
consists of a base with side trunnions to support the guns and a support hoop
over the gunner’s seat back. All of the interior parts were painted in
Grey-Green and the guns picked out in Tamiya XF-56 Metallic Grey. Eduard provide
some 42 tiny masks for the turrets and some 20 for the flight deck, and this
provided a happy evening’s eye strain in their application but the result was
well worth it. Both turrets were airbrushed in Xtracrylix XA 1025 RAF Dark Slate
Grey and when dry the nose turret was fixed into the similarly pre-painted
retractable nose fairing. The flight deck glazing is provided with a
roof-mounted internal throttle box which is painted Black with relief detail
picked out in dry brushed Silver.
Attention
now turns to the components that must be trapped between the fuselage halves
when they are closed up, being the nose and tail turrets and the fight deck
glazing. The turrets are small with complex curves and multiple glazing panels.
The Eduard pre-cut paint masks are indispensable for this stage. Each turret
consists of a base with side trunnions to support the guns and a support hoop
over the gunner’s seat back. All of the interior parts were painted in
Grey-Green and the guns picked out in Tamiya XF-56 Metallic Grey. Eduard provide
some 42 tiny masks for the turrets and some 20 for the flight deck, and this
provided a happy evening’s eye strain in their application but the result was
well worth it. Both turrets were airbrushed in Xtracrylix XA 1025 RAF Dark Slate
Grey and when dry the nose turret was fixed into the similarly pre-painted
retractable nose fairing. The flight deck glazing is provided with a
roof-mounted internal throttle box which is painted Black with relief detail
picked out in dry brushed Silver.
The
nose turret assembly and the rear turret were fixed into the right hand fuselage
half followed by the flight deck glazing. This glazing has an unusual flange
moulded to its joining edges, with the result that it cannot be added after the
fuselage is closed up. The two main fuselage halves were glued together after
some trimming and fettling to the edges of the internal floors and bulkheads in
order to get the parts to close up snugly. The tall tail fin is has one half
moulded onto the right fuselage half but the left side is a separate panel that
can be added while trapping the rudder in place. The manner of construction
means that the turrets’ gun barrels are vulnerable to breakage throughout the
rest of the build.
This
large assembly was set aside to settle for a couple of days while attention
turned to the wing and tail components, which are essentially simple. Each wing
consists of one each upper and lower halves with the engine nacelles moulded in.
Marked holes need to be drilled out for the float rigging. The large ailerons
consist of upper and lower sections that are trapped between the wing sections.
There are no separate flaps. The
port
wing is provided with a pair of clear glazed landing lights in the leading edge,
but, having gone to the trouble of providing this feature, Italeri has not
extended this detail to the wing tip navigation lights, which are simply scribed
on the solid plastic wing tips. Each wing has an inset rail
 for the
bomb carriers to slide into the launch position but I decided to add these later
at the finishing stage, together with the remaining bomb carrier sub assembly.
for the
bomb carriers to slide into the launch position but I decided to add these later
at the finishing stage, together with the remaining bomb carrier sub assembly.
The
tail section consists simply of upper and lower panels to the fixed sections and
elevator structures, these fit positively into stubs on the rear fuselage.
Italeri next suggests that the beaching gear is attached. I assembled it,
together with the tail trolley, but postponed its attachment to the airframe
until much later in the build. The main beaching gear consists of a massive
vertical leg, moulded in two halves to incorporate the flotation collar. Twin
single piece wheels are provided. The legs were painted in medium grey with the
flotation collars picked out in red brown, the wheels silver with tyres finished
in Tamiya’s XF-85 Rubber Black. The tail trolley was a little more complex being
a box and lid arrangement with a built in towing hook. To this, two “v” shape
cradles are attached with angled etch plates to support the hull sides. Two
single part wheels complete the assembly. The trolley was painted flat red with
the hull support pads picked out in red brown.
The
wing is glued to the fuselage stubs via positive fittings tongues to form a
relatively large and heavy basic airframe. Some filler was necessary along the
joint between the fuselage halves. I used Squadron Green Putty which sets
quickly and after it dried small areas of the engraved panels lined were
rescribed.
The
engines and nacelles were built up next. The single row radial engines have
reasonable cylinder detail but care must be taken when cutting them from the
parts frames, since alternate cylinders have a small pip moulded onto the end,
which are spacers to locate the engine cowlings. The collector rings to the cowl
fronts are moulded separately so they can be painted in metallic bronze and
added after the cowls are assembled and painted. The engines were painted
metallic grey and detailed with a wash of dirty thinners. Care must be taken in
fitting the cowls around the radial engines since the joining pins provide
minimal contact area and the cowls must be correct aligned for the exhausts; the
kit instructions make this clear.
The
wing floats were assembled ready for the painting stage. The floats are moulded
in two halves and the support struts are provided with a good strong
self-aligning socket and peg arrangement. As a precaution, I checked the struts
for fit into the underwing sockets while the glue was setting.
| COLORS & MARKINGS |
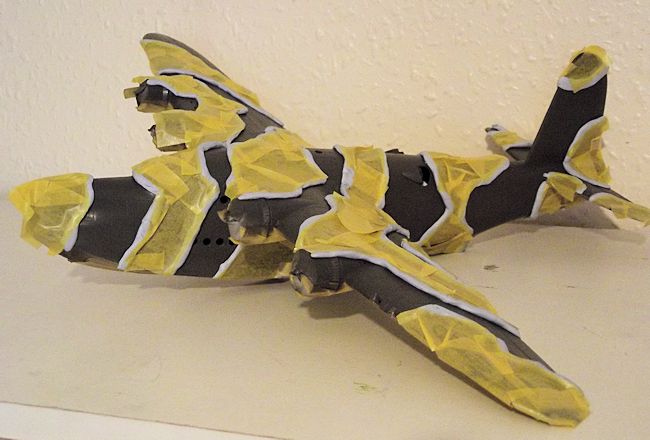
Next
I screwed up the paintwork by confusing my choice of a paint finish. I had
airbrushed the upper surface base camouflage, in Dark Slate Grey from the
Xtracrylix range with the upper surface colours carried under the rear fuselage
boom, combined with Medium Sea Grey under surfaces. I then discovered that there
was no such combination on the decal options offered, so I had to undertake a
partial repaint, starting by re-spraying the lower surfaces in Tamiya XF-16 Flat
Aluminium. The under surfaces were then covered with masking tape and the
original Slate Grey to the top surfaces touched in.
The top surface
was then carefully masked out, using Blu Tack “sausages” and an infill of
masking tape to define the demarcation between the upper surface colours before
adding the shadow shaded area of Extra Dark Sea Grey. With the size of the
fuselage and wing components this took a lot of the low tack putty and tape.
When
I came to strip off the masking the camo colours had not taken too well to the
silver overspray on the fuselage sides and small ragged areas of the Grey and
Green were pulled away when the tape was removed. I also found that the paint
along the lower hull chipped when scratched with a finger nail. Strangely, I had
accidentally created an interpretation of the paint damage to be found along the
waterline of a well-used flying boat, so I decided to leave it as it was. The
same had happened to the wing floats, so at least I had consistency. I consider
this the happy result of a special modelling system known as SRSU (the Self
Rectifying Screw Up). The paintwork was sealed with two brushed coats of Future/Klear
floor polish in preparation for the decals.
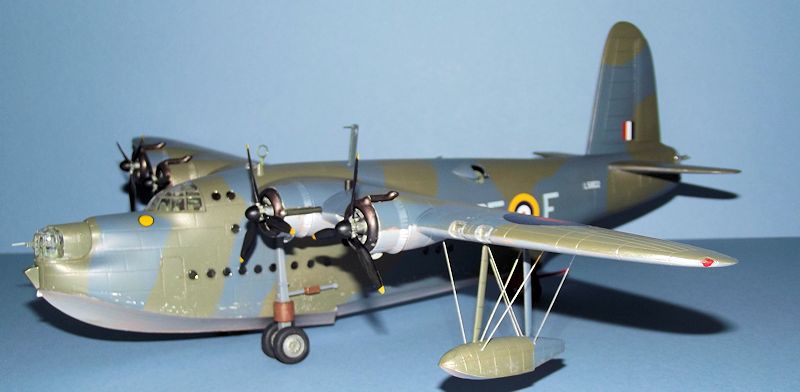
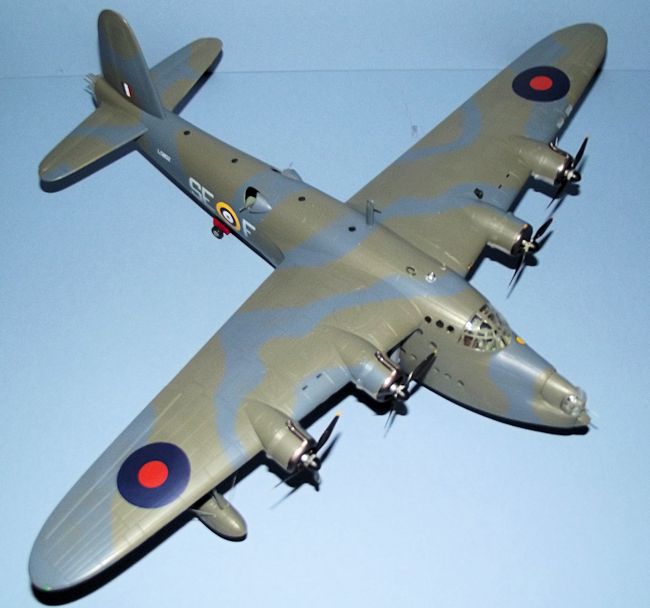
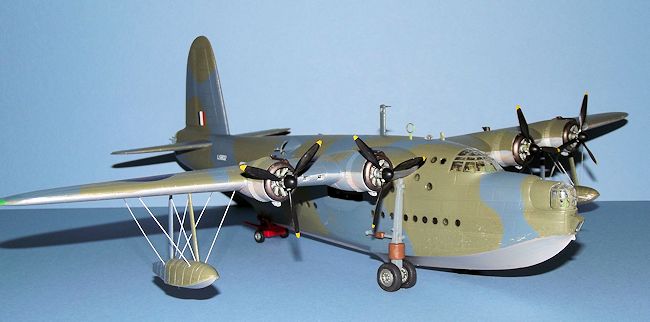
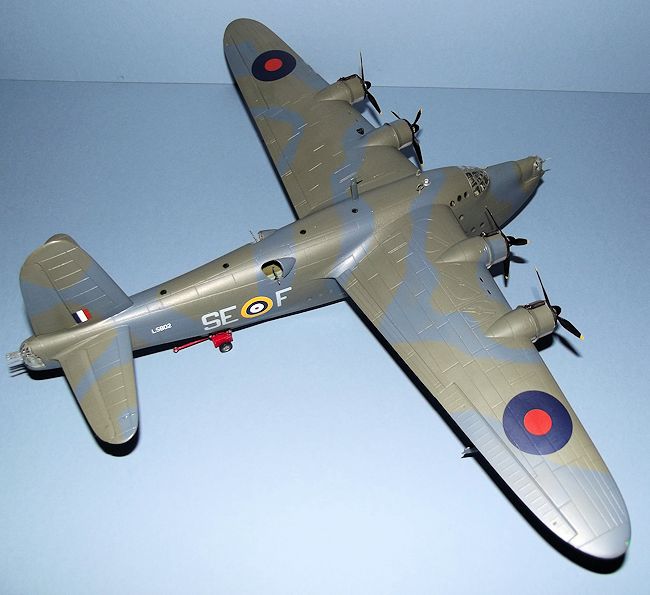
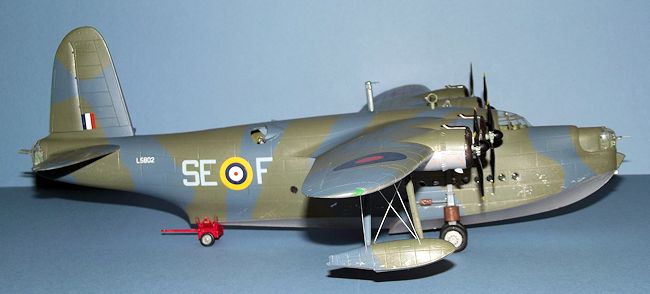
By
default I had ended up with the colour scheme for an aircraft of No.95 Sqn.,
Royal Air Force, Freetown, Sierra Leone, 1941. But it was none the worse for
that. The Cartograf
decals went on easily
 and
responded well to Micro Sol and Micro Set, necessary in view of the heavily
detailed exterior. The decals simply provided national markings, squadron codes
letters and the aircraft serial number. A small decal is provided for the gas
detection patch on the fuselage nose.
and
responded well to Micro Sol and Micro Set, necessary in view of the heavily
detailed exterior. The decals simply provided national markings, squadron codes
letters and the aircraft serial number. A small decal is provided for the gas
detection patch on the fuselage nose.
| FINAL CONSTRUCTION |
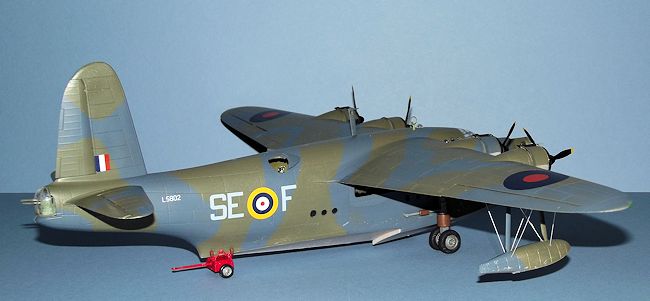
The
chunky beaching gear was glued in place and the main legs have positive
locations in the fuselage sides. This was left overnight to set.
 The
airframe was propped upside down to permit rigging of the floats. Small marked
holes in the floats and wing undersides were drilled out to accept the bracing
wires. Italeri charmingly invites the modeller to “add wire bracings from
stirred plastic” which I take to mean stretched sprue. However I elected to use
Griffon Model 0.3mm Brass Hollow Pipe, marked out with dividers and cut slightly
overlong to enable it to be juggled into the fixing holes before being secured
with a tiny drop of superglue. The pipe/rigging wire was painted in enamel matt
silver before installation. Although I normally use acrylics, the enamel had
better adhesion. This rigging method was new to me and recommended by a fellow
modeller, Rich Reynolds, who happens to be my son. The relatively stiff hollow
wire is easy to handle and provides a rigid assembly, so it is a method that I
shall return to with future projects.
The
airframe was propped upside down to permit rigging of the floats. Small marked
holes in the floats and wing undersides were drilled out to accept the bracing
wires. Italeri charmingly invites the modeller to “add wire bracings from
stirred plastic” which I take to mean stretched sprue. However I elected to use
Griffon Model 0.3mm Brass Hollow Pipe, marked out with dividers and cut slightly
overlong to enable it to be juggled into the fixing holes before being secured
with a tiny drop of superglue. The pipe/rigging wire was painted in enamel matt
silver before installation. Although I normally use acrylics, the enamel had
better adhesion. This rigging method was new to me and recommended by a fellow
modeller, Rich Reynolds, who happens to be my son. The relatively stiff hollow
wire is easy to handle and provides a rigid assembly, so it is a method that I
shall return to with future projects.
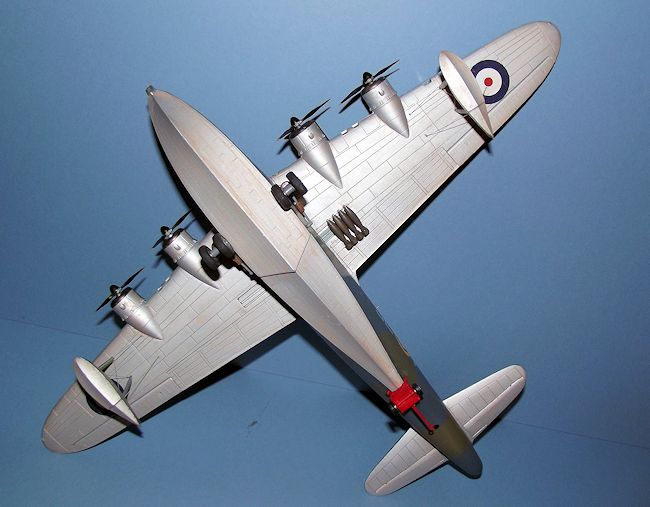
Construction was completed with the installation of aerials and the astrodome to
the upper fuselage and the beam guns with their extended wind deflectors. The
second bomb rack was fixed in the run out position under the
port
wing to give a little variety to the weapons layout.
| CONCLUSIONS |
 I do not
consider that the etch fret of parts adds much to the model since the metal is
rather thick and most of the etch
could equally well have been rendered in plastic. The decal sheet is adequate
but the
absence of any airframe stencilling is disappointing in a kit that is marketed
and priced as having premium features. The coloured booklet is helpful but again
does not really tip the balance in favour of the relatively high price.
I do not
consider that the etch fret of parts adds much to the model since the metal is
rather thick and most of the etch
could equally well have been rendered in plastic. The decal sheet is adequate
but the
absence of any airframe stencilling is disappointing in a kit that is marketed
and priced as having premium features. The coloured booklet is helpful but again
does not really tip the balance in favour of the relatively high price.
This
is a typical Italeri kit in that the fit of parts is adequate rather than
totally precise. As to the surface detail, I would not consider this kit to be
“unbuildable” but the designers should perhaps have had a closer look at the
photographs that are provided with this kit to get a better feel for the
characteristics of the external skinning.
It is
nigh on fifty years since Airfix first brought a 1:72 Sunderland to the market
place and Italeri should be congratulated on a large and imposing model. It
looks the part, in my opinion.
| REFERENCES |
Warplanes of the Second World War, Volume Five, Flying Boats, by William Green.
Macdonald
1961.
The
Short Sunderland, by Geoffrey Norris and Richard Ward, Profile Publications
Ltd., 1967
Frank
Reynolds
October 2014
Kit
from my LHS, Spot on Models and Hobbies of Swindon, England.
If you would like your product reviewed fairly and fairly quickly, please contact the editor or see other details in the Note to Contributors.