Airfix/Revell 1/72 York C.1
| KIT #: | 195 (CMR set) |
| PRICE: | £69.98 for conversion and kit |
| DECALS: | Ten options |
| REVIEWER: | Frank Reynolds |
| NOTES: | Resin conversion set |
| HISTORY |
During World War 2 the British aircraft industry focussed its attentions
and resources on offensive warplanes and relied upon the USA to produce
transport aircraft. One significant exception is the Avro York, which was a
simple and logical adaptation of the Lancaster bomber into a passenger and
freight aircraft. The idea for a York was mooted early in the Lancaster
programme as a private venture project and once the drawings were issued for
production, in February 1942, the first prototype flew a remarkably short five
months later, on 5 July 1942.
 The
concept was logical and simple, a box section slab sided fuselage was married to
the standard Lancaster wing and tail structures. The high set wing permitted a
low slung fuselage profile with easy loading into a wide freight door on the
port side. Flight testing of the prototype revealed some directional instability
that was cured by adding a distinctive central fin to the tailplane. The York
was designed to function as a VIP aircraft, freighter, or combi
passenger/freighter. The heavy lift and long range capabilities of the
Lancaster, combined with a fuselage of much greater volume, yielded an aircraft
with a potential range of 3,000 miles and could accommodate 25-30 passengers or
8,000lbs of freight.
The
concept was logical and simple, a box section slab sided fuselage was married to
the standard Lancaster wing and tail structures. The high set wing permitted a
low slung fuselage profile with easy loading into a wide freight door on the
port side. Flight testing of the prototype revealed some directional instability
that was cured by adding a distinctive central fin to the tailplane. The York
was designed to function as a VIP aircraft, freighter, or combi
passenger/freighter. The heavy lift and long range capabilities of the
Lancaster, combined with a fuselage of much greater volume, yielded an aircraft
with a potential range of 3,000 miles and could accommodate 25-30 passengers or
8,000lbs of freight.
Production was slow, because of priority production for Lancasters and
only four prototypes and three production aircraft had appeared by the end of
1943. Regular production began in 1944, at an initial planned rate of three
aircraft per month, against an order of 208 for the RAF.
The York was intended as a long range transport, ideal for the support
of operations throughout an Empire that, although shrinking, still encompassed
outposts through the Mediterranean, into the Middle East, Africa and the Far
East. In the early post war years it was also eagerly accepted by airlines
within the British sphere of influence to help deal with an increasing demand
for long range transport. 25 were built for British Overseas Airways
Corporation, 12 for British South American Airways, three for Skyways of London,
five for Flota Aerea Mercante of Argentina.
The York earned its place in history during the Berlin Airlift of 1948.
Although the type had been designed for routes having
long stage lengths, it was pressed into service on high intensity short hops
from West Germany into the isolated city of Berlin, following a Soviet blockade.
36 RAF Yorks and four from the civil airline Skyways of London conducted some
13,180 sorties over the period June 1948 to May 1949. Taking off and landing at
maximum weight, often carrying bulk loads such as coal or flour, it was a
punishing schedule. Some aircraft were rotated back to England every 150 flying
hours for overhaul and a change of engines such was the intensity of the
operation.
The York began to fade from RAF service in the mid 1950s and many of the
airframes, like so many aircraft of the period, found new homes with smaller
independent airlines, the last being withdrawn from service in 1964
| THE KIT |
 CMR’s
package is a “resin conversion” by definition, but the sheer scale of what is
provided goes way beyond the normal expectation. Packed in a stout white box is
a full kit for everything that is required to build the fuselage and tail
feathers of a York, the builder just needs to add the
wing, engine
and undercarriage assemblies from a mainstream injection moulded Lancaster of
their choice, from Airfix,
Hasegawa or Revell. The package is expertly designed so
that no major hacking or filling of parts is required.
CMR’s
package is a “resin conversion” by definition, but the sheer scale of what is
provided goes way beyond the normal expectation. Packed in a stout white box is
a full kit for everything that is required to build the fuselage and tail
feathers of a York, the builder just needs to add the
wing, engine
and undercarriage assemblies from a mainstream injection moulded Lancaster of
their choice, from Airfix,
Hasegawa or Revell. The package is expertly designed so
that no major hacking or filling of parts is required.
There are over 80 parts in the box, the resin carefully protected in
sealed bags; so carefully in fact that some of the bags are bagged! These guys
at CMR certainly go the extra mile to ensure that the parts arrive safely.
Nothing was broken, even though some of the resin castings are very delicate.
Dominating the contents are two beautifully cast full length fuselage
halves in a medium grey, dense, smooth resin. The fuselage components are
commendably thin with reasonable lightly engraved panel lines. They are so close
to plastic injection moulded parts that this kit seems to leap out of the box
calling out to be built.
The tail assembly is provided in resin, comprising the horizontal
surfaces and elevators and a choice of fins with rounded or extended trim tabs.
Paddle blade propellers, spinners and unshrouded exhaust pipes are provided. The
main wheels are the late type with treaded tyres and flats moulded on. There is
a well detailed flight deck and crew area in the nose, with commendably thin
tables for the navigator and flight engineer and appropriate bulkheads and
flooring for the crew compartments. Clear resin parts are included for the 38
fuselage windows and the astrodome. The rear fuselage is completely empty, but
this is not really a problem since little is likely to be seen through the small
circular windows. A separate freight door is provided for those who might wish
to open up the fuselage side and scratch build an interior.
The main flight deck transparency is in clear vacuform, with a spare
provided. A coloured etch fret, by Eduard, provides instrument panels for the
pilots and flight engineer and a set of canopy masks, again by Eduard, for the
flight deck glazing.
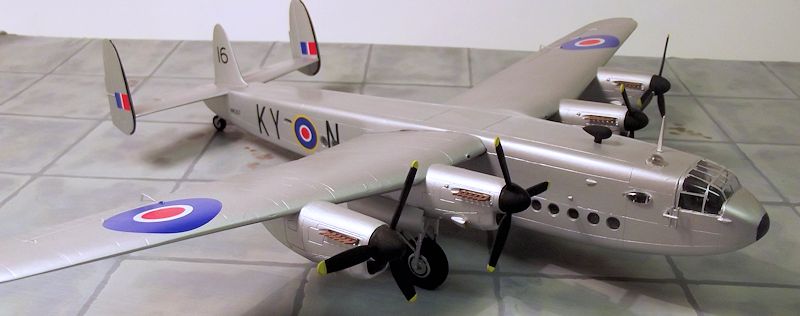
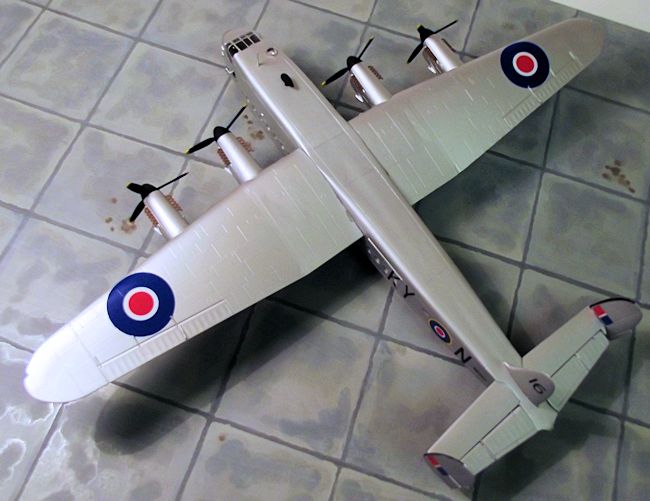
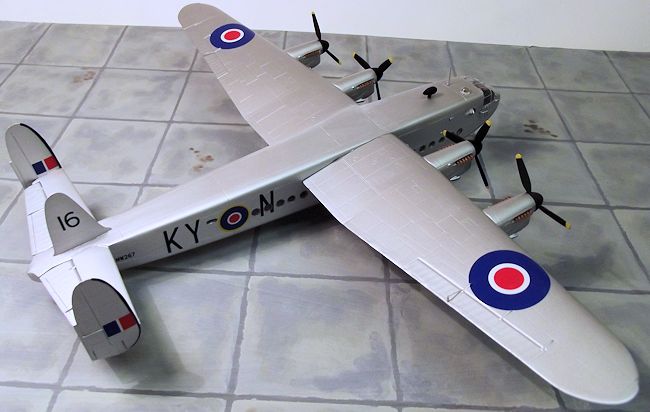
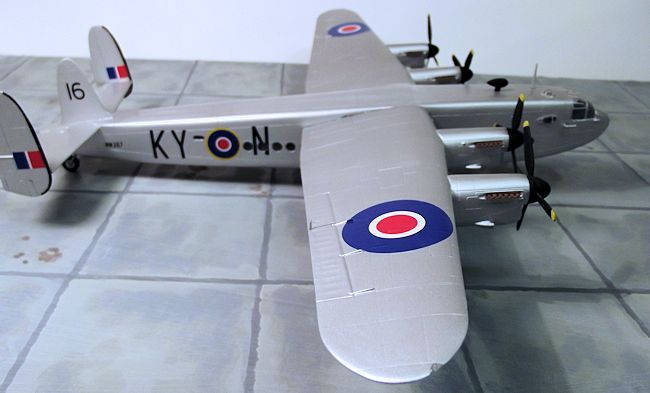
The decal sheet provides a choice of ten aircraft all from the Berlin
Airlift, all finished in silver with C1 type post war RAF roundels that are
printed in the correct shade of post war Blue. There is little difference be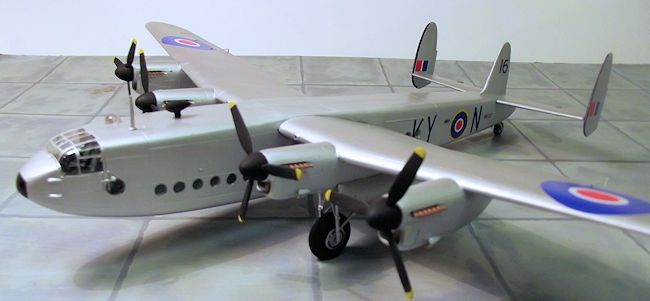 tween
the schemes offered beyond different fuselage codes and under wing serial
numbers. The decals originate from Tally Ho and are neatly done, in good
register.
tween
the schemes offered beyond different fuselage codes and under wing serial
numbers. The decals originate from Tally Ho and are neatly done, in good
register.
Instructions consist of eight loose leaf A4 sheets, of which four pages
are exploded view sketches, four pages give a brief history and
including 43 black and white photos showing useful
interior shots and close ups. Finally there are three pages of drawings showing
colour information and decal positions.
So confronted with a cram full box of resin parts, a comprehensive
collection of mixed media accessories and a choice of ten finishes, next is the
planning stage, for there are no instructions in the conventional sense.
Checking those references is the watchword here; not the easiest
approach, since the York is not a particularly well documented type, but it
seems that late versions had paddle blade propellers and the larger type
rudders. Yet there is enough in-box information included to build a Berlin
Airlift York with reasonable confidence.
I elected to build the fuselage and tail as a separate unit, then add
the wings from the donor kit, my choice being Revell’s Lancaster. It happened to
be the Dambuster version, but this is irrelevant since the wings are common to
each Revell boxing. The Revell kit needs a correction to the wing dihedral but I
chose it partly on the grounds of cost, since it is substantially cheaper than
the Airfix or Hasegawa competition, at least in my home market in the UK. Mine
was even cheaper than usual since it picked it up at a bargain £14-99 at the
IPMS UK Scale Model World 2013 extravaganza at Telford.
| CONSTRUCTION |
This begins with a clean up of the resin parts, but by the usual
standards of this medium relatively little is required. The moulding blocks are
joined to the main components with thin and well defined gates that are easily
dealt with using a fine razor saw. Very slight flash was present around the
window openings and the very delicate cockpit interior parts, but this was
easily stroked away with a fresh scalpel blade. The joining faces of the
substantial fuselage halves received extra attention from sanding sticks to
ensure a strong joint. The parts were then washed in warm water to which a few
drops of wash up liquid were added and then left overnight to dry. At this stage
I tried some experimental fuselage windows from blobs of Micro Kristal Kleer,
guided into a couple of the circular windows with the tip of a wooden cocktail
stick. Left to dry overnight, I
 found them
to give a satisfactory result, so these temporary glazings were cut out with a
scalpel blade and discarded. I decided not to use the clear resin windows for
any of the circular openings – glazing could now be added after painting using
this Kristal Kleer method, and avoid having to mask multiple windows during
painting.
found them
to give a satisfactory result, so these temporary glazings were cut out with a
scalpel blade and discarded. I decided not to use the clear resin windows for
any of the circular openings – glazing could now be added after painting using
this Kristal Kleer method, and avoid having to mask multiple windows during
painting.
A single bulkhead divides the flight deck from the main cabin. Two
pilots seats and control pedestals are fixed in the front cockpit under the
large canopy and an overhead throttle box is provided. To the rear is a central
aisle with the engineer and navigator positions either side. The seats are well
detailed and suitable black boxes and tables furnish the rear crew positions.
The parts were assembled with thin super glue.
The flight deck area was painted black overall with seat cushions picked
out in medium green. The main fuselage interior was sprayed in Tamiya XF-71
cockpit green. Etch metal instrument panels were added to the main panel and the
two rear crew positions. I decided that there would probably have been a curtain
to divide the flight deck from the main cabin so I fixed a piece of scrap
plastic over the opening in the bulkhead, concealing the empty rear fuselage.
I superglued small plastic card tabs around the joining edges of the
fuselage halves to aid line up during assembly.
The two halves were taped together first and spot fixed
with dabs of thin superglue every 25mm or so along the joint. Once dry, the tape
was removed and medium superglue spread into the whole length of the joint. This
was left overnight to dry and ensure that all fumes evaporated. Mould shrinkage
left a clearly defined shallow groove along the length of the joint, so this was
smoothed over and filled with two-part epoxy putty. I fired over a quick
overspray of auto primer from a rattle can and rubbed it away with a fine
sanding stick. This reveals any small dings or scratches that require further
filler, using standard Green Putty.
 I do
not like vacuform transparencies; I am nervous when cutting them out, fretful
when trimming them to shape and was uncertain which type of glue I should use to
fix vacuform to resin. CMR helpfully provide two transparencies in case of
accidents, both of which I messed up, but a humble e-mail to CMR brought swift
replacements and eventually I ended up with one that fitted snugly into the
cockpit area. The glazing was fixed into the nose cut out with Humbrol Clear
Fix.
I do
not like vacuform transparencies; I am nervous when cutting them out, fretful
when trimming them to shape and was uncertain which type of glue I should use to
fix vacuform to resin. CMR helpfully provide two transparencies in case of
accidents, both of which I messed up, but a humble e-mail to CMR brought swift
replacements and eventually I ended up with one that fitted snugly into the
cockpit area. The glazing was fixed into the nose cut out with Humbrol Clear
Fix.
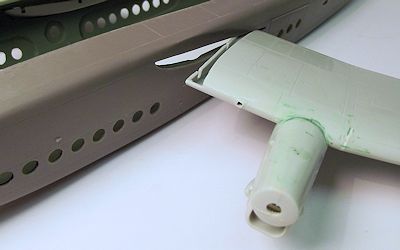
Attention now turned to the wings. Critical to this project is the need
to provide a strong and effective joint between the plastic wing assembly and
the resin fuselage structure. CMR have come up with a brilliant and effective
solution. A slot is cast into the fuselage halves corresponding to the wing root
of just the lower half of the plastic wing and I found that the Revell component
fitted snugly. Since the York has a wider fuselage than the donor Lancaster,
6.5mm must be trimmed from the root of each upper wing half by a simple saw cut.
When the upper and lower wing halves are joined the protruding section of the
lower wing panel becomes a locating tongue that simply slips into place. While
this simple modification was carried out I took the opportunity to modify the
most obvious flaw in Revell’s pretty good kit – the fact that the wing dihedral
is far too shallow. This was corrected by making a saw cut the whole width of
the lower wing along the line of the dihedral break immediately outboard of the
inner engine nacelles. There is a clearly scribed line on the kit parts to guide
a saw cut. The corresponding upper surfaces were cut back about 5mm from the
leading and trailing
 edges. The
upper and lower halves were then joined with tube cement and the wings bent
upwards to the correct angle. This allowed the saw cut in the lower wing panels
to open up and strips of 10 thou. and 5 thou. plastic card were slipped into
these slots to wedge them into the correct position. I used a wing from an
unbuilt Airfix Lancaster as a jig for this exercise, although it would have been
just as easy to line up the structure with a plan.
edges. The
upper and lower halves were then joined with tube cement and the wings bent
upwards to the correct angle. This allowed the saw cut in the lower wing panels
to open up and strips of 10 thou. and 5 thou. plastic card were slipped into
these slots to wedge them into the correct position. I used a wing from an
unbuilt Airfix Lancaster as a jig for this exercise, although it would have been
just as easy to line up the structure with a plan.
The wings were tightly taped and left to dry for a couple of days before
the surplus card was trimmed away to leave a neat and strong joint. I have read
in some sources that the outboard engine nacelles may need to be trimmed to
shape to seat square on the more steeply angled wings but mine seemed just fine.
The inner nacelles can be added at the same time, incorporating rib detail in
the wheel wells. Thankfully Revell’s construction methods mean that the landing
gear can be added later.
A small point to check with a donor kit is to ensure that cable cutters
in the wing leading edge are eliminated, since they are only applicable to a
bomber wing.
The resin horizontal tail sections are designed to plug into recesses in
the rear fuselage and simply secured with superglue. The fin/rudder units were
added after painting.
| COLORS & MARKINGS |
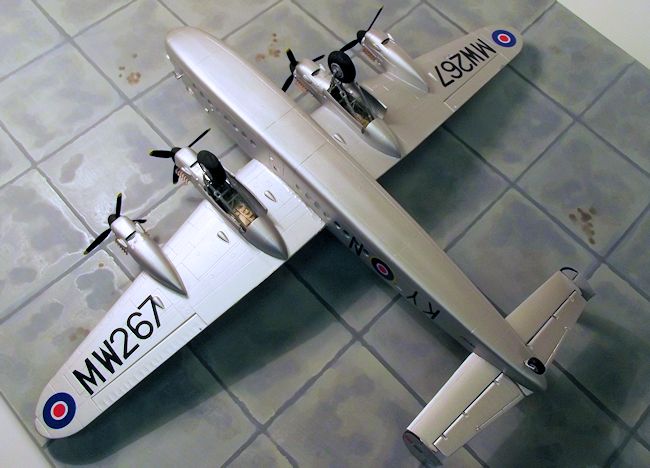
Many Yorks were operated in a polished natural metal finish although
some sources suggest that some examples were painted in high speed silver.
Polished natural metal is one of the nightmare finishes that I try to avoid, so
I contented myself with the thought that a well-used example on the Berlin
airlift would be pretty dull through constant use, and settled for a basic
overall finish of Tamiya XF-17 Flat Aluminium fixed with two brushed coats of
Future/Klear and finished with a spray coat of Xtracrylix Semi-gloss varnish.
The propellers
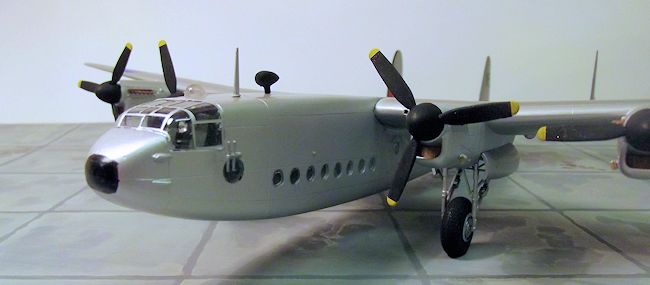 and
spinners were finished in Tamiya XF-1 Flat Black. Main painting was carried out
with my Iwata HP-C airbrush.
and
spinners were finished in Tamiya XF-1 Flat Black. Main painting was carried out
with my Iwata HP-C airbrush.
Decals
are commendably thin and sharply printed. CMR provide RAF roundels, codes and
serial numbers. My choice was that of a York from No. 242 Sqn. There is nothing
in the way of airframe stencilling or wing walk lines, but it appears that
natural metal aircraft had little in the way of such. They went on easily but
need care, since they are so thin that there is a tendency for them to fold over
as they are slid off the backing sheet. They reacted well to Micro Sol and Micro
Set decal fixing solutions. A final coat of semi-matt varnish sealed the decals.
| FINAL CONSTRUCTION |
The main sub-assemblies now comprised the fuselage and tail, and the wings with engines attached. The main airframe was assembled for the first time, adding the tail fins and left to set over a couple of days. The main wing to fuselage joint was secured using Devcon two part epoxy resin glue. I then added the main undercarriage and doors from Revell, incorporating the resin main wheels.. Finally the engine exhausts, propellers, fuselage aerials and wing tip lights completed assembly.
| CONCLUSIONS |
This build was inspired by my having seen the World’s two preserved
Yorks , one at the Imperial War Museum at Duxford and the other at the RAF
Museum, Cosford, both in England.
CMR provide a package that is among the very best available,
comprehensive and of high quality. My only niggle is the curse of the vacuform
transparencies since they test my limited skills far too much for comfort.
Thankfully, CMR were more than helpful in coming to the rescue when my first two
attempts went horribly wrong. It is a welcome addition to my slowly growing
collection of aircraft from the Lancaster family. I found it to be a rewarding
project and one that is highly recommended.
| REFERENCES |
Profile No. 168, The Avro York, by Donald M.Hannah. Profile Publications
Ltd., 1967
Avro York in Royal Air Force Service 1942-1957,
by Chris
Ashworth. Hall Park Publications Ltd., 1988
Avro Lancaster, Lincoln and York in post-war RAF service 1945-1950, by
Martin Derry. Dalrymple and Verdun Publishing,
2010.
March 2014
If you would like your product reviewed fairly and fairly quickly, please contact the editor or see other details in the Note to Contributors.