Revell 1/48 Spitfire XVI
| KIT #: | 04661 |
| PRICE: | $24.99 SRP |
| DECALS: | options |
| REVIEWER: | Jonathan Prestidge |
| NOTES: | Reboxed ICM kit. Aeromaster 48-580 decals |
| HISTORY |
The Spitfire certainly needs no introduction. It was the darling of Great Britain, and remains one of the most iconic aircraft ever produced. That it was one of just a few truly beautiful British aircraft makes it even more striking. Fortunately for the Allies, the Spitfire flew like it looked. The Spitfire was constantly upgraded during WWII, keeping it competitive with its adversaries throughout the conflict. The Spitfire’s airframe was adaptable, able to take on larger engines and higher power while retaining its legendary handling characteristics. Many variants were produced including planes optimized as reconnaissance aircraft, low and high altitude interceptors, fighter bombers, shipboard fighters, etc.
From the kit instructions: The Supermarine
Spitfire Mk.XVI was externally identical to the Spitfire Mk.IX, differ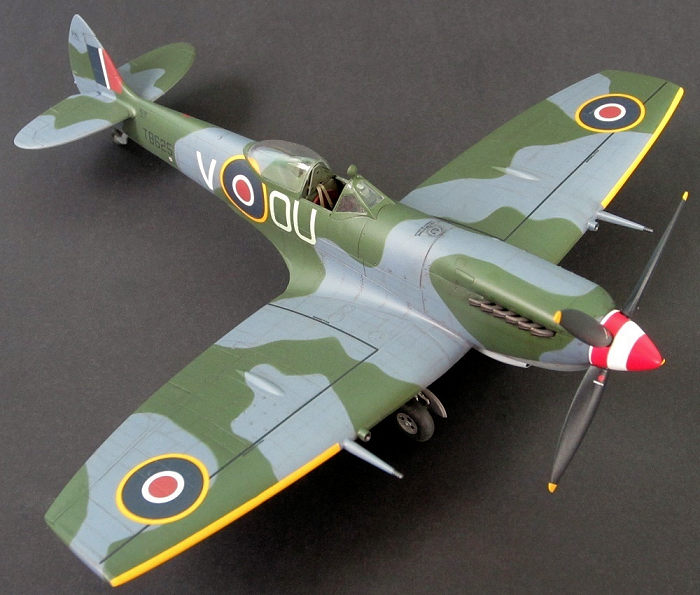 ing only
by the type of Merlin engine fitted – the Mk.IX had a Rolls-Royce 66 or 70
powerplant and the Mk.XVI used the American Packard license-built 1,750hp Merlin
266 engine. Production commenced in September 1944 with the first aircraft
reaching No.433 Sqn. Royal Canadian Air Force in January 1945. All 1054 aircraft
were built at the huge Castle Bromwich factory near Birmingham, with the last
delivery taking place in August 1945. Optimized for the low level fighter-bomber
role, this version was typically fitted with the ‘E’ wing having the long 20mm
cannon barrels outboard of the 0.5in machine guns. Spitfire Mk.XVIs equipped 36
RAF squadrons, including eight squadrons of the Royal Auxiliary Air Force after
the war, these serving until 1951 when they were replaced by jet powered
Vampires and Meteors. SL718 of No.612 Sqn., Royal Auxiliary Air Force was one of
several spitfires entered in post war UK air races. Mk.XVIs were also supplied
to the air forces of France, Belgium and Burma.
ing only
by the type of Merlin engine fitted – the Mk.IX had a Rolls-Royce 66 or 70
powerplant and the Mk.XVI used the American Packard license-built 1,750hp Merlin
266 engine. Production commenced in September 1944 with the first aircraft
reaching No.433 Sqn. Royal Canadian Air Force in January 1945. All 1054 aircraft
were built at the huge Castle Bromwich factory near Birmingham, with the last
delivery taking place in August 1945. Optimized for the low level fighter-bomber
role, this version was typically fitted with the ‘E’ wing having the long 20mm
cannon barrels outboard of the 0.5in machine guns. Spitfire Mk.XVIs equipped 36
RAF squadrons, including eight squadrons of the Royal Auxiliary Air Force after
the war, these serving until 1951 when they were replaced by jet powered
Vampires and Meteors. SL718 of No.612 Sqn., Royal Auxiliary Air Force was one of
several spitfires entered in post war UK air races. Mk.XVIs were also supplied
to the air forces of France, Belgium and Burma.
As of 2012 five Spitfire Mk.XVIs were airworthy or being restored to flying condition, with several others displayed in museums around the world.
The Merlin 266 engine gave a maximum speed of 652km/h (405mph) at 6,704m (22,000ft). Maximum range was 1,577km (980 miles). Wingspan: 9.93m (32ft 7in). Length: 9.55m (31ft 4in).
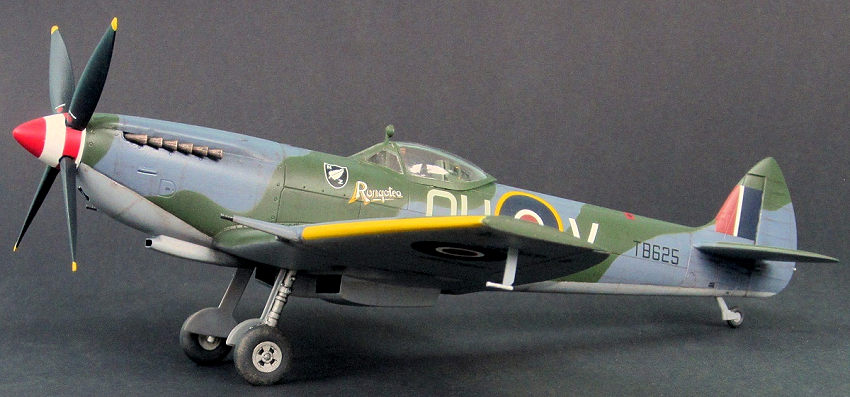
Like most Spitfire Marks, the Mk.XVI was available in many configurations. The subject of this kit was a bubble top Spitfire Mk.XVI with the LF (clipped) ‘E’ wing and late style enlarged rudder. To my eyes this configuration of the Mk.XVI was a great looking plane in a series of great looking planes!
| THE KIT |
First off – this was the ICM Spitfire XVI
reboxed by Revell. When released, ICM’s Spitfire line was deemed the most
accurate in 1/48th
scale. Unfortunately, ICM kits of a few years ago were plagued by poor quality
control that resulted in sink marks, short shot parts, greasy plastic with a
grainy surface, poor decals, etc. I bought one of ICM’s Spitfire kits when it
fir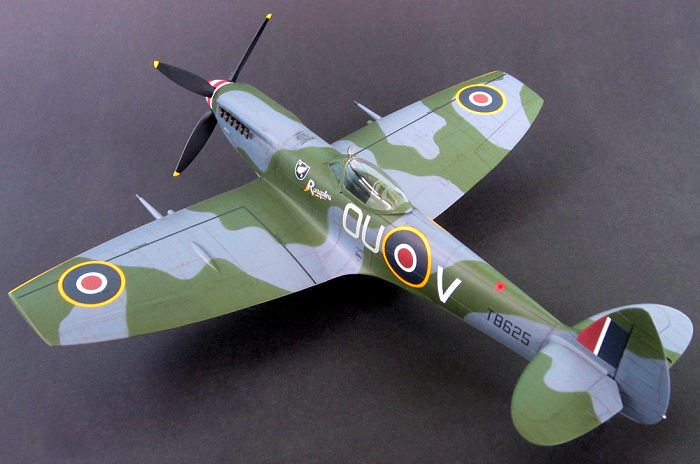 st came out and, upon opening the box promptly sold it on ebay!
I only decided to give this one a go because I thought Revell would have higher quality control standards. I was mostly right. In the box the kit looked to be nicely molded with a simple cockpit. There were lots of parts: full Merlin 266 engine, optional wingtips, optional bombs, different intakes, etc. - lots of spares left over for the spares box! The decals were of useable quality but the red on the roundels was too bright. The clear parts were of decent quality - thin and reasonably clear. The shape of the finished kit looked true to the prototype though I admit to not being a rivet counter.
On the down side: the surface detailing of the parts was a bit sparse, the kit was overly complex, the complexity was compounded by iffy fit, the surface of the plastic was grainy, and on my example the wing roots were short shot. The instruction booklet was busy. Each step of the 37 step assembly guide was small and many steps had a “?” indicating an option choice. Finally, the clipped wingtips were very rounded looking (though the box art showed the typical squared off wingtips).
| CONSTRUCTION |
Construction began with careful review of the instructions. Since I didn’t want to model the plane with the engine exposed I skipped ahead to step 12. I then had to carefully decide what parts were going to be used on the plane I modeled. With those decisions made, I began removing the major parts from the sprues and cleaning them up. Next, parts that could be assembled prior to paint were glued together resulting in a series of subassemblies.
I then sprayed the interior with Poly
Scale British Interior Green thinned with Future. The semi-gloss f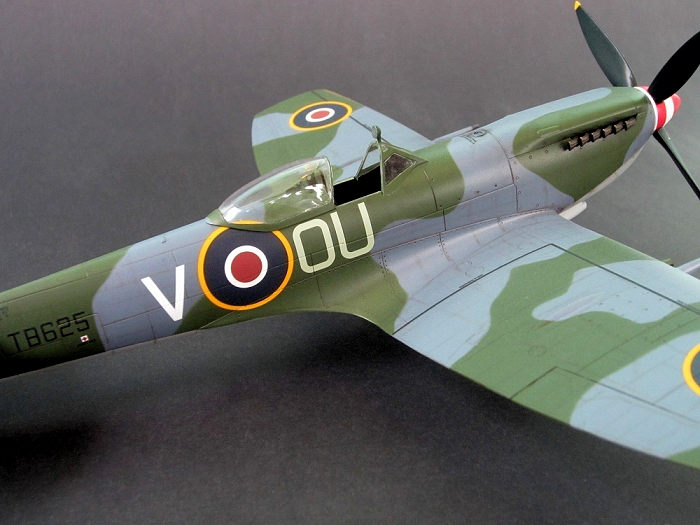 inish allowed
washes to flow freely and also made it easier to remove excess wash from the
high spots. Detailing continued in the cockpit with individual dials cut from a
decal sheet and placed on the instrument panel. I added seatbelts made from
.010” x .030” Evergreen strip. A thin black soapy water wash was applied. Once
the wash had dried, I drybrushed the interior with a slightly lighter shade of
interior green.
inish allowed
washes to flow freely and also made it easier to remove excess wash from the
high spots. Detailing continued in the cockpit with individual dials cut from a
decal sheet and placed on the instrument panel. I added seatbelts made from
.010” x .030” Evergreen strip. A thin black soapy water wash was applied. Once
the wash had dried, I drybrushed the interior with a slightly lighter shade of
interior green.
With the cockpit complete, I closed up the fuselage. Following my usual procedure, I glued the upper wings to the fuselage before gluing the upper and lower wing halves together (filler free seam every time). The rest of the airframe was then assembled. Since I was building an Eduard Spitfire IX at the same time, I used the Eduard kit as a reference. The fit of the airframe was okay but most parts needed careful cleanup and dry fitting to get a good fit. I used a bit of putty and plastic card to fill the short shot wing roots. Next came sanding, sanding, and more sanding! Determined to get a smooth finish on the plane before paint, I spent several hours sanding and polishing the airframe.
Two areas that received modification and special attention were the wingtips and the lower front engine cowl. I could find no photos that showed anything like the kit supplied wingtips. I therefore filed the wing tips to look like the reference photos I had. The lower cowling just took a lot of fiddling, filing, sanding and rescribing to get a decent fit and look once installed.
Finally, I added the canopy. The clear parts were dipped in Future prior to assembly. White glue was used to attach the canopy sections. Once dry, I masked the canopy using Tamiya tape and a new #11 blade.
| COLORS & MARKINGS |
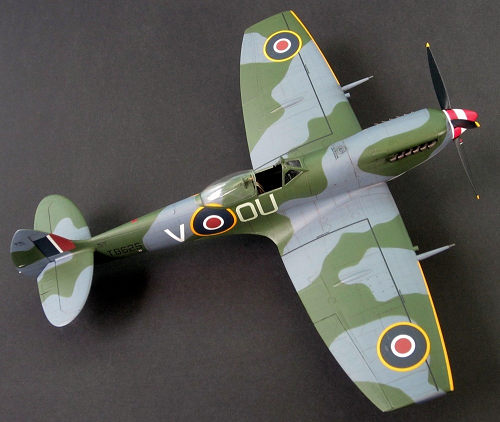
Since I had AeroMaster’s Post D-Day
Spitfires 1944/45 in the stash, I decided to model a Spitfire Mk.XVI of 485 Sqn.
Fasseberg Germany, April 1945 flown by W.O. MCJ Lind. This plane wore the
standard European camouflage of Ocean Gray, Dark Green, and Medium Sea Gray with
a colorful red and white nose. I used Polly Scale acrylics for the airframe and
masked between the colors with thinly rolled snakes of kneaded eraser. I then
applied a thick coat of rubber cement over the color I was protecting. This
technique is much faster for me than cutting paper/tape masks and keeps out
paint better than any method I have previously tried. Once the paint was dry the
rubber cement peeled right off. I had no ill effects due to the rubber cement
reacting with the underlying acrylic paints or peeling them off.
white nose. I used Polly Scale acrylics for the airframe and
masked between the colors with thinly rolled snakes of kneaded eraser. I then
applied a thick coat of rubber cement over the color I was protecting. This
technique is much faster for me than cutting paper/tape masks and keeps out
paint better than any method I have previously tried. Once the paint was dry the
rubber cement peeled right off. I had no ill effects due to the rubber cement
reacting with the underlying acrylic paints or peeling them off.
At this point I used pastels to emphasize the panel lines and dirty the airframe a bit. I tried to keep things subtle, adding just enough shade variation to enhance detail. Again, the Eduard Spitfire IX kit was used as a reference, this time for adding detail to the airframe. I didn’t just use pastels to highlight the engraved detail but effectively “drew on” detail where it was missing. Hopefully, the pictures showed this. I then sealed everything with a coat of Future in preparation for decals.
The AeroMaster markings went down beautifully. I used the kit decals for the stencils without issue. I wetted the area receiving the decals with Micro Set. Once in position, the decals responded well to an application of Micro Sol. After weathering the decals, I gave the plane a final semi-gloss clear coat. Once dry, I added some minor chipping around maintenance panels with a silver Prismacolor colored pencil.
The landing gear and other fiddly bits were added at this time. Final detailing was then completed.
| CONCLUSIONS |
 What a lot of work! While I am happy with the end result
and the finished kit looks good on the shelf, this one was a bit of a grudge
match. Post build I noticed that the landing gear is not angled forward enough,
thus the plane sits a bit nose high. Still, the corrected wingtips improve the
look and the finished kit really shows off the beautiful lines of the Spitfire
Mk.XVI. I must admit to enjoying the challenge of turning this kit out nicely.
What a lot of work! While I am happy with the end result
and the finished kit looks good on the shelf, this one was a bit of a grudge
match. Post build I noticed that the landing gear is not angled forward enough,
thus the plane sits a bit nose high. Still, the corrected wingtips improve the
look and the finished kit really shows off the beautiful lines of the Spitfire
Mk.XVI. I must admit to enjoying the challenge of turning this kit out nicely.
Would I build another? NO!!! The surface detail, fit, decals, instructions, clear parts and accuracy of the Eduard Spitfire Mk.XVI are so much better than this kit. Having built the Eduard Spitfire IX at the same time, there is no way I can recommend spending good money on this kit. If you need a Spitfire Mk.XVI in your collection and don’t have this Revell kit already, do yourself a favor and buy the Eduard. If you have this kit already, do yourself a favor and buy the Eduard – unless of course, you like a challenge!
7 February 2017
Copyright ModelingMadness.com
If you would like your product reviewed fairly and fairly quickly, please contact the editor or see other details in the Note to Contributors.