Airfix 1/48 Spitfire Vb/trop
| KIT #: | A05125 |
| PRICE: | £16-99 |
| DECALS: | Two options |
| REVIEWER: | Frank Reynolds |
| NOTES: |
| HISTORY |
The Spitfire Vb was the first major upgrade of the Spitfire
series following lessons learned in combat during the Battle of Britain
in 1940. Fitted with a Merlin 45 engine of 1470hp the wing profile was
changed by the installation of
a 20mm cannon in each wing, which
replaced the inboard pair of .303in machine guns. The cannon
installation required the provision of very distinctive blister fairings
to the upper and lower wing surfaces. In order to adapt the type for
operations in desert conditions a very distinctive lower nose profile
incorporated a large air filter and an enlarged under wing oil cooler
was fitted. On late build Vbs the windscreen and pilot’s hood were
modified to a more aerodynamic shape. The combination of these factors
resulted in a very different looking Spitfire from the sleek point
defence interceptor that had entered RAF service in 1938.
 By
September 1943 twenty seven RAF squadrons were operating Spitfire Vbs .
As later Spitfires entered service, well used and war weary Vbs were
transferred to overseas areas of operations and to other air forces. Vbs
were found in the inventory of the South African Air Force, Turkey and
Yugoslavia, all of whom had influence in the Mediterranean Theatre of
World War 2.
By
September 1943 twenty seven RAF squadrons were operating Spitfire Vbs .
As later Spitfires entered service, well used and war weary Vbs were
transferred to overseas areas of operations and to other air forces. Vbs
were found in the inventory of the South African Air Force, Turkey and
Yugoslavia, all of whom had influence in the Mediterranean Theatre of
World War 2.
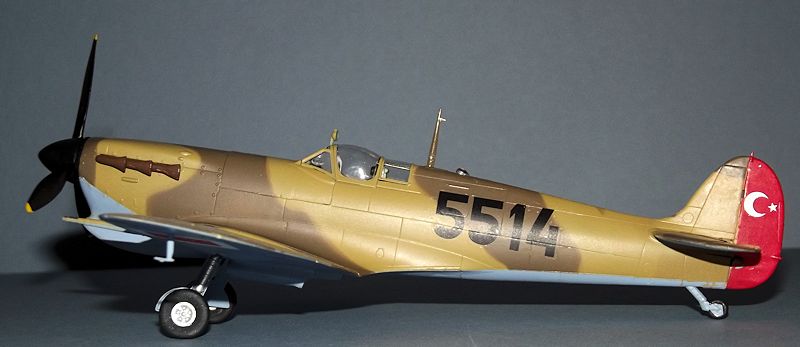
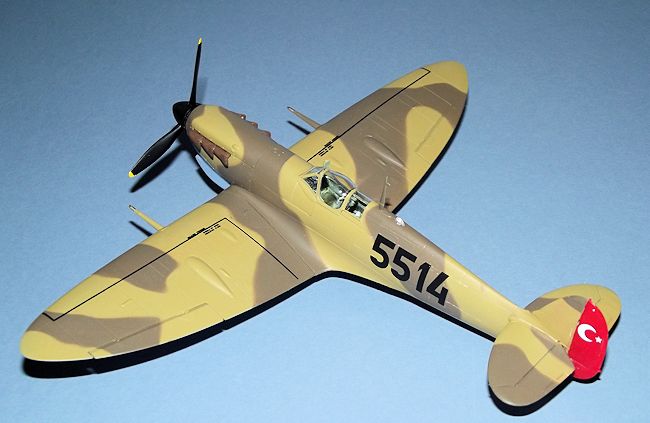
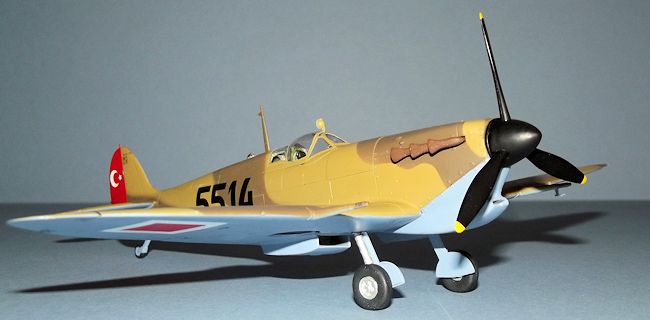
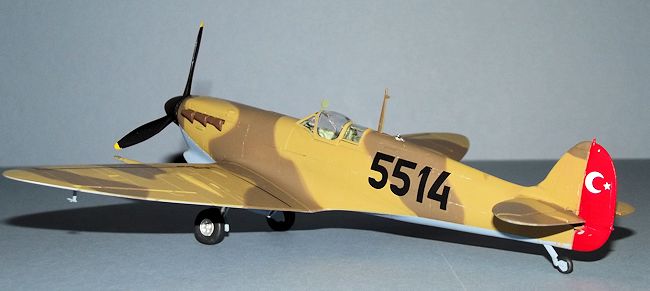
It is the air force of Turkey that provides the interest for
this project, a service that has the intriguing claim to fame of being
the only one to simultaneously operate the Spitfire and Focke Wulf
Fw-190 in its fighter squadrons. A neutral country in World War 2,
Turkey was able to accept deliveries of war material from both sides of
the conflict.
Turkey initially accepted three Mk.1 Spitfires in late 1939, but
further deliveries were delayed until 1944, after some years of
negotiations to persuade Turkey to cut off trade and diplomatic
relations with the Axis Powers. A total of 105 aircraft were supplied,
some 36 Mk.Vb and 69 Mk.Vc. Drawn from RAF Middle East stocks many were
well-used and in poor condition when delivered and they were used
primarily for training by the 5th
and 6th Air Regiments. The
Vbs were withdrawn in 1948 and the Vcs a year later.
When modelling a Spitfire V, good reference sources are
essential to get the right combination of features and it will always be
a trap for the unwary. Sometimes the only answer is an inspired guess.
| THE KIT |
 This
new tooling is supplied in Airfix’s now standard top opening box with a
rather flimsy lid. There are five parts frames in pale blue plastic and one
of clear.
The parts are very cleanly moulded with no evidence of flash
or sinkage and are beautifully engraved with sharp clean panel lines and
subtle fabric texture to the rudder and elevators. The transparent parts are
reasonably well done but there is some distortion visible in the cockpit
hood mouldings.
This
new tooling is supplied in Airfix’s now standard top opening box with a
rather flimsy lid. There are five parts frames in pale blue plastic and one
of clear.
The parts are very cleanly moulded with no evidence of flash
or sinkage and are beautifully engraved with sharp clean panel lines and
subtle fabric texture to the rudder and elevators. The transparent parts are
reasonably well done but there is some distortion visible in the cockpit
hood mouldings.
Instructions consist of a 14 page
booklet with construction steps set out in
46 pictorial stages keyed to CAD drawings with the relevant parts colour
coded to each stage
| CONSTRUCTION |
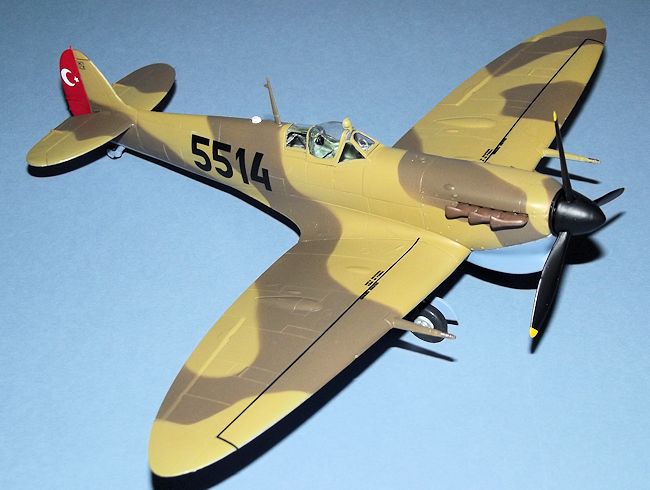
This is my second version of Airfix’s recently released Spitfire Mk.Vb, the
first of which was reviewed on MM on 02 September 2014. This project
represents the “other version” offered by Airfix,
a Mk.Vb/Trop
incorporating the massive chin air intake/filter, the later type windscreen
with more bulged cockpit hood and the large Rotol propeller.
Construction
begins with the interior, which features separate cockpit side walls which
also form the interior of the lower fuselage. There are four bulkheads
providing the engine firewall, instrument panel, pilot’s seat support and
headrest support. The seat is well detailed with separate sides, rear armour
plate, seat frame and head rest. Well detailed levers, pedals, trim wheels
and oxygen bottle are separately moulded. The cockpit interior was finished
in Xtracrylix XA1010 Interior Grey Green, with the section aft of
 the seat
in Tamiya XF-16 Flat Aluminium. The instrument panel, control boxes and
handles were picked out in Flat Black. The kit provides an effective decal
for the instrument faces and seat belts were fashioned from painted masking
tape.
the seat
in Tamiya XF-16 Flat Aluminium. The instrument panel, control boxes and
handles were picked out in Flat Black. The kit provides an effective decal
for the instrument faces and seat belts were fashioned from painted masking
tape.
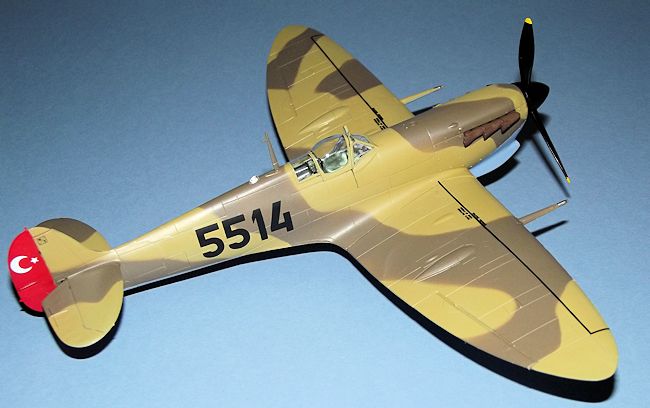
The lower wing is a full span section and in a departure from Airfix
tradition, the flaps are moulded in place, with no option for dropped flaps
available.. The walls to the circular wheel wells are glued to the lower
surface. The wing is provided with front and rear stub spars that span
between the wheel wells and help to set up the correct dihedral. An unusual
undercarriage arrangement has been tooled, whereby each leg has an angled
pintle (stub) at the top of the leg that fits into the rear face of the
front spar, the remainder of the gear leg is to be added later. The spars
and leg stub/pivot were found to be a very close fit and some shaving and
fettling of the parts was necessary. I chose to add the lower wing section
to the underside of the fuselage and then add the separate left and right
upper wing mouldings. The upper wing panels incorporate the elliptical tips.
Airfix have moulded two prominent strengthening strips on the upper surface
of each wing, a feature that is not found on all Mk.VBs. Having established
that they were not applicable to the Turkish machine being modelled, I
carefully carved the strips away, using a fresh scalpel blade. The ailerons
are separate and very finely cast. There is minimal joining area between the
ailerons and the wing
 cut out so they are vulnerable to breakage and I had
to re-glue each one after some careless handling during construction.
cut out so they are vulnerable to breakage and I had
to re-glue each one after some careless handling during construction.
The horizontal tails consist of separate upper and lower surfaces that fit
positively into sockets in the fuselage. The elevators are a one piece
component with a central joining bar. I find it easier to cut the two
elevator sections apart and to line them up when gluing either side of the
tail fin. The one piece rudder can now be added and the various flying
surfaces checked for alignment.
The lower section of the engine cowl needed some adjustment to get it to
seat into the leading edge of the wing.
The under
wing radiator and oil cooler show the degree of sophistication that is found
in current Airfix kits with moulded fine mesh detail inside the components
and a positionable outlet door on the radiator housing. These parts fit
snugly into positive recesses in the lower wings.
The canopy was added and I chose the closed option, not forgetting to add
the gun sight before the canopy went on. The hood and fixed rear section are
supplied in one piece, with a separate windscreen. They fit snugly and were
secured with Airfix Clearfix glue, then masked with Tamiya tape trimmed with
a fresh scalpel blade. Next I added the wing cannon.
The propeller assembly has a positive keying system to prevent the blades
from being assembled backwards. The spinner was painted Sky in Xtracrylix
XA1007
, with the blades in Flat Black and tips picked out in Yellow. The prop
assembly was set aside while painting was carried out.
| COLORS & MARKINGS |
 The colour scheme was taken from Tigerhead Decals sheet 48008 “Spitfires and
Wurgers of the Turkish Air Force” which I obtained from Hannants in the UK
at a reasonable £10-50
The colour scheme was taken from Tigerhead Decals sheet 48008 “Spitfires and
Wurgers of the Turkish Air Force” which I obtained from Hannants in the UK
at a reasonable £10-50
The decals are well printed in good register and packed with a small header
card that simply shows side views of three of the five colour schemes. I
queried this with Hannants and it seems that the full instructions are
available on Tigerhead’s web site as a download – duly obtained as a pdf.
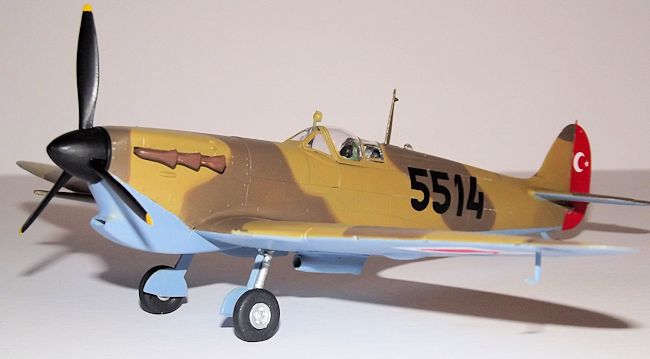
 The aircraft is finished in the standard RAF-style desert scheme of the era,
the underside airbrushed in Xtracrylix XA1026 Azure Blue, the upper surfaces
shadow shaded in Xtracrylix XA1009 Middle Stone and XA1002 Dark Earth. The
upper colours were divided with sausages of Blu-tack to provide a slightly
feathered camouflage demarcation line. The rudder was picked out in Tamiya
XF-7 Flat Red over a white undercoat and the propeller assembly in XF-1 Flat
Black. All of the paint was applied with my Iwata HP-C airbrush. The whole
airframe was then brushed with Future/Klear floor polish to provide a good
base for the decals.
The aircraft is finished in the standard RAF-style desert scheme of the era,
the underside airbrushed in Xtracrylix XA1026 Azure Blue, the upper surfaces
shadow shaded in Xtracrylix XA1009 Middle Stone and XA1002 Dark Earth. The
upper colours were divided with sausages of Blu-tack to provide a slightly
feathered camouflage demarcation line. The rudder was picked out in Tamiya
XF-7 Flat Red over a white undercoat and the propeller assembly in XF-1 Flat
Black. All of the paint was applied with my Iwata HP-C airbrush. The whole
airframe was then brushed with Future/Klear floor polish to provide a good
base for the decals.
The decals went on fairly easily assisted with Micro Sol and Micro Set.
Tigerhead provide only the main national markings and codes but the photos
that I have seen indicate that the Turkish Spits had little in the way of
obvious stencilling. Wing walk lines came from the Airfix decal sheet and I
added a few of their RAF-type stencils to the underside to break the
monotony of the all-blue paintwork. The decals were sealed with an
airbrushed coat of Xracrylix XFF Flat varnish.
| FINAL CONSTRUCTION |
The undercarriage is added next but Airfix’s approach to the assembly far
from conventional and demands care. The join between the undercarriage legs
and the pintle/stub arrangement housed in the wing is shallow and
potentially weak. It is definitely not novice friendly. The main leg and
in-wing stub each have a flat section cut onto them to serve as a half
lapped joint. At the same time the instructions show that each leg has to be
angled forward by 77 degrees and set up at 93 degrees splay to the wing
under surface. I left t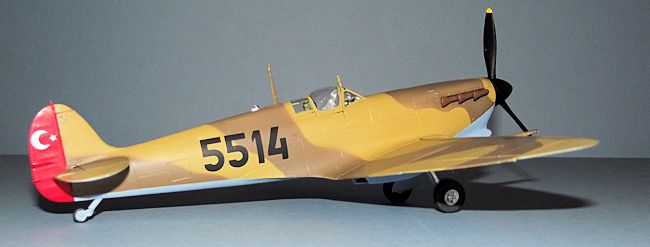 he wheels off to avoid a dead weight on the end of
the legs while I tacked then in place with tube cement and then pushed and
prodded them for about half an hour while waiting for the cement to go off,
constantly checking the legs’ alignment against the drawings in the
instructions.
he wheels off to avoid a dead weight on the end of
the legs while I tacked then in place with tube cement and then pushed and
prodded them for about half an hour while waiting for the cement to go off,
constantly checking the legs’ alignment against the drawings in the
instructions.
I still wonder whether this clever arrangement is over-engineered. In about
60 years of plastic kit production most manufacturers seem to agree that the
easy way to secure a single leg undercarriage is to have a peg on top of the
leg and a socket in the wing. It is a reasonably strong system and virtually
self-aligning. It is even a system that Airfix use in their relatively
recent 1:48 scale kits of Spitfire XII, Spitfire XIX, Seafire XVII. I still
prefer that traditional arrangement. Left overnight to dry the legs still
looked fragile so I extended the upper edge of the gear doors with a sliver
of 20
thou. plastic
card. This enabled me to glue the doors to both the wing underside and the
legs and stiffen up the structure. The wheels were added once I was
satisfied that the undercarriage structure had well and truly set hard.
| CONCLUSIONS |
 In spite of the irritation with the undercarriage
assembly I still rate this as a great kit.
In spite of the irritation with the undercarriage
assembly I still rate this as a great kit.
Teamed with the Tigerhead decals it makes an interesting and unusual subject and comparison with the standard Mk.Vb makes an interesting contrast in configuration. The kit is comprehensive, and a lot of thought has gone into its design. It repays careful work but it is not a kit for a beginner. The only filler needed was the slightest trace along main joint lines. Highly recommended and, for what is on offer, amazing value for money.
| REFERENCES |
Aeroguide Classics Number 1, Supermarine Spitfire Mk
V. Linewrights Ltd 1985.
Spitfire in Action. Squadron Signal Publications
1980.
Supermarine Spitfire. Ducimus Books Ltd 1970.
Spitfire International, by Helmet Terbeck, Harry Van
der Meer and Ray Sturtivant, Air-Britain Publications 2002
November 2014
If you would like your product reviewed fairly and fairly quickly, please contact the editor or see other details in the Note to Contributors.