Tamiya 1/48 Spitfire I
| KIT #: | 61032 |
| PRICE: | $26.78 MSRP |
| DECALS: | Three options |
| REVIEWER: | Kevin Thompson |
| NOTES: | Aeroclub prop, Falcon canopy and Iliad Designs decals used to make an early Mk. I |
| HISTORY |
The Supermarine Spitfire, as any knowledgeable aviation enthusiast already knows, is Britain’s most famous fighter aircraft of World War II, and is certainly Britain’s most famous aircraft of all time. In the writer’s opinion, the Spitfire, with its elliptical- shaped wing, ranks (along with the Macchi MC 202 Folgore, Kawasaki Ki-61 Hien, and Heinkel’s He 100) as one of the most beautiful in-line engine fighter designs of the World War II era, and few aviation historians would argue its classic good looks. Symbolized as the hero of the Battle of Britain, the Spitfire was Britain’s second eight-gun fighter (the Hawker Hurricane was the first), and holds a very special place in the hearts of the British people, as well as the pilots who flew them.
While it is not necessary to go into the full history of the aircraft, it is known that the Spitfire’s development went well into the end of World War II, and all the way up to Mk. 47. It underwent multiple airframe, power plant/ propeller and armament changes along the way, and roughly 20,000 Spitfires of all variants were eventually produced. Spitfires were flown by a variety of different nations, including the United States, and were used in every major theatre of World War II.
The
original Spitfire design was created by R. J. Mitchell, who had so successfully
designed and developed Supermarine’s Schneider-Trophy winning S.6 and S.6B
racing floatplanes. In many ways, the racing planes were the genesis of the
Spitfire, with their in-line Rolls-Royce “R” V-12 engines, and the general lines
of the S.6 series were certainly a preview of things to come. The original
prototype, K5054, first flew in 19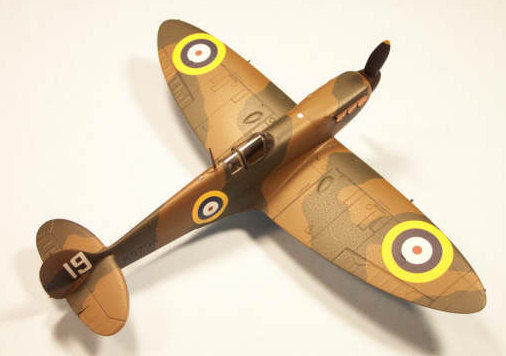 36, and production of the Mk. 1 Spitfire began
the following year. By mid-1938, the first deliveries of the new fighter began
to arrive at the Duxford based RAF No. 19 Squadron. These early Mk.1 series
Spitfires were fitted with the original flat canopy, the Watts two-bladed
fixed-pitch wooden propeller, and featured a very tall antenna mast behind the
canopy on the upper fuselage. This is the Spitfire in its purest original
in-service form, with the flat canopy making the aircraft extremely sleek in
side view.
36, and production of the Mk. 1 Spitfire began
the following year. By mid-1938, the first deliveries of the new fighter began
to arrive at the Duxford based RAF No. 19 Squadron. These early Mk.1 series
Spitfires were fitted with the original flat canopy, the Watts two-bladed
fixed-pitch wooden propeller, and featured a very tall antenna mast behind the
canopy on the upper fuselage. This is the Spitfire in its purest original
in-service form, with the flat canopy making the aircraft extremely sleek in
side view.
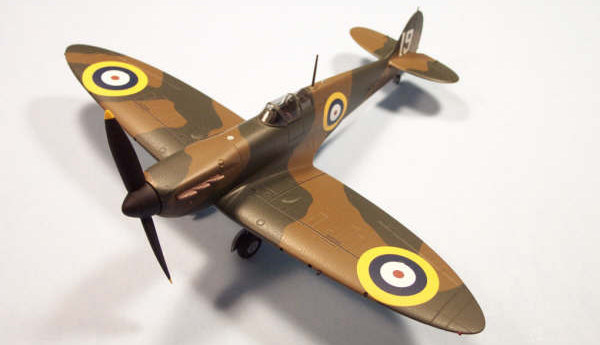
The paint scheme recently adopted by the RAF was Dark Earth and Dark Green camouflage with the large yellow surround roundels on the upper surfaces and fuselage sides. The undersides were “doped aluminum” lacquer, although this was very temporary; the undersides of Spitfires up to and during the Battle of Britain in mid-1940 would undergo at least five distinctively different color schemes, including “Sky Type S”, “Azure Blue”, “Duck Egg Blue”, “Night and White” (a split scheme of black and white), and several iterations of this black/ white scheme using aluminum, sky and other colors!
Unfortunately, R.J. Mitchell died before the Battle of Britain started, never getting to see what a legend and national icon his beautiful fighter design would become. These early Mk.1 Spitfires were eventually upgraded with the Rotol three-bladed variable-pitch propeller, a bulged canopy for better all around vision, and a shortened antenna mast, and these changes were phased into production very early on. While more knowledgeable Spitfire experts would be able to pinpoint the exact number, it is the writer’s guess that fewer than fifty of the original production batch had the early prop and canopy configuration.
For some time it had been my desire to model this earliest-series Spitfire Mk 1 in 1/48, and while on the Modeling Madness Reader’s Forum, helpful individuals such as Tom Cleaver and Malcolm McKay were able to advise me as to where I could find the conversion parts I would need to transform the Tamiya 1/48 Spitfire kit. The Watts propeller is available from Aeroclub in England (item number P430), the Falcon Clear-Vax canopy set #51 “Spitfire Special” from New Zealand features canopies for every Spitfire variant, including the prototype/ early production, and some internet searching revealed that the American Iliad Design produced a 1/48th “Pre-War Spitfires” decal sheet, number 48003. Having a Japanese kit, a British propeller, a New Zealand canopy and an American decal sheet, I finally had all the bits in place to do my early Mk. 1 “Spit” as was delivered to RAF No. 19 Squadron at Duxford in mid-1938.
| THE KIT |
 In
the early-90s, Tamiya produced three excellent 1/48 Spitfire kits, including the
Mk. 1, Mk. Vb, and the Mk. Vb tropical version, as used in North Africa and the
Mediterranean. Accurate, well-engineered and extremely well-fitting, these
Tamiya Spitfires are generally regarded as the best Spitfire kits in the scale,
and probably rank among the most accurate in any scale. As of this writing,
Airfix has announced an early Mk. 1 kit in 1/48, though it is not yet out, and
it is doubtful that it would be of equal quality as the Tamiya offering, though
this remains to be seen. The Tamiya kit is a Battle of Britain-era version,
featuring the three-bladed prop and several different versions of the blown
canopy, though none were correct for the early flat canopy version I was
modeling. There are several other reviews of the Tamiya 1/48 Spitfires in the
reviews archive.
In
the early-90s, Tamiya produced three excellent 1/48 Spitfire kits, including the
Mk. 1, Mk. Vb, and the Mk. Vb tropical version, as used in North Africa and the
Mediterranean. Accurate, well-engineered and extremely well-fitting, these
Tamiya Spitfires are generally regarded as the best Spitfire kits in the scale,
and probably rank among the most accurate in any scale. As of this writing,
Airfix has announced an early Mk. 1 kit in 1/48, though it is not yet out, and
it is doubtful that it would be of equal quality as the Tamiya offering, though
this remains to be seen. The Tamiya kit is a Battle of Britain-era version,
featuring the three-bladed prop and several different versions of the blown
canopy, though none were correct for the early flat canopy version I was
modeling. There are several other reviews of the Tamiya 1/48 Spitfires in the
reviews archive.
| CONSTRUCTION |
Stating
with the cockpit, the seat, bulkheads and floor framing were built up, with the
majority of the structure and fuselage inside walls being painted with Testors
Model Master RAF Interior Green. The Bakelite seat was painted in a semi-gloss
dark maroon brown, made up simply from a mix of red and black. I’m sure there
are several detail differences between the interior details of early and late Mk
1 Spitfires, but since the model was to be made with a closed canopy, it was not
a priority for me to go into the heavy research or make cockpit modifications.
Once the cockpit was assembled, the fuselage halves, wing assemblies and
horizontal stabs were all cemented together to make the basic airframe. This is
a really good, no-nonsense kit that goes together really easily, and all the
wing-to-fuselage junctions fit very clean and tight. The next step was to
reshape the fuselage beneath the windshield area for the early flat canopy.
Because the early windshield did not have the bulletproof front flat glass
panel, it was 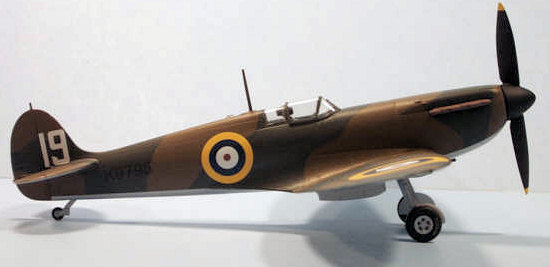 necessary to cut out the opening in the forward fuselage, then add
some Plastruct sheet styrene shaped like a horseshoe, then sanded flush with the
fuselage shape. I wanted the Falcon Clear-Vax canopy to have as tight a fit as
possible at the front with no gap, and this was achieved fairly effectively with
the added styrene.
necessary to cut out the opening in the forward fuselage, then add
some Plastruct sheet styrene shaped like a horseshoe, then sanded flush with the
fuselage shape. I wanted the Falcon Clear-Vax canopy to have as tight a fit as
possible at the front with no gap, and this was achieved fairly effectively with
the added styrene.
The under wing radiator and oil cooler fairings and center carburetor intake scoop were then added, with the internals painted aluminum with a light wash of flat black on the coolant radiator. The basic airframe was then seam-sanded and finished off with a wet sanding using 600 grit. Absolutely no filler was needed. Once the airframe sanding was completed, a taller antenna mast was made from spare sprue, and added to the upper fuselage behind the canopy. It was now time for painting.
| COLORS & MARKINGS |
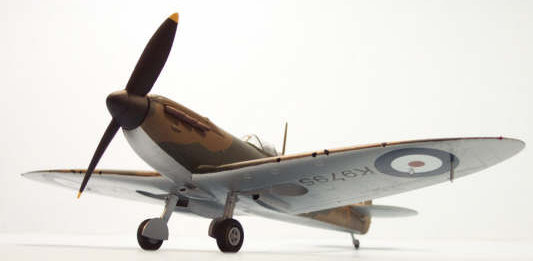
The aircraft I was modeling, serial number K9795, was the eighth
production aircraft, and was painted with the RAF “A” scheme camouflage pattern
with dark earth and dark green. Photos of this aircraft show a very sharp
demarcation line between the two colors. The entire upper surfaces were painted
with Testors Model Master RAF Dark Earth and allowed to dry for a day or so.
Tamiya provides a 1/48 scale camouflage pattern sheet with the kit, which
features plan form, left and right fuselage patterns. Although the kit’s sheet
features the “B” scheme, as used on both of the Battle of Britain aircraft
represented with the kit decals, the “A” scheme is essentially a mirror of the
“B” scheme, so it was easy to reverse the masking to accommodate this. I made a
c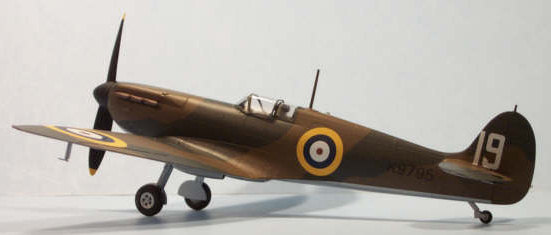 ouple photocopies of the pattern sheet then cut out the brown pattern shapes. I
then turned each shape upside down, and traced each shape to a 2-inch flat piece
of 3M low-tack blue masking tape. Once the traced edges were then cut to shape,
they were applied to the model upper surface, carefully positioning them to
reverse-mimic the “B” scheme plans. After all the masking was in place, Testors
Model Master RAF Dark Green was then applied. The tape was removed, and the
basic upper surface camouflage was complete, save for a couple of minor
touch-ups.
ouple photocopies of the pattern sheet then cut out the brown pattern shapes. I
then turned each shape upside down, and traced each shape to a 2-inch flat piece
of 3M low-tack blue masking tape. Once the traced edges were then cut to shape,
they were applied to the model upper surface, carefully positioning them to
reverse-mimic the “B” scheme plans. After all the masking was in place, Testors
Model Master RAF Dark Green was then applied. The tape was removed, and the
basic upper surface camouflage was complete, save for a couple of minor
touch-ups.
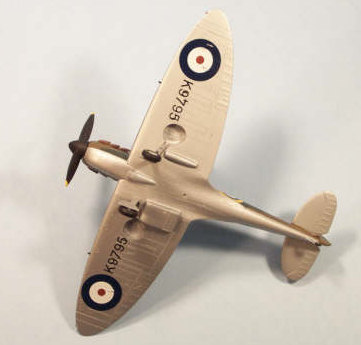
It was now time to do the underside, which was doped aluminum on these early in-service aircraft. Masking the entire upper surface camouflage, Testors Model Master Aluminum Non-Buffing Metalizer was then applied to the undersides, as well as the gear doors and gear legs. Note that the general demarcation between the upper and lower surface colors beneath the engine cowl is usually along the lower engine panel on most Spitfires. On these early aircraft, however, the demarcation line was actually lower and more contoured. Once the aluminum had dried, I then applied one coat of Testors Model Master Metalizer sealer to give the aluminum a slight sheen and to aid decal adhesion. Once the upper surface masking was removed, the upper surface was sprayed with a layer of Testors Gloss Coat to also aid decal adhesion.
Before the wing roundels were applied, the black wing walk stripes were taken from an Aero Master “Battle of Britain Spitfires” sheet and applied. The Tamiya kit decals offer the wing walk stripe, but are a bit thick, so the Aero Master stripes were used. In-flight photos of K9795 show the wing walk stripes not going outboard of the upper wing roundels as they do on later aircraft, so they were shortened accordingly. The rest of the decals were really simple. Yellow surround roundels are used on the upper surface and fuselage sides, with the white “19” on the vertical fin and a small K9795 on each rear fuselage side. Undersides have the standard tri-color roundels with the alternating K9795 inverted form one another as was common practice on all RAF aircraft in the late 30s. The upper surface was then sprayed with Dull Coat, and the underside given one more shot of metalizer sealer.
The
Falcon Clear-Vax canopy is a nice looking piece, but unfortunately suffers from
one setback. It is not formed as a single piece, but instead with the rear
window being separate from the main canopy and windshield. This was probably
engineered to allow the modeler the option of an open canopy. The rear window is
a perfect fit to the fuselage, but the main canopy’s rear edge is a bit w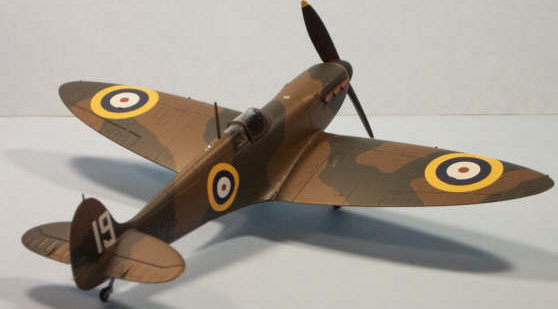 ide,
and does not fit tightly to the front edge of the rear window. This gap is well
out of scale for an actual aircraft, but since I got the main canopy and
windshield fit as I wanted, I won’t complain too much. The gap is evident in the
photos. The reflector gun sight was installed, then the canopy frame was masked
and painted RAF Dark Green, then carefully cemented to the fuselage. Tires were
painted flat black with the wheel hubs done in aluminum, with the center spoke
holes being shadowed in black. The “Dunlop” wording on the tires was highlighted
in flat yellow and is a nice touch on this kit. Tail wheel and strut were also
done in aluminum/ black, and all the landing gear was assembled to the airframe.
The main gear fit on this kit is excellent, with the correct camber and rake of
the gear legs and tires/ wheels.
ide,
and does not fit tightly to the front edge of the rear window. This gap is well
out of scale for an actual aircraft, but since I got the main canopy and
windshield fit as I wanted, I won’t complain too much. The gap is evident in the
photos. The reflector gun sight was installed, then the canopy frame was masked
and painted RAF Dark Green, then carefully cemented to the fuselage. Tires were
painted flat black with the wheel hubs done in aluminum, with the center spoke
holes being shadowed in black. The “Dunlop” wording on the tires was highlighted
in flat yellow and is a nice touch on this kit. Tail wheel and strut were also
done in aluminum/ black, and all the landing gear was assembled to the airframe.
The main gear fit on this kit is excellent, with the correct camber and rake of
the gear legs and tires/ wheels.
The exhaust stacks were painted in a rust/ metallic mixture, and installed in the fuselage sides. The clear lights were added to the upper fuselage aft of the antenna mast, and the lower wing with white glue. Next, the pitot tube was added to the lower left wing. The final touch was the Aeroclub propeller. First painted in flat yellow for the tips, then masked off and painted flat black, the prop was added to the kit’s existing propeller shaft with a little modification, a light film of baby oil added for the prop to turn freely, and then the prop was pushed into the front of the engine. This Aeroclub prop is very nice and fits well to this kit. The wingtip lights were then painted red and blue green, and this early Spitfire is now complete.
After completing the model and doing some subsequent follow-up research, I found at least a few areas where I made mistakes. First of all is the canopy to rear window fit I already mentioned. Second is that the lower wing roundels should have been positioned more inboard, because I had to put the pitot tube through the outer blue section of the roundel. Third is that the “19” decals on the tail fin are about 20% too large; they should be slightly smaller. Fourth on the list is that the wheel hubs may have actually been covered with a streamlined “hub cap” as has been seen in a few photos of very early aircraft. Those things aside, the overall finished product is well representative of the original-series Mk.1 Spitfire.
| CONCLUSIONS |
 The
Tamiya kit is basically flawless. It goes together really well and looks right
when finished. The Falcon canopy is overall very good, just suffers from some
rear gap. The Aeroclub prop is just right in shape, and works fine with this
model. The Iliad Design decal sheet is great, but the “19” is just a touch too
large. The conversion was fun and straightforward, and I was pleased with the
final result. I think this pre-war scheme with the yellow surround roundels
looks cool and isn’t seen that often. I look forward to doing all of the Tamiya
1/48 Spitfires; they are very gratifying builds of a great airplane. I recommend
this kit to any fan of the Spitfire.
The
Tamiya kit is basically flawless. It goes together really well and looks right
when finished. The Falcon canopy is overall very good, just suffers from some
rear gap. The Aeroclub prop is just right in shape, and works fine with this
model. The Iliad Design decal sheet is great, but the “19” is just a touch too
large. The conversion was fun and straightforward, and I was pleased with the
final result. I think this pre-war scheme with the yellow surround roundels
looks cool and isn’t seen that often. I look forward to doing all of the Tamiya
1/48 Spitfires; they are very gratifying builds of a great airplane. I recommend
this kit to any fan of the Spitfire.
| REFERENCES |
Various websites concerning the history of RAF No. 19 Squadron, and the Iliad Design decal sheet.
August 2007
Copyright ModelingMadness.com.
If you would like your product reviewed fairly and fairly quickly, please contact the editor or see other details in the Note to Contributors.