Airfix 1/72 Short Stirling
| KIT #: | ? |
| PRICE: | $10.00 (used, at a swap meet) |
| DECALS: | See review |
| REVIEWER: | Bryan Tucker |
| NOTES: |
| HISTORY |
The Short Stirling
was Great Britain’s first 4-engine bomber to achieve mass production since
the V/1500 in 1918. The bomber was to be the supreme aircraft t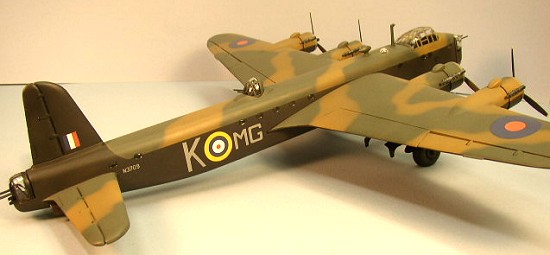 o win any
future war. However, the shortsightedness of the Air Ministry in 1936 was
remarkable: The aircraft must fit within existing hangars, limiting the
wingspan to a mere 99-ft. This single item accounted for the Stirlings one
true Achilles heel: It could not climb over 17,000. This meant the
aircraft bore the brunt of the flak, as it was flying in range of most of
the anti-aircraft weapons Germany had. Lancaster crews were said to
rejoice when they learned Stirlings would accompany them, as the Stirling
would draw the most fire. Aircrews, however, loved the majestic beast, and
those that survived and converted to Lancasters found the new aircraft
cramped, difficult to exit in an emergency, and tricky to fly not to
mention lacking dual controls. Defensive armament consisted of nose; tail
and mid-upper turrets all armed with .303 in. guns. The Stirling was unable
to carry the large blockbuster bombs of the RAF in later years, so the
remaining aircraft served with distinction as minelayers (called
“gardening”) and glider tug aircraft.
o win any
future war. However, the shortsightedness of the Air Ministry in 1936 was
remarkable: The aircraft must fit within existing hangars, limiting the
wingspan to a mere 99-ft. This single item accounted for the Stirlings one
true Achilles heel: It could not climb over 17,000. This meant the
aircraft bore the brunt of the flak, as it was flying in range of most of
the anti-aircraft weapons Germany had. Lancaster crews were said to
rejoice when they learned Stirlings would accompany them, as the Stirling
would draw the most fire. Aircrews, however, loved the majestic beast, and
those that survived and converted to Lancasters found the new aircraft
cramped, difficult to exit in an emergency, and tricky to fly not to
mention lacking dual controls. Defensive armament consisted of nose; tail
and mid-upper turrets all armed with .303 in. guns. The Stirling was unable
to carry the large blockbuster bombs of the RAF in later years, so the
remaining aircraft served with distinction as minelayers (called
“gardening”) and glider tug aircraft.
| THE KIT |
 Airfix’s Short
Stirling is the only injected molded model of this large aircraft. Other
scales are available (even 1/32!!!) in vacu-form. The kit is typical of
it’s 1960’s vintage: Vast raised surface detail, workable control surfaces,
and non-existent internal detail. The canopies are thick and opaque,
rendering anything inside distorted even if it was visible. A rudimentary
cockpit is provided with floor, seats and staircase to the lower deck. The
control panel is printed in the instructions and the builder is supposed to
cut this out and glue it to the panel! The complex undercarriage is well
executed, even for a kit of this vintage. Full bomb bay and bomb loads are
provided, as is a tractor and bomb carts. All the parts suffer from tons
of flash, sinkholes and severe warping and twisting. Decals are provided
for one aircraft. My sample’s decals were long destroyed by mold and
mildew, but Airfix/Humbrol replaced them free of charge within 10 days of
request via. E-mail!
Airfix’s Short
Stirling is the only injected molded model of this large aircraft. Other
scales are available (even 1/32!!!) in vacu-form. The kit is typical of
it’s 1960’s vintage: Vast raised surface detail, workable control surfaces,
and non-existent internal detail. The canopies are thick and opaque,
rendering anything inside distorted even if it was visible. A rudimentary
cockpit is provided with floor, seats and staircase to the lower deck. The
control panel is printed in the instructions and the builder is supposed to
cut this out and glue it to the panel! The complex undercarriage is well
executed, even for a kit of this vintage. Full bomb bay and bomb loads are
provided, as is a tractor and bomb carts. All the parts suffer from tons
of flash, sinkholes and severe warping and twisting. Decals are provided
for one aircraft. My sample’s decals were long destroyed by mold and
mildew, but Airfix/Humbrol replaced them free of charge within 10 days of
request via. E-mail!
| CONSTRUCTION |
First I separated
all major parts from the sprue trees (most had fallen off over the years,
anyway) and clean up began. I filled the sinkholes with putty and
assembled the control surfaces. I chose to glue all of my control surfaces
to the wings, etc.
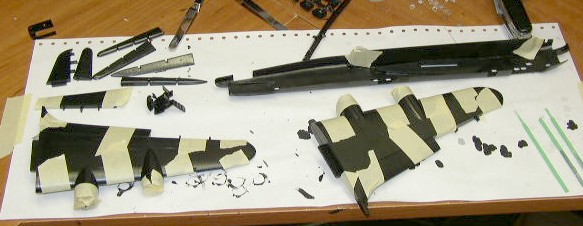 The fit of the controls to the wings requires putty and
glue to fill all the gaps, but this did not take as long as I thought. All
warped parts were bent back by hand. My wing halves when taped together
and test fit to the fuselage looked like an X-wing from head-on! That’s
the kind of warping we’re talking about here. After bending, shaping, etc.
the wing and tail halves were glued together and set aside with books on
top to prevent the warp from re-appearing during drying.
The fit of the controls to the wings requires putty and
glue to fill all the gaps, but this did not take as long as I thought. All
warped parts were bent back by hand. My wing halves when taped together
and test fit to the fuselage looked like an X-wing from head-on! That’s
the kind of warping we’re talking about here. After bending, shaping, etc.
the wing and tail halves were glued together and set aside with books on
top to prevent the warp from re-appearing during drying.
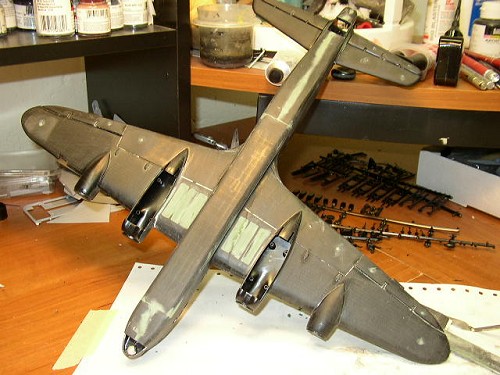
I then assembled the rudimentary interior and bomb bay into the fuselage half. I chose to make this a quick, simple build and painted the entire interior black. Even with the large canopy, you cannot really tell that your missing anything by not super-detailing the inside. This allowed me to close the fuselage halve fast and begin seam work. I left off all of the small internal windows, as I would replace these with Micro Krystal Kleer (saving masking time during painting). I chose to leave the bomb bay closed and glued the single-piece cover over the bay. I also did this with the wing bomb cell doors. The wing bomb cell doors fit terrible and took a ton of putty and sanding to make decent.
 Before I joined
the tail, horizontal stabilizers and wings, I went over all major
sub-assemblies with medium grit sanding stick to knockdown the raised
surface detail. My goal was not to completely eliminate it, but just to
knock it down to make it less conspicuous. After sanding and cleaning all
major subassemblies were joined. The task of putty-sand-repeat then
began. Filler was required of the majority of the very long fuselage
seam. The bomb bay cover also needed tons of putty to fair it in. After I
was satisfied with the seams, I began the rest of construction.
Before I joined
the tail, horizontal stabilizers and wings, I went over all major
sub-assemblies with medium grit sanding stick to knockdown the raised
surface detail. My goal was not to completely eliminate it, but just to
knock it down to make it less conspicuous. After sanding and cleaning all
major subassemblies were joined. The task of putty-sand-repeat then
began. Filler was required of the majority of the very long fuselage
seam. The bomb bay cover also needed tons of putty to fair it in. After I
was satisfied with the seams, I began the rest of construction.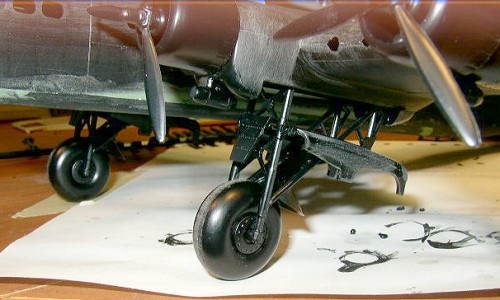
I then turned my attention to the complex main landing gear. These beefy undercarriage units went together with minimal fuss, although I chose to flatten the large tires on an iron to make the plane not sit so high. Construction was quick since I did not have to worry about painting the wheels and legs separately. The all-black undersurfaces make paining the gear a snap, since it is all black as well. The rear twin tail wheels were installed without incident. The entire model was then final sanded with fine grit sanding sticks and cleaned thoroughly.
| COLORS & MARKINGS |
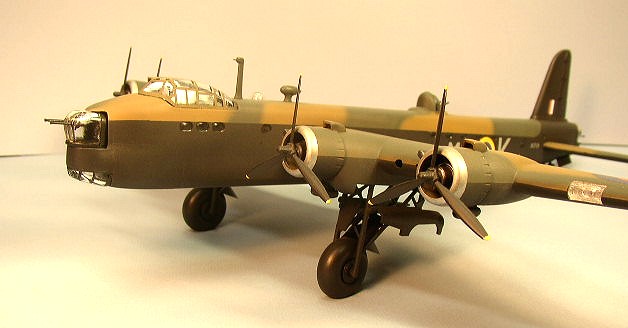
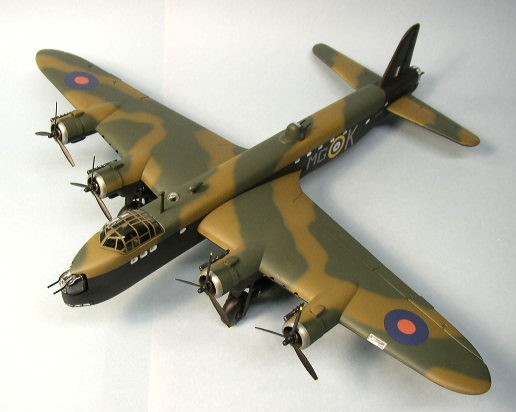
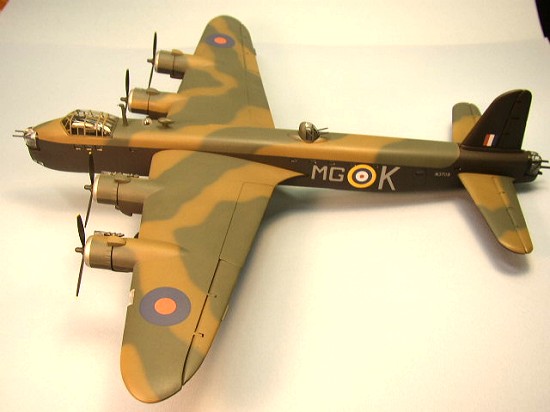 I chose to do a
Stirling Mk I (K-MG) of No. 7 Squadron based at Oakington, 1941. I painted
the kit with Testors Model Master Acrylics. I painted the bottom flat
black and the upper surfaces Dark Earth and RAF Medium Green. I used a
pencil to very lightly draw the camouflage pattern on the upper surfaces
and then freehand sprayed the pattern with my Aztec airbrush. I masked the
front of the engine nacelles and painted them Steel. I then prepped the
kit for decals with Model Master Gloss overcoat. I masked all the turrets
and canopies with Tamiya tape.
I chose to do a
Stirling Mk I (K-MG) of No. 7 Squadron based at Oakington, 1941. I painted
the kit with Testors Model Master Acrylics. I painted the bottom flat
black and the upper surfaces Dark Earth and RAF Medium Green. I used a
pencil to very lightly draw the camouflage pattern on the upper surfaces
and then freehand sprayed the pattern with my Aztec airbrush. I masked the
front of the engine nacelles and painted them Steel. I then prepped the
kit for decals with Model Master Gloss overcoat. I masked all the turrets
and canopies with Tamiya tape.
Airfix decals have a bad reputation, but the new samples sent to me had no problems whatsoever. They reacted well to Solva-Set and conformed well over all the remaining raised surface detail. I then waited 24 hours before I sprayed my final Model Master Flat coat.
| FINAL CONSTRUCTION |
I attached the landing gear, props and turrets and filled all the small windows with Krystal Kleer and the kit was finished!
| CONCLUSIONS |
Although I build almost exclusively German Luftwaffe aircraft, I can now say the Short Stirling is one of my favorites. The plane is huge and takes a bit of space to display. It’s one of those planes you never see modeled, even though there is a kit of it. All in all the construction of this old Airfix was trying at times, but if you know how to fix warped parts, putty and sand you will be fine. So dig out those old kits and build one, you just might be surprised with the outcome!
October 2004
| REFERENCES |
Warpaint Series No. 15, Short Stirling, Alan W. Hall
Profile Publications The Short Stirling, no. 142, Geoffrey Norris, 1966
Classic World War II Aircraft Cutaways, Bill Gunston, 1995
Copyright ModelingMadness.com
If you would like your product reviewed fairly and quickly, please contact the editor or see other details in the Note to Contributors.