|
KIT # |
3062 |
|
PRICE: |
$9.50 |
|
DECALS: |
Three Aircraft |
|
REVIEWER: |
|
|
NOTES: |
British D-Day or Swedish Air Force markings |
|
HISTORY |
The Mosquito was something of an unconventional aircraft from the
start. Constructed of wood at a time when the move was towards aluminum, the
aircraft was not received favorably at first, yet would go on to be constructed
in a variety of marks and serve in almost every role imaginable.
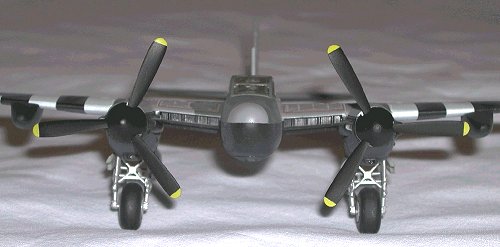
 The NF.XIX was a follow-on to earlier night fighter variants. It carried a
couple of different radars internal to the aircraft, with no need for extruding
antennas. This gives the aircraft’s nose a distinctly bulbous look when
compared to other marks. A total of 280 aircraft were delivered to the RAF by
the close of the Second World War. They were principally used to escort RAF
bombers on their night raids over Germany, to keep the Luftwaffe at bay.
The NF.XIX was a follow-on to earlier night fighter variants. It carried a
couple of different radars internal to the aircraft, with no need for extruding
antennas. This gives the aircraft’s nose a distinctly bulbous look when
compared to other marks. A total of 280 aircraft were delivered to the RAF by
the close of the Second World War. They were principally used to escort RAF
bombers on their night raids over Germany, to keep the Luftwaffe at bay.
Post-war, 60 refurbished NF.XIXs were passed to the Swedish Air Force and
redesignated J.30s. These Mosquitos were readily distinquished by their
four-bladed props. They served the Swedes faithfully from 1948 until the
arrival of Venom night fighters in 1953-54.
|
THE KIT |
Chuck August wrote a really nice preview of the kit . That preview is what inspired me to pick up this model at the local hobby store. I thought it would be a nice diversion from the usual Hasegawa-type kits I’ve been building. Of course, it had been a long time since I’ve built an Airfix kit....
|
CONSTRUCTION |
 The first two construction steps direct you to painting
the crewman. While I didn’t include them in my build, they would certainly help
fill an otherwise Spartan cockpit. My own first step was to dip the canopy,
already very clear, in Future, to give it that extra shine. (You should really
try this if you haven’t yet!) Although the canopy is thick, it’s very clear and
you can easily make out the cockpit details (or lack thereof, in my case).
The first two construction steps direct you to painting
the crewman. While I didn’t include them in my build, they would certainly help
fill an otherwise Spartan cockpit. My own first step was to dip the canopy,
already very clear, in Future, to give it that extra shine. (You should really
try this if you haven’t yet!) Although the canopy is thick, it’s very clear and
you can easily make out the cockpit details (or lack thereof, in my case).
Step three is where the rubber meets the road. I removed the forward part of
the fuselage halves as directed to make way for the new radome. The cockpit,
consisting of a floor, two seats, the stick, instrument panel, and radio rack
were installed along with the tail wheel. My tail wheel had an interesting
problem in that the side of the tire were wider than the middle section, giving
me a kind of “H” shaped wheel. (Actually, the tail wheel is supposed to be
that shape. Ed) I used superglue to make up the difference, then painted the
assembly and sandwiched it between the fuselage halves. I also glued the
horizontal stabilizer halves together and was ready to move on to the wings.
(Make sure you test fit the stabilizer halves to each other before you apply the
glue!)
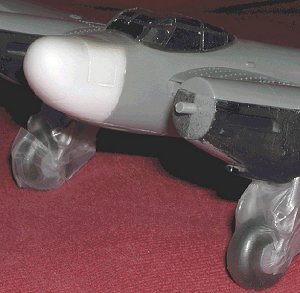 The next steps force you to make a decision. If you’re going to add the slipper
fuel tanks and/or the rockets, get out your drill and make the appropriate
holes. I’d decided to do the British “D-Day” version, but elected to leave
off the rockets. I put a piece of Bare Metal foil above the holes for the
landing lights, joined the wing halves, and added the wings, canopy, and nose to
the fuselage. The wings required some force to align properly, but superglue
and accelerator made short work of it--and no filler was required! This brings
me to the most challenging part
The next steps force you to make a decision. If you’re going to add the slipper
fuel tanks and/or the rockets, get out your drill and make the appropriate
holes. I’d decided to do the British “D-Day” version, but elected to leave
off the rockets. I put a piece of Bare Metal foil above the holes for the
landing lights, joined the wing halves, and added the wings, canopy, and nose to
the fuselage. The wings required some force to align properly, but superglue
and accelerator made short work of it--and no filler was required! This brings
me to the most challenging part
of the build.....
Building up the landing gear and constructing the nacelles was very frustrating.
The great thing is that I learned something from it and developed a much greater
appreciation for those who build older/limited run kits. The main gear itself
is about as complicated as the real thing, with four pieces that come together
and trapping the tire in between. As it was, the only pieces that gave me
trouble were the mud guards. You have to have their attachment lugs perfectly
aligned when they are glued together. Having done this, I spent several minutes
filing the mud flap mating points to get at least a reasonable fit. I had to
reattach these silly little flaps at least three times subsequently as there’s
just not much there to hold them. You’ve been warned!
 I always like having the option to add the landing gear at the very end of the
project. You don’t have that choice, here. I did some test fitting and ended
up enlarging the holes into which the struts attach on the sides of the engine
cowlings. I should have shortened the attachment pegs on the gear struts. The
landing gear struts have a slight inward bow at the gear/nacelle attachment
points because I didn’t.
I always like having the option to add the landing gear at the very end of the
project. You don’t have that choice, here. I did some test fitting and ended
up enlarging the holes into which the struts attach on the sides of the engine
cowlings. I should have shortened the attachment pegs on the gear struts. The
landing gear struts have a slight inward bow at the gear/nacelle attachment
points because I didn’t.
I glued the prop shaft to the right nacelle halves of the engines before closing
up the assembly. That gave me the relative luxury of being able to add the
props at the end of construction. After joining the halves, I filled the large
sink marks at the rear of the nacelles. This was the only filler used on the
kit. Once you get the nacelles glued in properly to the wings, its time to mask
everything off and paint.
|
PAINT & DECALS |
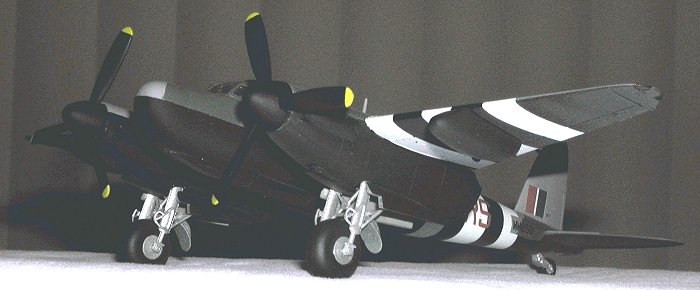
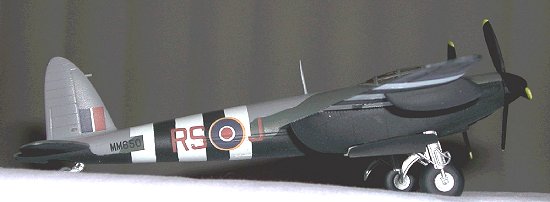
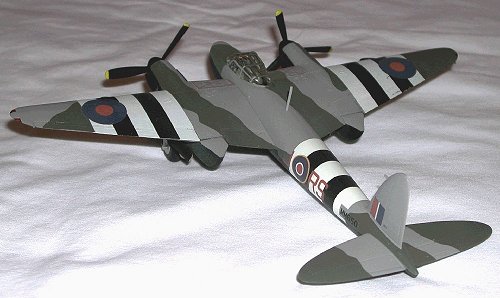
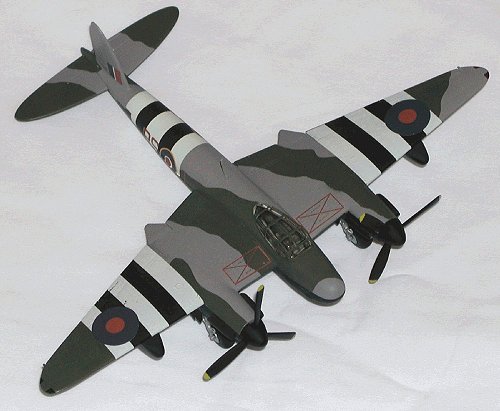
The British D-Day option, my choice, calls for black
undersides. Although unconventional, I decided that it would be easier to mask
the bottom of the aircraft off than the top side, so Gunze’s Flat Black was my
first color. Once that was masked off, I sprayed on the top colors (Gunze
Neutral Gray (H-53) and FS34079 Green (H-309)). I removed the masking tape
after about thirty minutes, sprayed Gunze’s Clear Gloss over the areas that
would be decaled, and let the aircraft sit for about a week.
 The last time I built an Airfix kit, the decals had the strength of wet tissue
paper without any of the flexibility. I found that they hadn’t changed much
since. I wanted to take the easy way out and use the invasion stripe decals.
The last time I built an Airfix kit, the decals had the strength of wet tissue
paper without any of the flexibility. I found that they hadn’t changed much
since. I wanted to take the easy way out and use the invasion stripe decals.
Looking the model over, I figured the fuselage stripes would be
the place to start. I dipped the stripes in water, wet down the model, and
proceeded to spend a very frustrating five minutes trying to get the blasted
thing to work. It really would have turned out o.k. except for one quarter-inch
area that stuck to the model as if it had been applied with superglue. I
finally gave up, threw the decal in the trash, and sanded down the stubborn
piece as much as I dared. (Yes, I tried to use masking tape to pull the residue
off, but it didn’t work!)
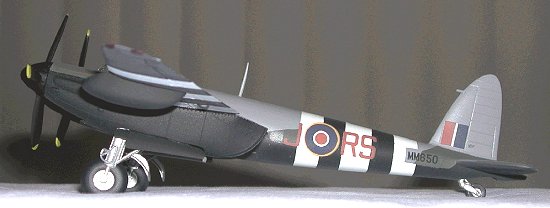
A taking a couple of days to cool off, I painted on the fuselage invasion
stripes and added the rest of the decals. The wing stripes went on relatively
well, but I used lots of Decal Sol to get them to bed down. As a matter of
fact, I used so much that the paint lifted in a couple of places while the
decals began disintegrating in others. Sigh..... This is supposed to be an
enjoyable hobby, right? After everything was in place and dry, I very carefully
wiped off the excess decal solution and touched up the damaged areas. Figuring
that the invasion stripes were temporary and imperfectly painted to start with,
I didn’t touch them up.
Despite problems with the larger decals, the smaller ones went on fairly well.
The radiator “No Step” markings settled down wonderfully over the raised rivet
detail in that area with absolutely no silvering. I’d recommend either painting
the invasion stripes or going with a Swedish bird next time....
|
CONSTRUCTION CONTINUES |
Now it was time to add the final small bits, gear doors, exhaust covers, antenna, fuel tanks, mud guards, etc., and give the last overall spray of flat. Once that was done and the canopy unmasked, I had a real feeling of accomplishment--and the whole thing looked o.k.!
|
CONCLUSIONS |
 I very much admire Airfix for bringing out these oddball-type
variants. They take a good amount of work to get right, but I’m more proud of
the work I put into this kit than some of the Hasegawa-type kits I’ve built
lately. This type of project really builds up my modelling skills and is
very rewarding. If you’re ready to take on a challenge, give this kit a whorl.
Any way you
I very much admire Airfix for bringing out these oddball-type
variants. They take a good amount of work to get right, but I’m more proud of
the work I put into this kit than some of the Hasegawa-type kits I’ve built
lately. This type of project really builds up my modelling skills and is
very rewarding. If you’re ready to take on a challenge, give this kit a whorl.
Any way you
build it, you’ll end up with four spare props for your parts bin! Recommended
to all but the absolute beginner.
Copyright ModelingMadness.com. All rights reserved. No reproduction in part or in whole without express permission from the editor.
If you would like your product reviewed fairly and fairly quickly, please contact the editor or see other details in the Note to Contributors.