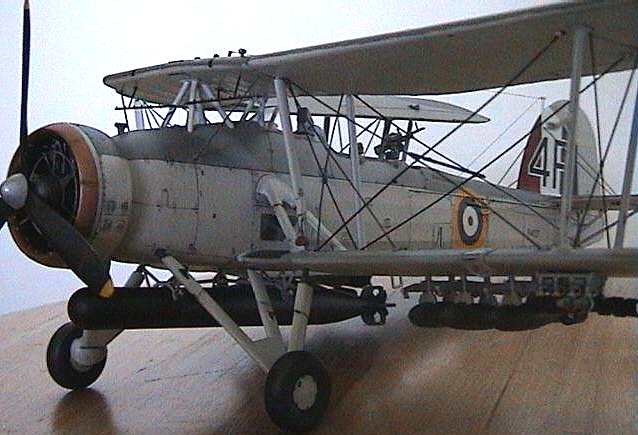
Tamiya 1/48 Swordfish I
|
KIT # |
61068 |
|
PRICE: |
Singapore $65.00 |
|
DECALS: |
Three aircraft |
|
REVIEW & |
Ewart Yong |
|
NOTES: |
Aeromaster Decals & Tamiya rigging set used |
|
HISTORY |
|When the Swordfish entered service with the Royal Navy's Fleet Air Arm in 1936, it already looked like a refugee from another age, a fabric-covered biplane in the dawning age of metal monoplanes. By the time war broke out in 1939, the Swordfish was considered obsolete. Yet it would be one of five aircraft in first line service of all combatants in 1939 that would still be in first line service in 1945, the others being the German Bf-109 and He-111, and the British Spitfire and Hurricane. Amazing as it may seem to look at the ungainly Swordfish, it is the most successful naval strike aircraft in history. Its exploits are the stuff of legend.
|
THE KIT |
The only major error in this kit is the specification of the camouflage scheme.
The instruction sheet incorrectly calls for a Dark Green/Dark Gray scheme when
it should be Dark Slate Gray and Dark Sea Gray. Other than this minor
discrepancy which all you Stringbag fans out there should be able to spot when
opening the box, the kit is otherwise perfect.
 When I first heard the first initial reviews on this kit, I was determined to
get my hands on it, so when it appeared on the shelves of a local hobby shop, I
bought it without hesitation, much to the disapproval of my wife who is aware
that I have nearly twenty unbuilt kits and accessories stashed in various parts
of our apartment. Molding is extremely crisp and free from any flash.
Panel lines are recessed and excellently portrayed. The instruction sheet
is very well laid out and each construction step is very clearly outlined with
no ambiguity whatsoever. At each of the steps, the modeler is alerted to
the
When I first heard the first initial reviews on this kit, I was determined to
get my hands on it, so when it appeared on the shelves of a local hobby shop, I
bought it without hesitation, much to the disapproval of my wife who is aware
that I have nearly twenty unbuilt kits and accessories stashed in various parts
of our apartment. Molding is extremely crisp and free from any flash.
Panel lines are recessed and excellently portrayed. The instruction sheet
is very well laid out and each construction step is very clearly outlined with
no ambiguity whatsoever. At each of the steps, the modeler is alerted to
the
addition of the photoetched detail parts should he chose to use this optional
extra.
|
CONSTRUCTION |
The kit was built straight out of the box and construction began with the
cockpit as usual. The only addition which I made was seat belts and
buckles from lead foil and fuse wire. Other than these very minor
enhancements, assembly pretty much went according to the instructions. The
cockpit interior was painted RAF Interior Green and given a brown/black wash of
water colours to accentuate the details. Once this was done the raised
detail was highlighted with the basic colour lightened with about forty percent
white. Other details were like switches, throttle etc.. were picked out in
the appropriate colours at this stage. Paint scuffing was simulated with
Testors aluminium paint applied with a 00 brush. Dirt was simulated by a
liberal dusting of brown pastel chalk powder in the appropriate areas. The
whole assembly was then given a protective coating of Testors Dullcote Lacquer
from a spary can.
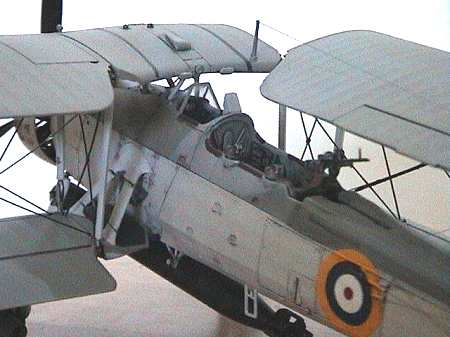
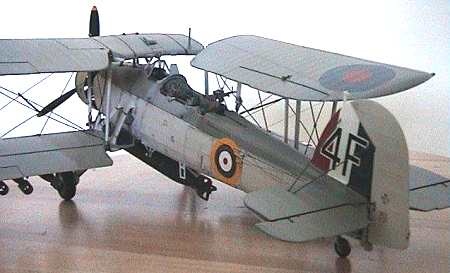
My attention now turned to the wings... I could not decide whether to pose the
model with the wings folded or extended and finally settled on a compromise - I
posed one wing extended and the other folded but that meant some minor
modifications to the wing spar. Construction of the rest of the kit went rather
smoothly. The fuselage, lower and top wings were not assembled together at
this stage as this might make painting very difficult, if not impossible.
The subassemblies were inspected for flaws and touched up accordingly in
preparation for painting.
 The fuselage interior was given a similar treatment, with the exception of the
doped fabric. This was painted red although some references suggested that
this was more a brownish colour. I decided however that the red would
enhance an otherwise drab interior. At this point I debated whether or not
to install the excellently molded crew figures but after much internal turmoil,
decided against it as (1) most of the interior detail would be obscured and (2)
this would mean removing the seat belts. The cockpit assembly was now attached
to the fuselage side. Fit is very tight and quite tricky. It took me
several dry fit attempts to get the installation just right.
The fuselage interior was given a similar treatment, with the exception of the
doped fabric. This was painted red although some references suggested that
this was more a brownish colour. I decided however that the red would
enhance an otherwise drab interior. At this point I debated whether or not
to install the excellently molded crew figures but after much internal turmoil,
decided against it as (1) most of the interior detail would be obscured and (2)
this would mean removing the seat belts. The cockpit assembly was now attached
to the fuselage side. Fit is very tight and quite tricky. It took me
several dry fit attempts to get the installation just right.
|
PAINT & DECALS |
The scheme which I chose was from the Aeromaster decal sheet as I felt that the
camouflaged options provided with the kit was rather dull. I masked the
off the cockpit opening with blue tac and the side windows with Tamiya masking
tape and sprayed the Light Aircraft Gray underside colour. After allowing
this to dry overnight, I shot the subassemblies with Dark Sea Gray after masking
off the demarcation between the upper and lower colours. Once dried, I masked
off the Dark Sea Gray portions with blue tac for the soft edge and sprayed the
Slate Gray. The Aeromaster sheet indicated that for the scheme I chose,
the upper surfaces of the lower wing and a semicircular area around the cockpit
just under the upper wing was to be painted a lightened hue of the basic
camouflage colours. I mixed the basic colours with about forty percent
white and painted these areas as specified.
These subassemblies were then given a coat of Humbrol Glosscote and the decals
applied. Once dry, light weathering was applied and panel lines enhanced
with my usual concoction of brown black water colours with a touch of kitchen
cleaner added to improve flowability and wetting. I decided not to weather
the model too heavily as I did not have any references at the time of
construction to show how the fabric covered surfaces of the flying surfaces
should be weathered. When done, the model was given a coat of Testors Dullcote
from my trusty Testors airbrush using the general purpose paint nozzle.
FINISHING DETAILS
 The photoetched rigging was painted and added now, secured with superglue. I
sprayed the photo eched parts with automotive primer and then with gunmetal
before cutting out the individual parts of for attachment to the model.
Fitting of these parts proved more difficult than expected and I made a mess of
a couple of parts, which had to be replaced with steel wire. The wings were then
installed along with the torpedo, smoke floats and bombs. It is doubtful
if the version I portrayed carried any of these amarment but I decided to put
them on anyway as I could not resist the colourful smoke floats and the
intimidating array of armament.
The photoetched rigging was painted and added now, secured with superglue. I
sprayed the photo eched parts with automotive primer and then with gunmetal
before cutting out the individual parts of for attachment to the model.
Fitting of these parts proved more difficult than expected and I made a mess of
a couple of parts, which had to be replaced with steel wire. The wings were then
installed along with the torpedo, smoke floats and bombs. It is doubtful
if the version I portrayed carried any of these amarment but I decided to put
them on anyway as I could not resist the colourful smoke floats and the
intimidating array of armament.
|
CONCLUSIONS |
The kit was a pleasure to build and I managed to complete it over 3 months,
about the usual time I take to finish a kit of this complexity. I highly
reccomend this kit to anyone who wishes to fill that gap in his FAA collection
and as usual, I hope the readers out there can overlook any imperfections and
technical errors in the pictures.
REFERENCES
I did not use any references in particular, but there were many websites which
greatly assisted me during my project.
Ewart Yong
If you would like your product reviewed fairly and fairly quickly, please contact the editor or see other details in the Note to
Contributors.