Xotic-72 1/72 Fokker T.V
| KIT #: | AU 2021 |
| PRICE: | Around $35.00 |
| DECALS: | All aircraft, two insignia options |
| REVIEWER: | Peter Neinhuis |
| NOTES: | Vacuform and injected multi-media kit. |
| HISTORY |
 In the
mid-thirties, the Dutch Fokker factory decided to build a medium range
“air-cruiser”, a twin-engined plane, with great fire-power, and a bomb-load as
well. The first plane was ready for it’s maiden flight on the 16th
October 1937. The Dutch government ordered 16 T-5’s, and they were delivered in
2 batches of 8 in the period 1938-1939.
In the
mid-thirties, the Dutch Fokker factory decided to build a medium range
“air-cruiser”, a twin-engined plane, with great fire-power, and a bomb-load as
well. The first plane was ready for it’s maiden flight on the 16th
October 1937. The Dutch government ordered 16 T-5’s, and they were delivered in
2 batches of 8 in the period 1938-1939.
Just in time to give the Dutch Army Airforce some more fire-power, this “modern” plane was the backbone of the Dutch Bomber command, the BomVliegtuituigAfdeling, BVA. Unfortunately, due to the common known Dutch habit of saving every dime, when the war broke out on the may of 10th 1940, 9 out of 16 T-5’s were ready for combat, with only two of them with the right bomb-racks to carry the full pay-load……. Overwhelmed by German Airforces in the early morning, the T-5’s took off, looking for action, not knowing where and how to strike. They did a fine job, the 20 mm Solothurn gun in the nose proved to be a major advantage as some German planes found out the hard why. However, enemy forces where much stronger, and on the 12th of may, the last T-5 went down in action. The German captured some damaged examples, but there where-abouts are foggy, so no complete T-5 survived the war.
| THE KIT |
Well, here starts another great story….
In the late 80’s
of the previous century, some Dutch modellers made contact with some fellow
builders in Czechia. Contacts 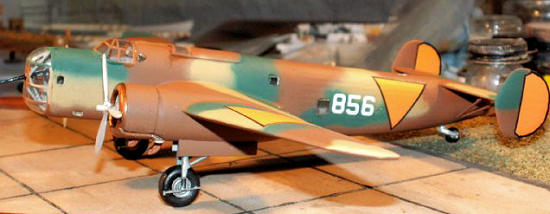 resulted in the making of several Dutch subjected
model kits in resin, CMK style. The Fokker T-5, T-VIIIw, D-XXIII, G-1 then came
available in the popular 1/72nd scale. All of them full resin, with
some vacform canopies, but no decals.
resulted in the making of several Dutch subjected
model kits in resin, CMK style. The Fokker T-5, T-VIIIw, D-XXIII, G-1 then came
available in the popular 1/72nd scale. All of them full resin, with
some vacform canopies, but no decals.
The Fokker T-5 was believed to be the best of the bunch. Good surface details, a complete interior, and a (relative) good fit. Of course, there were some lacks, but still you had a Fokker T-5 kit!
The resin T-5 is still rare, but it seems that one of the examples found it’s way to the USK Aviation modelkit company, and they decided to make the T-5 into a multi-media kit, so less experienced builders could built there T-5 as well, for a cheaper price. And so the USK-Aviation went into the Xotic brand-name, but the kit remains the same.
For the inbox kit review, see this link:
| CONSTRUCTION |
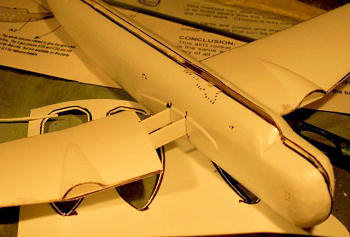
The contents of the box is 2 plates of vacform material, one metal etch sheet, 2 sets of short run injection molded plastic, a vacform clear sheet, and a full set of decals.
 Construction
starts with outlining the vacform parts, cutting them out and sanding them down
to the proper sizes or thickness. Start this process with the nose and canopy.
With these two parts, you can measure the fuselage halves during the sanding
process, and you can stop sanding at the right time. If you sand like other
vacform kits, until you meet the outlining, the fuselage will turn out1 mm too
thin….. and then it’s up to you to fill the gap.
Construction
starts with outlining the vacform parts, cutting them out and sanding them down
to the proper sizes or thickness. Start this process with the nose and canopy.
With these two parts, you can measure the fuselage halves during the sanding
process, and you can stop sanding at the right time. If you sand like other
vacform kits, until you meet the outlining, the fuselage will turn out1 mm too
thin….. and then it’s up to you to fill the gap.
For a proper construction, I first glued the wings together so I could dry fit them to the fuselage halves. After measuring, I made two slots in each fuselage halves where the wings would be mounted. In each slot there comes a spar (when the fuselage is ready), long enough to cover the space from engine to engine. For a better fix, the position of the wing I outlined with some scratch material, so the wing could clamp around it. Not uncommon in the vacform building I learned.
 When all this is
done, time to get the interior together. The floor panels will do fine for the
straight out of the box builder. However, to build a proper T-5, here comes the
bad news….. All parts are sized for almost 1/48th scale….. So the
control columns, seats and machine guns are useless, and the only proper floor
panel is the one that’s the ceiling of the bomb-bay. The cockpit floor and
second-pilot/airgunner floors only were half the size of the kit parts, and they
were only situated on the left (starboard) side of the plane. Getting these
trimmed down, not the real challenge, finding good seats, well a dive in the
spares box will solve that problem as well, If not, the kit leaves you with
enough scratch material to build your own. The metal etched parts, to get the
detailing up to scale, are good, and really a big plus in consideration with the
resin kit.
When all this is
done, time to get the interior together. The floor panels will do fine for the
straight out of the box builder. However, to build a proper T-5, here comes the
bad news….. All parts are sized for almost 1/48th scale….. So the
control columns, seats and machine guns are useless, and the only proper floor
panel is the one that’s the ceiling of the bomb-bay. The cockpit floor and
second-pilot/airgunner floors only were half the size of the kit parts, and they
were only situated on the left (starboard) side of the plane. Getting these
trimmed down, not the real challenge, finding good seats, well a dive in the
spares box will solve that problem as well, If not, the kit leaves you with
enough scratch material to build your own. The metal etched parts, to get the
detailing up to scale, are good, and really a big plus in consideration with the
resin kit.
When you have the
interior parts ready for fitting them into the fuselage, another vacform problem
struck me. Where the resin kit has supporting strips to get the floor-panels
well placed, the vacform fuselage halves come without those. Attach these strips
 yourself on the right spots, the bulkhead behind the pilot’s seat is a good
arching point. Don’t forget to glue the supporting strips of scratch material in
one fuselage halve as well. This is necessary to get the two fuselage halves
properly together.
yourself on the right spots, the bulkhead behind the pilot’s seat is a good
arching point. Don’t forget to glue the supporting strips of scratch material in
one fuselage halve as well. This is necessary to get the two fuselage halves
properly together.
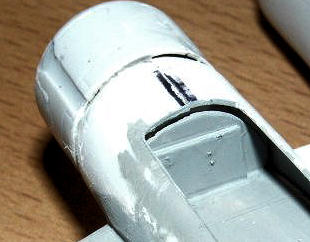
If you decide to make the kit with sticking machine guns out of every gunning position, now is the time to fix those guns on the right spots. And then you will find a big missing part on this kit. The entrance door on the right (starboard) side of the plane is missing….. As it was on the resin kit as well…… You can fix it by sanding the ribs down a bit on that part, and fill the spaces between the ribs with some filler. Sand it down until you have the same flat surface like the front part of the fuselage, and the entrance door is finished.
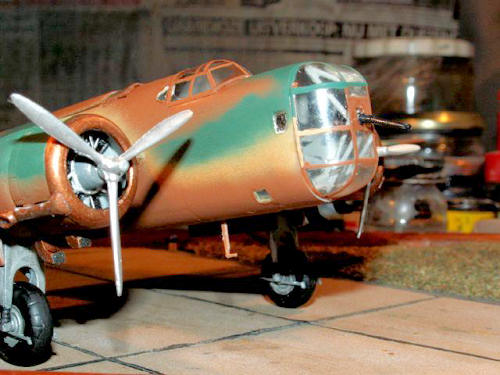
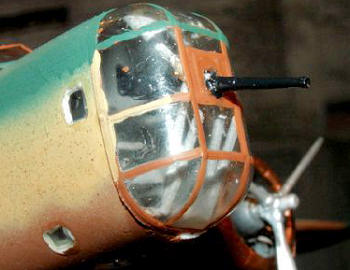
The nose glazing can also do with some better detailing as the kit offers, some of the supporting tubing is missing. However, on good pictures of the nose those tubings are very visible, and making them is really easy. Take the right length, and glue the parts inside the clear part on the right spots.
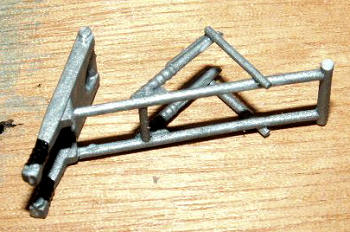 The biggest
challenge is the fit of the main undercarriage. If you believe the instruction
sheet, well, then the main legs will be in some air, and will be attached to
nothing. So you will have to make your own bulkhead in each engine bay, not
uncommon for vacform kits. To get the position of the main legs right, I glued a
The biggest
challenge is the fit of the main undercarriage. If you believe the instruction
sheet, well, then the main legs will be in some air, and will be attached to
nothing. So you will have to make your own bulkhead in each engine bay, not
uncommon for vacform kits. To get the position of the main legs right, I glued a
 strip of sheet on to this bulkhead, almost 1 mm above the point were the landing
gear doors are attached. If the strip is thick enough, you have the perfect rest
for the main legs. Construction of the legs themselves is almost straight
forward.
strip of sheet on to this bulkhead, almost 1 mm above the point were the landing
gear doors are attached. If the strip is thick enough, you have the perfect rest
for the main legs. Construction of the legs themselves is almost straight
forward.
OK, with the main
components, wings, engines and fuselage ready, it’s time to stick them together.
Fit of the engine-bays under the wings is a bit tricky, I cut of too much
material, but with some filler this problem can be solved fast. The short run
engines that the kit provid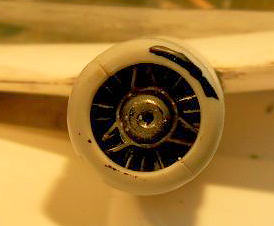 es are….. more or less useless. If you can find some better examples in your spare box grab them, or you can try to get you some
aftermarket resin ones as well. Fit of the engine cowlings is good enough, ant
they will fit properly on the engine bays as well.
es are….. more or less useless. If you can find some better examples in your spare box grab them, or you can try to get you some
aftermarket resin ones as well. Fit of the engine cowlings is good enough, ant
they will fit properly on the engine bays as well.
Wings fit reasonably well to the fuselage (if you take the “normal” vacform steps, making a fitting position with some scrap strips), only some minor putty was needed here.
The tail parts are all shortrun plastic, just trim the parts, align them correctly, and glue the tail on the end of the fuselage. The rudders must be sanded a little smaller on the upper and under sides, compared with the non moving part. Tail supports, tail wheel, pitot tubes can be added in this step as well. The antenna mast behind the cockpit isn’t necessary for every T-5, since it was a retractable kind of thing.
| COLORS & MARKINGS |
Painting
The kit instructions are not of any help here. The interior can be painted in light grey, humbrol 64, instrument panels satin black, as the ends of the steering columns. Guns in gun metal, engines aluminium like, landing gear legs dark brown, the socks matt black, tires satin black/ dark grey.
Exterior you can
do easy, overall aluminium dope, with registration 850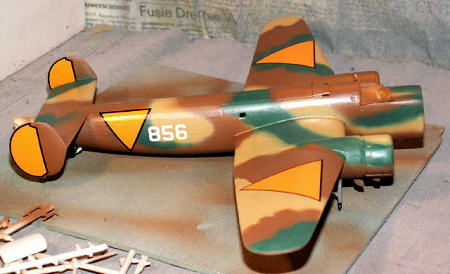 ,
and the insignias on the right places, and you have the 850 in prototype livery.
,
and the insignias on the right places, and you have the 850 in prototype livery.
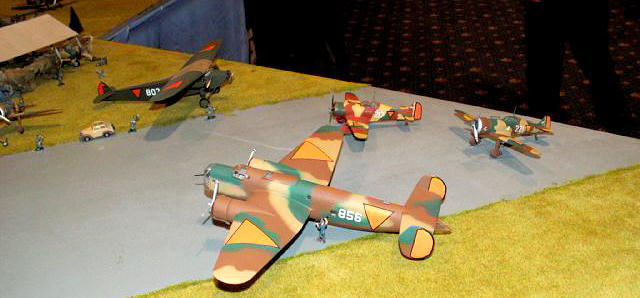
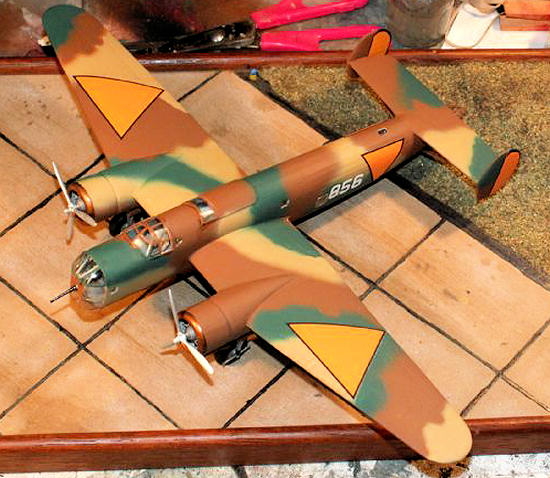
In real service, the camouflage patterns were simple, with 3 colours. There were 2 patterns, for each delivery batch, and they only differed in details. The colour scheme used brown overall, and sand and dark brown in large spots on the upper and side surfaces.
I’ve used humbrol 168, brown (or Testors 1701), humbrol 88 deck green, and humbrol 94, sand.
Markings
The Xotic kit has the benefit of being gifted with a very complete decal sheet. Markings for every T-5 are possible, and the left overs can be usefull for other Dutch aircraft of that same period. The sheet has the numbers in black and in white, but the white ones were common used. You can choose for the aluminium dope livery, the pre September 1939 option, with Dutch roundels and red-white-blue rudder surfaces in- and outside, or the orange triangles with orange rudders from the post September 1939 period. If you go for the orange option, be a were that the black outlining is to small. In 1/72nd scale, they all should be 2 mm thick, including the outlining on the rudder surfaces.
| CONCLUSIONS |
 Since it’s almost
the only Fokker T-5 kit in town in 1/72nd scale, a reasonable kit.
Because of the short run and metal etch parts not a full vacform kit. That can
be fine for those who don’t have much experience with vacform kits, only the
bigger parts are in vacform sheet. The complete decal sheet is also a big plus
in my humble opinion, the off-size black outlining of the orange decals can be
easily corrected if you want.
Since it’s almost
the only Fokker T-5 kit in town in 1/72nd scale, a reasonable kit.
Because of the short run and metal etch parts not a full vacform kit. That can
be fine for those who don’t have much experience with vacform kits, only the
bigger parts are in vacform sheet. The complete decal sheet is also a big plus
in my humble opinion, the off-size black outlining of the orange decals can be
easily corrected if you want.
Skill level, for the moderate experienced builder. The vacform parts are not that difficult that knowledge of rocket science is necessary.
The kit looks good when finished, that’s what really matters. If you want to build a Fokker T-5 at this present moment, this is the one to go for!
April 2008
Copyright ModelingMadness.com. All rights reserved. No reproduction in part or in whole without express permission from the editor.
If you would like your product reviewed fairly and quickly, please contact the editor or see other details in the Note to Contributors.
Back to the Review Index Page 2022