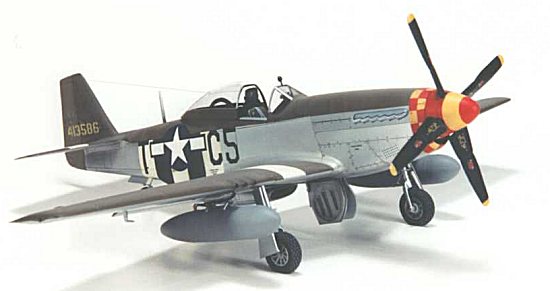
Tamiya 1/48 P-51D Mustang '8th AF'
|
KIT # |
61040 |
|
PRICE: |
$26 |
|
DECALS: |
three aircraft |
|
REVIEW : |
Ken Acosta |
|
NOTES: |
Several Updates |
|
HISTORY |
So much has been written about the history of the Mustang that any attempt to add more would definitely be redundant and, in my case, would probably be counterproductive. Please refer to the writings of true Mustang historians for truly worthwhile information.
|
THE KIT |
You’ve heard all about Tamiya Mustangs by now. Great fit, terrific engineering, solid accuracy, shake-the-box simple construction, yadda, yadda, yadda….. My experience reveals nothing to the contrary. I departed here and there from the instructions just to keep it interesting, but it would be downright difficult to build a bad model if one limits themselves to just the box contents.
|
CONSTRUCTION |
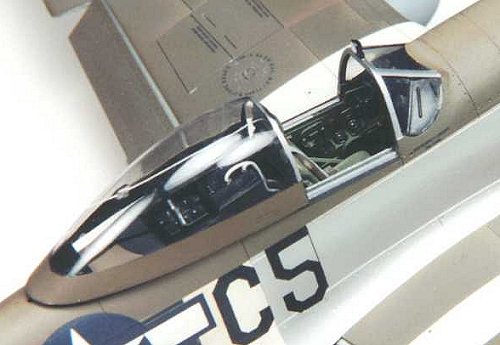 I started
with a True Details resin cockpit. This is a really sharp product that can’t
be beat for detail, fit, and low cost. Just to torture myself, I modified the
instrument panel and seat for a bit more accuracy. I sanded the back of the
resin panel until the center section was gone, then made my own replacement with
styrene and Waldron instrument dials. I like the appearance of this setup a
little better, but I also can’t paint molded instrument faces to save my life.
For this same reason, I carved away the molded lap belt and shoulder harnesses
from the resin seat and made my own from lead foil and Waldron PE buckles. These
were attached after the rest of the seat was painted. To the seat I also
attached the strip styrene angled side supports between the seat back and seat
pan. The resin sidewalls were attached to the fuselage after scraping away the
molded plastic detail. I wish I had taken more time with this operation to get a
snug fit rather than settling for "good enough," because now there is
a visible and unrepairable gap along the top edge on both sides. I didn’t even
notice it until much later when I removed the cockpit masking after painting the
plane. I used the P-51 Aero Detail book and P-51 Mustang Restored by Paul
Coggin for much of my cockpit coloring reference. Discrepancies were resolved by
the reliable "no-one-will-ever-notice-much-less-care" method of
choosing my own reasonable color. After painting, I added Waldron cockpit
placards where appropriate. After a good wash and drybrush, I closed the
fuselage sides and proceeded.
I started
with a True Details resin cockpit. This is a really sharp product that can’t
be beat for detail, fit, and low cost. Just to torture myself, I modified the
instrument panel and seat for a bit more accuracy. I sanded the back of the
resin panel until the center section was gone, then made my own replacement with
styrene and Waldron instrument dials. I like the appearance of this setup a
little better, but I also can’t paint molded instrument faces to save my life.
For this same reason, I carved away the molded lap belt and shoulder harnesses
from the resin seat and made my own from lead foil and Waldron PE buckles. These
were attached after the rest of the seat was painted. To the seat I also
attached the strip styrene angled side supports between the seat back and seat
pan. The resin sidewalls were attached to the fuselage after scraping away the
molded plastic detail. I wish I had taken more time with this operation to get a
snug fit rather than settling for "good enough," because now there is
a visible and unrepairable gap along the top edge on both sides. I didn’t even
notice it until much later when I removed the cockpit masking after painting the
plane. I used the P-51 Aero Detail book and P-51 Mustang Restored by Paul
Coggin for much of my cockpit coloring reference. Discrepancies were resolved by
the reliable "no-one-will-ever-notice-much-less-care" method of
choosing my own reasonable color. After painting, I added Waldron cockpit
placards where appropriate. After a good wash and drybrush, I closed the
fuselage sides and proceeded.
 I wanted to
model an early ‘D’ Mustang without the fin fillet, so I carefully cut away
the unwanted plastic from that area, filled in the resulting hole with scrap
styrene and CA, then carefully sanded and shaped it to create a decent panel
effect. The perforated panels on the lower front of the cowl (don’t know what
they’re called) looked OK, but I went ahead and drilled out the holes for a
bit more realism. Wings and horizontal tail were assembled and attached per the
instructions. The tail plane was attached before it was common to cut and drop
the elevators. In hindsight I really wish that I had done this for the more
candid look. The windscreen was attached with watch crystal cement, then masked
with one of those new (at the time) vinyl masks. IFF light holes were drilled
out in the lower wing tip and filled with epoxy tinted with the appropriate
color clear Tamiya acrylic paint. The molded position lights were cut off, to be
replaced with tinted epoxy as a final detail step.
I wanted to
model an early ‘D’ Mustang without the fin fillet, so I carefully cut away
the unwanted plastic from that area, filled in the resulting hole with scrap
styrene and CA, then carefully sanded and shaped it to create a decent panel
effect. The perforated panels on the lower front of the cowl (don’t know what
they’re called) looked OK, but I went ahead and drilled out the holes for a
bit more realism. Wings and horizontal tail were assembled and attached per the
instructions. The tail plane was attached before it was common to cut and drop
the elevators. In hindsight I really wish that I had done this for the more
candid look. The windscreen was attached with watch crystal cement, then masked
with one of those new (at the time) vinyl masks. IFF light holes were drilled
out in the lower wing tip and filled with epoxy tinted with the appropriate
color clear Tamiya acrylic paint. The molded position lights were cut off, to be
replaced with tinted epoxy as a final detail step.
I like to prepare as many parts separately as possible before they are attached to the bigger structure. I approach these parts as models unto themselves, which yields (in my opinion) a finished model with impressive attention to detail. After drooling over the fantastic work of other modelers, I’ve learned that this is a technique common to many of them. If I ever hope to approach their level of excellence, I figure it can’t hurt to apply their tricks to my work. For those of you who can do fine detail painting, my hat is off to you. However, my shaky hands preclude my membership in that club. So, painting a thousand separate parts before assembly works for me.
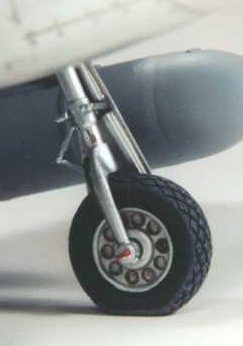 I used the
gorgeous Teknics brass landing gear, but I filed off the molded-on brake lines
in favor of my own made from copper wire. Each strut was sprayed with SNJ and
Future, then the oleo was wrapped with Bare Metal Foil. The brake lines were
painted and attached to the strut, then the tow rings were touched up in red. I
used True Details resin wheels as opposed to the kit parts partly for the better
tread detail, but also because the kit wheels were too big for the brass LG
struts. Excessive bulging was reduced and the "flat" was minimized
with a #11 blade and a Swiss file. The axle holes needed to be deepened to
accommodate the brass axles and this was done very carefully with a jeweler’s
drill press. The hubs were sprayed with SNJ and Future, then they were masked
and the tires were sprayed with Gunze Tire Black before drybrushing the treads
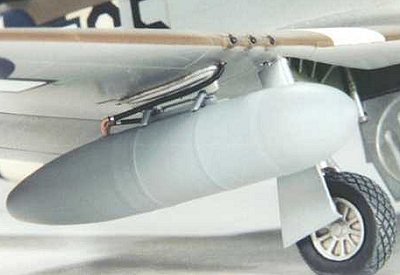
with dark gray and tan. The kit comes with the later 75-gallon metal drop tanks,
but the plane I ended up modeling used the earlier paper tanks. If you have the
Tamiya P-51B kit, you can rob the paper tanks from there. Otherwise you can use
the nice resin tanks from KMC, which is what I did. The actual tank has a steel
mounting bar along the top that KMC didn’t mold, so I added it with strip
styrene painted Metalizer Steel. The tanks were sprayed with Tamiya Neutral
Gray, which is correct for this plane at this time, even though the fuselage and
wing undersides were unpainted. I intentionally left them un-weathered since the
actual paper tanks were used only once. My semi-educated
I used the
gorgeous Teknics brass landing gear, but I filed off the molded-on brake lines
in favor of my own made from copper wire. Each strut was sprayed with SNJ and
Future, then the oleo was wrapped with Bare Metal Foil. The brake lines were
painted and attached to the strut, then the tow rings were touched up in red. I
used True Details resin wheels as opposed to the kit parts partly for the better
tread detail, but also because the kit wheels were too big for the brass LG
struts. Excessive bulging was reduced and the "flat" was minimized
with a #11 blade and a Swiss file. The axle holes needed to be deepened to
accommodate the brass axles and this was done very carefully with a jeweler’s
drill press. The hubs were sprayed with SNJ and Future, then they were masked
and the tires were sprayed with Gunze Tire Black before drybrushing the treads
with dark gray and tan. The kit comes with the later 75-gallon metal drop tanks,
but the plane I ended up modeling used the earlier paper tanks. If you have the
Tamiya P-51B kit, you can rob the paper tanks from there. Otherwise you can use
the nice resin tanks from KMC, which is what I did. The actual tank has a steel
mounting bar along the top that KMC didn’t mold, so I added it with strip
styrene painted Metalizer Steel. The tanks were sprayed with Tamiya Neutral
Gray, which is correct for this plane at this time, even though the fuselage and
wing undersides were unpainted. I intentionally left them un-weathered since the
actual paper tanks were used only once. My semi-educated
 guess is that they would have shown very
little wear and tear. The kit wing racks are nicely molded and include separate
sway braces. However, the sway braces are incorrect for the paper tank. More
appropriate braces came from the spares box and they were shaped to fit the
Tamiya racks. The resin tanks are relatively heavy, so I drilled two holes in
the mounting bar and corresponding holes in the rack. Short lengths of rod would
be used to strengthen the attachment and double as scale mounting lugs. Holes
were drilled in the lower wing surface near the rack and in the tank at the
locations where the fuel plumbing would attach. Several frustrating iterations
of scratch built plumbing nearly brought me to tears, but I finally used lengths
of copper wire bent to shape and painted to depict flexible hoses attached to
rigid pipes with Bare Metal Foil hose clamps. All of these small subassemblies
were set aside while I concentrated on the paint job.
guess is that they would have shown very
little wear and tear. The kit wing racks are nicely molded and include separate
sway braces. However, the sway braces are incorrect for the paper tank. More
appropriate braces came from the spares box and they were shaped to fit the
Tamiya racks. The resin tanks are relatively heavy, so I drilled two holes in
the mounting bar and corresponding holes in the rack. Short lengths of rod would
be used to strengthen the attachment and double as scale mounting lugs. Holes
were drilled in the lower wing surface near the rack and in the tank at the
locations where the fuel plumbing would attach. Several frustrating iterations
of scratch built plumbing nearly brought me to tears, but I finally used lengths
of copper wire bent to shape and painted to depict flexible hoses attached to
rigid pipes with Bare Metal Foil hose clamps. All of these small subassemblies
were set aside while I concentrated on the paint job.
|
PAINT & DECALS |
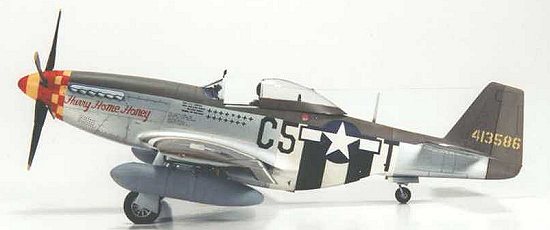 The majority
of ‘D’ Mustangs sport a natural metal finish. This was to be my first
serious attempt at NMF, and I was hoping to sorta stick my toes into the water
rather than jump straight in. One of the kit-supplied marking options is Thomas
Christian’s "Lou IV." This looked like a good choice since I always
liked the famous scheme and there wasn’t too much exposed NMF surface. The
combination of OD upper surfaces, big yellow nose, black anti-glare panel, and
partial invasion stripes left only a few areas on the fuselage sides, fin, and
most of the lower surfaces for natural metal (and the lower surfaces wouldn’t
be seen much). Using Testors Model Master Buffing Metalizers and Aeromaster
Warbird enamels, I got about 95% done with the paint scheme and only needed to
replicate the feathered edge of the OD over the metal. For the life of me, I
couldn’t get the edge right. No effort of soft-masking or fine-tip airbrushing
at low psi would give me the edge that looked acceptable. Ever since then, I’ve
exclusively blamed a faulty airbrush and the underlying Metalizer for the sloppy
edges, but a small, annoying voice keeps whispering something about
"operator error." Whatever. I ended up stripping the paint off of the
entire kit and started over.
The majority
of ‘D’ Mustangs sport a natural metal finish. This was to be my first
serious attempt at NMF, and I was hoping to sorta stick my toes into the water
rather than jump straight in. One of the kit-supplied marking options is Thomas
Christian’s "Lou IV." This looked like a good choice since I always
liked the famous scheme and there wasn’t too much exposed NMF surface. The
combination of OD upper surfaces, big yellow nose, black anti-glare panel, and
partial invasion stripes left only a few areas on the fuselage sides, fin, and
most of the lower surfaces for natural metal (and the lower surfaces wouldn’t
be seen much). Using Testors Model Master Buffing Metalizers and Aeromaster
Warbird enamels, I got about 95% done with the paint scheme and only needed to
replicate the feathered edge of the OD over the metal. For the life of me, I
couldn’t get the edge right. No effort of soft-masking or fine-tip airbrushing
at low psi would give me the edge that looked acceptable. Ever since then, I’ve
exclusively blamed a faulty airbrush and the underlying Metalizer for the sloppy
edges, but a small, annoying voice keeps whispering something about
"operator error." Whatever. I ended up stripping the paint off of the
entire kit and started over.
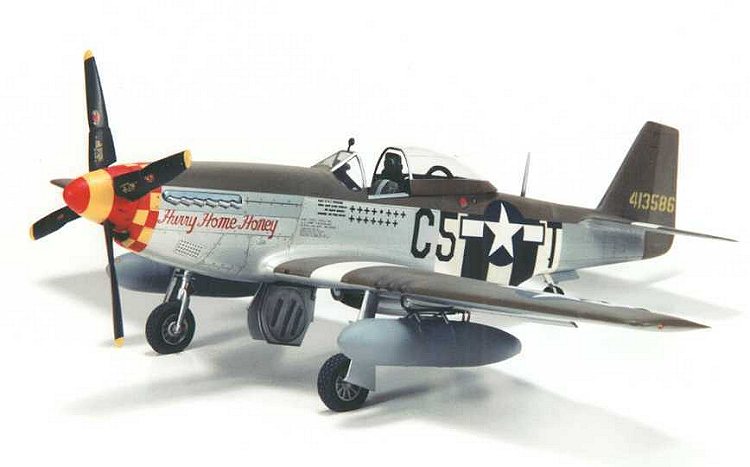
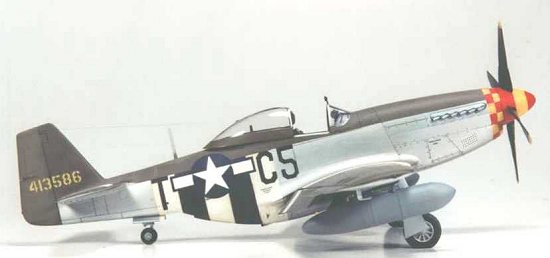
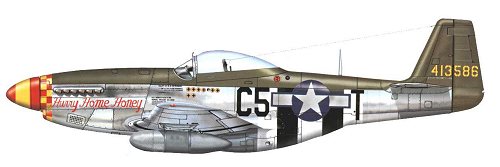
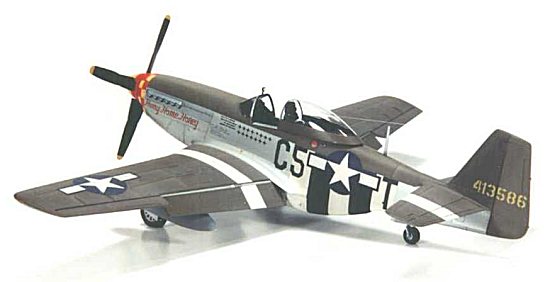
Since the fin fillet was gone, my remaining options were few. I
now needed to find a photo of an early ‘D’ with not too much NMF showing and
only hard-edged masking. Shouldn’t be too tough. Luckily, the terrific Osprey
book Mustang Aces of the 8th Air Force has a great side view
of Pete Peterson’s 357th FG mount "Hurry Home Honey" that
fit the bill perfectly. 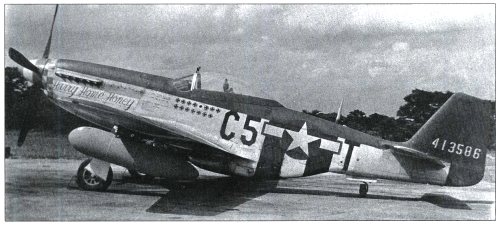 One
hurdle down. Now, does anyone make these markings? After much searching across
continents and over oceans, I found the markings practically in my back yard in
a hobby shop in Columbus, Ohio, where I was living at the time. The now-defunct
RepliScale made a series of sheets entitled "The Yoxford Boys," one of
which includes the very markings I needed. Two hurdles down and looking good! By
this point, I was a newlywed working a consulting job that required 12-15 hours
on site each day. Needless to say, modeling time was scarce. It took more than
two years to get the kit painted again. This time around I used SNJ for the
metal since it could be masked over. A couple of the panels are shaded with
slightly tinted SNJ for some visual variety. The OD upper surfaces are
One
hurdle down. Now, does anyone make these markings? After much searching across
continents and over oceans, I found the markings practically in my back yard in
a hobby shop in Columbus, Ohio, where I was living at the time. The now-defunct
RepliScale made a series of sheets entitled "The Yoxford Boys," one of
which includes the very markings I needed. Two hurdles down and looking good! By
this point, I was a newlywed working a consulting job that required 12-15 hours
on site each day. Needless to say, modeling time was scarce. It took more than
two years to get the kit painted again. This time around I used SNJ for the
metal since it could be masked over. A couple of the panels are shaded with
slightly tinted SNJ for some visual variety. The OD upper surfaces are
 Aeromaster enamels as are all of
the white invasion stripes. Panel shading of the OD was accomplished by spraying
a lightened shade of OD to the aft and outer edges of the panel lines, masked
with a Post-It Note. I masked and painted the yellow nose band with Aeromaster
enamels in anticipation of translucent decals. Black invasion stripes are Tamiya
acrylics and the wheel wells are Gunze interior green.
Aeromaster enamels as are all of
the white invasion stripes. Panel shading of the OD was accomplished by spraying
a lightened shade of OD to the aft and outer edges of the panel lines, masked
with a Post-It Note. I masked and painted the yellow nose band with Aeromaster
enamels in anticipation of translucent decals. Black invasion stripes are Tamiya
acrylics and the wheel wells are Gunze interior green.
By the time I got around to decals, Squadron/Signal had
published the book 357th Fighter Group by James Roeder. The
book includes a good profile of Peterson’s "Hurry Home Honey" and
there was also a great close-up photo of this plane’s nose section with the
nose art. 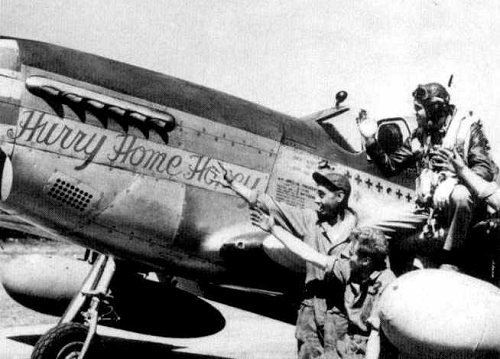 I compared the
photo, the caption, and the profile to the RepliScale markings and became
clinically depressed when I saw how inaccurate the decals were. The nose art
script was not only black when it needed to be red, but the lettering style was
completely fictitious.
I compared the
photo, the caption, and the profile to the RepliScale markings and became
clinically depressed when I saw how inaccurate the decals were. The nose art
script was not only black when it needed to be red, but the lettering style was
completely fictitious.

The fuselage codes were about 20% too wide and the sheet did not
include the crew stenciling. A co-worker, Dean Hawkins, helped me create the
correct nose art using Adobe PhotoShop on an image based on the correct style
from the Roeder documentation. The image turned out better than I had hoped,
albeit just a bit short in length.
Let’s see if the penlight police catch it. Thanks go to several folks who helped me slay this dragon, specifically Al Superczynski who steered me in the right direction regarding vector graphics software. I made the crew data stenciling on the computer while the fuselage codes came from either the spares box or from clear decal paper painted black and cut out. The red and yellow checkerboard nose band decal complied with neither my considerable will nor a gallon of Micro Sol, so I sprayed some clear decal paper red, then measured, cut out, and applied each square one by one. Since I had already painted the yellow band, this worked out quite well. I wouldn’t necessarily recommend this method to others, but I ended up with a nose band that I like and colors that matched perfectly with the red and yellow painted spinner. Stars and bars came from SuperScale spares, but the ones on the fuselage were translucent, so these were doubled-up. General stencils are from the Aeromaster P-51 Stencil sheet. When the dust had settled, the only markings used from the RepliScale sheet were the inaccurate kill markings, the incorrect aircraft data stencil, and the tail number.
 Future and
Pactra Clear Flat provided the decal under- and overcoats respectively.
Weathering was kept subtle as the available pictures of this particular plane
showed a relatively clean machine. No exhaust staining was evident, so I left it
off. Panel lines were highlighted with artist oils and a small bit of Tamiya
Clear Smoke was used for gun blast residue. I depicted chipped paint on the
edges of the gun bay doors and around the fuel filler caps with a silver
PrismaColor pencil. Keeping with my general rule of "less is more,"
this wear and tear was kept to a minimum.
Future and
Pactra Clear Flat provided the decal under- and overcoats respectively.
Weathering was kept subtle as the available pictures of this particular plane
showed a relatively clean machine. No exhaust staining was evident, so I left it
off. Panel lines were highlighted with artist oils and a small bit of Tamiya
Clear Smoke was used for gun blast residue. I depicted chipped paint on the
edges of the gun bay doors and around the fuel filler caps with a silver
PrismaColor pencil. Keeping with my general rule of "less is more,"
this wear and tear was kept to a minimum.
Details-
 Once all of
the color was applied, final assembly began. The stick, seat, and gunsight
reflector were installed in the cockpit. The brass landing gear, resin wheels,
and gear doors were attached, taking care to set the correct alignment on the
gear struts from all angles. Terrific Replicast exhaust units were sprayed with
some tinted SNJ, washed and drybrushed a bit, then attached with CA. Wing racks
and drop tanks were added along with plumbing lines. Fine brass tubing replaced
the molded on gun barrels. (Building tip: don’t install them with CA or they
will lock up in the wrong position. Believe me.) I used a canopy hood from the
Hasegawa Mustang so as to avoid dealing with the notorious sprue blemish and
canopy thickness of the Tamiya part. I added guide brackets to the inside
forward edge on each side of the frame but once installed, they’re pretty
tough to see. A quick dunk in Future for a great shine and the canopy was done.
Flaps and the prop were permanently attached. The rear view mirror was made from
styrene rod shaped to look about right, painted black, then dressed up with a
disc of Bare Metal Foil and attached to the windscreen. Position lights were
made by adding a touch of clear red or clear green Tamiya acrylic paint to a
spot of five-minute epoxy, waiting until the epoxy just starts to stiffen up,
then touching a dot of it to the correct position on the respective wing tip
with a toothpick. I would definitely recommend this method to others who might
consider it, but just be advised that the paint lengthens the epoxy hardening
time by several minutes. The final detail was the antenna line, which is
invisible thread painted silver. This was carefully attached to the fin and
pilot headrest with CA after threading it through a #80 hole drilled in the
canopy.
Once all of
the color was applied, final assembly began. The stick, seat, and gunsight
reflector were installed in the cockpit. The brass landing gear, resin wheels,
and gear doors were attached, taking care to set the correct alignment on the
gear struts from all angles. Terrific Replicast exhaust units were sprayed with
some tinted SNJ, washed and drybrushed a bit, then attached with CA. Wing racks
and drop tanks were added along with plumbing lines. Fine brass tubing replaced
the molded on gun barrels. (Building tip: don’t install them with CA or they
will lock up in the wrong position. Believe me.) I used a canopy hood from the
Hasegawa Mustang so as to avoid dealing with the notorious sprue blemish and
canopy thickness of the Tamiya part. I added guide brackets to the inside
forward edge on each side of the frame but once installed, they’re pretty
tough to see. A quick dunk in Future for a great shine and the canopy was done.
Flaps and the prop were permanently attached. The rear view mirror was made from
styrene rod shaped to look about right, painted black, then dressed up with a
disc of Bare Metal Foil and attached to the windscreen. Position lights were
made by adding a touch of clear red or clear green Tamiya acrylic paint to a
spot of five-minute epoxy, waiting until the epoxy just starts to stiffen up,
then touching a dot of it to the correct position on the respective wing tip
with a toothpick. I would definitely recommend this method to others who might
consider it, but just be advised that the paint lengthens the epoxy hardening
time by several minutes. The final detail was the antenna line, which is
invisible thread painted silver. This was carefully attached to the fin and
pilot headrest with CA after threading it through a #80 hole drilled in the
canopy.
|
CONCLUSIONS |
 No one will
ever rightly accuse me of building too fast. I started this kit in December ’95
and completed it in November 2000. So much for a kit that practically builds
itself! To be fair, the kit spent much of those five years either stuffed in a
box on the closet shelf or lying neglected and gathering dust on the workbench.
Graduate school, a wedding, two career changes, and three moves within that time
span can take their toll on available model building time. But all that aside, I
ended up with a Mustang that I’m proud of and that looks pretty sharp on the
display shelf. I had a blast upgrading the kit and overcoming the challenges of
the color scheme and markings. My only regrets are not being more careful with
the fit of the TD cockpit sidewalls and not dropping the elevator. Other than
that, I’m real tickled with the outcome. Much of the satisfaction I get from
this hobby comes from clearing tough hurdles and acquiring new modeling skills.
With that in mind, this project was totally satisfying.
No one will
ever rightly accuse me of building too fast. I started this kit in December ’95
and completed it in November 2000. So much for a kit that practically builds
itself! To be fair, the kit spent much of those five years either stuffed in a
box on the closet shelf or lying neglected and gathering dust on the workbench.
Graduate school, a wedding, two career changes, and three moves within that time
span can take their toll on available model building time. But all that aside, I
ended up with a Mustang that I’m proud of and that looks pretty sharp on the
display shelf. I had a blast upgrading the kit and overcoming the challenges of
the color scheme and markings. My only regrets are not being more careful with
the fit of the TD cockpit sidewalls and not dropping the elevator. Other than
that, I’m real tickled with the outcome. Much of the satisfaction I get from
this hobby comes from clearing tough hurdles and acquiring new modeling skills.
With that in mind, this project was totally satisfying.
P.S. This was my first serious attempt at model photography. While I have a long way to go before I consider myself proficient, I nevertheless owe many thanks to Tom Cleaver and Bob Laskodi, both of whom I met through the WWI Modelers Mailing List. Tom described the proper studio setup and Bob passed on his optical secrets. Thanks guys!
|
REFERENCES |
357th Fighter Group
Fighters of the Mighty 8th
The Great Book of WWII Airplanes; P-51 Mustang
Mustang Aces of the 8th Air Force
Mustang, The Story of the P-51 Fighter
North American P-51D Mustang
North American P-51 Mustang
P-51 Mustang in Action
P-51 Mustang in Color
P-51 Mustang Restored
Warbird History – P-51 Mustang
WWII Fighters, Design with Precision
Copyright ModelingMadness.com. All rights reserved. No reproduction in part or in whole without express permission from the editor.
If you would like your product reviewed fairly and quickly, please contact the editor or see other details in the Note to Contributors.
Back to Reviews Page 2024