|
KIT: |
Hasegawa 1/72 F6F-3/5 Hellcat |
|
KIT # |
617 |
|
PRICE: |
$14.25 |
|
DECALS: |
Two aircraft |
|
REVIEW & |
Ken Acosta |
|
NOTES: |
Several Updates |
|
HISTORY |
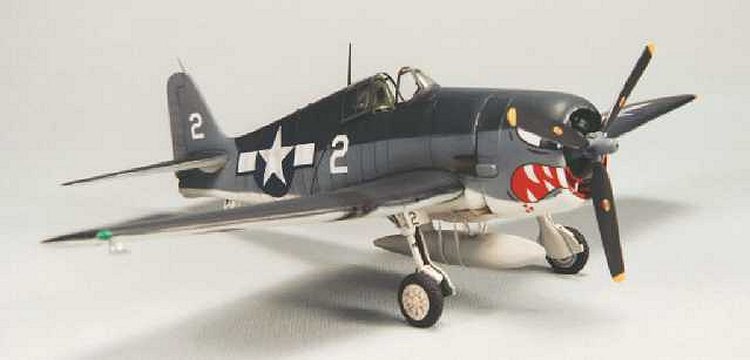
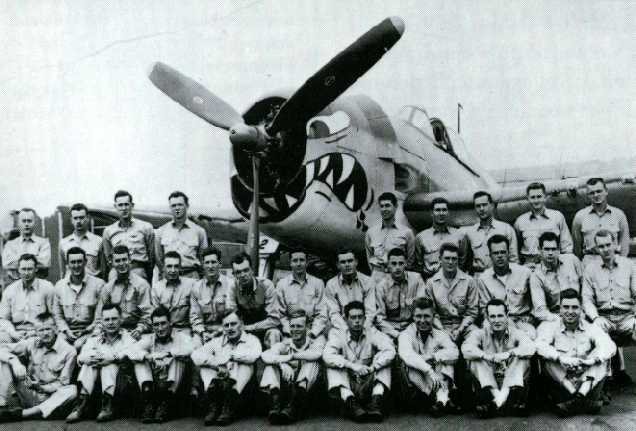
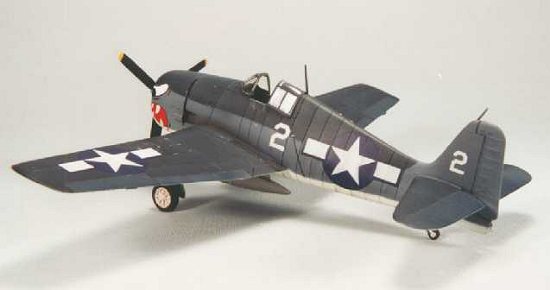
The model represents an F6F-3 Hellcat of VF-27 as it appeared in October 1944 when it served aboard the USS Princeton. This was the only squadron of US Hellcats throughout the war that uniformly displayed markings other than those officially sanctioned by the Navy. Three of VF-27’s pilots contributed to the design of the "cat mouth" nose art, which was then hand-painted on most of the squadron aircraft by one of the pilots, LT Robert Burnell. When the Princeton was sunk by Japanese aircraft off the eastern coast of Luzon in the Philippines on October 24, the defending Hellcats were forced to recover aboard other carriers where they were promptly directed to comply with Navy regulations and eliminate the nose art.
|
THE KIT |
I built this model back in 1994/95. When deciding what to build at the time, I examined this kit along side the Academy kit. Both looked good, with the Academy kit having nicely recessed panel lines but overly-thick trailing edges on the tail. I remember that it was the thick trailing edges that swayed me toward the Hasegawa kit (regrets detailed elsewhere in this review). Overall, the Hasegawa 1/72 Hellcat releases are quite nice. While the kit shows its age with its raised panel lines and sparse cockpit detail, the fit of the parts is very good. My particular kit came molded in dark blue styrene, although I understand they are now released in Hasegawa’s typical light gray.
|
CONSTRUCTION |
I retained a sheet of notes that I displayed with the model when it was entered in a local contest. If it weren’t for this, I would have long forgotten most of the construction experience. Close inspection of the photos has helped fill in the rest of the memory blanks.
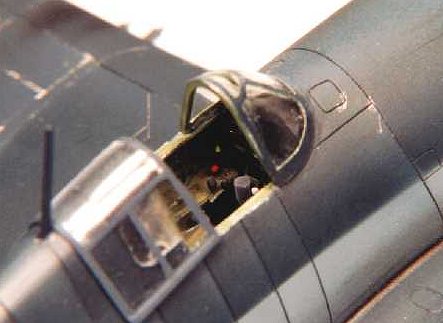 Construction began in the cockpit. The kit provided the bare essentials here,
but I wanted a better representation. I modified the photoetch (PE) seat from
the Eduard Wildcat set and the support frame came from .020 styrene rod. Lap
belts and shoulder harnesses were cut from lead foil, while the PE buckles are
from Model Technologies. I cut the cockpit floor and foot rails from styrene
sheet. Side consoles and the instrument panel came from the Airwaves Hellcat PE
cockpit set. The cockpit was painted with Aeromaster and Model Master enamels,
then washed with thinned artists’ oils. *Modeling tip: apply acrylic clear
coat over enamels if washing with thinned artists oils. This way, you can avoid
having to re-paint the entire cockpit after you watch the oil thinners clean off
all of the paint. And I mean ALL of the paint. Grrrrrrr…
Construction began in the cockpit. The kit provided the bare essentials here,
but I wanted a better representation. I modified the photoetch (PE) seat from
the Eduard Wildcat set and the support frame came from .020 styrene rod. Lap
belts and shoulder harnesses were cut from lead foil, while the PE buckles are
from Model Technologies. I cut the cockpit floor and foot rails from styrene
sheet. Side consoles and the instrument panel came from the Airwaves Hellcat PE
cockpit set. The cockpit was painted with Aeromaster and Model Master enamels,
then washed with thinned artists’ oils. *Modeling tip: apply acrylic clear
coat over enamels if washing with thinned artists oils. This way, you can avoid
having to re-paint the entire cockpit after you watch the oil thinners clean off
all of the paint. And I mean ALL of the paint. Grrrrrrr…
The fuselage sides came together nicely as did the three-part wing assembly.
Fit was exceptional throughout. Once all of the big pieces came together, I
foolishly took this opportunity to expand my modeling skills by attempting to
re-scribe all of the panel lines.
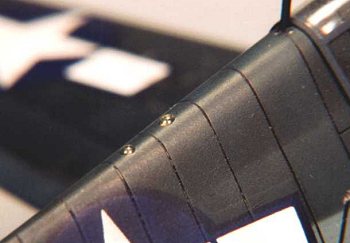 Partly because it was my first attempt and
partly because I was working in such a small scale, the experience was rather
painful. The results that you see in the photos did not come easily. I used a
sewing needle held in a pin vise, which is a decent tool for the task, but my
dexterity was underdeveloped. Many times I overshot the end of a panel line or
somehow strayed off of the guide, leaving ugly and unwanted trenches that had to
be addressed. In each case, I went back and filled the errant gouge with thick
CA and accelerator, then re-re-scribed the line correctly. Those thick trailing
edges on the Academy kit were looking better and better.
Partly because it was my first attempt and
partly because I was working in such a small scale, the experience was rather
painful. The results that you see in the photos did not come easily. I used a
sewing needle held in a pin vise, which is a decent tool for the task, but my
dexterity was underdeveloped. Many times I overshot the end of a panel line or
somehow strayed off of the guide, leaving ugly and unwanted trenches that had to
be addressed. In each case, I went back and filled the errant gouge with thick
CA and accelerator, then re-re-scribed the line correctly. Those thick trailing
edges on the Academy kit were looking better and better.
Before attaching the wings to the fuselage, the IFF light locations on the belly were drilled out, backed by scrap styrene, then filled with a disc of Bare-Metal Foil and clear green/red/orange Tamiya acrylic paints. The lenses are from 5-minute epoxy. The molded-on guns were cut away from the wing leading edges and holes were drilled in preparation for brass tubing replacements. The kit comes with a one-piece canopy, which wouldn’t do if I wanted to show off all that hard-won cockpit detail. I carefully sawed the windscreen and hood apart, discarding the hood in favor of a Falcon vac-form replacement. After sanding the aft edge of the windscreen to size, I masked off the clear panels and attached it to the fuselage using white glue. Sealing off the cockpit with tissue paper and masking tape, I proceeded to the paint booth.
|
PAINT & MARKINGS |
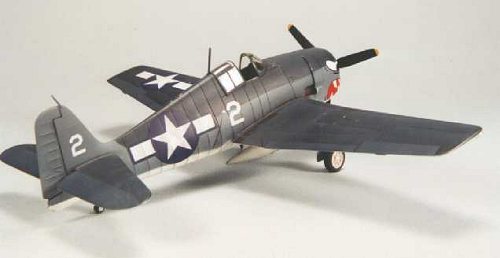 I polished the assembly with Blue Magic in preparation for the paint. I knew
I would be painting this kit in the three-tone Navy scheme of sea
blue/intermediate blue/white, so I started with an overall coat of Aeromaster
enamel white. This was my first experience with Aeromaster paints and I used
Aeromaster thinner in my airbrush. I’m still not completely sure why, but the
paint dried to a disturbing pebbly texture all over. Speculation is that the
silicon-based Blue Magic that was used to polish the plastic reacted poorly with
the enamel, or that my paint-to-thinner ratio was off. Whichever. Either way,
attempts to sand the paint to a smooth surface proved fruitless and I ended up
stripping the paint with Aeromaster paint & decal remover. After cleaning
off the paint and rinsing the stripper residue, I let the model sit overnight
while my frustrations settled down. The stripper proved to be very effective; so
effective in fact that it ate through several of the major glue joints! When I
picked up the model the next morning to inspect the work, the top wing halves
separated from the wing bottom and one of the horizontal stabs fell off. (I wish
I could build just ONE model that doesn’t require a massive mid-project
repair/salvage effort.) I think I’ve stayed in this hobby as long as I have in
part by recognizing when to walk away from a project and close the door. I came
back about a week later, this time armed with renewed determination and focus.
I polished the assembly with Blue Magic in preparation for the paint. I knew
I would be painting this kit in the three-tone Navy scheme of sea
blue/intermediate blue/white, so I started with an overall coat of Aeromaster
enamel white. This was my first experience with Aeromaster paints and I used
Aeromaster thinner in my airbrush. I’m still not completely sure why, but the
paint dried to a disturbing pebbly texture all over. Speculation is that the
silicon-based Blue Magic that was used to polish the plastic reacted poorly with
the enamel, or that my paint-to-thinner ratio was off. Whichever. Either way,
attempts to sand the paint to a smooth surface proved fruitless and I ended up
stripping the paint with Aeromaster paint & decal remover. After cleaning
off the paint and rinsing the stripper residue, I let the model sit overnight
while my frustrations settled down. The stripper proved to be very effective; so
effective in fact that it ate through several of the major glue joints! When I
picked up the model the next morning to inspect the work, the top wing halves
separated from the wing bottom and one of the horizontal stabs fell off. (I wish
I could build just ONE model that doesn’t require a massive mid-project
repair/salvage effort.) I think I’ve stayed in this hobby as long as I have in
part by recognizing when to walk away from a project and close the door. I came
back about a week later, this time armed with renewed determination and focus.
After reattaching the fallen pieces and taking care of the seams, I turned
again to the paint job. This time around at the recommendation of a fellow
modeler, I used Testors Model Master thinner with the Aeromaster paints. The
white went on with no problem. The intermediate blue and sea blue went on
respectively using Post-It notes for masks, trimmed to follow the correct edge
patterns. In order to avoid the hard edges that result from contact masks, I
lifted the mask edges from the surface by about 1/8 of an inch.
 The photos do
not do this effort much justice, but I hope you believe me when I say that it
looks very scale-like in person. The faded fabric control surfaces and panel
effect were applied with a mix of sea blue, gray, white, and clear. This mix was
also lightly dusted over all of the aircraft upper surfaces to depict sun
fading. The wing tip position light locations were masked off and painted white
before overcoating with Tamiya clear green and red as appropriate. A coat of
Future was applied as a final step prior to decal application.
The photos do
not do this effort much justice, but I hope you believe me when I say that it
looks very scale-like in person. The faded fabric control surfaces and panel
effect were applied with a mix of sea blue, gray, white, and clear. This mix was
also lightly dusted over all of the aircraft upper surfaces to depict sun
fading. The wing tip position light locations were masked off and painted white
before overcoating with Tamiya clear green and red as appropriate. A coat of
Future was applied as a final step prior to decal application.
Decals came from the kit, Superscale, Aeromaster, and the spares box. All went on well, with the only challenge coming from the cat mouth where it wraps around the front of the cowl. Patience and several applications of MicoSol did the trick nicely.
Weathering was done primarily with thinned artist's oils. These brought out the panel lines and flight control separation lines. A heavier mix was used for exhaust and oil stains. The chipped paint was done with selective use of a silver Prismacolor pencil, and a final coat of Gunze Sangyo flat clear finished it off.
|
DETAILS |
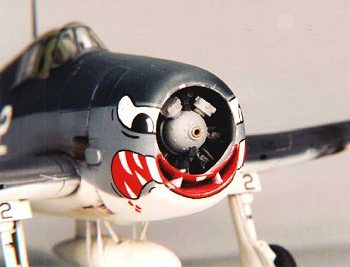 I discarded the kit engine in exchange for a more detailed resin P&W
R-2800 from Cooper Details. I wanted the propeller to be removable for
transportation, so I drilled out the crankcase to accept a small diameter brass
tube. I correspondingly drilled out the back of the prop hub and attached a
brass rod that slipped inside the crankcase tube. Since this operation also
allowed the prop to spin freely, I took great care to ensure that each hole was
drilled straight. Just a little bit off on the alignment and either the prop
would tilt or lean inappropriately or the spinning prop would wobble like a
poorly thrown Frisbee. Once satisfied with fit and appearance, the engine was
attached to the firewall.
I discarded the kit engine in exchange for a more detailed resin P&W
R-2800 from Cooper Details. I wanted the propeller to be removable for
transportation, so I drilled out the crankcase to accept a small diameter brass
tube. I correspondingly drilled out the back of the prop hub and attached a
brass rod that slipped inside the crankcase tube. Since this operation also
allowed the prop to spin freely, I took great care to ensure that each hole was
drilled straight. Just a little bit off on the alignment and either the prop
would tilt or lean inappropriately or the spinning prop would wobble like a
poorly thrown Frisbee. Once satisfied with fit and appearance, the engine was
attached to the firewall.
The kit exhaust pipes were represented by bulges on the inside back edges of the cowl. I knew I could probably improve on this, so I trimmed away the bulges, cut several lengths of small-diameter steel hypodermic tubes as replacements, then glued them in the proper locations on each side of the engine firewall. The specific F6F-3 that I was modeling featured the cowl bulges over these exhaust pipes. The kit allows this feature, but it consists of merely attaching a solid styrene bump in place. Since I made the effort to accurize the pipes, I wanted the cowling in that area to be properly represented as well, so I hollowed out the inside of the bulge after attaching it. The cowl was then permanently attached to the fuselage.
The landing gear was pretty decent, but could stand to be improved a bit. I drilled out the surfaces of the main gear scissor links and the tail wheel strut as well. The forward main gear doors were overly thick, so they were replaced by .010 sheet styrene. The data plates on the LG struts were made from scrap decal bits. True Detail resin wheels rounded out this area before attaching the LG with 5-minute epoxy. I like epoxy for this step because it allows plenty of time for alignment adjustments before hardening. No question about strength either.
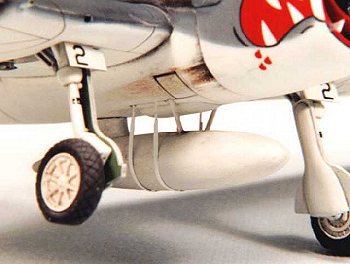 The belly tank in the kit is represented adequately, but its detail fell a
little short for my purposes. On the real Hellcat, the tank is attached to the
fuselage via a streamlined pylon located well aft of its center, which contains
the plumbing connections between the tank and the plane. The weight of the tank
is supported by two metal straps that cradle the tank and anchor on the fuselage
bottom. The tank is stabilized by a pair of adjustable braces located near its
front. I cut away the chunky "straps" from the kit tank and smoothed
over any evidence. I then fashioned more realistic straps from strips of lead
foil cut to length with .010 styrene rods attached at each end, then painted.
Corresponding holes were drilled into the fuselage belly at the proper locations
to receive the straps. The stabilizing braces, which are not represented in the
kit, were made from .030 styrene rod. The toughest part of the drop tank
detailing was aligning the holes drilled in the tank with the holes drilled in
the fuselage for the stabilizing braces. Happily, all went well as demonstrated
during test fitting. The tank was attached to the fuselage while simultaneously
aligning the stabilizing braces. It didn’t hit me until much later that I
could have simplified the operation by drilling the holes ONLY in the fuselage
and just touching them to the tank at the proper location. But how much fun
would THAT have been? The styrene rods at each end of the straps were inserted
into their respective holes in the fuselage belly. The fit was snug enough that
no glue was needed to keep the straps tight. Care was taken to ensure symmetry
when viewed from the front.
The belly tank in the kit is represented adequately, but its detail fell a
little short for my purposes. On the real Hellcat, the tank is attached to the
fuselage via a streamlined pylon located well aft of its center, which contains
the plumbing connections between the tank and the plane. The weight of the tank
is supported by two metal straps that cradle the tank and anchor on the fuselage
bottom. The tank is stabilized by a pair of adjustable braces located near its
front. I cut away the chunky "straps" from the kit tank and smoothed
over any evidence. I then fashioned more realistic straps from strips of lead
foil cut to length with .010 styrene rods attached at each end, then painted.
Corresponding holes were drilled into the fuselage belly at the proper locations
to receive the straps. The stabilizing braces, which are not represented in the
kit, were made from .030 styrene rod. The toughest part of the drop tank
detailing was aligning the holes drilled in the tank with the holes drilled in
the fuselage for the stabilizing braces. Happily, all went well as demonstrated
during test fitting. The tank was attached to the fuselage while simultaneously
aligning the stabilizing braces. It didn’t hit me until much later that I
could have simplified the operation by drilling the holes ONLY in the fuselage
and just touching them to the tank at the proper location. But how much fun
would THAT have been? The styrene rods at each end of the straps were inserted
into their respective holes in the fuselage belly. The fit was snug enough that
no glue was needed to keep the straps tight. Care was taken to ensure symmetry
when viewed from the front.
Small-diameter brass tubes were cut to size and inserted in the wing leading edges to replace the molded guns. Fin and fuselage antenna arials and the pitot tube were carefully attached with CA. The vac-form canopy hood was masked and painted, then attached to the fuselage with white glue. Nav lights on the fuselage spine were made from small dots of 5-minute epoxy.
|
CONCLUSIONS |
 I’m pleased with the model nowadays. This was the first kit on which I
inflicted multiple upgrades; photoetch, lead foil, styrene sheet and rod, and
the infamous re-scribing, to name a few. I’m happy to say that my scribing
skills have improved significantly since this project, but I credit the Hellcat
for motivating me to overcome the challenge of a new skill. If you look closely
it’s not hard to see evidence of the struggle, but fortunately the evidence is
concentrated mainly on the seldom-seen fuselage underside.
I’m pleased with the model nowadays. This was the first kit on which I
inflicted multiple upgrades; photoetch, lead foil, styrene sheet and rod, and
the infamous re-scribing, to name a few. I’m happy to say that my scribing
skills have improved significantly since this project, but I credit the Hellcat
for motivating me to overcome the challenge of a new skill. If you look closely
it’s not hard to see evidence of the struggle, but fortunately the evidence is
concentrated mainly on the seldom-seen fuselage underside.
As of this writing, I’ve competed in precisely one model contest in my adult life. Entering this Hellcat, I was very satisfied to walk away with a plaque for Second Place in its category at the 1995 Blue Angel Modelfest in Pensacola. Fortunately for me, the satisfaction I get from this hobby doesn’t come from trophies or plaques, but from the building process itself and the pleasure in seeing the finished product on my display shelf.
|
REFERENCES |
If you would like your product reviewed fairly and quickly by a site that averages over 2,200 visits a day, please contact me or see other details in the Note to Contributors.