Hasegawa 1/48 P-38J/L
|
KIT # |
JT 2 |
|
PRICE: |
$25.00 |
|
DECALS: |
See Review |
|
REVIEW : |
|
|
NOTES: |
Diorama of a real event |
|
HISTORY |
The leading American fighter ace of all time is Richard Ira "Dick" Bong. Flying P-38s in the Pacific during World War II, Bong racked up an impressive score of 40 air-to-air kills. Although there were other American pilots that got close (such as Tom McGuire, who had 38 kills before his untimely death during a mission on January 7, 1945), no one has matched or surpassed Bong’s score since.
Prior to World War II, the leading American ace was Captain Eddie Rickenbacker, who shot down 26 aircraft during World War I. Typical of fighter pilots, as WWII drug on there was increasing competition among American flyers to be the first to break Rickenbacker’s record. In early April 1944, three pilots were in range: Captains Don Gentile and Bob Johnson, both pilots with the 8th Air Force in the European Theater; and Dick Bong. Gentile’s air-to-air score stood at 21.8 kills, while Dick Bong and Bob Johnson both had 25 confirmed victories.
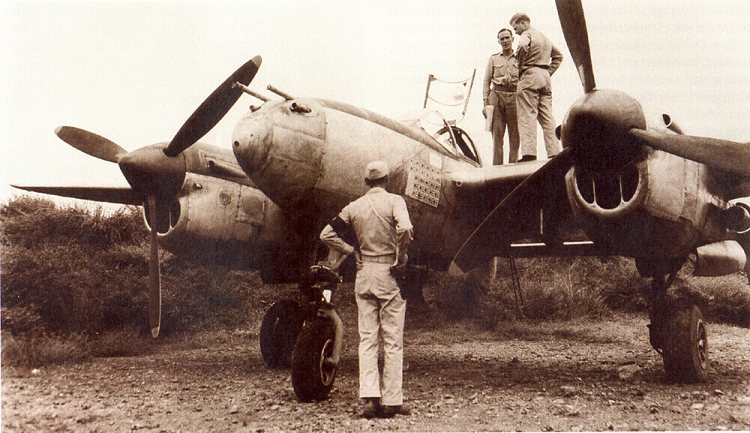
On April 12, during a strike against Japanese forces at Hollandia, New Guinea, Dick Bong, flying a natural metal P-38J-15LO (probably serial number 42-104012 or 42-104380, depending on what references one uses) with red spinners, wingtips and tailtips, shot down two Ki-43 Oscars and probably downed a third (which Bong reported crashed in the waters of Tannemara Bay, but did not have gun camera evidence or a witness to claim a confirmed kill). Thus, Dick Bong achieved his 26th and 27th kills to be the first pilot officially credited with breaking Rickenbacker’s record (there are reports that Johnson was officially credited with 26 aerial kills as of April 13 after a "loose" interpretation of one of Johnson’s probable kills by an eager ETO public relations officer, but this was too late to officially claim the record).
General Kenney, the 5th Air Force commander, subsequently sent Bong home to be touted as the top-ranking ace of the war. (After Hollandia was captured, General Kenney, who had taken a liking to the skills and daring of Bong, arranged for a diver to search Tannemara Bay, and a Japanese fighter with damage similar to that described in Bong’s mission report from April 12 was located. Kenney then ordered that Bong be credited with his 28th kill as of April 12, 1944). Bong later returned to the Pacific and racked up another 12 kills, earning the Congressional Medal of Honor for his feats. He was then sent home for the final time, and was killed on August 6, 1945 while flight testing a new P-80 jet fighter.
As the son of a World War II veteran, I fondly remember the times my dad would reminisce about his wartime experiences as a ground communications officer in General Kenney’s 5th Air Force in New Guinea, the Philippines, and later Japan. I realize how fortunate I am, because there are many veterans whose wartime experiences were just too horrible to relate, and, ‘though my father had some of those experiences, he would still talk about many of the things he saw and did during the three plus years he served in the Pacific Theater. It was from hearing those experiences and my dad’s subsequent active duty time in the US Air Force during the Korean War that I decided on my own military career and gained a love for the hobby of modeling military aircraft.
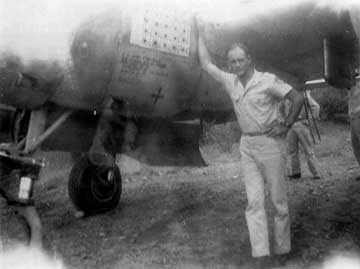 My father recently related
one of his experiences that I had not heard after my sister showed me a
photograph he had sent to my mother in 1944. The snapshot (which, I might add,
is almost 60 years old!) pictured him standing next to Dick Bong’s P-38, and
my dad had typed on the back of the photo that the aircraft was Bong’s. He
also noted that the date was April 12, 1944. In talking with him,
I learned that the photo was taken at Port Moresby, New Guinea. My father
was the airdrome officer for that day, and Bong landed after a mission. My
father helped Bong park his aircraft and had a nice chat with him after he
deplaned. The caption also stated that there were 27 kill markings on the
aircraft, so I can only surmise that the two additional kill markings were added
shortly after Bong landed at Port Moresby, and then my dad struck his pose
beside the aircraft.
My father recently related
one of his experiences that I had not heard after my sister showed me a
photograph he had sent to my mother in 1944. The snapshot (which, I might add,
is almost 60 years old!) pictured him standing next to Dick Bong’s P-38, and
my dad had typed on the back of the photo that the aircraft was Bong’s. He
also noted that the date was April 12, 1944. In talking with him,
I learned that the photo was taken at Port Moresby, New Guinea. My father
was the airdrome officer for that day, and Bong landed after a mission. My
father helped Bong park his aircraft and had a nice chat with him after he
deplaned. The caption also stated that there were 27 kill markings on the
aircraft, so I can only surmise that the two additional kill markings were added
shortly after Bong landed at Port Moresby, and then my dad struck his pose
beside the aircraft.|
THE KIT |
 The Hasegawa P-38 kits
have been out since the early 1990s, and have been reboxed a few times with
different box art and decals. As of this writing, three different P-38 kits
appear to be available from Hasegawa: No. 09101, a P-38J; No. 09103,
P-38F/G/H; and No. 09358, a P-38J/L. When I purchased the P-38 kit used for
this diorama in 1993, it was listed as an L model with decals for "Geronimo
II," flown by Lt. Col. C. Tice, Jr., and "Putt Putt Maru,"
flown by Col. Charles "Mac" McDonald. For this diorama, I didn’t
think the subtle differences between a J and L model P-38 would matter to my
dad, so I used the kit I already had.
The Hasegawa P-38 kits
have been out since the early 1990s, and have been reboxed a few times with
different box art and decals. As of this writing, three different P-38 kits
appear to be available from Hasegawa: No. 09101, a P-38J; No. 09103,
P-38F/G/H; and No. 09358, a P-38J/L. When I purchased the P-38 kit used for
this diorama in 1993, it was listed as an L model with decals for "Geronimo
II," flown by Lt. Col. C. Tice, Jr., and "Putt Putt Maru,"
flown by Col. Charles "Mac" McDonald. For this diorama, I didn’t
think the subtle differences between a J and L model P-38 would matter to my
dad, so I used the kit I already had.|
CONSTRUCTION |
|
PAINT & DECALS |
Having assembly the P-38 model, I was again faced by something I have grown to dread in the modeling hobby: a natural metal finish! And while I have gritted my teeth and struggled through my share of these kits, I nevertheless do not look forward to applying these finishes. I debated using the standard Testors Model Master Aluminum Plate Buffing Metalizer and buffing out various panels on the model as is often recommended by those who have mastered this art, but I have always had trouble with that process and have not been entirely satisfied each time I have tried it. (One must be extremely patient to complete natural metal finishes using the various buffing products available on the market, and forget about handling the model once it’s finished unless you coat the finish with products that will, in essence, dull the finish).
 It was at this point that I
remembered an article in a very early issue of FineScale Modeler that
showed how to use Floquil’s Old Silver, Bright Silver, and Platinum Mist to
achieve varying shades of aluminum on plastic model aircraft. The intriguing
thing about this approach was the author had discovered by accident that Old
Silver could be polished to some degree. The advantage of using this paint was
that once it is polished out, it can be handled without fingerprinting, it
covers putty joints with no special preparation, and it can be masked over and
unmasked without removing the finish. (Modelers should be cautioned, however,
that even this technique will show the slightest flaw in your model’s finish,
so it is best used after a coat of flat aluminum or white to reveal any
imperfections that need to be sanded or polished out of the plastic or the
puttied surfaces).
It was at this point that I
remembered an article in a very early issue of FineScale Modeler that
showed how to use Floquil’s Old Silver, Bright Silver, and Platinum Mist to
achieve varying shades of aluminum on plastic model aircraft. The intriguing
thing about this approach was the author had discovered by accident that Old
Silver could be polished to some degree. The advantage of using this paint was
that once it is polished out, it can be handled without fingerprinting, it
covers putty joints with no special preparation, and it can be masked over and
unmasked without removing the finish. (Modelers should be cautioned, however,
that even this technique will show the slightest flaw in your model’s finish,
so it is best used after a coat of flat aluminum or white to reveal any
imperfections that need to be sanded or polished out of the plastic or the
puttied surfaces).
After letting the Old Silver top coat dry overnight, I then followed the article’s suggestion and buffed out the surface with toothpaste (the article suggested Ultra Brite, but I think just about any brand will do the job. Liquid rubbing compound also works). The results were plenty good for me, given my aversion to natural metal finishes.
After achieving the results I wanted on the overall finish, I then set out to decal the aircraft. Given the smooth surface of the polished Old Silver finish, there was no need to coat the model with future or a clear gloss finish prior to decaling.
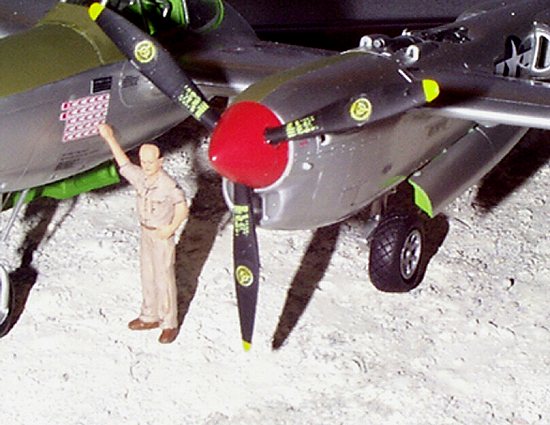
I used a variety of decals from the kit’s sheet and various other sheets. The kill panel on the left forward fuselage section was taken from the reissued 1/48 scale Monogram P-38, which contains markings for Bong’s "Marge." That decal correctly has 25 kill marks, so I added the two additional kill markings that were shown in the photograph I was modeling. The wing tips, tail tips, and spinners were all spray painted with Model Master Guards Red gloss paint. The props were painted flat black and decaled using the kit decals.
I used True Details P-38 Fast Frames (Part no. 41012) for the canopy. The undersurface of the frame was painted with Model Master chromate green, and then the outer surface was painted with Old Silver. The frame was then attached to the canopy per the instructions. The cockpit interior and wheel wells were also painted chromate green. The anti-glare panels on the nose and engines were masked off and painted with Model Masters olive drab.
The figure of my father was hand painted using a variety of Model Master flat paints. Finally, I touched up spots of the diorama ground cover using a variety of Testors flat paint shades.
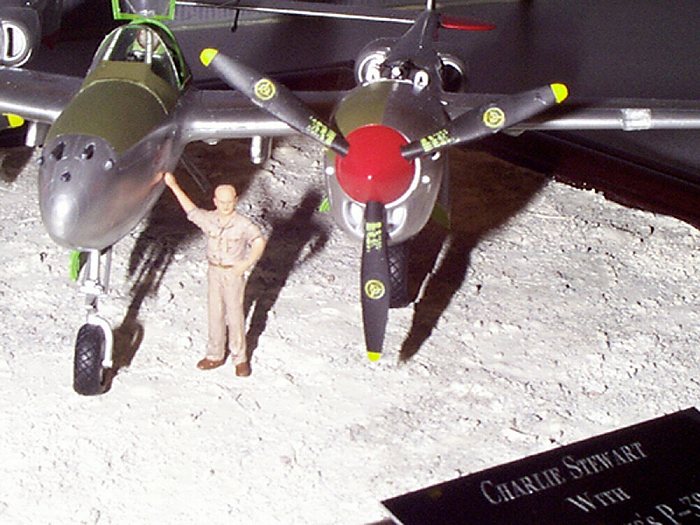
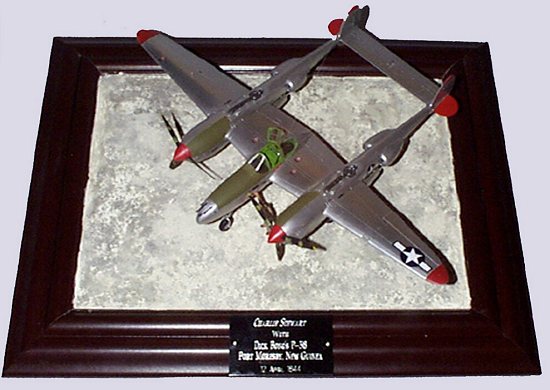
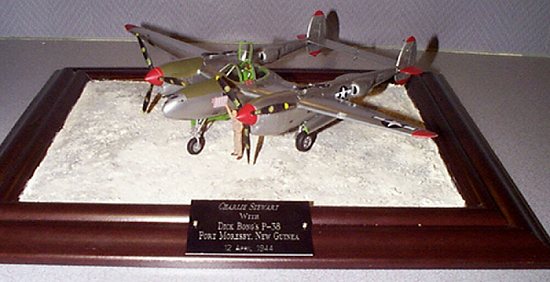 When the model was ready for
mounting, I drilled three holes in the bottom of the tires and then superglued
the model to three sections of a paper clip cut to size and glued in holes
drilled into the Masonite base. The diorama base was then adorned with an
engraved black and silver plate with the inscription "Charlie Stewart with
Dick Bong’s P-38, Port Moresby, New Guinea, 12 April 1944."
When the model was ready for
mounting, I drilled three holes in the bottom of the tires and then superglued
the model to three sections of a paper clip cut to size and glued in holes
drilled into the Masonite base. The diorama base was then adorned with an
engraved black and silver plate with the inscription "Charlie Stewart with
Dick Bong’s P-38, Port Moresby, New Guinea, 12 April 1944."
A final "construction" note. After completing the diorama, I carefully boxed it up, typed an explanation of what it was, and shipped it to my dad for a Christmas present. To my horror, even though I had used a million tons of popcorn-type foam around the diorama, which I had centered in a very large box, the shipping company (who shall go unnamed) managed to break the model into several pieces. My dad carefully retrieved all of the small pieces from the packing material, but he had to wait another six months until I returned for my 35th high school reunion armed with glue, tweezers, paint and other repair tools to see the finished product. In spite of this trauma, the diorama is now fully restored and prominently displayed in my mom and dad’s home.
I’m not sure what the lesson is in all of this, but I know that the next time I labor to build a diorama and ship it to someone, I’ll spend a little more time investigating the proper way to ship it, whatever that might be (finished car models are so much easier to ship than airplanes!).
|
CONCLUSIONS |
|
REFERENCES |
Copyright ModelingMadness.com. All rights reserved. No reproduction in part or in whole without express permission.
If you would like your product reviewed fairly and fairly quickly, please contact the editor or see other details in the Note to Contributors.
Back to Reviews Page 2016