Monogram 1/48 B-17G Flying Fortress
| KIT #: | 5600 |
| PRICE: | $19.96 MSRP |
| DECALS: | Two options |
| REVIEWER: | Bruno Schielzeth |
| NOTES: | The inside story |
| HISTORY |
 The Boeing B-17 was, arguably, the most
famous Allied heavy bomber of WWII. It didn't carry the largest bomb
load, or fly the fastest, but it was rugged and beloved by its crews. From
the original Model 299 to the final version, the B-17G, it fought from
first day to the last day of the war in every theater. Thousands of men
lived, fought, and died in the remarkable Boeing B-17.
Because it didn't have the range to fly the vast expanses of the Pacific
Ocean most B-17s were sent to the European theater where they served with
distinction and proved the name “Flying Fortress” was not just a name but a
fact.
The Boeing B-17 was, arguably, the most
famous Allied heavy bomber of WWII. It didn't carry the largest bomb
load, or fly the fastest, but it was rugged and beloved by its crews. From
the original Model 299 to the final version, the B-17G, it fought from
first day to the last day of the war in every theater. Thousands of men
lived, fought, and died in the remarkable Boeing B-17.
Because it didn't have the range to fly the vast expanses of the Pacific
Ocean most B-17s were sent to the European theater where they served with
distinction and proved the name “Flying Fortress” was not just a name but a
fact.
 Not all of the mighty bombers left
the shores of America to battle the Axis military machine. A number of them
served in anti-submarine and search and rescue operations on all the
seacoasts of the USA. One of them was a Boeing B-17G-60 BO 42-102823
nicknamed Murph by its crew. It flew anti-submarine patrols out of Florida
from early 1943 to the end of hostilities in April, 1945. Among the crew
was my father, Bruno P. Schielzeth. Bruno emigrated from Kiel, Germany in
1938. He was still a German citizen at the time and was barred from serving
in the European theater because of this. He was the tail gunner on Murph.
Not all of the mighty bombers left
the shores of America to battle the Axis military machine. A number of them
served in anti-submarine and search and rescue operations on all the
seacoasts of the USA. One of them was a Boeing B-17G-60 BO 42-102823
nicknamed Murph by its crew. It flew anti-submarine patrols out of Florida
from early 1943 to the end of hostilities in April, 1945. Among the crew
was my father, Bruno P. Schielzeth. Bruno emigrated from Kiel, Germany in
1938. He was still a German citizen at the time and was barred from serving
in the European theater because of this. He was the tail gunner on Murph.
Murph flew from Jacksonville, Florida looking for German submarines along the South-Eastern shipping lanes. Most of the long patrols consisted of hours and hours of boredom and open seas. Most, but not all. At least one German submarine Commander stayed on the surface and attempted to fight Murph one on one.
My father's account, as I remember it, is that a German submarine was sighted off of the Carolina coast late in the day. Because of either mechanical problems or just stubborn determination the submarine didn't submerge as Murph began its attack out of the setting sun. As the bombardier lined up on the target every anti-aircraft gun on the sub opened up on Murph. The sub gunners were accurate and got several hits on Murph. At least one shell hit the tail gunner's position as my father received wounds in his legs from shrapnel and a bullet. My father still carried the shrapnel in his leg from that encounter when he died in 2001. The submarine dove as Murph came back for another pass and several depth charges were dropped near the sub. I believe it was claimed as a 'probable kill'.
On May 18, 1945, over two weeks after the German surrender, my father took a number of pictures of Murph and the crew he served with while they were stationed in Avon Park, Florida. Almost 60 years later those pictures made their way to me.
| THE KIT |
 (Editor's Note: I've
decided to show the images as if going from the front to the back. It seems
the most logical way to do the things so images may not correspond with the
surrounding article.)
Looking at the pictures I knew I had to build a model of my father's
airplane. Luckily the venerable Monogram B-17G Flying Fortress #85-5600 is
a very close match for an early 60 series B-17G with the large waist gun
windows directly opposite of each other. It was the same kit I used as a
lad of 16 to build my first model of my father's plane. It is still, after
more than 40 years of production, the only 1/48th scale B-17G available.
Thank goodness the molds have held up because the kit is still fun to
build!
(Editor's Note: I've
decided to show the images as if going from the front to the back. It seems
the most logical way to do the things so images may not correspond with the
surrounding article.)
Looking at the pictures I knew I had to build a model of my father's
airplane. Luckily the venerable Monogram B-17G Flying Fortress #85-5600 is
a very close match for an early 60 series B-17G with the large waist gun
windows directly opposite of each other. It was the same kit I used as a
lad of 16 to build my first model of my father's plane. It is still, after
more than 40 years of production, the only 1/48th scale B-17G available.
Thank goodness the molds have held up because the kit is still fun to
build!
This time I was going to build it right. No hand painted numbers on the tail, no sloppy silver paint from a rattle can. With 30 odd years of modeling under my now much expanded belt, I was going to do it right, no matter what it took.
 Step one was digging out my credit
card and making an order from Squadron. I ordered the Monogram kit, the
Verlinden update set #718, the Eduard armament set #48 209, and the
Squadron Crystal Clear Canopies sets for the B-17G. While I waited for my
order to arrive I scanned my father's pictures into the computer and spent
hours searching the web for information and reference material.The US Army
Air Force site at
http://www.armyairforces.com/ was helpful in tracking the serial number
of Murph, and the forum section was a good place to look for information on
the other crew members but, sadly, nothing has surfaced so far. If anyone
has any ideas of how to track down any of the following people, please feel
free to let me know!
Step one was digging out my credit
card and making an order from Squadron. I ordered the Monogram kit, the
Verlinden update set #718, the Eduard armament set #48 209, and the
Squadron Crystal Clear Canopies sets for the B-17G. While I waited for my
order to arrive I scanned my father's pictures into the computer and spent
hours searching the web for information and reference material.The US Army
Air Force site at
http://www.armyairforces.com/ was helpful in tracking the serial number
of Murph, and the forum section was a good place to look for information on
the other crew members but, sadly, nothing has surfaced so far. If anyone
has any ideas of how to track down any of the following people, please feel
free to let me know!
Pilot: 1st Lt. Dobbs.
Co-pilot: Lt. Vreland or Vrelind. The spelling is unclear on the picture
(my father had horrible hand writing!)
Bombardier: “Smythie” no other name known.
Armorer: Richard Bennett, “Benny” from New York (city?)
Flight Engineer: W.R. Hurig (? spelling again)
Lower ball turret gunner: John Nitecowitcz, “Nick” (? spelling again),
Navigator: George Hemstead
Radioman: “Fisher” no other name known.
Waist gunner: Lowell Ball.
Tail gunner: Bruno Schielzeth
In order to build the Murph as accurately as possible I also accepted help
from a few dear modeling friends. The late, and much missed, Garry Beebe
supplied Roger A. Freeman's 'B-17 Fortress at War' and Denis Keegan from
Canada pulled some strings with Dave Parkins of FlightPath to get a sheet
of his out of production B-17G Photo etched details from Dave's private
stash.
| CONSTRUCTION |
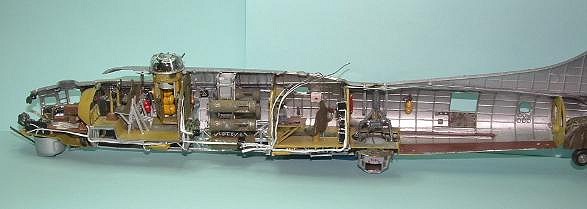
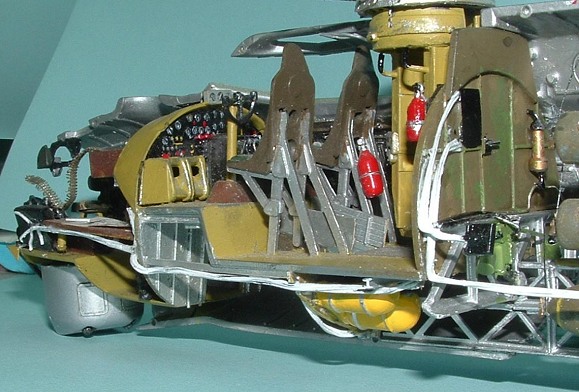 I noticed from my father's pictures
that Murph was mostly lacquered aluminum inside. The cockpit appeared to be
dark, and was probably chromate green, with olive drab for the armor plate,
but the rest of interior shots seem to show aluminum with possible chromate
green frame members. It would certainly make the interior of the model
brighter and more colorful!
I noticed from my father's pictures
that Murph was mostly lacquered aluminum inside. The cockpit appeared to be
dark, and was probably chromate green, with olive drab for the armor plate,
but the rest of interior shots seem to show aluminum with possible chromate
green frame members. It would certainly make the interior of the model
brighter and more colorful!
Since Murph did not operate at 30,000 feet, and was based in an almost tropical climate, there did not appear to be any of the insulated quilted batting applied to the outer walls. I began the build, as usual, with the cockpit. I assembled the Monogram flight deck and painted and detailed the instrument panel to match photo references.
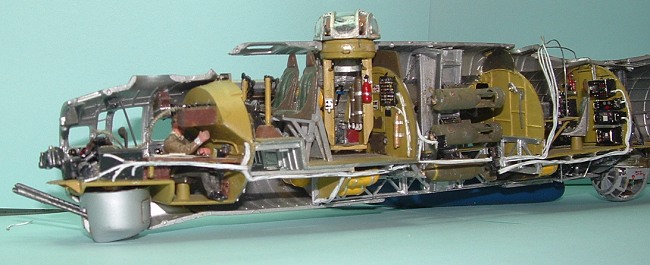
I added the engine controls to the center console from thin wire pieces with a drop of Testor's Clear Parts cement on the ends to create the knob. A small drop of the appropriate color of paint put on with the end of a sharp toothpick finished them off properly. I added the auxiliary instruments to the top of the instrument panel and wired them with .010 electrical solder but otherwise left the cockpit as it came from the box.About this time my idea about the build changed dramatically. I think it started out innocently enough. I just held up the FlightPath cockpit framing to the fuselage and thought I would like to open up the pilot's window as shown in my father's pictures. That should be easy enough to do, right? Well, I guess I should detail the turret area behind the cockpit since it would be very visible. As long as I was working on that, why not dress up the bombardier's and navigator's areas a little too? The Verlinden resin might as well be used, right? As I said, it started off innocently enough, but the “as long as I'm doing this I might as well.....” thought can cause a lot of extra work!
 After adding all the bits and pieces
per the Verlinden instructions I looked at the finished flight deck. Very
nice! Except for a few little things. I compared my flight deck with Dad's
pictures and my collection of reference material. The Monogram part is a
good representation of a generic B-17, but it certainly didn't match what I
saw in the pictures!
After adding all the bits and pieces
per the Verlinden instructions I looked at the finished flight deck. Very
nice! Except for a few little things. I compared my flight deck with Dad's
pictures and my collection of reference material. The Monogram part is a
good representation of a generic B-17, but it certainly didn't match what I
saw in the pictures!
A moral dilemma ensued. Do I leave it 'as is', or do I tear out a week's worth of work and make it match the pictures?
Gritting my teeth, I grabbed my tools and tore the flight deck apart and carved off most of the cast in details! I then opened up the access panel in the cockpit deck and the canvas curtain to the navigator's and bombardier's areas. That required that I add some detailing to the now exposed crew's tunnel. In went various bits and pieces of styrene I- beams and lots of stretched sprue, plus some oxygen tanks salvaged from a Monogram B-29 kit and kindly supplied by fellow modeler Terry (who should be working on models) Moore.After 'deconstruction' I added the Verlinden resin bits, electrical solder, stretched sprue, and PE switch panels from Reheat to the flight deck until it matched my father's pictures and the other references I had on hand.
I built up an APU (Auxiliary Power Unit) from the engine of a 1/72nd scale Kubelwagen engine and scrap plastic and stationed it against the aft cockpit bulkhead behind the co-pilot's seat. The APU placement varied from plane to plane and I've seen them in the cockpit, in the bomb bay, in the radio room, in the tail, and under the decks, I just guessed on Murph and installed it where I did because there was room there and it looked pretty barren.
 That decision to rebuild the flight
deck affected the entire rest of the model. Once the flight deck was
looking so good I couldn't just slap the rest of the kit together.
That decision to rebuild the flight
deck affected the entire rest of the model. Once the flight deck was
looking so good I couldn't just slap the rest of the kit together.
The Turrets.
I was going to use the Squadron vacuformed turrets, but I wanted to use the
FlightPath PE framing. The FlightPath PE is designed for the Monogram parts
and wouldn't line up properly on the Squadron parts. Rather than modify the
excellent FlightPath PE I ended up sanding off all the framing on the kit
turrets.
It really wasn't as bad as it sounds, but it does take courage to take a 150 grit sanding stick to clear parts! I could just image having to buy another kit just to replace the clear parts I ruined! I masked off the clear panels to protect them and sanded the parts until the framing was almost gone. I then began going to finer and finer grades of sand paper.
I finished sanding with Detail
Master's Micro-mesh cloths until I reached the 12000 grit cloth. A final
polishing with Mother's Mag Wheel Polish returned the clear parts to proper
clarity. A dip in Future sealed everything and gave me crystal clear
turrets.I then began to add some extras to the inside of the turrets.
Verlinden resin breeches, FlightPath PE heat shields soldered to .030 brass
tube, and scratch built parts like clear gun sights and new hand controls
from stretch sprue. The kit lower turret assembly didn't resemble the real
item at all so the only kit part used was the actual mounting ring. The
lower mount was fabricated out of rectangular styrene tube tapered to the
correct shape and then skinned in .010 flat styrene sheet. I cut some spare
gun heat shields to the proper shape and used them for the cooling grates
over the hydraulic pumps 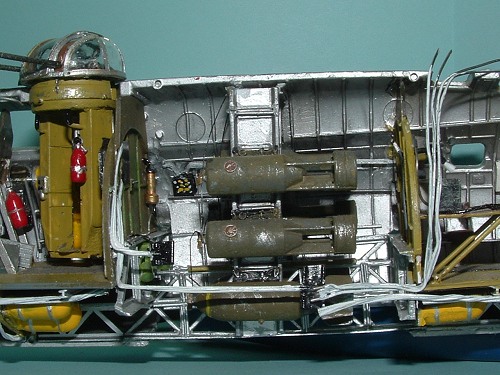 and controls located in the 'legs' of the lower
mount. I also added foot supports and ammo bins. The upper half received
wire supports for the weather shields around the gun barrels and charging
handles made from scrap PE. The lower ball received scratch built ammo
bins, seat cushions, a clear gun sight, foot controls for the gun sight,
and an open hatch courtesy of the Squadron vacuformed ball turret.
and controls located in the 'legs' of the lower
mount. I also added foot supports and ammo bins. The upper half received
wire supports for the weather shields around the gun barrels and charging
handles made from scrap PE. The lower ball received scratch built ammo
bins, seat cushions, a clear gun sight, foot controls for the gun sight,
and an open hatch courtesy of the Squadron vacuformed ball turret.
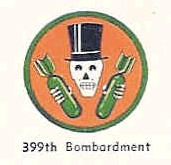
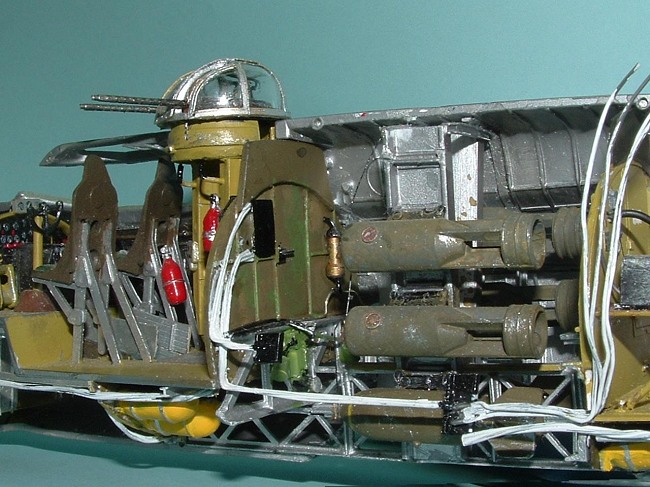
The Bomb Bay
My father's pictures of Murph on the ground showed the plane with the flaps
up and the crew doors all open. The bomb bay was also open. I'm sure it was
because Florida in May is very warm and they needed all the ventilation
they could get to keep the plane from becoming a roasting oven! That meant
that I would have to duplicate those features on my model.The bomb bay in
the kit is pretty bland. The bulkheads on either end are totally blank and
the center bomb rack is lacking in detail and rather thick. Since I planned
on showing the Murph with the FlightPath PE bay doors open, I needed to
detail it too.
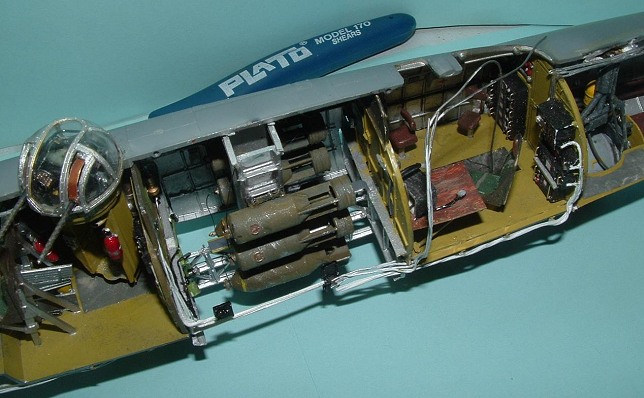
My local hobby shop, Don's Hobby Shop in Kenosha, WI., supplied the Evergreen styrene trusses to build up a more detailed bay and Accurate Miniatures supplied the ordnance. I cut the Evergreen truss material to fit between the aft bulkhead of the radio room and the half bulkhead just under the cockpit. I used larger truss material to add the main wing spars to the fore and aft bulkheads of the bomb bay.
The center truss in my model isn't
totally accurate, as the real one is a single span, but I had to choose
between scratch building the entire thing or using a doubled up truss. I
built up the double truss and liked the looks of it, so I took the easy way
out. 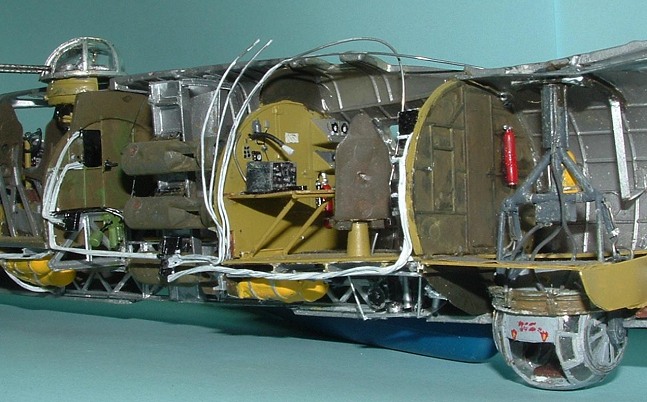 I didn't like the look of the massive wing mounting lugs of the kit and
finally found a way to hide them. I used more .010 sheet styrene to cut a
panel that fit just below one of the stringers on the sidewall of the bay
and added .020 hex rod to match the spacing of the kit's ribs. I then
ground off all the ribs below the stringer with a Dremel motor tool and cut
the mounting lugs on the wing down to about half their normal depth. The
wing still slides in and locks the way Monogram intended, but the join is
now hidden behind the new sidewall.
I didn't like the look of the massive wing mounting lugs of the kit and
finally found a way to hide them. I used more .010 sheet styrene to cut a
panel that fit just below one of the stringers on the sidewall of the bay
and added .020 hex rod to match the spacing of the kit's ribs. I then
ground off all the ribs below the stringer with a Dremel motor tool and cut
the mounting lugs on the wing down to about half their normal depth. The
wing still slides in and locks the way Monogram intended, but the join is
now hidden behind the new sidewall.
My father's pictures showed a bomb
load of one 500 pound HE bomb with two depth charges above it on each side
of the center rack. The side racks carried two 250 pound HE bombs each.
Because I blanked in the sidewalls of the bomb bay I just didn't have the
room to mount the smaller ordnance on the side racks, but the overall look
is right I think. I detailed both bulkheads with styrene rod and various
bits and pieces of scrap plastic to duplicate the hydraulic motors and gear
boxes to open and close the bomb bay doors. If you look carefully you can
see that I even included the fuse safety retention wires.
The Radio Room
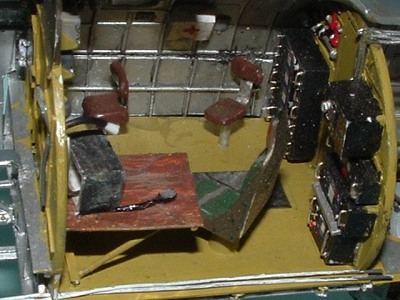 I had already planned on
building up the radio room because of the large clear window in the top of
the fuselage. Now, considering the detail in the rest of the model, I had
no choice but to go all out on it. I started by cutting off all the radios
on the aft bulkhead. They were in very low relief but the real radios were
massive units almost 16 inches deep. I found styrene rectangular tube of
the proper dimensions and cut five boxes for the right rack and several
other ones for the left rack.
I had already planned on
building up the radio room because of the large clear window in the top of
the fuselage. Now, considering the detail in the rest of the model, I had
no choice but to go all out on it. I started by cutting off all the radios
on the aft bulkhead. They were in very low relief but the real radios were
massive units almost 16 inches deep. I found styrene rectangular tube of
the proper dimensions and cut five boxes for the right rack and several
other ones for the left rack.
I skinned the front of the boxes with .010 sheet plastic and then made scans of the original radios and reduced them to 1/48th scale on my computer. I printed them at full photo quality on my printer and glued them to the front of the radio boxes. I added knobs from stretched sprue. I then spent a night forming HO gage handrails into tiny stainless steel grab handles for the radios. Yes, I lost about 1/3rd of them to the infamous 'Carpet Monster'!
The kit radio room has a massive lump
to represent the desk and radio receiver. I cut it off of the deck and
filled the resulting hole with heavy sheet styrene. The new receiver was
fashioned from tube, and the desk was a sheet of styrene with supports from
.030 rod. I added a few runs of .010 and .020 electrical solder for the
wiring and antenna lines and added a few bits and pieces to the sidewalls
for some clutter. I then added two jump seats to the right side for the
waist gunners to use during takeoff and landings.
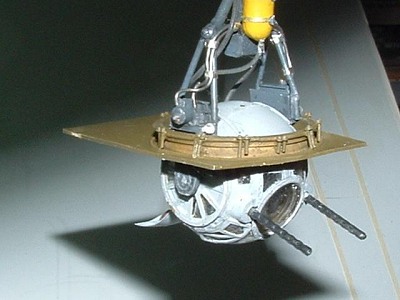
Mounting the Lower Ball Turret
Working towards the tail I now had to mount the ball turret I had detailed.
Would I use the kit part? No. Of course not! That would be too easy!
 I did find one interesting thing
while researching the real ball mount. One of the flying B-17s out there
today has the mount from a B-24 in it! The Sperry ball turret is the same
in both planes, but the B-24 mount can retract the ball into the fuselage,
the B-17 mount is solid. I guess it just proves you have to research your
research!
I did find one interesting thing
while researching the real ball mount. One of the flying B-17s out there
today has the mount from a B-24 in it! The Sperry ball turret is the same
in both planes, but the B-24 mount can retract the ball into the fuselage,
the B-17 mount is solid. I guess it just proves you have to research your
research!
I kept the kit mount on the ball as I built up a new and more correct upper ball mount out of styrene rod of various sizes and then cut away 99% of the kit part.
Looking back I probably should have used soldered brass tube, as my plastic mount is very fragile. However, it does work and looks right. I added various bits of styrene tube and rod to duplicate the hydraulic motors and the control box on the mount and then added .010 solder for the hydraulic lines.
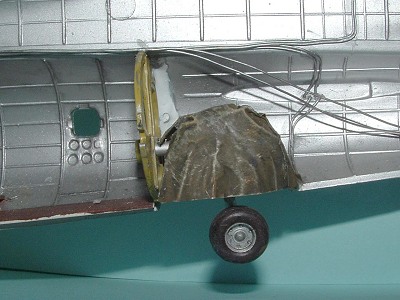
After the rebuild the yellow oxygen
tank and the pivot points are the only kit parts left! I built up the lower
ring mount from flat styrene stock around a properly sized bottle and added
dozens of Grant Line nut and bolt pieces to it. I then mounted the ball
turret into the fuselage. I built up the walkway around the ball with flat
stock and added used 2000 grit sandpaper for the anti-skid paint used on
the decks throughout the plane. The flexible lines to the ball turret for
the intercom, oxygen, and electricity were made from the soft rubber tube
in the Verlinden detail set. The lower turret still rotates and elevates as
it should.
The Ma Duces
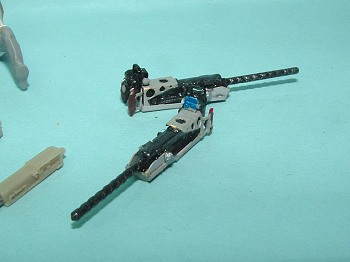 The Monogram M-2 50 cal machine guns are actually very nice in this kit, so
I used the kit guns with the FlightPath shields over more .030 brass tube
for the barrels and the FlightPath PE gun cradles. My father's pictures
show that Murph had the new electronic auto-computing gun sights on the
waist guns, so I scratch built a pair of them out of clear rod sanded to
shape and painted. I added those to the two waist guns but I left the cheek
guns with just the ring and bead sights. I also added styrene blocks for
the gun heaters and used more of the Verlinden rubber tube for the shock
mount cords used to keep the guns secured when not in use.
The Monogram M-2 50 cal machine guns are actually very nice in this kit, so
I used the kit guns with the FlightPath shields over more .030 brass tube
for the barrels and the FlightPath PE gun cradles. My father's pictures
show that Murph had the new electronic auto-computing gun sights on the
waist guns, so I scratch built a pair of them out of clear rod sanded to
shape and painted. I added those to the two waist guns but I left the cheek
guns with just the ring and bead sights. I also added styrene blocks for
the gun heaters and used more of the Verlinden rubber tube for the shock
mount cords used to keep the guns secured when not in use.
Going over the edge
After I had the plane built and detailed back to the waist gunner's area I
decided to add just a little extra detail. I put in two scratch built
strike cameras under the radio room floor, one a 35 mm still camera, the
other a 70mm film camera. I also added more oxygen tanks and framing
detail, added wiring harnesses, oxygen and hydraulic lines, and flight
cables.
 I have a long way to go before I'm
done with the inside of Murph, and I still have the entire outside of the
airplane to do! The plans include opening up one of the engine nacelles to
show off a fully detailed Wright Cyclone R-1820 radial engine and detailed
wheel wells. I guess that will have to wait until part 2 of this build.
I have a long way to go before I'm
done with the inside of Murph, and I still have the entire outside of the
airplane to do! The plans include opening up one of the engine nacelles to
show off a fully detailed Wright Cyclone R-1820 radial engine and detailed
wheel wells. I guess that will have to wait until part 2 of this build.
A Thank You
I need to thank Scott Van Aken for his courage to show a half completed
model on Modeling Madness.
I also would like to thank Mike Horrell, 'Crazy Don' Flynn, Larry Goodell,
Lynn Ritger, and all the rest of the crazy gang at the modeling sites I am
a member of for pushing me to make this build public.I need to also thank
my long suffering and very understanding partner in life, Cindy, for
putting up with spray paint fumes in the bedroom, glue marks on the bed
spread, and my demented fascination with little plastic toys. Like she
says, “At least I know where you are and what you are doing. Besides, it's
cheaper and safer than you sitting in a bar all night”. Truer words have
never been spoken!
Suggestions, criticisms, and help in locating the members of Muph's crew
are gladly accepted at
Bschielzeth1@wi.rr.com
If you would like your product reviewed fairly and fairly quickly, please contact the editor or see other details in the Note to Contributors.